8.28.2013

Wednesday Decor // Dorm Edition - East Meets Mod

These two styles - Asian inspired & Mod - don't really have much in common but it's fun to blend two things to see what you can come up with.  If you missed last week's Dorm Edition it was Eclectic meets Shabby Chic, read it here.  This week is East meets Mod.  Angular shapes & mod elements meet more rustic asian inspired accents.  My favorite part is is the pairing of the mod art with the more asian inspired (yet totally reflecting angular elements) mirror.

East Meets Mod


1. Bold Angular Lighting - You can choose one bold color to be the theme throughout this look.  In this example, I chose orange.  Colors that work well with bright orange are yellows, creams, & navy blues.  This shape is reminiscent of huge decorative jars I've seen in Asiatic pottery so it really complements the other shapes.

2. Collect Angular Storage  - Shop thrift stores for the perfect angular containers.  Then grab a can of spray pain & have at it.  Paint these into the complimentary colors in your theme to have an East meets Mod look.

3. Bold Throw Pillows - Pair complementary patterned pillows for a fun look.  Keep your color choice in mind when looking for complimentary pillows.  These two patterns go well together because of the colors & the pair of bold and soft. 

4. Complementary Art & Wall Decor - This Mod print in a navy blue goes great with the asian inspired mirror.  The mirror complements the mod design with the graphic style and angles.  Add in something super rustic like these candle holders to give they style a grounded feel.

5. Bold Mod Alarm Clock - Because, why not.  You've got to wake up for class & you also probably have some spray paint left over.  Give a thrifted find new life to match your decor.

6. Collected Trinkets - Keep things grounded with a dark stone feel to some of your trinkets but don't be afraid to throw in something fun.  Add texture with different figurines & add color with spray paint matching your theme.

Stay tuned for the final style pairing next week!

How do you use color in your decor?  What styles have you paired together in your decor?

xoxo, Moe

Connect on Twitter // Follow on Pinterest

8.27.2013

Multi Purpose Make Up // Simplify for Travel, Dorm Life, Etc

My make up collection has grown by leaps & bounds over the past few months.  I've even branched into brands other than drug store brands!  Gasp!  Spending $30 on a foundation is now in my vocabulary - though I restrained myself on my last Ulta trip & just bought a little kit from Benefit to try out a few things (honestly this is the best way to go!)  But sometimes it gets overwhelming when you're thinking about packing or traveling with your make up.  I totally want to pack everything - and I did for the last trip I went on - but sometimes (most of the time) it's not necessary.  So here are some basics for packing/traveling/moving/etc:
multipurpose make up

multipurpose make up by fivesixteenthsblog featuring revlon face makeup

BB Cream + Full Coverage Foundation - Pack these because they'll do double duty!  That's the theme around here!  On days you don't need a lot of coverage, your BB Cream is perfect (I use the one by Rimmel).  If you need a bit more coverage, use the full coverage foundation as a concealer.  If you do need a heavy cover day you have your full coverage foundation on hand.

Elf Golden Bronzer - This bronzer does tripple duty as a bronzer, as an eyeshadow quad, and as a highlight.  This particular shade (find it here) is great for an all over bronze look - to accent the tan you're getting in the tropics right? - by swirling all the colors together with a bigger brush.  It creates a great eye look since it's sectioned into 4 colors.  It also has a lighter shade included that is perfect as a highlight!

Blush & Bronzer Duos - The Elf Golden Bronzer isn't great for a contour but if you have these handy guys you'll have no need to pack anything extra.  The bronzer side is a great contour & the blush side is a great blush (duh).  I use the Elf duo in St. Lucia but you can also find duos like this from other brands - especially Nars.

Favorite Mascara - Pack your favorite mascara not only to separate your lashes but to act as a liner too.  Pack your liner brush & forget the chunky pots of gel eyeliner - use your mascara instead.  Just dab a bit out of the top or off the wand itself on your liner brush.

Essential brushes - This is where the over packing can happen & I might just let it.  Since all of these products can do double duty you might need double the brushes for the precise application you're looking for.  But pack what you need - powder brush, beauty blender, eye brushes, etc.  Discover which of your brushes can play a dual role & stick with them.  

So thats what I have in my collection that plays double duty when I travel.  These guys are awesome, simple go-to products if you want a no fuss quick look too!

What do you pack when you travel?  Are you even concerned with your face on vacation?

xoxo, Moe

CONNECT ON TWITTER // FOLLOW ON PINTEREST

8.26.2013

Where I Was a Year Ago

A year ago around this time I packed up all my things, left my friends, family, & the southern states to trek up north to be with the person that means the most to me.  This whole year has been pretty weird.  I battled with self-employment/unemployment which was the main roller coaster throughout anything else that happened.  But we also lived in Michigan, renovated a house, traveled around, & grew to know each other more.  It's been a crazy, crazy year in which I don't know what I've learned & I really don't know where I've ended up.
Where we lived for the first few months at Zach's parents' house
This biggest struggle was seeing my creative dream really start to take off but knowing that I wasn't making ends meet for myself & deciding to put job hunting full force.  After many tears, many emails, many why am I not good enough moments, & many hours spent searching for the elusive creature called a full time job I finally landed one.  Right now I feel very thankful for my job - oh so grateful - but miss the hours of dedication I put towards other endeavors like the many shops, this blog, etc.  I miss being proud of myself for the small accomplishment of having someone notice this blog, notice the shop, or make any headway in my online presence.

But I'm moving forward.  I'm accomplishing something - my bank account is rising.  Whether or not that's a good thing when it comes to creativity is still up for debate.  I would say I'm content.  I'm doing better than most.  But I'm not where I want to be yet.  It's a year later & I'm not quite sure where I am but I do know I'm somewhere.

How do you deal with the uncertainty of being uncertain? Have you ever been completely lost?

xoxo, Moe

Connect on Twitter // Follow on Pinterest

8.22.2013

My Favorite Make Up Brushes // Great Quality & Affordable

Today I want to share with you my favorite make up brushes that I've collected that are both great quality & very affordable.  I've collected brushes since I've been wearing make up - which has been a long time!  I have one eyeliner brush (that I don't use for eyeliner) that I've had for ages.  I also have had a few Real Techniques brushes for ages.  In addition to collecting everything related to make up, I like collecting brushes & trying out new ones because I love finding the perfect brush for the perfect job.  So if you're interested in affordable brushes, check out the video below!


If you're interested in the 22 piece brush roll I mentioned, you can pick it up here.  There are plenty of brushes in there that I know you'll be able to use!  This is a great beginner brush set because there is a purpose for every brush & you can really hone your application skills.  The bristles are really soft & the brushes are made really well!!

Click here for more info on the YouTube video.  And let me know if you want to see more of these sorts of videos.  Not necessarily make up but videos in general.  I really liked doing the plus size fashion haul I did a while ago & am thinking about doing another one here soon even though I haven't picked up too much stuff lately!

What are your favorite brushes? Where did you collect them from?

xoxo, Moe

Connect on Twitter // Follow on Pinterest

8.21.2013

Wednesday Decor // Dorm Edition - Eclectic Meets Shabby Chic

I know a lot of people are already back to school! I also know a lot of people are heading back with cars full this coming weekend!  So I'm a bit late on doing this series but you can definitely add a touch of each of these (there will be three) styles to your current dorm/apartment decor.  The first one is Eclectic meets Shabby Chic.  I feel like I am always between two styles.  This one is my favorite and I've always been drawn to Shabby Chic but it's a bit too girly.  You can totally grunge it up with an eclectic vibe by brining in deeper tones & old world accents.

Eclectic Meets Shabby Chic


1. Collected Containers - A great way to store your little doodads (pencils, mascaras, etc, etc) is in small containers.  Consider popping by the thrift stores in your area to see if you can collect a few that compliment each other.  To keep it Shabby Chic consider buying milk glass, mercury glass, or glass with etched designs.  Keep it eclectic by finding glass in jewel tones or metallic containers.  Vary the widths & heights.  Don't go over board - two or three look the best paired together.

2. Display your Perfume Collection - Consider a more modern tray to bring down the overly shabby look of your perfume collection.  A tray in a contrasting style of your perfume bottles adds a bit of depth & compliments the marriage of these two styles.

3. Flameless Pillar Candles - These are great since you can't have burning candles in school housing.  Pillar candles look worldly but are also classy so they are a mix of both of these styles.  Ones that are remote operated or with a timer are very low maintenance.  They come on when you want & you don't have to switch on a bunch of candles.

4. Blend Floral & Bold Patterns - Using throw pillows & bedding you can blend these two styles.  Key elements are florals & bold patterns.  Don't over do it though - chose complimentary colors in your florals & then black and white for your bold patterns (or do it opposite, how chic!).

5. Fluffy Warm Blankets - These blankets in a neutral colors & not patterns bring a bit of warmth into your room.  They also add texture to your bedding.  Consider a white or cream colored comforter so there's not a lot of pattern clashing going on.

6. Fun Lighting - I threw this guy in here because I have him & I think he's adorable.  He's great to add a little light to your room.  Turn him on with all of your flameless candles & bask in the relaxing glow.

7. Collected Dishware - Dishware is another collection you can build by blending these two styles.  Choose tradition style cutlery with a fun twist.  Then add different textures with handmade ceramics & other rustic elements.

Stay tuned for the next two installments!

What styles do you blend in your own decor?

xoxo, Moe

Connect on Twitter // Follow on Pinterest 

8.20.2013

Giveaway Time! Win a Diamond Candle!

What better way to greet a Tuesday evening than with a giveaway!  Today on Five Sixteenths you can enter to win a Diamond Candle of your choice from the website DiamondCandles.com.  If you haven't heard of Diamond Candles, let me introduce you:
Diamond Candles is a great website featuring high quality 100% soy candles that are eco friendly & natural.  Each candle not only comes with the perks of being a candle that burns evenly & fills your house with a beautiful scent, but you get a ring in every candle.  Burn your candle to reveal real rings valuing $10, $100, $1000, or even $5000.  Each candle comes with a ring!  What a great thing to look forward to!  You can read more about the origins of the Diamond Candle brand on their About Page here.

My Candle - Review & Reveal
The lovely Diamond Candle brand offered me a free candle of my choice to review before hosting the giveaway.  I placed my order, choosing the scent Ocean Dr & anxiously awaited my box.  Once it arrived I was instantly surprised by the weight of the candle.  The container is glass, features a lid, & is 100% soy. Once I opened my package I instantly trimmed the wick & lit it.  
I hung out in the living room, watched some TV, & ignored it like one tends to do.  Then after a bit I realized the scent filled the entire room!  I was pleasantly surprised!  The scent I picked is very beachy & really reminds me of summer.  I plan on burning this candle down until I break out my fall ones mid-september!  
Not only does the smell fill the room, but the candle burns clean & evenly.  Theres no hole down the center of the pillar.  There is a nice pool of wax burning evenly down the entire container.  On the back of the glass container you can see that there is a little gold, foil package eagerly awaiting you to burn your candle for 15 hours to reach it.  I burned this candle each  night after work for a few hours until I was able to reach my little gold foiled package!
Following the instructions I blew out the candle, waited for the wax to cool a bit, then pulled out the foil with a pair of tweezers.  Be careful! It was covered in a bit of wax, but the ring is tucked in a little baggie, then folded up in the foil, then placed in the candle so the ring is safe & sound.  As I unwrapped the foil I found a cute little silver colored ring with a flower & green stone.  While I wasn't lucky enough to get a 14k ring I still think these candles are great!


These candles retail for $24.95 - a great price for the quality of candle, even if there wasn't a ring inside! Seriously, these candles are great & the price is perfect for an even burning, beautifully scented candle that fills your room with fragrance.  The current candles I have in my house don't even fill a room!  I'm lusting after the Relax & Revive scent (a blend of lemon verbena & fresh mandarin lime) & the Rosewood Candle (which features sandalwood).  These candles make great gifts for a friend or for yourself & look great with your decor.

Now for the Giveaway!
Diamond Candles has offered a giveaway of a free candle to Five Sixteenths readers!  Using the Rafflecopter widget below, you can enter the giveaway!  If you would please, go ahead & give Five Sixteenths a follow too why don't you?

You can find Diamond Candles on their website here, on twitterfacebook, and instagram.  If you're interested in seeing some Ring Reveal videos, check out their facebook page!


xoxo, Moe

**I was given a Diamond Candle to review from the Diamond Candle brand, however, all opinions are my own & I will never accept compensation for a good review.  I totally love this product!  All product specs & top photo taken from the Diamond Candles website.

Connect on Twitter // Follow on Pinterest

8.08.2013

Some August Blog & Shop Goals

I've been a bad blogger/shop owner - I got a full time job & just let everything I've ever dreamed about slip through the cracks.  (Dramatic much?)  But this month is the month to get some things in shape - oh yeah!  So, I wanted to share with you a few of the blog & shop goals I want to complete through the month of August.  There are only three but they are kind of broad - 

Convert all the blog designs that can be into instant downloads in the design shop - I know Etsy has had this option for a bit now & I've just been too lazy.  And seriously if you're not on the bandwagon you'll get left behind.  I haven't made too many sales in the design shop lately & I know it's because it's not instant gratification.  (Well I can assume it is.)  I want to focus on this before I release some new designs.  Maybe that will be September's goal.

Update the Vintage shop - Are you kidding, we're coming up on the 1 year anniversary of 516VINTAGE and the steam has been lost.  I'm going to order a new charger for my camera & get to updating.  We've got a lot of stock, I just haven't photographed it.  I want to do a whole new shop relaunch on the 1st of September - when we launched last year - and make it count.

Send out more newsletters  - I slacked on that & I didn't mean to.  I totally forgot about it period until I got a new subscriber the other day.  So along with the re-launch of 516VINTAGE the next newsletter will go out in September as well.

It's time to stop putting things off & take things by the horns.  I think I'm a slow adapter.  I've always been good with change but it does take it's tole on me...so a 5 month semi-hiatus is enough.  It's time to get back on track, for real this time, and keep up the steam.

What are your goals for August?

xoxo, Moe

Connect on Twitter // Follow on Pinterest

8.07.2013

Wednesday Decor // Projects to Tackle

We've been in this house nearly a year & there are still things we haven't accomplished....and I have to say I'm a bit ashamed about it!  I think we've been good though at getting things together but there's been a lull in the organizing.  So now that one year is approaching in October, we've got to get our butts in gear!  A lot of these things are little here's and theres but they still need to get done right?  So here's the list wee need to check off!

Curtains in the Living Room
While they are up there are still somethings that need to be done.  I need to put up the tie backs I got for the ones over the couch & on the window.  Then there's the window on the door.  It's metal so the only rod I could find - which is actually pretty cool - was magnetic & in white.  Also, the curtain is too long & just hangs there.  So I need to hem up the curtain or get a longer, full length one, & get a second magnetic rod to keep it taught at the bottom.  I'm also going to spray paint the rod & magnet part a bronzy color since that's the color running through the room.

Baskets for the bookshelves
I love the baskets I have near my desk on my side of our bookshelf divider so I want to get some more of them for the bookshelves flanking the TV.  I want to store extra gadgets, game systems (my N64), games, cards, etc.

Get the junk to Goodwill
That's right, I've got Goodwill donate boxes everywhere just sitting there because I'm lazy.  That's right people I'm lazy.  I don't really want to lug all that stuff to my car, drive to Goodwill, & unload it.  Written down that doesn't seem like much.

Decide on a bed frame
I really want to do my DIY idea but I'm not too keen on it anymore.  We have a slanted wall above our bed which will make bed frames hard to fit in there....but I'm determined to have something instead of a mattress on a floor....please.

Put the spare room together
Like all spare rooms this spare room houses most of the spare stuff.  But I really want to get to turning it into my little sewing space & a functional spare room for guests and what not.  Who wants to come visit to kick my butt in gear?

Organize my desk
I told you it wouldn't stay clean.  I told you.  Right now it just looks like a craft store threw up everywhere & it really can be a lot better.  Then I won't have to blog from the couch.

Get the kiln/pottery studio set up in the garage
Plain & simple.  Get off my butt & do it!  Just do it.

Photograph for the vintage shop
This is unrelated to getting the house together but I've been letting too many things slip....so no more. gosh darn it.  No more!  We've got a load of new stock from over the Summer that needs a new home and I just plain need to focus on things that are important.

So hopefully in the next month and a half or so we'll be through.  I can't believe that October 8th we'll have been in the house for a year!  Fun fact: Zach & I moved into this house 3 days before we'd been together for a year.  Needless to say I packed up all my stuff & moved up to Michigan nearly 3 months before we were together for a year.  How crazy!

Oh, I fully intend to do a sort of house tour or before & after type deal here soon as well.  Maybe when it's closer to the fall after the year mark has passed just so everything is in it's place.

What are things you need to do around the house?  What's your motivation to do it? Please share, I need it!

xoxo, Moe

Connect on Twitter // Follow on Pinterest

8.06.2013

Trend Tuesday // e.l.f. Cosmetics Haul

I'm not sure if you're aware but e.l.f (or eyes lips face) is a crazy affordable cosmetic line you can usually find at places like Target & Meijer.  I've seen it pop up in Wal-Mart recently too!  But if you've ever passed up these little gems, you totally should turn around & pick up something to try - might I suggest their studio line blushes?  Any who, e.l.f. recently had a crazy sale where their Studio Line was 50% so I thought I'd give a few things a try.
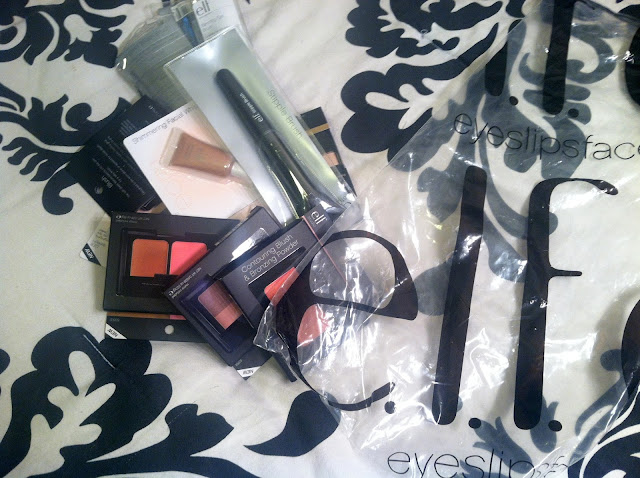
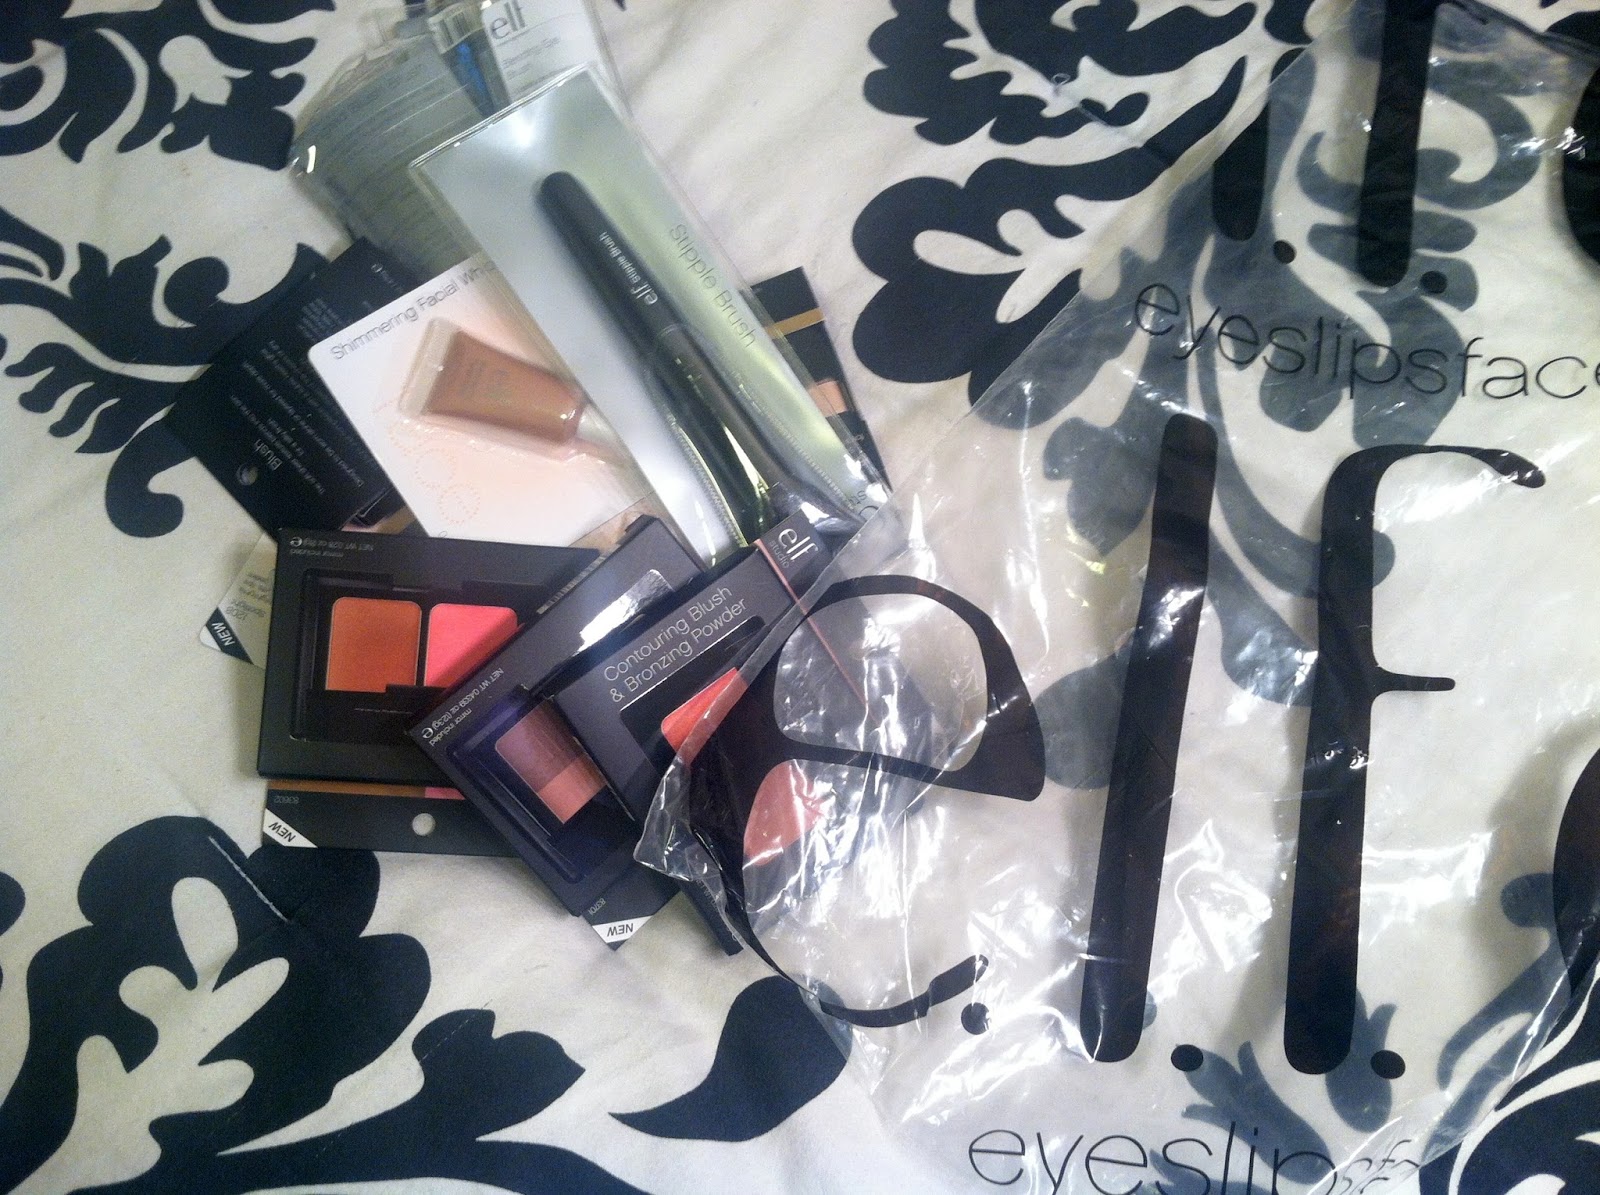
If you aren't familiar with e.l.f. they have a few lines of products - the ones you'll see the most (at least the ones I do) are their Essentials Collection and the Studio Line.  There are hits & misses in both lines, but for me the Studio Line is where it's at.  In the Essential Collection a lot of the products are $1 & in the Studio Line a lot of the things are $3-$6 ish.  So with a 50% off sale, you're able to get the Studio Line considerably cheaper...nearly the price of the Essential Collection!  So that's always a plus.  Also, if you've ever thought what you saw in the store was all the existed from e.l.f., check them out online.  There's a lot more than I ever would have thought!  For example I didn't know the Tone Correcting Powder came in different tones, nor did I know the Blushed & Bronzed Duo (or St Lucia blush/bronzer duo) came in different shades!  You'll get lost in the many, many, many options on the site!  So onto the haul, beware - many pictures below!
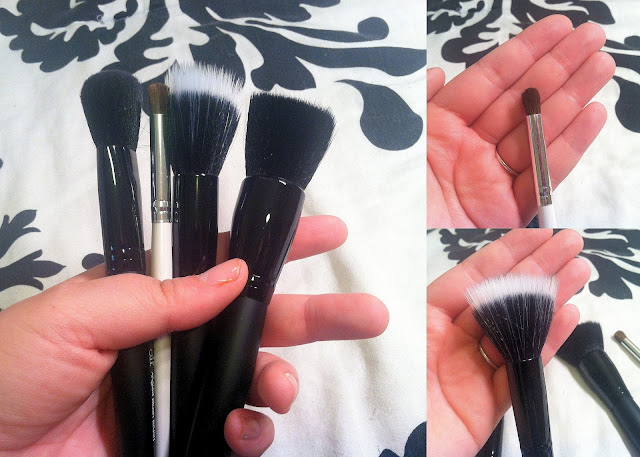
Angled Blush Brush, Professional Crease Brush, Stipple Brush, Powder Brush
I feel like I'm always looking for more brushes to serve a particular purpose & sometimes it's not the purpose they were intended for!  Buying single brushes means it's easier to double up on them if you really like them.  Right now I have a favorite brush for bronzer that I got in a kit & I'd like another but I don't want to buy another kit just for one brush.  I'm hoping that crease brush will be a better one than the one I have now at precisely placing product & blending it out.  I'm also hoping the stipple brush works great for blush or for foundation.  I used to have a stipple brush from Sonia Kashuk that I loved but it started to shed & leave little furs everywhere.  Gross! But this one isn't as dense.  The angled blush brush from the studio line feels a lot softer than the angled one I have from the essential line so I'm hoping I get more use out of it.

Bronzer in Warm & Bronzer/Blush Duos in Turks & Caicos and Antiqua
I love my St Lucia bronzer/blush duo so I thought I'd see what the others had to offer.  For 50% off of these it's worth a shot even if the bronzers would be too dark - which I think they may be!  The St Lucia duo is a teeny tiny tad bit too dark but works now that I've gotten a tan.  I'm not quite sure if I'll ever be tan enough for these two bronzers though!  But I think they would be perfect crease colors for a neutral eyeshadow look.  Who knows...maybe some use will come of them!  The left swatch above is the duo in Antiqua & right is the duo in Turks & Cacos
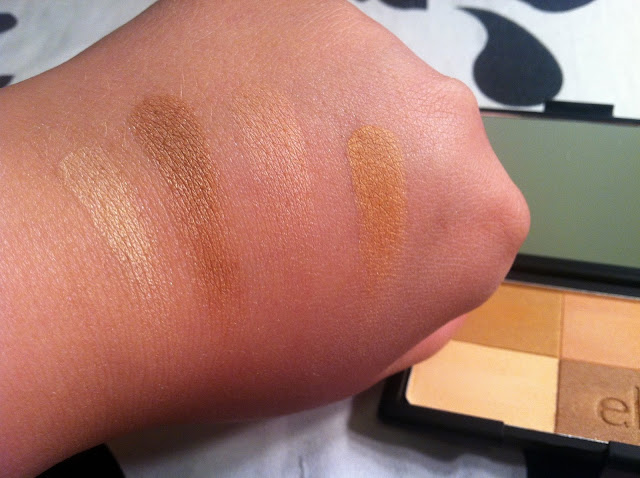
I've also seen this quad like bronzer palette thing - if you want to call it that! - in the stores.  But only in one shade.  On the eyes lips face website there are quite a few shades you can pick this bad boy up in.  That didn't really appeal to me at the time so I just picked up this one in Warm.  But when I swatched it I realized how perfect each of the shades in the quad was for eyeshadow!  I totally think you can get a great neutral eye look from this little thing.  So now, of course, I'd like the other two bronzer colors!  I'll wait until the next sale though.
Studio Blushes in ______________ & _____________
I already own quite a few of the blushes in the studio line & some of them are hit or miss.  For example, I really wanted Candid Coral to be a great peachy blush for me but it doesn't show up.  When I saw the color on the left ____________ I thought I'd give it a try.  50% off of these made them $1.50!  Then this golden color ______________ just stood out so I thought why the heck not.  It's weird because the plastic cover on the gold one had the logo on it but elf wasn't stamped into the blush & it was opposite for the other.
Shimmering Facial Whip in Three Colors & the Body Shimmer
The shimmering facial whips were from the Essential Collection so they weren't on sale but for a dollar a pop, seriously you can't pass it up.  I haven't opened them yet but I'm excited to use them because they say they are dual purpose as well - use on your face as a highlight, on your eyelids, or on your lips.  Pretty neat.  The next is this little deodorant stick type deal of a roll up body shimmer in Mystic Moonlight (swatched below):
I think this is super cool! You could use this for different things as well.  This is a swipe not blended out so it could be part of an eye look or blended on your cheekbones for a highlight.  I've never tried a liquid or a creamier style highlight so I'm excited to check these out!

So there you go, my huge discounted e.l.f. haul!  I love eyes lips face & if you're on a budget these products are great to add to your collection.  The reason I like drug store priced products is because I'm able to try out different looks & products without dropping so much $$$ if I don't like it.  With more affordable products that are good quality - let me clarify just because these are cheap in price doesn't mean they are cheap in quality! E.l.f. is up there with one of my favorite make up brands that are affordable & awesome.  You can get a lot but not make a dent in your wallet! 

What are your favorite e.l.f. products?  Any other drugstore products you rave about?

xoxo, Moe

Connect on Twitter // Follow on Pinterest

8.05.2013

Make it Monday // DIY Back to School Classroom Art

So no, I'm not going back to school but it is around this time that I start getting all nostalgic about school.  Around this time all the school supplies come out & I just want to pick up pretty notebooks & pens & loads of other school supplies I don't need at this point in my life.  I recently upgraded my PicMonkey account after putting it off for ages because I saw all of the cute new clipart, fonts, and textures they added in a Back to School theme.  These cute additions inspired me to create a digital wall art DIY to share with you!  This one is geared toward teachers & such (or those who just like to learn). 
If you aren't too keen on making one yourself, you can download the original print here.
First you'll need to go to PicMonkey.  If you haven't signed up for the Royale feature, you'll have to use other clipart & fonts.  The Royale feature gives you access to more options but the free features of PicMonkey are pretty nice.  I do think that the $33 a year is great to create your own bits of art, collages, & edit photos.  In fact if you use the Royale features to create at least 3 prints like this, you'll totally have paid for it!  You can also sign up to be billed monthly at around $4.99 or so a month.  So if you only sign up for one month to make a few prints...you're still good!  Like I said though there are tons of free options to play with, this DIY however features most of the paid options in their School themed set.  Anyway, on to the tutorial.

From the home screen you'll select create a collage.  Then you'll need to close out all of the extra boxes until you have one left.  Adjust your canvas by dragging the edges (sides & bottom) to make it bigger.  For this one I made a more horizontally oriented canvas.  This size (along with the download size) fits best as a 5x7 print.  Perfect for a school desk!
From the little tag icon to the left you can choose provided backgrounds - I used the lined paper background - or you can upload your own.  Drag the image over so it fills up your entire canvas.  Now go to the palette icon & move the spacing all the way to the left so that there's no white left.
A new feature in PicMonkey is the ability to move your collage straight into the editing program in PicMonkey.  Before you had to save your collage then re-upload it to edit and add overlays.  Click the edit button to move your collage into the editor.
It is now that you can play around with the cool fonts, overlays, textures, & clip art that PicMonkey has to offer.  I used the fonts Sketchbook & Learning Curve because I liked the school house vibe of it all!  Then I added some clip art, arranged the sizes, & picked different colors.  Check it all out below:
Once you've finished your work, be sure to save your work to your computer.  You can't go back & edit it so make sure you're happy with what you have!  You can always keep the PicMonkey website open to do any changes but once it's closed, the flattened image is only saved.

Now print it out & frame it!  Play around with all the overlays to create some fun pieces of art for your classroom! 

xoxo, Moe

Connect on Twitter // Follow on Pinterest

8.01.2013

3 Creative Crochet Tips // Pick Up that Project Again & Keep Going

I love to always be doing something with my hands.  I have to always be occupied whether it's in front of the TV, in bed, or waiting - somethings gotta be getting made.  But since I have the attention span of like a flea, I pick up & put down projects quite frequently, rip projects a part, & just plain forget about them.  Over the years I've developed a few things to keep forgotten projects easy to pick up & started projects easier to finish.

Remind yourself about the project - I write down either the idea or even just simply the yarn & the hook size on a piece of paper & pin it to my project after I've worked a few rows.  I do this so when I pick up the blanket I've set aside 3 months ago I'll remember what I'm supposed to be doing with it! Sometimes I'll throw in the colors I wanted to add to it - because if I've set it down I've probably used the other colors for some other project!  Most of my projects aren't based on patterns & are very loose so the key part is writing down the hook size so I don't have to try this one or that one or hope that it's right!

Use a bigger hook & a faster stitch - Ever since last summer when I sat down & made more blankets in a few months that I had in my entire life, I fell in love with a really fast stitch I came up with (at least I think I came up with it!) when making a scarf. This stitch works great in any type of yarn - the blankets in the shop are acrylic yarn & this blanket for out house is made from really fluffy yarn.  Learn the stitch I'm talking about in this post.  A bigger hook makes projects go by faster as well and I'm all about that!  My favorite size hook for blankets is an L and for hats & scarves its a J or K.  Bigger hooks also make smaller stitches go by faster.  I'm in love with the way single crochet looks done with a K size hook!

Bobby pins, hair clips, bits of yarn, paper clips, etc are great stitch markers - I've never had a set of proper stitch markers because there are a zillion things around the house that can be used to mark your place.  Even just little bits of extra yarn can act as a stitch marker.  I've used bits of yarn, bobby pins, paper clips, & hair clips to mark my place.  I'm not ashamed!


Connect on Twitter // Follow on Pinterest // Peep me at Hello Cotton