7.30.2015

Three Apps To Use Along with Instagram

The title of this post should be something like three apps I use everyday or the three apps I talk to death on my blog or something like that.  The truth of the matter is 90% of the time I'm on my phone, I'm on Instagram.  I use Instagram to promote my blog & my shop and to just share parts of my life.  Even if you don't use Instagram in a professional way, these apps are perfect for making a beautiful feed.  
Phonto (free + in app purchases)
I've tooted Phonto's horn for like ages on the blog.  See a full review here.  And I'm back, again, to toot something - text presets.  If you share a lot on Instagram and are worried of your work being shared, reposted, etc with out proper credit, Phonto can help you with a watermark.  The best thing about the presets is that you can set a few and then you don't have to type out your blog address, Instagram name, or shop address.
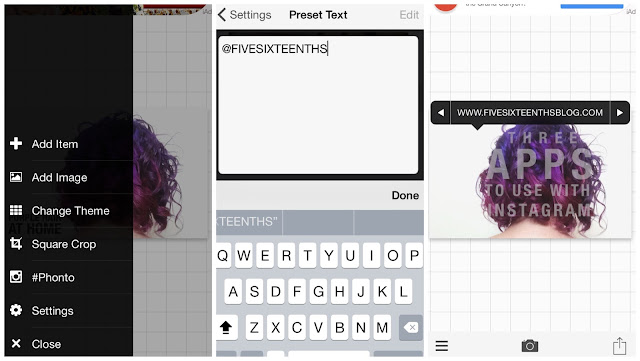
To add the presets, click on the three lines at the bottom of the edit screen, select Settings, then tap Preset Text.  Select Add New Text and type in your preset.  To add it to your image, tap the scree to add text then use the left arrow to arrow over to the preset you'd like to use.  If you favorite a few of the zillions of fonts offered in the app then you're done with your watermark in like 2 seconds.  This is helpful for me because I tend to put all the words I overlay in all caps and sometimes I forget to double tap the shift and then I have to start over. By the way, I just realized how dumb the previous sentence sounded...but it's true!  I don't want to have to retype!  Phonto is seriously a fun and easy mini design machine for your iPhone or iPad.  (if you want another fun font over photos type app I used to love Phoster! It makes your images into faux-posters...you can add folds, etc....check it out!  You should also check out Text Mask...it's pretty cool for adding text too.  Tutorial here.)

Afterlight (.99 cents + in app purchases)
Here is another app I've boasted about before!  (See the full review here.)  This app I love because it is super easy to design your own filters.  Much like actions would work in a program like Photoshop, you can design and save you're own presets to get consistent photos across the board.  This is called fusion in the app.  I have a specific 'blog' fusion that I use on nearly all my blog photos and my Instagram photos.
It gives them that je ne sais quoi slightly filtered look that I'm in love with.  You can set as many as you'd like (I believe) and even email them to friends or to yourself to install on all your devices.  I have the 'blog' fusion filter on both my phone and iPad incase I'm on one or the other.  You can also add to the fusion later, if you wish.  I emailed myself my blog fusion filter and then added to the original one - bumped up more brightness, etc - because some photos may need a little bit more.  (If you find you'd like to do some detail work - targeted highlights/contrast/etc - try Snapseed.  If ever I find one corner of my photo is a little too dark I run it through Snapseed first.  This app is also super detailed and like a master photo-editing app for your phone.  I'm always impressed.  Oh, and VSCO Cam also is pretty impressive.  In doing research for this post I found that there are some pretty interesting tools you can use now!)

Picframe (.99 cents)
Once again, I have a horn to toot.  Here is the full review of PicFrame but if you're wondering why I choose PicFrame over the hundreds if not thousands of collage apps, here's the reason - it's the first one I downloaded.  Its a damn good collage app!  Nothing is frilly about this app.  there's your standard grid style collages.  Nothing crazy, no diagonals, no star shapes, no funny business.  It is sleek and simple.  I use it in the basic way possible and add none of the minimal extras that are in the app - filters, frame shapes, banners, etc.  I used it to make the screen shot collages above!  I keep it to collage and that's that - square collage, horizontal collage, vertical collage, just collage.  The best part is I can use a simple slider to get rid of the white lines between each image.  Its all in the design of this app for me.  (If you want a free collage app, you'll have to search yourself! I will never leave my beloved PicFrame!)

All of these apps help me keep a professional and well composed image on my Instagram page.  Not all of my pictures are perfect - and I like it that way - but when I want to take one of those pretty pictures this is where I turn!  I can protect my work, add a dreamy filter, and showcase multiple things in one image.  These three apps are my solid go to before I even touch Instagram!

What apps do you use in conjunction with Instagram?  Any others to recommend?

xoxo, Moe

7.28.2015

Achieve Vibrant Purple Hair at Home

I used to have a folder on my phone with images of purple hair pulled from Pinterest.  One day I found a box of deep purple dye at the drugstore (it was Vidal Sassoon London Lilac - which I'd still recommend) and dyed the under layer of my hair purple.  Once I fell in love with it, I then decided to make it official and headed to the salon.  I did that for while then I decided that I didn't really want to pay a zillion dollars to get my hair dyed each month, I tried to find a cheaper alternative.  
The dye I used in the salon was Pravana, I'm pretty sure I used the color Wild Orchid on the bottom layer of my hair and then Violet on the top layer.  You can find Pravana online at places like Ebay and Amazon for about a drug store price.  However, if you don't like to wait, you can head to the actual drugstore and pick up Splat Hair Color.
I found Splat after going to Sally's only to find that the only bright colored hair dye was temporary.  Splat does make temporary color however the range of permanent hair dye colors is great.  I chose the color Lusty Lavender as I thought it would be something different than what I had, however the lavender color closely matched the Wild Orchid color from Pravana.  Eventually I decided to try out the other purple color, Purple Desire.  As of this post, my hair has a layer of Purple Desire on the top layer and then the rest of my hair is Lusty Lavender.

Each box comes with a bleach kit and the color.  If you have medium length or longer hair, you may need two boxes but at about $11.99 at Walgreens (where I buy mine), that's pretty affordable.  The cheapest I've found it was Target, but the shade range is limited.
This is my hair just with Lusty Lavender, you can see it's more pink than purple on bleached hair.  It looks nothing like the box and never did!  It also really sticks to well bleached areas, like my roots.

I would suggest getting a bowl and brush from Sally's as this will make for easier application.  Pick up a box of gloves as well!  The first go round I did not use a bowl and a brush.  I found that my hair did not bleach evenly because I ran out of bleach towards the end (I would recommend getting two boxes to start with if you're hair is shoulder length or longer!)  With good rationing and bowl + brush, I might have been able to make the bleach go through the length of my hair.  I also missed pieces when I was using the dye applicator provided with the box so I used a second box (just the dye) to touch up the places I missed.  The third time I dyed my hair, the bowl and brush helped tremendously.

I recently re-dyed my hair.  I started with the bleach first, just on the roots.  The bowl and the brush were very helpful here because I only needed a little bit of bleach to do all of my roots.  I sectioned my hair into very thin layers and went all the way around bleaching my roots, using a mirror to help me see the back when I needed.  When in doubt, I made the layer of hair very thin to make sure I didn't miss any parts.  Once this is rinsed out you'll need to dry your hair to apply the dye.  I usually do the bleach one night then the dye the next.
When I went in with the dye, I did the same thing - sectioned my hair into very thin layers and then started at the root and pulled the color through with the brush.  Instead of doing my roots first and then the rest of my head, I did each section all at once because it was easier for me.  To get the top layer a different shade of purple I first sectioned a U shape of hair from about my temples back.  Using a clip, I kept this section up an out of the way.  You don't have to have multiple bowls either - I rinsed my bowl & brush between applications and made sure to dry them.

This purple color will stain!! So to be careful I suggest getting all the bathroom rugs and other stuff out of the way.  Use an old towel over your sink and just take it slow.  You won't be a pro the first time you do this but you'll get better, promise.  The water in the shower will continue to run purple for quite a while - even up to the point the next month where you need to dye it again.  So be careful when you're hair is wet that you're not sleeping on the queens sheets!  Make sure you dry your body super well, too, because you don't want purple foot prints on the carpet down the hall.  I'm lucky that we use black towels!  Also don't put your towel on the floor or on something else while it's wet as the purple might leach onto the carpet, tile, pile of dirty clothes.  Wash these towels together too so your other clothes don't end up stained.
To keep my hair color lasting longer I try to shampoo it at most 3 times per week.  When I do shampoo I use the Redken Color Magnetics shampoo and then whatever conditioner I have on hand.  Splat also makes a small bottle of shampoo and conditioner to preserve color.

Overall, I am very impressed with this dye and have gotten many compliments on it.  I will continue to use this brand as I think it lasts long enough & the price is decent.  I highly recommend these kits to anyone who is looking to maintain fun colored hair, permanently, at an affordable price!

I hope this was helpful!  Do you have any fun hair coloring tips?

xoxo, Moe

7.27.2015

Make it Monday // Create Planner Stickers using Cricut Explore

I've been using my Cricut Explore to create stickers for a few months now and have been asked to share how I do so...since the Cricut isn't the go to for sticker making.  I am one of those people that have always found a way to make things work for me.  If something has limitations, you've got to find a way to work around them.  For example, you may know that PicMonkey is my go to for quick designing and photo editing when I don't want to open up Photoshop.  I've learned to make the limited capacity of PicMonkey work for me and found that you can really do a lot with the simple program.  (See all the PicMonkey tutorials here.)
this post contains affiliate links, please read my full disclosure here.  thank you for your support.

That is how I feel about the Cricut Explore and Cricut Design space.  The library of images is expansive, some are free, some are part of yearly or monthly subscription, and some you can purchase individually or as a cartridge (or image collection).  When I purchased my Cricut Explore I got a 3 month trial of the subscription for free but have since purchased my own.  You can subscribe to a monthly plan for $9.99 or a yearly plan for $99.99, both are great deals and totally recommend it! 
Above is a video on how I made simple washing machine stickers using the free images in Design Space!  I also use the slice tool to create my own image using two free images found in the image library.  Super simple to be creative!
The Cricut program doesn't have too much of a learning curve and you can totally make it work for you!  This is how I design a most of my stickers in the shop - I use various images already available and assemble my own.  Take a look here at the stickers already for sale but new stickers will be added this week!

Hope this little screen cast tutorial was helpful!

How do you use Cricut Design Space?  Have you made stickers yet?

xoxo, Moe

7.26.2015

Sum Up Sunday #77

This week has been a productive one on certain fronts - blog/etsy/youtube - but a non productive one on other fronts - the house.  I'm at a stand still with getting the house together....there's just so much more I could be creating and thats why I've gotten a lot of crafty stuff done but why there are still dishes in the sink!  I've really enjoyed working from Starbucks in the afternoons but only worked there once this week.  I just didn't have it in me to go one more time.  But I'm thinking my new Starbucks schedule will be Monday evening and Thursday evening.  It is really motivating on Sunday nights & Monday morning to look forward to working for myself after work.  Honestly, if I didn't have the dog I'd probably be working there 4 nights a week!
this post contains affiliate links, please read my full disclosure here. thank you for your support!

A lot of blog post ideas have been generated this week as well as new sticker ideas for the shop. My sister just told me she bought a planner - welcome to the dark side - so she's inspired me to make some stickers as well.  She was looking for some pineapple related things so I pushed her in the direction of Inspired Blush (who should be opening back up soon!) but decided to play with pineapples on my own.  I made some pineapple boxes sized to fit the Erin Condren planner & the MAMBI Happy Planner.  I also want to design some more inserts but just haven't felt too inspired to do it.  I need to photograph and list the inserts I currently have in my Fluro Pink (watch my set up here) but, again...I just haven't!

Since I've added stickers to my shop it's taken a lot of trial and error to get them right, especially since I have a Cricut Explore and not a Silhouette.  Playing around with it though I've gotten some good results.  (Obviously if I've put stickers in the shop!) The not so perfect sheets have been sliced up and packaged into little sample packs that go out with every physical order - even if you don't order stickers!  Also, did you know you can use Ebates on Etsy??  Right now the cash back is at 2% - the other day it was only at 1%!  If you haven't signed up for Ebates...please click here!

I've also jumped back into my make up.  And recently Influenster sent me a box with the new Maybelline Superstay Better Skin foundation, so I'll be wearing that for the next few weeks - which will be hard!! The challenge is to wear it for 3 weeks and see how it affects your skin for the better.  I'm trying not to come at it from the reviews I've already seen...but that's hard to do when you're tainted!  So far I do love that it has a pump and they chose a great color to send to me - porcelain - so hopefully it's a match.   I already like the original Superstay foundation from Maybelline even though it doesn't have a pump & doesn't come in that light of a shade.  I'm hoping they will do something like they did with their Fit Me foundation - create two similar lines for different skin types.  It would be great to have new shades & a pump on the original!

Finally, I dyed my hair this week.  I'd been putting it off so I decided to bleach my roots on Friday night so that I'd actually follow through with the dye.  Keep a look out for a how to & review of my purple hair on the blog.  It is permanent, affordable dye from the drugstore!

Here's to another productive week!

xoxo, Moe

7.21.2015

Trend Tuesday // Bright Summer Lip Color

On my top 3 list of super affordable drug store brands is Wet n Wild.  I would say that it's a tie between Wet n Wild and Eyes Lips Face - they both equally blow me away with the quality at the low price point.  I'm pretty sure Wet n Wild has made it's come back and regained traction in the world of drugstore make up, but if you're still wary you should totally go pick one thing up next time you find yourself in the drugstore make up aisle.
Today I want to share with you 5 lip colors from Wet n Wild - the Megalast Balm Stains.  These are nothing new.  In fact they were released in the beginning of 2014.  (If you ever want to know a release date of an old collection, check the blog Nouveau Cheap.  That's how I found this data.)  But, you may not know that recently they've come out with new, permanent shades and are know for releasing a few limited edition Balm Stains into the mix.  If you're looking for an affordable, comfortable, long wear/staining lip color for the summer - I tell you to look no further.

These lip colors act exactly as the name says.  They are very balm like in that they moisturize your lips.  They have a bit of a gloss to them but they don't slide all over the place.  The colors aren't transfer proof but once the shiny gloss wears away you are left with a nice stain on your lips. The stain doesn't turn into that lip liner look either.  It wears away nice and evenly.  The lighter colors are also pretty easy to apply with out a mirror but once you get into the darker shades you'll want to be more careful.
(from left to right Coral of the Story, Festival Fashionista, Red-ioactive, 2AM Call Time, Rico Mauve)

The packaging on these is average, at best.  The lids may or may not stay on in a bag so that is a downfall.  Another con is that sometimes the color in the tube and the color on your lips are two different things.  This isn't necessary bad, but I notice it especially with Rico Mauve that the stain left behind is different than the color first applied.  It isn't bad, just different.
I love the brighter shades released this year - like Red-ioactive and Coral of the Story (quite similar to Festival Fashionista, which was LE last summer).  I'm alway son the look out for the limited edition collections and that's why I picked up 2am Call Time last Halloween.  These are super unique from the drugstore and very affordable.  If you're looking to build up a your collection of bright lip colors, I suggest these!

see last year's lip color recommendations here.

What are your favorite lip colors for Summer?  Anything unique you are loving right now?

xoxo, Moe

7.20.2015

Make it Monday // DIY MAMBI Happy Planner Cover

If you've been wanting about a zillion planner covers but can not justify spending about a zillion dollars on them, I've got a tip for you - check the school supply section of your favorite retailer!  Yes, it is school supply season!  I would suggest running out as soon as you can before all the good folders are gone.  You know they will only have Justin Bieber folder left if you wait for September first!
(this post contains affiliate links, please see my full disclosure here)

I found some really cute pineapple and lemon folders (plus matching notebooks) at the Meijer down the street and had to scoop them up for $1.  It's not breaking my no buy if it's something for the blog right?  So I decided to make another planner cover (here is my first one and my second one) for my MAMBI Happy Planner that I use now for my blog/etsy/youtube planning.  I use it in the same way I used my ECLP, however I love the customization of the Happy Planner.  I still need to get an ARC punch for it but you can totally use a single hole punch to add things into your planner.  Here's how to make your own:
Supplies :: pocket folders, single hole punch, scissors, pencil, paper slicer or ruler and craft knife
In order to make this a bit easier, start of by slicing your folders in half down the folded line.  Next trace the existing cover onto the back side - the folder side - of your pocket folder.  Make sure to push the cover all the way to the edge opposite the edge you just cut so you have a pocket on the inside of your cover.  Repeat on both sides.
Using the paper cutter (or ruler and craft knife) cut down the folders from the lines you've traced.  Place the existing cover on to the trimmed down folder and trace the top part of the 'mushroom' that is the ARC punch.
The single hole punch is the correct size to fit that little arc there.  Line up the hole punch with the arc, and punch away.
Next use the scissors to trim slits on the edge of each of the holes.  Make sure to trim a little bit from the middle so that there is a gap.  This will help the cover turn in with the arced pages.  Insert your cover like normal and enjoy your new pocket storage!
Using a single hole punch is a great way to get around not having a specific ARC punch and if you want to add other inserts it is super easy - add journaling cards, add printed inserts, etc.  And if you already have ARC discs, then they will work with your Happy Planner and your punched inserts.  I switched out the gold discs for some purple discs sent to me by Criss of Stop n Jot Crafts.

ps the stickers in the pocket there are from my etsy shop!  Check it out here.

Do you have the Happy Planner?  How are you liking it so far?

xoxo, Moe

7.19.2015

Sum Up Sunday #76

Welcome back, Sum Up Sunday!! In the middle of the week I gave a little life update of sorts...just to say 'hey, I'm human, so sue me' and I wanted to thank you all for reading and for commenting.  This week was pretty eventful I'd say.
I've been working on an assortment of things - the house, the blog, my youtube, and my etsy shop.  Most recently I've been focusing on Etsy.  And I've added 10 sticker designs + some washi stickers.  My next thing to work on are bookmarks - I think I'm only going to focus on personal sized and ARC punched since I'm using the MAMBI Happy Planner.  I will probably punch some for the A5 size as well.  If you want to visit the shop - which I'd love for you to - please click here
Speaking of the shop, I worked from Starbucks for a few hours one night this past week and loved it.  (I really miss traveling with Zach and working from various Starbucks for 8 hours a day.)  I feel like I got a lot done, though not all of my to do list was checked off that one night in Starbucks.  I'm thinking of working 2 afternoons of Starbucks into my schedule.  I love that I can't be distracted!  Of course I can get up and leave but by forcing myself to stay there for 3-4 hours I have to get things done.  At home I'm constantly getting distracted.  And while sometimes I think that is great because it keeps me creative, it's bad when there are certain things that need to get done.  Like I really need to keep up on my editorial calendar.  Right now I've just been blogging as things come to me and I don't really like that because it makes for less consistent blog posts as you go back through the archives.  I don't like have only 3 Make it Monday posts one right after another with out anything in between.  I need to dedicate some time to actually typing out content. 
Sweetie and I got some wonderful cuddle time in this week + weekend.  She loves being in the bed which is bad because if I never had to get up, I wouldn't!! She's been really cuddly lately.  She's also really into sitting on the back of the couch.  Her legs are long enough that she has no problem getting up on the back of the couch.  I've also found a few bones/toys on the windowsill.  She's also really into chasing bunnies in the yard.  

I've been thinking about working on my Project Life albums again because I am so ridiculously behind.  I used to print out all my photos at home but now I'm thinking I'm going to send them off to be printed so I can just work on them when I can.  I do 6x8 photo albums and usually only use the 3x4 photos but sometimes I do 2x2 squares.  I also do the layouts monthly, not weekly so I find it easier to look through the pocket pages I have for that month and then print them out as I go in groups.  Like all the dog pictures, or all the make up pictures......so it might be harder to do the sending them to be printed.  But I might try. 

I'm also trying to work on more Boost Your Blog type posts because I really do like sharing tips and tricks that I use on my blog and for the shops, etc because I find that stuff helpful.  I've got some app posts in mind, some planner posts, and some blogging posts.

Oh, and I also need to dye my hair.

Hope your week went alright...I'm not looking forward to starting another one!

xoxo, Moe

7.16.2015

Currently

I used to have a post series here on my blog called Sum Up Sunday where I'd just go over what happened in the week.  I'd just share what I'd been doing, pictures I took, what we were planning, etc.  I haven't done a Sum Up Sunday post since January of 2014.  That is way over a year ago.  

I feel like I've been doing a lot lately but also not doing much of anything.  It's like I can't get my head in the right place to settle on one thing and that makes me feel overwhelmed.  I've also not been blogging, and that really gets to me. When I don't blog I feel like I'm not myself.  But recently I've not really known what to say.  I feel like I've worked myself into a rut (again) and really want to just break out of it.  So I thought I'd bring back the Sum Up Sunday post and just sit down once a week and share what's been going on....my thoughts on things, etc.  Just to make the blog more personal.  

First though, we'll do a little update in the middle of the week, how about that?  There are only two major things that have been happening right now: putting the house back together after our renovation and trying not to lose my mind with the new doggie Sweetie.  (and then a third major thing I added at the end)
We are like officially done with all big stuff for the house - like we can live in the whole house now and not just 1/3 of it.  Which is AMAZING.  I've been setting up like every room but I'm most excited because I set up my own little closet area with storage for all my make up ..... which is way too much by the way.  I would say the biggest downfall from all the construction is that I bought make up because I couldn't find what I had...or rather I didn't want to dig for it.  And now I'm finding that I might need to be on an episode of Make Up Hoarders or something.  But hey, it's getting organized and I loooove it.  If you've watched two most recent videos on my YouTube channel you'll see a little bit of my vanity area too.
While Zach was home he bought us the most beautiful bedroom set.  It. Is. Gorgeous.  We also got a brand new, stacking washer & dryer.  I bought us a little free standing wardrobe/bureau thing for our linen storage.  I'll tell you what, you know you're a grown up when you get excited about a linen closet.  I love our new little storage.  The last thing is a set of cabinets and a little counter top across the hall from the laundry closet thing.  I. Am. Dead. Excited.  Which means I'm an adult.

The next big thing that's been going on is that I've been slowly losing my mind with the new dog.  It is very, very, very hard to do this.  To train a dog and just plain have her let you do what you need to do.  With Emmy, he was very chill and already came from a loving home so he pretty much had life down being a dog.  While Sweetie has gotten a lot better there are still days where I have to get up every 3 seconds to see what she's into.  I can't sit at my desk because she wants me on the couch to cuddle (or rather 'here mom, hold this bone while a chew it') or she wants to be in the bed.  She loves the bed. 
When we first got her, there was a bit of a potty problem.  That is about 90% solved I would say.  She still likes to poop in new rooms so I keep all the doors closed.  TMI? Well this is a life update soooooo.......She also ran the leash out of my hand, then when I finally caught her and wiggled enough to loosen her collar so she wiggled out of it.  I had a naked dog running around and I was terrified.  I got her attention from the neighbors yard and my goal was to run away back to our house and hope she followed me inside.  It was seriously a miracle that she just ran up to me and sat.  I leashed her up so tight and went inside to loosen things up!! Needless to say we have one collar with identification on and a second, no escape collar that goes on when we are going potty.  But man, I was scared!!! So we're doing a lot of 'come here' and 'Sweetie girl, come her' so she learns her name and to come.  She is about 2 years old the estimated at the shelter and I think they are right because she's too wound up to be any older!
Other than those two huge things, life's just been going by.  I've kept up with dying my purple hair myself and do plan on doing a blog post or video about it, probably.  I'm actually thinking of trying to cut my hair by myself....but I'm not that brave yet!!!  I've also been wearing it in curls recently with my new Curlformers (there will be a video about them, promise!).  

I recently had a big meltdown at work that earned me two 'get your shit together' days.  I was way stressed and it all culminated on a Tuesday afternoon about an hour before the end of the day while all the phones were ringing.  I just felt it from all sides - not sure if it was a panic attack or what....but it was scary.  And I'm pretty sure I scared the shit out of my boss.  But in the days before that I was feeling really stuck, really something else that I'd never felt before.  I'd stopped wearing make up - it was just too much to do.  I was sleeping a lot.  I was getting mad at the dog a lot.  Like a lot.  I thought about taking her back to a shelter because I just couldn't do it, and that really scared me.  Zach is gone too and I was doing a lot of things by myself - I mean house wise, and I just literally couldn't do it any more.  I've never felt like that before and that Tuesday, I just lost it.  I had a 4 day break over Independence Day weekend - 2 get your shit together you bat shit crazy girl days, and two regular weekend days.  And I can't tell you how much it helped.  I'd never been one to believe the mental health day thing - just taking a day a relaxing, etc - I am much too uptight to do that.  I am so uptight at my job too, and it's so fast paced, and I just have to accept that I can't do it all.  I've never been good at failure or making mistakes.  Like if I make a mistake, it eats at me.  For hours. And I've always been like that.  I can't really deal with disappointment either.  I think about why I can't just do things right for fucks sake, what the hell is wrong with me, etc.  In my job, if I make a mistake there is no instant fix either.  I can't just backspace.  It either costs us money or everyone time.  And because of the stress of being the only person who can do my job correctly with no back up I was making more mistakes, and the stress of those mistakes was leading to more mistakes....and I just broke.  But taking those days has really made me able to go back to who I was.  I've worn make up everyday for the last week and a half.  I've put my hair in curls.  I've cared about what I was wearing.  Its a really weird thing.

That got a little intense at the end didn't it?  But seriously I wanted to get it all out so I could feel a little bit more myself.  You know?  I just wanted to share a little life update here and hope to bring a diary/journal/personal thing back to the blog.  I'll let you know if I have any more meltdowns.

xoxo, Moe

7.13.2015

Make it Monday // Create Planner Stickers using Overlay Apps

A little while ago a new app called Paint Paper Studio launched and I was dying to download it.  It is a pretty simple app - allows you to put overlays onto photos or predesigned backgrounds included in the app.  Well as soon as I found it I shared it on Instagram - where else do you go to find fun things - and a friend of mine, Criss, came up with the idea to make stickers from the images she created.  Of course I thought that was a brilliant idea an asked her if I could share it here on the blog with you all.  So today I want to share with you my take on making stickers from the Paint paper Studio app as well as other overlay apps you may be in love with
Supplies :: overlay apps and images created with them, Circle Crop app (or you can use PicMonkey for free on your computer), printer, sticker paper, die cutting machine (I'll be using my Cricut Explore but you can also print and cut by hand)

this is a peek at what the Paint paper Studio app looks like.  Be sure to download it here!

First you'll need to create some fun images using your favorite overlay apps.  I love mixing and matching the apps I use and even using downloaded backgrounds from my favorite pattern making site ColourLovers.com.  If you need some inspiration, click this post for a list of my favorite overlay apps.

In this post I'll be making circular stickers (but you can make square ones or ones that fit in ECLP or MAMBI Happy Planner boxes) so I need to take my images into another app that can create a circle frame around my sticker.  I like to do everything on my phone - this project is great to work on when your waiting somewhere because you can just design on your phone while you wait and print them out later.  I'll be pulling my images into a fun app I just found called Circle Crop.
Circle Crop lets you crop images in to the shape of a circle, like the name says, but get this - you can set the image with transparent background and save it as a .PNG!  Isn't that super cool??  This means that when the image is uploaded to Cricut Design Space it doesn't need any clean up.  .PNG files are my favorite to use in Design Space.  It is a shame that the new Cricut App for the iPad doesn't not support uploading from your image library to your matt.  I do hope that feature is added!

Once all the images are croped into a circle, I send the images over to my computer to open in Design Space (obviously you can use the Sillouhette Software if you have it or drop your images into Word and cut by hand, but I do like the simplicity of using a die cutting machine!)  I usually email my images to myself but you could also use Google Drive or Dropbox.

Uploading each image to Design Space is super simple and with no white area to clean up the images are ready to use.  Just insert them in to the canvas area and resize.  I resized to about .75 inches.  That happens to be the perfect size for my planners - not too big but not too small.
Once you have them all added to the canvas you can either align them how you'd like and then flatten the entire image to have a predesigned sticker sheet or you can let the site fill your cutting matt with the images by selecting how many 'projects' you'd like to make.
I always leave the bleed on when it comes to print then cut with my Cricut.  I do not like how it looks when printed - to fuzzy and unprofesional looking - but when you peel the top layer of sticker paper away you're left with a pretty nice sticker sheet.

For this DIY I used Office Max full sheet shipping layers and the custom setting of Washi Tape from the custom menu.  The Cricut Sticker paper is super thick so using that setting will cut straight through your sticker paper.  I find this setting works great for all sorts of shipping label adhesive paper and the Avery Sticker sheets.
In this image you can see how fuzzy the outline is from the bleed.  I think, personally, the bleed works the best when you design inside Cricut Design Space.  It is probably because the images used within Design Space have been created with the bleed in mind.  If you print without the bleed though, you risk having some white show on your final sticker.
I just pull the top layer of sticker paper away to get a nicer looking sticker sheet.

I think any app that has hand drawn elements to it like the Paint Paper Studio app or the A Beautiful Mess app are perfect for this DIY.

How do you utilize your phone for creative design?  Any apps I should check out?

xoxo, Moe

7.07.2015

Beauty Review // My Essential Travel Brushes

When I pack my make up bag for travel it is often hard to choose which brushes to bring.  If I'm going on a long trip - like maybe a week home in Virginia where I might be doing some different stuff - I tend to bring an assortment of my favorite brushes.  I'll even pack up my whole brush roll.  But if I'm only going out for a weekend I tend to be more picky.  Often I'll consider what I'll be doing - if I'm camping, nah, I'm probably bringing zero make up, if I'm going to a family function I might bring some more full coverage stuff, if it is a casual trip weekend maybe I'll bring some BB Cream and a few little things but nothing crazy.  But when it comes to brushes for smaller trips, I've paired it down to just the essentials.
this post contains affiliate links, please see my full disclosure here
I like to only bring brushes that will fit in my make up case.  Like I mentioned before, if I'm staying longer I'll bring more which means more room.  If it's a weekend trip I'll use a little bag like the picture above.  (Just FYI I took these pictures while I was traveling, and yes my brushes are dirty.  So sue me.) Here are the brushes I can't live with out:
from right to left: Real Techniques Blush Brush, Contour/Bronzer Brush/Real Techniques Powder Brush.
Real Techniques Blush Brush - This is my favorite brush for blush and I us it everytime I use blush.  Every.  Single.  Time.

Contour/Bronzer Brush - This brush is from a set on Amazon that I highly recommend.  I love this brush for bronzing and contouring because it is fluffy enough to blend but small enough to be precise.  I don't lay down a heavy contour so I like to have a brush that can blend out in the hollows of my cheek bones.


Real Techniques Powder Brush - If I've got a liquid foundation in my make up bag I need a powder brush to set my foundation.  I never go with out setting my foundation because I have oily skin and I need it to last as long as possible.
from top to bottom: Real Techniques Setting Brush, Eyes Lips Face Blush Brush
Real Techniques Setting Brush - If I plan on doing some under eye concealing and maybe a bit of highlighting with concealer, this brush is a must.  It is small enough to fit under my eye and the bristles are really soft so my endereye doesn't feel tortured!

Elf Blush Brush - If I don't pack this one I pack the Elf Tapered brush because both of these are great for highlight!  They place the highlight in the precise place and blend it out nicely.  (side note: did you know you can get cash back when you shop the ELF website through Ebates?  Ebates is my favorite way to save money on beauty products.  You can check it out and sign up here.  If you want to know my favorite ways to save money on make up, please read this post)
from top to bottom: Flat Shader Brush, Blending Brush
Flat Shader Brush - This brush is good for packing on the color to your lid and being precise in the inner corner or outer corner.  Because it is so dense, I find it to be a really functional brush.

Blending Brush - Because when I travel I am usually not going to do an intense eye look, I make sure to bring just one little blending brush.  This one happens to be from Mirabella and is just a simple fluffy brush.  I use this in the crease and to blend everything together.  Nothing fancy, just simple.

These also happen to be the brushes I grab for in a hurry.  If I'm just doing a simple look or just an everyday look I know these can be my go to brushes.  I also have a video on my channel about my favorite ELF brushes but I am thinking about doing an update video because there are so many more brushes added to the collection now!

What are your travel make up essentials?  

xoxo, Moe

7.06.2015

Make it Monday // Thin Crust Tortilla Pizza

So the title of this post is a little bit deceiving....you may think 'hey, this girl's got her shit together and it making some delish recipes.'  I'm gonna say you're wrong.  Pretty much this recipe came from me standing in front of the fridge thinking 'you know what?  I think I have enough crap in here to sorta make a pizza.'  
And that's how this yummy thin crust pizza came about .  This is perfect for a quick lunch for you or for some kiddos.  It is also pretty easy to just keep all these things on hand for when you think 'I have nothing to eat.'
Ingredients: pizza sauce or tomato sauce, mozzarella cheese (or any cheese really), pepperoni, parmesan cheese, tortilla, optional - various other toppings.  Not pictured - Pam or non stick spray, Aluminum foil or cookie sheet.
(I've found that since this is a super thin crust pizza it doesn't hold up well to too many toppings.  I just keep it simple with pepperoni.)

Preheat oven to 400 degrees.
I always make a little 'pan' with aluminum foil because I'm all for a no clean up meal.  You can set the aluminum pan right onto your oven rack or on a cookie sheet to bake.  Easy + no clean up.  Add your sauce, cheese, pep, etc to your tortilla.

Bake for about 10 minutes.  I find this makes the tortilla edges super crunchy but doesn't burn.  There has been a lot of pizza trial and error for this recipe....let me tell you!
Now slice it up with your pizza cutter. I usually cut into 8 slices.  And remember, every pizza is a personal pizza if you try hard enough.  

This is great weekend food or quick to whip up if you have a few unexpected friends over.  Pop open a beer and eat some pizza.  Don't forget to invite me.

What is the weirdest thing you've put together from the stuff in your fridge?  Do share!

xoxo, Moe