2.28.2014

February 2014 Ipsy Bag Review

Yay, it's Ipsy review time!  In December I did a get ready with me video & then in Januray I totally skipped it.  But this month I thought I'd bring it back!  Ipsy is my favorite of the two subscription services I'm subscribed to - redundant much?  I love that you only get beauty related products and I'm a sucker for little bags.  This months was sort of an ok month, I wasn't too blown away but I got to try something I hadn't before:
First, this bag is too cute.  It's pretty sturdy & I think it would make a great bag for your purse for make up or little things.  It seems like it's pretty water tight so should any thing spill from or onto the bag you won't have a mess in your purse!  Like I said, I'm a sucker for little bags. 
I've never tried anything from the brand Jesse's Girl or from JCat Beauty.  This month I was excited to get an eyeshadow palette that was neutral.  In December I got a smokey eye sort of trio & I'm more of a natural girl, really.  I love that center peachy shade in the photo above but a lot of the shades in the palette seem to be very similar.  Eyelashes are something I've failed at wearing only once so to get to try out a different brand is pretty great.   These seem to be really dramatic & flirty.  Now I can say I have my lash drawer stocked because I have some ones I purchased, these, & ones from Influenster.  I love that Ipsy sends you coordinating things - like eyeshadow & lashes - so you can try out not just new products but new looks as well.
This Zoya polish in the color Odette is pretty too.  I like Zoya because they hold up will & are just all around nice quality polishes.  This is actually a lighter, lilac color than what this camera is picking up.  I seriously haven't bought nail polish in ages because I get so many fun colors between Ipsy & BirchBox I don't need to pick new ones up any more!
Also thank you, thank you, thank you to all who signed up with my link because I got to 1000 points to earn one of three perks - I chose a Beauty Blender!  Now let me say this - This. Sponge. Is. Amazing.  All the hype is definitely true but I don't think you need to spend $26 on a sponge.  It was wonderful to try & I might blow the money on one in the future.  If you get the chance to try one for cheap I encourage it but I don't think it's really something to blow $$$ on.

I've gotten a few things from POP beauty before & they always seem to be in colors I don't care for.  I want to retake my quiz on Ipsy but I'm scared because I usually love everything I get except for the bright pink POP beauty lip colors I get.  But this lipgloss is nice - it's in a nice package, it's a decent size, and the gloss itself is nice.  It actually feels really expensive and I might get more use out of it when the weather gets warmer.  I do like this color of pink - it's not too bright & not too baby pink.  This Dr. Lin Acne Spot Corrector is spot on for my type of skin.  I like trying different spot treatments when I haven something that my even my tea tree oil won't calm down.  

So, was this bag worth it?
Yep! Totally.  Ipsy is always a hit for me even when one product stinks I still love Ipsy.  Ipsy is all beauty products and that's why I love it so much.  No other filler crap just fun beauty items.  I also love Ipsy because the bag is like a challenge.  Often times you get products that can work together to create a look.  I think the bags are really well thought out - more so to me than BirchBox.  Also, sometimes you get full sized products.  Hooray for that!

If that all seemed amazing to you - 5 beauty product for $10 a month + free shipping - then go ahead & sign up.  You can do so here.

Do you subscribe to Ipsy?  If so, what do you love about the bag?

xoxo, Moe

Connect on Twitter // Follow on Pinterest

2.27.2014

Elf Acne Fighting Foundation Review

Today I want to review for you the Acne Fighting Foundation from the brand Eyes Lips Face.  If you didn't see the elf haul I posted, check out that video here.  But as soon as I got this foundation I swatched it on the back of my hand.  I was pretty impressed at the coverage it looked like it had on my hand & even more impressed by the coverage on my face!  A while ago I got the Maximum Coverage Concealer from Meijer to see how that would play out as a foundation.  I was less than pleased - so that experience really pushed me away from trying elf face products other than blushes.  But I have to say I'm glad I picked this product up!  This review is going to focus on the foundation but I did set the foundation with the Studio pressed powder by Elf, I may review that later.
From the Elf Website:
This lightweight acne fighting foundation works to disguise redness, blemishes, & uneven skin tone.  The flawless coverage foundation formula is infused with acne fighting key ingredients Salicylic Acid, Witch Hazel, Camphor, Tea Tree & soothing Aloe to help prevent and treat acne blemishes.

Apply to clean & moisturized skin.  Squeeze a small amount on to a sponge, fingertips, or a foundation brush & starting at the center of the face blend outward.  One layer gives a natural finish or apply in buildable layers for fuller coverage.

Price is $6 for 1 fl oz, but I bought mine for half off (they always have half off studio sales!).  I'm in the color Porcelain which is the second to lightest shade & has more yellow tones to it.
First Impression:
The first time I used this foundation I applied this over the L'Oreal Youth Code primer.  I dotted the foundation on my skin then blened it out with the Real Techniques Buffing Brush.  This is the first foundation that I've loved applying with this brush.  Sponges work so much better for me & usually I use the brush to buff the foundation into my skin if I've applied maybe too much or really want to give a brushed look to my skin.  This foundation worked amazing with this brush!  With my new favorite contraption - the Beauty Blender - this foundation blended wonderful as well.  I think the Beauty Blender is my favorite new tool.  The coverage of this foundation is definitely buildable.  A thin layer did even my skin tone & hid the redness on my skin.  I was so impressed with the coverage on this!  I was also able to build it up a little in the areas I needed more coverage.  This foundation doesn't have too much of a dewey look - more of a satin matte finish, I'd say.  I set my foundation with the Real Techniques Powder Brush using the Elf Pressed Powder in Porcelain - I have two shades, Sand which has more pink tones & Porcelain which is definitely more yellow toned.  I liked this pressed powder too, but that might be in a separate review.

I would recommend only up to 2 layers of this if you're using a brush because it can start to look a bit like you're in fact wearing too much make up.  But the Beauty Blender really gives the best look for me with this foundation.  The finish of the foundation is more satin matte & really does even your skin tone.  I found it was a bit flat looking so I warmed up my face with the Maybelline Fit Me powder in a darker shade.  
Wear Time:
The thing that impressed me the most was the staying power of a $6 foundation.  When first applied this foundation looks flawless - the coverage is great, it blends well into your skin, and it is very impressive.  This foundation dissolved mostly in my t zone, where I get most oily, over the course of the day.  I noticed it first on my nose then I saw that it sort of gathered around the edges of my nostrils.  I was also able to pick the foundation up if I pressed my fingers along the edges of my nose. Because the foundation did not wear away or break down on the sides of my face my blush was on all day long - I was wearing an elf blush too. I think that if I'd brought the pressed powder a long during the day or had blotting sheets I could have touched up & looked good all day.  Even though I could see it breaking down I feel the it maintained the coverage all day, if that makes sense.  I would say you can get a good, solid 4-5 hours of awesomeness out of this foundation.  But longer than that and you're gonna need to touch up - though I just roll with it at work. I was also surprised that the foundation didn't oxidize on me for being at such a low price point.  It was rather impressive.

Overall Impressions & Recommendations:
I like this foundation & was very impressed with it even though it was only $6.  I wore it everyday for a week & loved it over the L'Oreal primer.  I tried it once with a thicker primer like the new Rimmel Stay Matte Primer and it didn't not work at all.  So thinner primers work best with this foundation.  The wear time is alright, not as great as some of my other foundations but I'd wear this on the weekends or for a jot out.  I have a feeling this would look amazing in photographs just because of the matte look & the coverage.  So for shorter periods of time this foundation is a great option.  Additionally, if you're on a super duper tight budget stock up on this when studio items are half off.  I'd probably only buy this again when it's half off.

As for the claims from the website, I agree with everything they mention though I'm not sure I saw any benefits from the acne fighting ingredients.  I don't think it clogged my pores or broke me out so that's a plus!  I would suggest this for normal to combo skin because I believe it would last longer.  I don't know much about dry skin, but would not really recommend this for super oily skin.

So there you have it, a full review of this affordable foundation.  I'm hoping to do more reviews in this format in the future.  I think the format of this is pretty comprehensive covering from when I open the product to wearing it for a bit & including swatches.  Hope you enjoy!

Any foundations you've been loving lately?  What is your experience with elf foundations?

xoxo, Moe

Connect on Twitter // Follow on Pinterest

2.25.2014

3 of the Scariest things I've Ever Done

I've been a bit preoccupied with memories lately.  I've just been having a lot flashback memories lately stimulated by everyday things.  Sometimes these memories are pretty everyday things - I remember sandals my grandparents bought me one time after our shoes shrunk in the dryer for example.  Just random things - the sand at the lake where we would vacation, the way the moon shone through the window in my childhood bedroom.  I could go on, but I'm not going to.  This post is about the scariest things I've ever done in my life.  Not really the most terrifying things that have happened to me but more like the scariest choices I've ever made.  I'm sort of doing them in order of events because, of course, that's how I remember them when I think back on the scariest things I've ever done.

The first time I repelled down the side of anything
When I was thinking about this blog post I wanted to do something a long the lines of 3 of the Scariest things I've done because the two I could think of really didn't make for a good read.  Two is a weird number to do a list post with - so I thought of this.  And the fact that it was the scariest thing I'd ever done prior to the last two really says something about my decision making skills.  Anyway, when I was in high school I had a friend who was in a coed division of the boy scouts.  I joined the group & it happened that one of the common things we did was go rock climbing & repelling.  I learned to belay before learning to climb or repel but I didn't really think about the interaction between everyone in this chain of people here.  So the scariest thing my high school self ever did was look into someones eyes & hang over a rock face.  It was pretty scary - but nothing compared to growing up & making these other decisions.  But if I'd never hung over the side of that rock I would never have reached the bottom.  When I did I promptly ran back up & did it again.  Success feels great.

Changing my Major 2 years into College,  Changing it to Art
This was terrifying not only because I knew there wasn't really a job waiting for me at graduation but also because I was so intimidated.  I did not want to show up to my first art class with the wrong sketchbook.  I had this idea that I was joining a group of people who already knew what they were doing - this feeling has actually held me back from a lot of things in my life, honestly.  Well, come to find out it's not the sketchbook that matters it's what you do with it.  I realized that the greatest artists were at once amateurs (someone said this once, I don't remember who!).  I also realized that I could spread my talent while also being at the top of my game. The hardest & some of the best 3 years of my life we're the last 3 years of my college experience.  If it weren't for my determination I don't think I would ever be where I am today.  I changed my major because I wanted to do something that I was good at, that I would succeed at.  I dedicated other parts of my life to gaining job experience like, well, getting jobs & gaining experience.  I realized that all a college degree shows is that you took the time to dedicate 4 years (or 5 in my case) to something.

Moving 800 Miles Away from Everything I Ever Knew
At the time my move up to Michigan, ending here in Indiana wasn't that scary.  I knew I was going to do it and I knew it was going to happen.  It was the looking back on it & realizing that Zach & I had only known each other about 8 or 9 months (period) before I decided to move from Virginia.  Even more surprising (read terrifying) is that we essentially bought a house together & closed on in 3 days before we'd been together for a year.  (I say essentially because I was mainly consulted on the deal, agreed, and made sure no papers got lost in the process.  Oh & I had a big hand in painting the down stairs..anyway.....)  Seriously, can you believe that?  I was so confident before, during, and after the move it was only about the Summer of 2013 that I was talking to my Dad & I realized 'what the actual hell did I do?!?!' Of course not in a bad way, but in a self reflective way.  In way where I'd realized how much I'd grown & finally realized how young I was a year ago.  I guess in this instance the memory was the scariest thing I'd ever remembered because when it was happening it was the best thing ever.  Confidence is the key.

These are the three scariest things I've ever done in my life.  I wanted to share these thing with you not only so you get to know me a little better but so I can document my journey which is what Five Sixteenths is about - living a creative (& sometimes self reflective) life.

What are they scariest things you've done in your life?  Have you ever made a decision & then looked back on it realizing how crazy you were?

xoxo, Moe

Connect on Twitter // Follow on Pinterest

2.21.2014

February 2014 BirchBox Review

I haven't talked about BirchBox here on the blog for a while!  I'm still subscribed to BirchBox (as well as Ipsy, that review for the month is coming soon!) but I was too happy with last month's but December's was nice!  BirchBox is a subscription service for only $10 a month & if you're looking for solely beauty items, you're out of luck here.  
To me BirchBox is more of a lifestyle box.  You get different things in there each month that don't necessarily relate to beauty.  I think that a lot of the bad reviews that BirchBox gets are because people forget that BirchBox is more about lifestyle - it even says it on their about page!  So sometimes I just don't quite care for the lifestyle things.  Sometimes they aren't as unique as they could be, but this month was pretty good:
The outside packaging was rather fun this month too.  It was red with different like tools on it: hairdryers, mascara, scissors, tubes of product, etc  Really different from their usual outer wrapper.  Inside were 5 products that made the cut for me this month!
Dr. Brandt Pore No More Pore Refiner - I'm not sure if this is intended as a primer or just as a pore minimizer, but I use it as a primer just to test out what it does.  I love trying new primers & have a whole section in my everyday make up drawer dedicated to primers/pore fillers/pore refiners/etc.  This seems to work ok as a primer & reminds me of Benefit's Porefessional.  It has a beige/skin tone tint to it & smooths over the skin like the Porefessional.  I think it makes my skin smoother, but it's nothing to really wright home about for me.

Juicy Couture Couture La La Malibu Sample - I think I get a nice amount of perfume samples sprinkled in my subscription with BirchBox - not too many, not too few, just the right amount.  I throw these in my vanity & pull them out when I need a change from my current perfume.  I'm not one to have a lot of perfumes so having a variety of small sizes means I can shake it up when I want.  From all these samples though I haven't found my all time favorite perfume yet!  I don't own any thing Juicy Couture so that was also a fun little surprise.

32 Oral Care Effervescent Breath Crystals - This is a lifestyle thing that is super unique.  I actually haven't tried them yet because I don't want to waist them!  Are you like that? I'll hoard one of something until the very exact time it should be used - spoilers: there is no exact time!  They come in interesting flavors like Peppermint, Honey Mint, Spearmint, and Lemon Mint.  Apparently these kill bacteria & freshen your breath instead of masking it.  Maybe there is an emergency time to use these!  Can't wait to try them.

Ruby Wing Color Changing Nail Polish - This is actually a brand I already own & love!  I found this brand at Meijer this past summer but I think they stopped carrying it there recently.  I have about four spring colors but this bright pink is to die for.  The color I got in this box is called Kitten Heels & is a bright pink indoors and a deeper orange-red outside.  These are really fun in the summer & I'm so glad to own another polish from this brand.  This size is just right too because I hardly ever go through an entire nail polish!

Beauty Protector Protect & Oil - This is another brand I've previously tried out from BirchBox & really love it so getting another product from the brand to try was fun.  This is a hair oil & it smells divine.  I keep this little bottle by my bed so I can run it through my hair before falling asleep.  It's designed to protect hair from heat styling & UV rays.  I rarely heat style my hair but I've found oils like these keep my hair from getting tangled during the day & I'm always up for trying different types.

So, was this box worth it?
I think so!  I love trying new things so primers, nail polishes, & hair oils are all welcomed.  To me BirchBox always hits it right with at least one thing in the box!  These boxes are good to try new things and also to get things to travel with & that offer connivence.  That small bottle of hair oil is perfect for beside my bed & takes up much less space than my Suave Moroccan Infusion Styling Oil.  Travel sizes of things are always great for travel or your purse.  I totally think that BirchBox is worth the $10 a month!  Plus you earn points when you review that you can redeem in their online market place.

So if all that sounded pretty nice to you ($10 + free shipping for 5 lifestyle samples a month!) then I encourage you to sign up!  You can do so by clicking here.

Are you subscribed to any services?  Which are your faves?

xoxo, Moe

Connect on Twitter // Follow on Pinterest

2.20.2014

Boost Your Blog // How to Make (a little) Money Blogging

In an effort to tell you some awesome info & an effort to be more transparent I want to share with you how I've monetized my blog and how you can too.  This is a great thing to do whether you're a small blog or a big blog or a medium blog.  If you think you're in this blogging thing for the long haul, starting now means you'll have more links through your blog that will yield you more over time - at least that's what I think.  So here's what I've done on the blog to try to earn a little bit of cash:
Affiliate Programs
I am a part of quite a few of these (most of them I forget about, honestly) but they are always linked in my side bar.  Craftsy, Modcloth, Blurb, Lulu's to name a few.  I joined these programs through ShareASale.com.  This little site has everything you need to manage your programs - links, images, offers, etc.  You also get an email every now & then with offers to write a blog post for $5 or so bucks regarding a sale or new promotion.  I usually do these because I'm only a part of programs I love.  I've written posts for money - mostly on Modcloth & Blurb offers.  ShareASale tracks your sales/earnings & issues you payment when you've reached a certain amount.  I'm also an Amazon affiliate & you can shop my aStore here.  That means I've created a little store of some of my favorite things - I have that linked in my sidebar too.  I also link to a lot of products on Amazon in blog posts (this Kitchen Essentials post is all Amazon links!).  The Amazon affiliate program is one of the first ones I joined and I really like it.  I joined because I like Amazon - you get amazing stuff for way cheap.  You sign up, make your affiliate ID, and then any time you want to link to a product on your blog there is a widget bar at the top of your Amazon screen where you can get your links.  Making an aStore is pretty fun but requires upkeep & hasn't been that successful for me....but it's something.  Another program I just joined is Shopstyle by PopSugar - I don't have much experience with this.  But so far it gives me more options to link to products.  Many sites participate with ShopStyle so you can install a widget to your bookmark bar & click it when you want to link to something.  Some sites don't participate but you'll get a notice in the pop up window.  You can also add looks & products, have followers, and other things I haven't explored yet!  And finally the last one I just signed up for is Lovocracy.  This is a site much like the ShopStyle site but more closely related to Pinterest in it's layout.  You can shop right from the site, add products, & earn.  It's kind of like if your Pinterest boards could earn you money - as of right now I'm not sure if you can link things in a blog like you can with ShopStyle, Amazon, or ShareASale but you can link to your list.  All of these are great options if you want to have your hand in a few things.

Subscription Boxes
I'm subscribed to two boxes currently: Ipsy & BirchBox.  While you don't earn money in the bank with these services, you do earn points.  You can refer friends & when they sign up with your link you get rewarded.  My favorite service is Ipsy but I like BirchBox's reward system better.  With Ipsy you get points per review & per person who's signed up with your link to go towards 1 of 4 or so prizes once you meet the 1000 point mark.  With BirchBox you get points per review & per person who signs up with your link that translate in to credit to shop the site.  You also get points per order you place with BirchBox.  So BirchBox points, to me, translate into something more tangible than Ipsy points.  You can choose from more things.  But with that being said I'm always talking on here about Ipsy & rarely BirchBox because I love Ipsy.  I'm not going to say I love something to death when I don't really just to reap the benefits of you believing me.

Blogger Programs & Networks
Currently I'm apart of the Blue Print Social network & the Clever Girls Collective.  While I haven't done a campaign in a while these are the easiest to complete & the easiest to get paid for.  I like to apply for crafty campaigns with companies like Martha Stewart & Plaid.  Last year I did quite a few campaigns but I haven't gotten chosen lately.  I like Blue Print Social the best as I've gotten to work with them the most.  They chose blogs of all levels - not just super huge ones - so you'll get a chance to shine.  Since I sign up for the craft related projects usually I get a box of free craft supplies to make the project & just have to provide the base for the project.  There are requirements you must follow, disclosures you must make, etc but after it's all done you get money in your PayPal for the post.  Sometimes there's no compensation but the products you get to use.  I still think it's pretty neat to be a part of.

Monetize Your YouTube Videos & Add AdSense to your Blog
If you have added any YouTube presence to your blog you can monetize them through Google.  Again, I've done it but haven't had too much experience so I don't know everything about that yet.  I've also looking into joining networks - like StyelHaul & FullScreen - but haven't done much with it.  If you haven't noticed I'm a don't put your eggs in the same basket kind of person.  You can also add ads through the Blogger interface & Google.  This can be done in your settings tab on Blogger & in your layout tab.

Sponsors of your Blog/Selling Ad Space
For me this is soooooo hard to keep up with.  In fact I'm nearly close to taking the option down permanently.  I just don't do enough to make it worth while nor do I have the page views to make an ad alone worth it.  But ads/sponsors are something to consider to monetize your blog if you can dedicate time to promoting others.

Monetizing your blog can be a great way to add a few bucks to your pocket but unless your diligent with it & have a great reader base it's not an instant success.  Just like any other way you make money it takes time & work!  But I thought I'd share with you a little secret that I feel like no one really talks about - I discovered these through personal emails & through clicking links with weird URLs that I later learned were things like ShopStyle or ShareASale.

Side note: I've not earned too much, really nothing at all, from these little things.  I have a few dollars here & there in various accounts I've signed up for.  So these are just options & I'm not a success story if you want to call it that but I have had some success with this sort of thing.  It takes a bit of work & you should work in links that are relevant to your posts.  Posting on things you love & linking them comes off more genuine than a post full of random links.  Also, make sure you have a disclaimer telling your readers that they may interact with affiliate links on your blog - I believe this is a legal thing & I believe in transparency (I'm not here to trick you, you know) - so make sure you tell readers so they can choose not to interact with those links.  Also, there's some tax related stuff if you decide to monetize your blog like reporting earnings - I'm not going to go into this here because I'm no tax expert!  But do your research before you decide to take the plunge.

What are your money making tips?  Have you learned anything from blogging you'd like to share?

xoxo, Moe

Connect on Twitter // Follow on Pinterest

2.19.2014

Wednesday Decor // Home Organization Plan for 2014

What is up 2014?  I'm taking total control of you lately!  I know it's only the 2nd month of the year - which means I'm sure to burn out on my new year momentum soon.  So far I think I've been owning 2014 with my Three Great Things project as well as setting my Four Simple Goals each month (and sort of sticking to them!).  But I want to focus on a greater theme this year which is Organization.  Since focus is my word for this year I want to take time to actually make a plan of attack instead of just say 'I want to do this _________'.  Planning will help me focus on what needs to be done in order to complete the task!  There are several home related organization things I want to tackle this year & here they are:
Clean out the closets
This goes for the bedroom & the guest closets.  They have both become catch alls for everything under the sun.  Clothes need to get donated & things just need to get moved around.  I need something to organize my shoes (oh god, my shoes!) & just plain need to get rid of clothes.  This was part of the February goals - but I think it's getting pushed back unless it stops snowing.  I also want to add mirrored doors to the bedroom closet to make it look bigger!

Kitchen Organization - Under the Sink
Um, under the sink is a plastic bag graveyard & also some dish soap, etc.  Pretty much it's not a fun place to look & I know I'm not using it very well.  I am pretty sure I don't know half of whats under there.  Yikes!  What needs to live under there are sponges & cleaning supplies, and maybe some plastic bags.  We have a lot of shelves under there but nothing is being utilized properly.

Kitchen Organization - Cabinets
One thing I looooove about this house is the amount of cabinet space we have.  It's unreal.  I also love that because of all these cabinets we have so much counter space!  There are quite a few cabinets that just have random junk in them.  I need to make better use of the space we have.  We also have a little cart that is becoming a catch all - I don't know how many times a week I clean junk off of the top of it!  I also want to designate some of this cabinet space for Zach to organize some of his paperwork & our paperwork for the house.  

The Garage
Oh, god the garage.  So this was supposed to be a January goal but it was way too cold to pull out all the junk & organize it.  This is going to be something for the spring.  Oh god, we need to get the garage under control.  Seriously, I don't even like to look in there!  We need to create space for both of us to work - it's already designated, just covered in random things.

Under the Bathroom Sink
Both the upstairs bathroom & the guest bathroom sink storage need to be organized like woah.  Again, I just shove any bathroom related items in the cabinets & shut the door.  Out of sight out of mind - until I need more shampoo.  I've seen at Dollar Store & Big Lots little stackable bins - the remind me of kindergarten classrooms but they look so helpful!

I've gotten a lot organized so far though.  The living room has a pretty good organization thing going on:  baskets under the shelves for board games, candles, game systems, and wires, the coffee table drawers just got organized, there's a basket under the coffee table for a blanket, heating pad, & laptop storage, and a coat rack & storage box by the side door.  Our bedroom is also pretty much organized, though there's always room for improvement in there & I always organize my make up at the end of the week.  The office area is pretty organized, too.

My plan is to incorporate these into my Four Simple Goals for each month & tackle one a weekend since a lot of it is going to be purchasing organization stuff for our house.  I'm also keeping this list pretty low (& full of the big things that need to get done) because completing a lot of things is not something I'm great at.  So with a smaller list I'm pretty sure I'll get through all of it!

What is one of your greater goals this year?  Have you been tackling it like you own 2014?

xoxo, Moe

Connect on Twitter // Follow on Pinterest

2.17.2014

Make it Monday // Easy Purse Organizer DIY from Placemats

I think when the beginning of the year hits something in our DNA screams 'it's time to get organized!' and I've been listening.  A few weeks ago I shared with you what I keep in my purse and I'd love to say that it's stayed that way - simple & organized - but the truth is it didn't.  Right now my purse is a receipt burial ground full of lost lip balm & pens.  My phone gets lost in there every two minutes and who knows what lurks at the bottom.  I love my purse from Target - it's big enough for everything, has two side handles, & another handle for a cross body if you want it.  The other day I was watching organizing videos on YouTube and I found something amazing: a little contraption to keep your purse organized called a purse organizer.  The person doing the video purchased hers on etsy (which is a great option!) but I decided that I could make something similar.  I knew that mine didn't have to be super duper fancy - just something to organize my crap.  So I picked up two cheap placemats & got to sewing.
this post contains affiliate links, please read my full disclosure here.

Supplies:  Sewing machine (or needle & thread, or fabric adhesive for a new sew option), two cheap placemats (or one, depending on the size of your purse), straight pens, ruler/tape measure
The best type of placemat to work with are the Mainstays brand from Wal-Mart.  They are $1.97 (so cheap!) and have little ridges that make it easier to sew in straight lines.  They are also pretty sturdy with out being too thick so your sewing machine needle will be able to pierce the fabric.
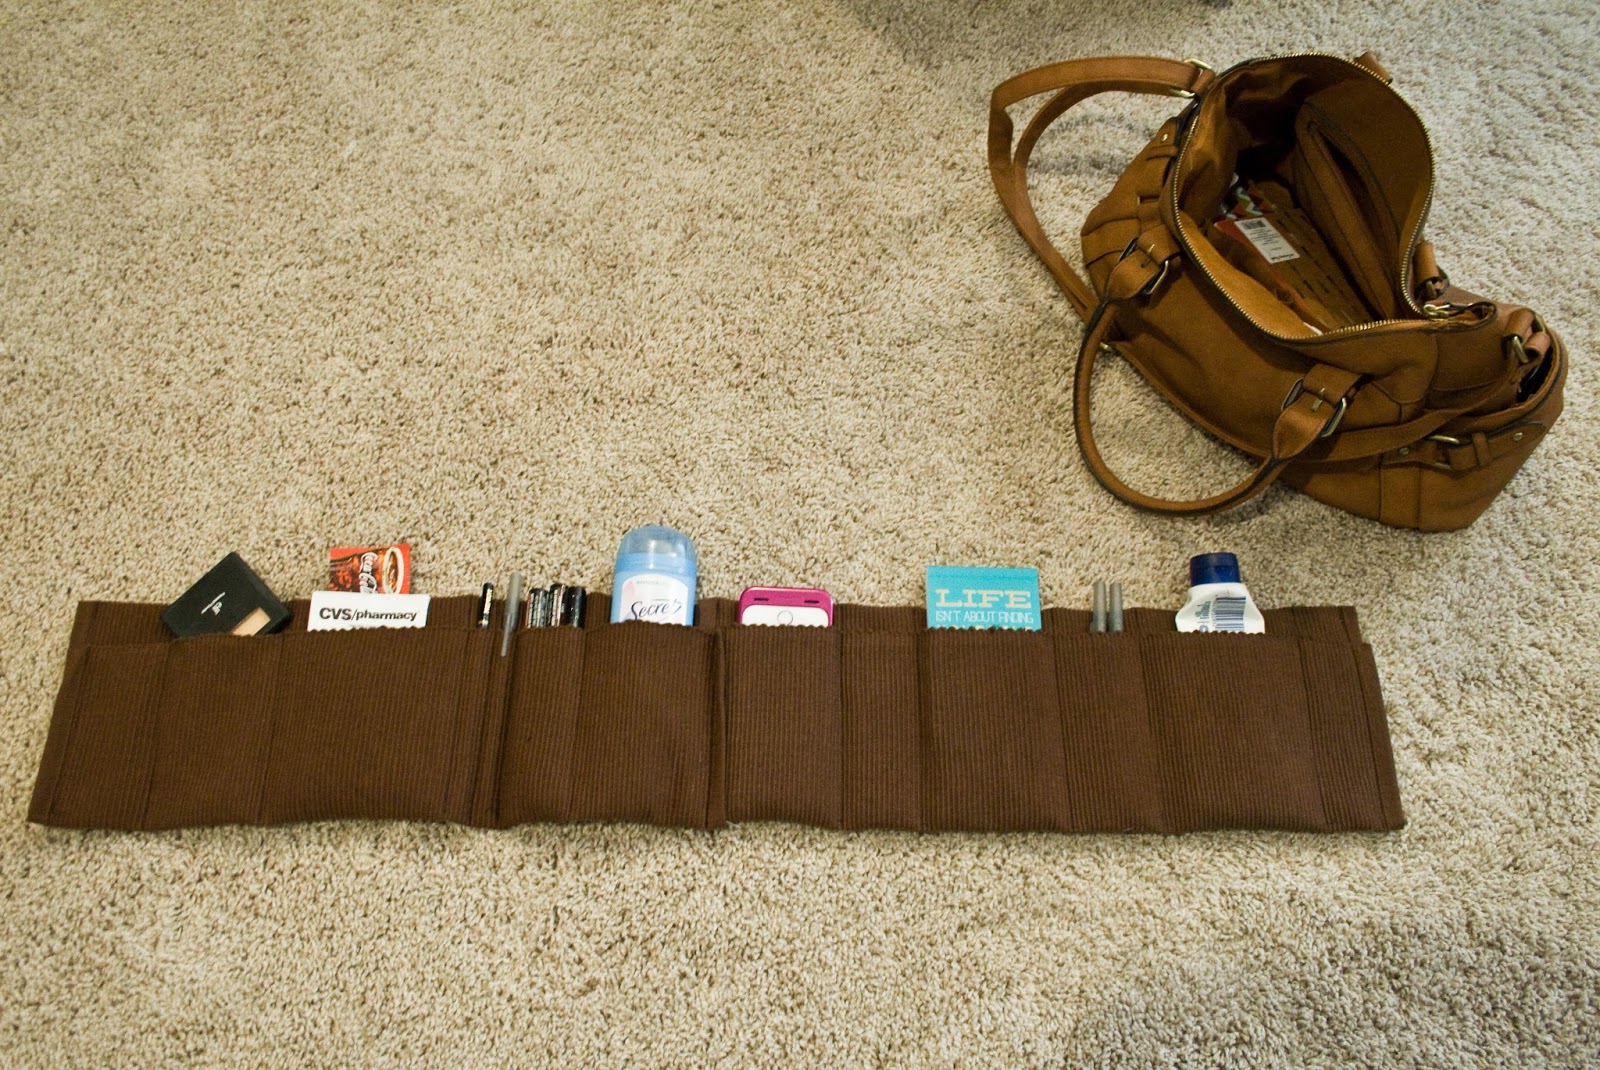
 First, lay the placemat flat horizontally & decide where to fold your placemat to make the pockets.  I decided to fold up the bottom of the placemat 3/4 of the way to the top.  The placemats ended up being a bit too tall for my bag so I flipped the placemat over & pinned the top flap down a little as well.
If you have an idea of things you want to store in the pockets, use the tape measure to measure out & pin the individual pockets.   Repeat the pining & measuring if you need to on the second placemat.  Leave each side of each placemat unpinned, we are going to join the placemats together at one end to create a longer organizer.
Now sew, sew, sew.  I used the thread I had on hand (but I'd suggest matching thread since you do see a bit of the thread in your bag once you're done.  Unless you don't care about that, which is fine).  You can see in the pictures above that following the ridges on these placemats is really easy.  Make thick & thin pockets as well.  Randomizing as you go is best especially if you didn't map out your pockets in advance.
Once you've sewn up all your pockets join the two placemats by sliding the hem of one placemat over the hem of the other placemat.  Pin & sew the placemats together in between each hem.  This is the easiest because you're not pushing your needed thorough 4 thick hems.  Hopefully the picture will help you see the placement.  Trim your ends & you're done!
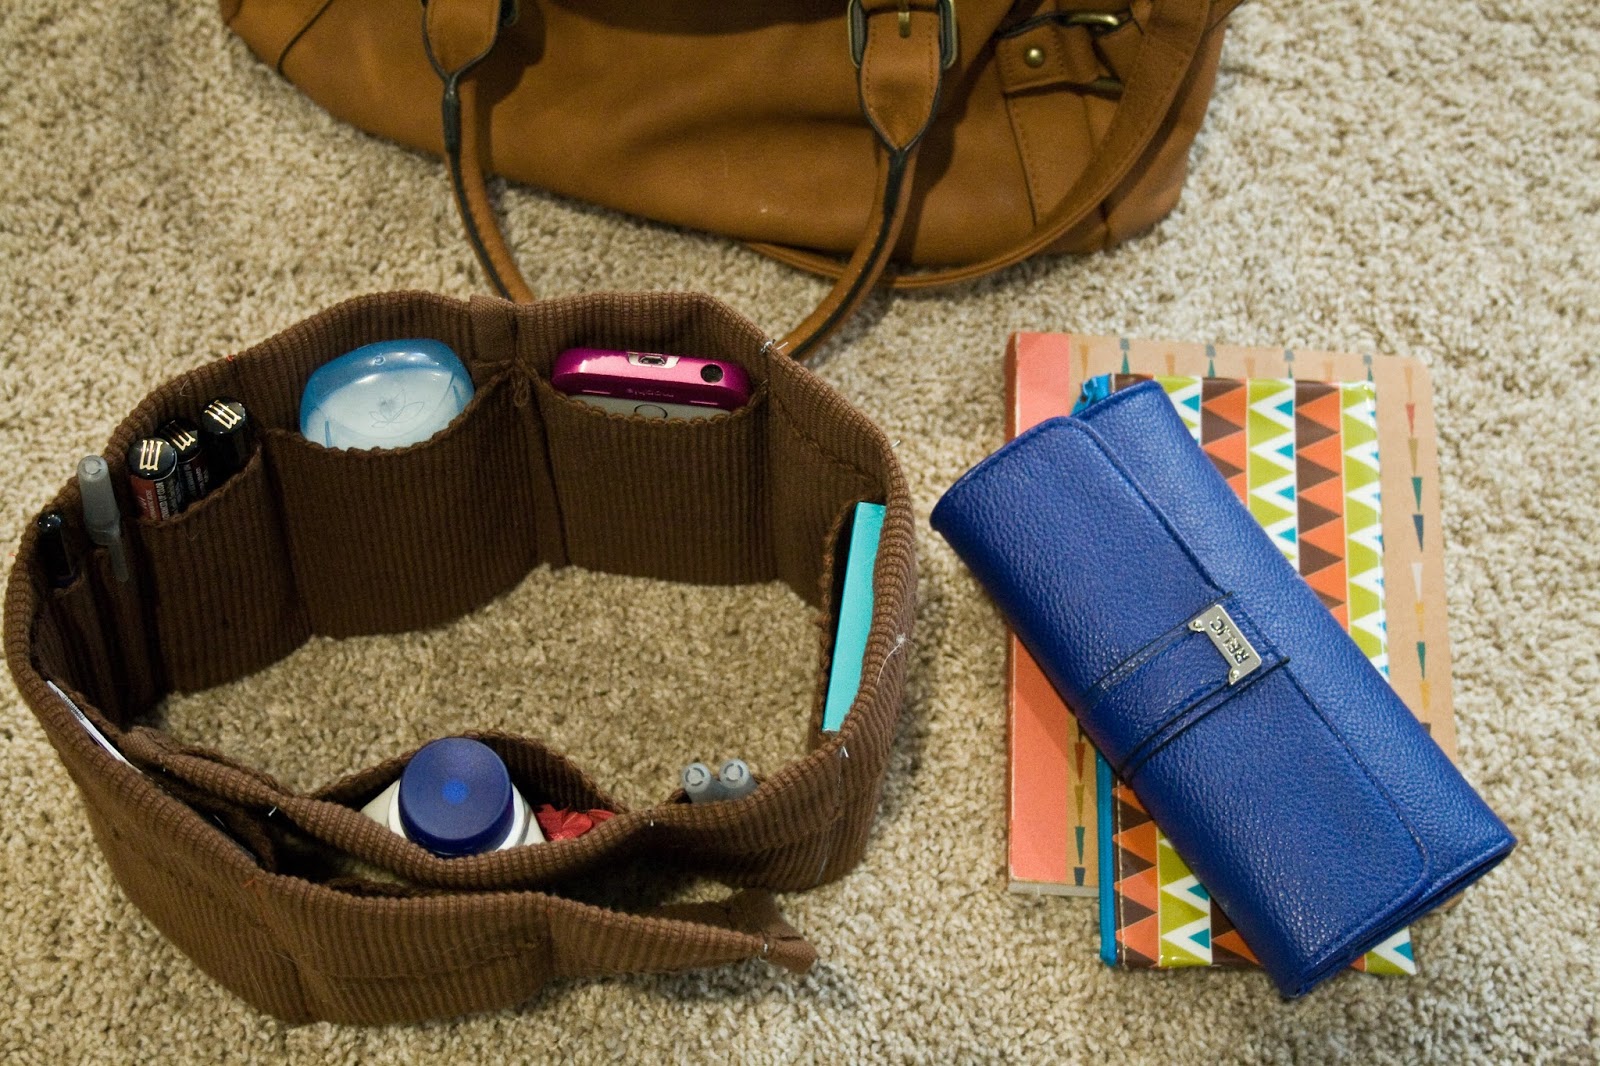
Your organizer might be a bit too long - mine was even though my purse is huge.  So you can double over the sides like the picture below.  Also don't be discouraged if your organizer is like a lump of weird fabric in your bag.  It doesn't quite look right until you get all your stuff in there.  I slipped the organizer in my bag then filled it up with my things.  I actually had a bunch of pockets left over after I put all my things in there!  I was totally not optimizing the amount my purse can hold!  I got rid of some of the little baggies that were in my previous what's in my purse post because I now have other pockets to hold the stuff - but I may add them back depending on the things I'll add to my purse now that everything has a spot.
You can either place your purse organizer with the pockets facing in or facing out.  I prefer the pockets facing in towards each other - I can get to things better.  Now your purse has like 4x the pockets it had before & you can easily move between purses and find everything you need! (In the photo above you can see that I used blue bobbin thread since I just had it on hand.  It doesn't bother me too much but if you don't like those kind of things use matching thread!)
I also made one from a single placemat for a clutch style organizer.  This one was supposed to be fancier, just in case you were going to a nice place or out for the evening, etc but then I realized I have no nice clutches!  So you can see that you can make one of these organizers from however many placemats you need.  I think this might even be great for a travel make up bag as well!

Want more easy sewing projects?  Click here!


Are you getting organized this year?  Are you including your purse in your organization plans?

xoxo, Moe

Connect on Twitter // Follow on Pinterest

2.13.2014

3 Ways To Stay Super Productive at Work

So I've held this full time job for nearly a year now and I have something to say: work is hard! Where I work is super hard because we are always super busy.  I mean literally can't stop to pee busy.   My day to day work is exhausting & very demanding.  I do quite a lot in a day & I used to feel very downtrodden when I'd reached the end of it.  There were many days I just felt I couldn't do the job anymore & really thought about quitting.  I was asked too much of, I couldn't do it all, and wasn't feeling successful at what I was doing.  There was just too much to do & I couldn't do it all - end of story!  But eventually I got better - well, it's still not 100% my favorite thing I could do with 8 hours of my day, but now I am able to feel like I'm productive & completing tasks.  I feel less overwhelmed & more in control.  I think this first year has helped me develop better organization skills & really know my limits.  I guess I was never asked to do this much before & now I know how much I can handle.  I started to implement these 3 things during my day to keep myself productive:

keep a running list
This is sorta like a to-do list but for me it's a notebook of things that have to happen in order.  A little bit about my job: There are time sensitive things that I have to do that take precedence over everything else anyone asks of me.  So these things go in my notebook in order so I can take care of them in order.  Also any notes or any quick 'hey do this real quick' sort of things go in there though I try to keep it reserved for the time sensitive things.  A running list allows you to keep everything in order & allows you to go back to verify information - for me this keeps me accountable for what I need to be accountable for.  I write down all the relevant info when things are getting tossed back & forth so I don't miss something.  This makes it easier to go back & confirm or deny anything I'm questioned about.  I don't want to be held accountable for something not told to me!  As you can see, I take things very seriously!

Prepare for the next task
If there is a never ending flow of things coming through your inbox & you have about 6 piles of things on your desk at any given time, believe me when I say it's hard to keep track of what needs to be done!  I also have people handing me papers & explaining things to me all the time.  Instead of nodding then putting the paper in my inbox, I prepare for the next task by taking the 5 seconds from my current task to take notes on what needs to be done for this task.  That way when I get to it I know what's going on & don't feel stressed about having to get up & ask questions.  It also doesn't help that 90% of the time the person that gave me the task is on the phone when I have questions.  If they are on the phone then the task gets delayed even more, which leads to more stress on me!  Taking the 5 seconds from my current task to take notes for the next task saves 10 minutes of running around.  Also, this tells people that I want to complete this task correctly.  I expect to be given all relative information & I let others know this which means they learn to come to me prepared with all their ducks in a row.  I also take 5 seconds from my current task to complete a 5 second task because it only takes 5 seconds.  I think this is the best thing I do that makes me feel productive!

Learn to say no
When I first started my job I didn't know when I could say no.  I mean that I didn't know if or when I was allowed to say no.  Eventually my boss had a meeting with me & told me I was doing amazing at my job, he was really pleased with the hard work I was doing.  He also saw that I'd get piled high with things that needed to be done at the same time &  I would get stressed.  He told me it was ok to ask for help.  This is the best thing I'd ever heard.  I'm now much more prepared for every task because I can handle everything on my plate.  I've learned to say no by estimating how much I have to do & how much time I have to do it.  This is especially helpful with the time sensitive tasks I need to complete.  If I'm swamped with them I will tell you that I can't do your task.  I will not be responsible for something you didn't delegate properly.  Additionally, if I have free time I ask if anyone needs help.  Others help me, so I need to take time to help them.

I feel like I never stop working at all during the day.  My 1 hour lunch break is a welcomed relief from the phones & tasks!  I find myself getting out of work on time because of these three things as well.  I ask people what they need done before I leave because I get paid for 8 hours - no overtime - if it can't be done in 8 hours, it can wait until tomorrow.  Sometimes I wonder what it would be like if I wasn't such a hard worker.  There's hasn't ever been a time where I didn't get overwhelmed with work.  I just can't be a slacker!  I don't know what it is about me but if you give it to me I will get it done.  Always have, always will.  Character flaw?  We'll see.

How do you stay productive at work?  Any organization tips to offer?

xoxo, Moe

Connect on Twitter // Follow on Pinterest

2.12.2014

February 2014 New, Used, & Empty Products

I'm trying to keep up with this little YouTube channel of mine but half the time my computer doesn't want to cooperate.  That ends up delaying a video for a few days!  I'm having problems exporting the video - it doesn't save or something when I export it.  Super weird.  Anyway, here are my new, used, & empty products for February 2014:


Don't forget to watch in HD as well .... still haven't figured out how to get the quality higher automatically.  Any help with YouTube would be appreciated!

Hope you enjoyed!

xoxo, Moe

Connect on Twitter // Follow on Pinterest

2.11.2014

Trend Tuesday // Radiant Orchid Around My Home

Like I've mentioned many times this month purple is my favorite color so I'm so excited that Radiant Orchid is the Pantone Color of the year.  Hooray for the purples!  I thought I'd collect all the purple things I could find around my house, and there were plenty more that didn't fit in this picture:
Purple handled scissors // Bella Terra Mineral Shimmer in Emotion // Ruby Wing Nail Polish in Zen Garden // Flower Beauty Cream Shadow in Lilac You A Lot! // The Balm Instain Blush in Houndstooth (I swear it's a light purple in person!) // Maybelline ColorSensational Lipsticks in Violet Intrigue (Limited Edition but it's still in some displays at my drug stores) & Brazen Berry (part of their permanent Vivids line) // Eyeko  Skinny Liquid Eyeliner in Purple // Milani 3D Glitzy Glamour Gloss in Fashion Diva // Rimmel Stay Matte Liquid Mousse Foundation in Ivory // Two Purple Crochet Hooks // Colgate Slim Soft Tooth Brush // iPhone 5S Mophie Case // Candle that's totally dead from Big Lot's // Chip Clip

There's much, more in my house that is purple - my current glasses included.  I love purple! I can't wait for there to be many purple things this year!

What is you're favorite color?  Are you digging Radiant Orchid?

xoxo, Moe

Connect on Twitter // Follow on Pinterest

2.10.2014

Make it Monday // Printable Valentine's Day Cards

One of my favorite holidays is Valentine's Day.  It didn't used to be a favorite though, more like an excuse to go out.  I remember one time in college a bunch of us got a little dressed up & headed out to Applebee's for dinner on year.  Just a few friends & good food.  We took up a huge booth there were so many of us.  Valentine's Day to me now means one of my favorite traditions - homemade pasta!  This has nothing to do with this DIY but I did want to share with you that memories are what makes holidays great, in my mind.  So onto the tutorial:
For this tutorial we're going to use my favorite online photo editor PicMonkey.  If you don't have the Royale feature, don't sweat it - you can totally make an awesome card with out it.  None of these steps involve Royale features! But if you want to try the awesome options that the Royale feature offers, click here to try the feature free for a day!
Head on over to PicMonkey & select a size to get started.  We're going to crop down the image anyway so it doesn't matter which size, I went with 4x6.
Now open this image in the canvas.  If you don't want to use my image provided you can search ColourLovers for patterns or even scan in a scrap book page.  If you have any digital scrapbook pages, feel free to use those as well.
Crop down your image so none of the weird border shows.  This image is downloaded from my page on the ColorLovers website so it has the watermark there at the bottom.  Crop your image in the ratio you want - I chose 4x6.  I would suggest you use a standard cropping range & nothing too unique.  You want this image to fit nicely on the page when you print it out later.  Now on to the designing.
At the bottom of the left hand options menu, click on the little heart with the arrow through it.  It is here you will find themed options.  We're going to be using the Sweethearts theme for this card.  Choose Heart Cutouts & begin to move & scale you're first heart.  Choose a paper pattern you like as well.  You can click & move the heart anywhere on your canvas & you can even have part of it hang off the canvas if you like.
Add another Heart Cutout in a contrasting paper pattern.  Move this around, scale it, position it how you want.  I left room at the top for text.
Using the Sweet Nothings fonts in Amatic Small Caps & Sacramento I asked you to be my valentine. You can write whatever text you'd like to here & even personalize it if you'd like.  Go sweet or racey with your sentiment - be daring if you want to!
I wanted to show you a little trick here when using PicMonkey by adding a little bit of ribbon to the top.  You can see that the pink ribbon is over the will you text, blocking it.  Simply right click on the ribbon & select send backward to send the ribbon under the text.  You can also choose send to back to put that layer on the bottom of all the other layers you've made.
Now save your work to your computer.  If you think you might want to edit your card later do not close the tab you have open with PicMonkey in it.  This way you can edit your card if you find an error or find you might not like something after printing.
We're going to use Picasa to print our Valentine's Day cards.  I've found this is the simplest, most user friendly photo program out there!  Open your card in Picasa & click File, Print.  Under Print Layout select how many cards you'd like to see on your page.  Select Shrink to Fit, then increase the number of copies to how many you'd like to print.  If you want to print more than one page increase copies until you have the page amount you'd like - but do it in multiples of the number of cards per page.  In my example 3 pages will print 12 cards I need to increase copies from 4 to 12.  Then hit print!  Make sure you have colored ink & you're good to go.  You can also have these printed from your original file at a place like Staples or Office Max.  Just tell them you want it printed 4 to a page.

Happy Valentine's Day All!

xoxo, Moe

Connect on Twitter // Follow on Pinterest

2.07.2014

ModCloth Make The Cut Contest: 'Prints Charming"

Hello there Friday!  Man I love when the week is over.  This weekend we're going to go visit some friends in Michigan & get our board game on.  If you are looking for something more creative this weekend, I've got something to share with you: The ModCloth Make the Cut Contest!

The ModCloth Make the Cut Contest is a recurring design contest that invites the ModCloth Community to design garments, graphics, or fabric prints & the main purse is to further their mission of democratizing fashion!  Producing clothing designed by the community that loves ModCloth means that YOU can become a designer!  I've never ever before thought about designing a pattern for actual fabric - let alone something to be sold by ModCloth!  If you love their brand go ahead & design your heart away.  I took the little example graphic from their website & used photoshop to just fill it with patterns:

This isn't the official template to design for but it was fun to play around.  Check out below for an overview of the rules, but read the official rules here (Hurry, submission ends on 2/14!):

How does the contest work?
Entrants will design a new print for a private label dress silhouette that is already being produced! Contestants have two weeks to submit designs. After the submission period, the ModCloth Creative Team will narrow down the submissions to 20, which will be sent to the guest judge, Amanda Needham, Costume Designer for Portlandia. After Amanda has chosen the 10 finalists, they will be posted on the Be The Buyer page for voting. There will be a week for the Community to vote, then ModCloth will contact the winner and update the contest announcement with the big news!

• Contest is Live Now!
• End of Submission Period: Friday 02/14/14
• Launch voting on Be The Buyer: Monday 03/03/14
• End voting on Be The Buyer: Monday 03/10/14
• Winner announced on ModCloth Blog (winner will be contacted personally): Wednesday 3/12/14

So get cracking on those designs ladies and gents!  Good luck if you enter!

xoxo, Moe

**This post contains affiliate links and I will be compensated if you make a purchase after clicking on my links.  Thank you for your continue support the partners that support the Five Sixteenths blog.**

Connect on Twitter // Follow on Pinterest

2.06.2014

Four Simple Goals for February 2014

Last month I started a post on Four Simple Goals for each month of the year focusing on our home, my creative businesses, & our relationship and this month (of course) I want to continue the trend!  So far so good, right? Two months out of twelve?  Here's hoping!

Order fume hood, glaze, clay, etc for the studio
Last month we were going to work on cleaning out the garage in order to refocus & make it a space where we each can be creative.  It was definitely too cold to do anything in the garage this January - but while we're piling it high with crap might as well get the crap in there that needs to be in there right?

Clean out the bedroom Closet
I need to get rid of clothes, organize my shoes, & see what is hanging out in there.  I do know there are some things that are stored in the back that will stay there but it's time to organize.

Add new stationery designs to the stationery shop focusing on upcoming events/trends
Now is the time to focus on spring/summer wedding invites & other stationery.  I'm want to add more graduation announcements & just more stuff in general.  After reorganizing the shop I've found a renewed love of creating things.

Play more games together - set aside time once a week.
Zach & I rarely play games together.  We've bought a few Wii games & have Minecraft for the Xbox but we rarely play.  Theres a funny thing we do where we do our own thing eventually at the end of the night - I want to make more of a priority to play together.  We tend to separate & do our own thing - which is fine - but I think we get to comfortable taking for granted we'll each be there, you know?  I just want to not put off spending time together.

xoxo, Moe

Connect on Twitter // Follow on Pinterest

2.05.2014

Wednesday Decor // Planning for Planting

Is it too early to be talking about planting?  Perhaps, since there's about a foot of snow on the ground when I'm writing this.  (I'm writing this post in advance but I'm 90% sure there will snow from here until September.  What the actual hell?)  I can't help it.  I'm dreaming of warmer weather while I snuggle under the heated blanket.

Last year I tried very hard to plant flowers & herbs and keep them up.  But after I was done I hated what I'd done outside & somehow the herbs all died.  Well it's a new year & I get a new try as soon as the weather warms up.  I've been pinning a lot of inspiration lately because I really want to give it a hard try - I love the look of greenery & I want to have it both inside and out.  We've got two big windows at the front of our house & I sit in front of one at my desk so putting some greenery in there would really make the most of these windows!  Here's some of my inspiration:
This tutorial form All Things Heart & Home really has me inspired to spruce up plain, terra cotta pots instead of spending zillions on fancy pots.  I think this is going to be my go to pot style of choice I think.
I like that tutorial above because I really want to make this Herb Tower (found on Martha Stewart) for our deck of the kitchen.  I think it would be great to step outside, grab some herbs, & keep on cooking!
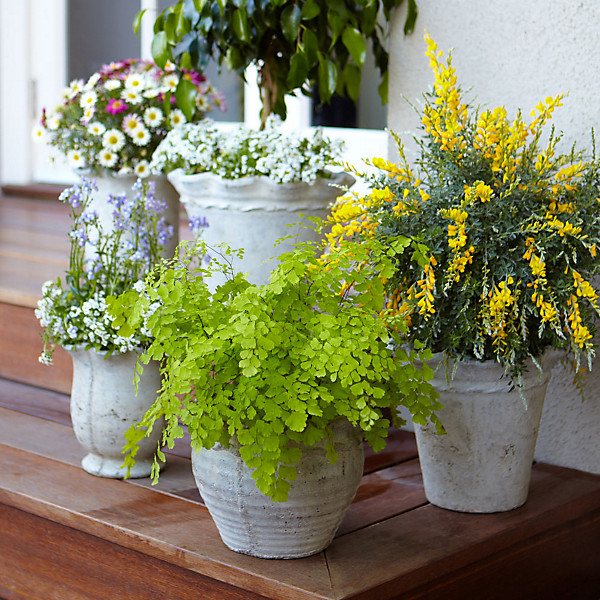
And I love the look of these aged pots in this post!  Good thing I found a way to spruce up plain ones right?  I'm hoping I can find affordable ones to age so I can have an arrangement like this around an entry way.  I'm thinking about doing something near our side door with pedestals so there can be some varying heights with the varying plants. 
This is what I'd like the front of our garden to look like.  Currently we have a big space for planting & it has four large hostas in it.  But at the front is like a little sub-planting area & I want to add a bunch of plants that will over spill from the box to give fullness.  I need a gardener.
I also just want plants everywhere in the house.  I'm much better at taking care of those, even though I still suck at it!  Sorry plants!  I love the random assortment of things going on here & am thinking about adding all the plants I can find to the windowsill above my desk!

What are you planning for the warmer weather?

xoxo, Moe

Connect on Twitter // Follow on Pinterest // Peep me at Hello Cotton