2.28.2018

The Benefits of Using Essential Oils Topically

There are several ways to use essential oils that will benefit your over all emotional well being.  Most often you hear about using essential oils aromatically, like in diffuser blends or in diffuser jewelry.  I'd say the second most common way to use essential oils is topically - meaning apply the oil directly to your skin.  Aromatic & topical use are the two ways I use essential oils the most.
this post contains affiliate links, please read my full disclosure here.
There are several reasons to use essential oils topically over using them aromatically or internally.  It may simply be because topically is more convenient for your situation.  I apply oils to my skin throughout my work day.  Most of the time I am not using them to treat anything like a cut or a bug bite, but I'm using them for the emotional support they offer.  Currently, I do have a diffuser in my office but right now I use that for respiratory support of my desk mate!  You may also choose to apply an oil topically to relieve a digestive issue* while you're out and about or as a hand sanitizer if there's no sink around.  Topical application often tends to be the most convenient but the physical & emotion benefits are none the less powerful.

Applying Essential Oils Topically

Dilution

When you get into this method there are several safety issues that should be addressed to ensure proper use of oils on the skin.  DoTERRA provides a Touch line of essential oils that are prediluted with fractionated coconut oil & prepackaged in 15 ml roller bottles for you.  So if you're applying it to your skin you'll already be good to go.

These prediluted rollers are designed for adult skin.  If you're using oils on extremely sensitive skin, mature skin, young children, or infants you'll need to follow a heavier dilution guide.  Essential oils are highly concentrated and while some can be applies NEAT (or directly to the skin) it is always best to err on the side of caution & begin with dilution.

A quick way to dilute any oil fast is to fill a roller bottle with only fractionated coconut oil, apply that to the skin, then swipe a Touch roller over or apply a drop of undiluted oil.  Be sure to check the doTERRA dilution guide for more information.

Dosage

While some essential oils can be taken internally and the suggested dosage is listed on the bottle, there are several factors to take into account when it comes to applying oils topically.  Since we've already talked about dilution, applying a diluted oil is a lower dosage than applying an undiluted oil directly to the skin.  Here is a helpful dosage chart.  Bear in mind that your skin sensitivity may be another consideration for dosage.  Oils are highly concentrated and tend to act fast so you may only need one or two applications to find them effective.


Caution

Since essential oils are highly concentrated plant essences, you'll want to avoid sensitive areas - like eyes, broken skin, etc - even if the oil is diluted.  If you do get an oil in your eye you'll want to dilute with fractionated coconut oil & not water.  FCO is a carrier oil that will help move the oil across your body.  They are fatty and tend to attach to the essential oils helping the scent last longer so applying coconut oil to will help dilute the oil in case you've gotten it in your eye.

Why Apply Oils Topically?

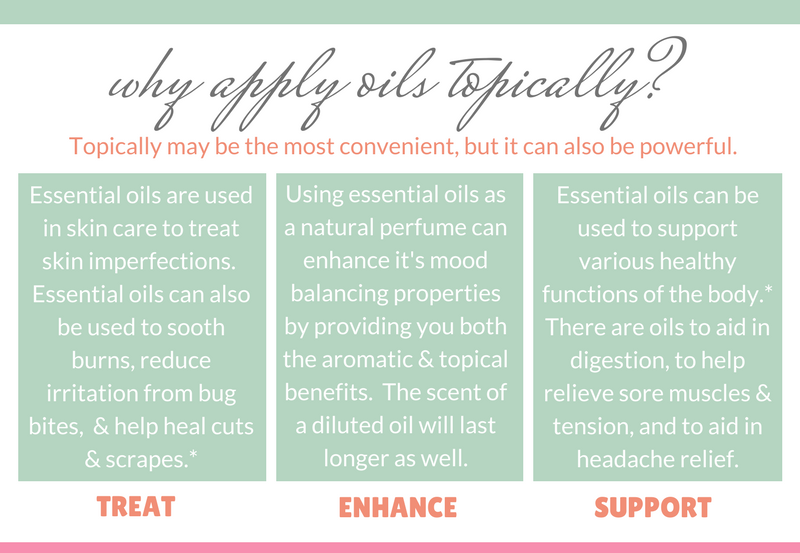
Topical application may be the most convenient way to use essential oils but it can also be the most beneficial way if you're needing direct skin support.  Our skin is the barrier to our internal body but it also one of our largest organs.  Anything you place on the skin can directly affect your internal body as the compound is carried through to the blood stream.  That is one reason why we need to be careful with what we apply to our skin.  Here are three ways I use essential oils daily :

To Treat the Skin

For the most part I use essential oils in my skin care routine.  Melaluca is known to be clarifying and thus helps to treat breakouts.  Frankincense not only smells amazing but when applied to the skin reduces imperfections as it helps with cellular regeneration*.  DoTERRA even has quite a few skin care lines for various skin types & concerns.  But more over you can use essential oils to naturally sooth burns, reduce the puffiness & irritation of bug bites, and to help mend cuts & scrapes*.  Topical application in this case is the most effective way to have the essential oils directly impact the skin and surrounding areas.


To Act as a Natural Perfume

The emotional support essential oils offer can be enhanced by wearing the oils as natural perfumes.  If you're like me and want to feel motivated, awake, or emotionally supported through out the day then using the Touch roller bottles (or making your own) is a great way to combine the aromatic effects of essential oils with their topical benefits.  Plus the scent of a diluted oil will last a lot longer, it won't evaporate as quickly.


To Support the Body

Essential oils can support functions that may need a little help*.  DigestZen is designed to support the digestive system so it's great for nausea or an upset tummy.*  Applying this oil topically to the stomach can help with these issues.  Deep Blue oil can be used in a soothing massage to relieve muscle soreness.  Add it into any lotion or use the oil in an epsom salt bath.  My favorite essential oil blend to use topically is PastTense to calm and relieve tension at the end of a long day but it also helps me when I have severe headaches.  Essential oils can be used to support healthy functions!

When you apply essential oils topically you are getting their benefits localized but your also able to enjoy the aromatic qualities as well.  I personally carry a little bag with me everywhere I go with all the oils I may need to use in a day.  The best thing about doTERRA is that they package up the Top 10 oils in a great enrollment kit!  These 5 ml bottles are perfect to carry around with you. Plus pop in a little FCO roller bottle to your bag & you'll be ready to dilute in no time!

Grab the Free Ebook!

* indicates required

If you're down for joining in on the emotional & physical support essential oils can offer, I'd love to talk with you!  If you're looking for a kit to start with the Family Essentials Kit is perfect and you'll enjoy 25% off other oils with your Wholesale Membership!  Shoot me an email or learn more about doTERRA by clicking here.  It's all about taking charge of your emotional & physical wellness!

xoxo, Moe

*These statements have not been evaluated by the Food and Drug Administration.  This product is not intended to diagnose, treat, cure, or prevent any disease.

2.26.2018

Make it Monday // DIY Dollar Tree Ostara Altar Decor

Spring is almost here!  I am so excited for warmer weather and longer days.  At the beginning of February we celebrated Imbolc which is about the first inklings of spring shinging through - more active animals, longer days, maybe a hint of green here & there.  

I was compensated for this post. This post also contains affiliate links and I will be compensated if you make a purchase after clicking on my links.  Please read my full disclosure here.
Today's DIY is focused on creating budget friendly Ostara decor from supplies found at the Dollar Tree!  There are a ton of pretty spring things out right now.  My favorite find was the springs of lavender which is perfect for this project.  Purple is such a spring color.  And I found these amazing speckled eggs that look like they came from a high end decor shop.  Dollar Tree for the win - 6 pastel speckled eggs in a little egg container for only $1!  I couldn't link these for you below, but I've linked what I can.  Even the bunnies came from the Dollar Tree.  Assorted Spring decor for $1 each!
supplies : mini wreath, lavender sprigs, speckled eggs, moss, hot glue gun & glue sticks, wire cutters/snippers

Start by snipping buds from the flower bunches.  Don't snip too close to the base of the flower, you want to make sure there is enough stem left to push into the wreath.  Organize the flower sprigs on the wreath form the way you'd like.  Using the glue gun place a line of hot glue on the stem & push it into the wreath.
Pull some of the leaves from the stems & add those in to your floral mix.  This creates a little bit of depth to the arrangement.  The arrangement is going to be on the side of the wreathe, so press these leaves into the arrangement upright.
Next it is time to add the speckled eggs.  We're mainly working with a lot of visual balance in this project.  The floral arrangement is on the right side of the wreathe and the egg & moss grouping is going to ground back down the overall design.
Attach the moss to the wreathe by putting glue on the wreathe first then pressing on the moss.  The moss sticks together, but small pieces will fall off.  It was a mess.  Pressing the moss on to the glue allows you more control over it.
Keep it balanced by creating a cluster of three eggs in the moss.  I chose pink, yellow, and blue for the eggs to compliment the purple lavender sprigs.  Adding two egg in the front & one egg in the back makes a lovely little scene.

Now for some facts:

What is Ostara?

The Vernal or Spring Equinox falls on March 20th.  Also known as Ostara, the Spring Equinox celebrates the balance of light and dark with light beginning to increase until we get to the longest day of the year the Summer Solstice.  It is one of the eight holidays or sabbats on the pagan Wheel of the Year.

This Pagan holiday celebrates the maiden goddess that overseas the budding of plants and the idea of fertility as she begins to interact with the horned sun god.  The maiden goddess transforms over the year from maiden, to mother, to crone.  She is fertile now, just as the earth is, ready to conceive.  So now is the time to celebrate planting & new life to harvest later in the year (at celebrations like Litha & Mabon).  We can also celebrate a goddess like Persephone who has emerged from her stay in the underworld.  I personally think Ostara celebrates newness & new life.

Easter, the Christian holiday celebrating Christ's resurrection, is most closely related to Ostara as it celebrates rebirth & shares similar symbols.  However, Ostara & Easter don't really have any close linguistic relations (from what I've read when trying to find a definitive answer on this).  These two holidays seem to just fall closely & share symbolism.

Symbols of Ostara

Around this time we start to see a lot of bunnies & eggs pop up in our stores seasonal aisles.  Eggs have always been a symbol of 'seed'.  Eggs are a symbol of opportunity & growth as the hold the entirety of potential inside of them.  Think of an bird's egg - a self contained unit that nourishes & protects the bird while it grows.  Decorated eggs are fun & a great way to spend time with a symbol you'd like to work with - so coloring eggs with your family using a PAHS dye set isn't necessarily a pagan (or Christian) thing but it is still an important part of spending time with family & carefully prepping for the coming holiday.

When it comes to hares or bunnies, this animal has been associated with fertility for a long while.  Apparently a rabbit can conceive another litter, while she is still pregnant!  And we all know how rabbits seem to multiply exponentially.  So that symbol comes with a little bit of science.  We're also seeing animals stirring during the spring time and that can lead to an association between the bunny & Easter/Ostara/the Spring Equinox.
I can't wait to sit with these symbols at my altar while I celebrate the longer days and the development of ideas.  I've spoken before about how Mabon, or the Atumn Equinox, is like the Full Moon for me, well the Spring Equinox is like the New Moon.  It is a time to set & refine intentions for the year (even though you may have done this in January).  You can also work with the New Moon in Aries energy that falls in April this year to set goals & intentions.  Spring is a great time to see new growth & new opportunity in your life, especially after the reflection & release that was the Winter Solstice.

Use this time to celebrate the longer days, the warmth coming, and the seeds you can plant towards becoming your best self.  If you haven't started a new habit, try one out!  If you've got a new idea, refine it a little then offer it up to be nurtured by your hard work.

How do you celebrate spring?  What do you do to celebrate the spring time?

xoxo, Moe

2.22.2018

Boost Your Blog // Create Pinable Blog Images with Your iPhone

I've said it before and I'll say it again - my iPhone is a key part of my blogging arsenal.  I use it to take & edit photos, I use it to organize blog files, I use it to share blog posts, and I use it to create cover images for those blog posts.  There is a lot of power packed into this tiny thing and I am all about harnessing it.  Blogging doesn't have to be a chore and, honestly, it shouldn't be.  Creating a space that is supportive & expressive is right at your fingertips.
this post contains affiliate links, please read my full disclosure here.
I've been blogging for over 10 years and Pinterest came into the game for me right around the time I decided to take my blog to the next level.  But it wasn't until recently I started to optimize my blog posts with the vertical images best suited for Pinterest.  As website traffic grows increasingly from mobile users, vertical media is being prioritized over the square or horizontal format.  Not only are we consuming media in a vertical format, but the tiled style of your Pinterest feed allows for vertical pins to rule.  The more real estate an image takes up the easier it is for us to see on our small, mobile screens.

Since we're already on our phones all the time, we can take our blogging tools on the go.  I can't tell you how helpful it is to have an handy computer in my pocket to work on blog tasks - especially with my 9-5 job.  I can edit videos, photos, and blog posts quickly and on the go!  But let's get started with the step by step on creating Pinterest friendly images straight on your iPhone:

First, Start with the Perfect Canvas

Create a your photo library

I often use my own blog photos to create the pinable cover photo for each blog post.  But sometimes I don't have a photo specific to a blog post.  This post is actually a good example of that!  If I don't have a photo, I'll pull from my own library of styled photos or from an online, royalty free stock photo site.  Unsplash is a great resource as it allows you to create a library as you browse their site and I use it quite often.

Plenty of bloggers use stock photos, so don't feel like you're cheating!  Here are some tips to make sure you're choosing the best stock photo for your post.  You can also find some free styled photos here on the blog.

Image size is important

The best aspect ratio for a pinable image is 2:3.  This means you're image is longer than it is wide.  You don't have to be terribly precise if you're cropping a photo, but many photo apps offer a ratio scale so you can crop your image perfectly.  Vertical images straight from your camera roll fit this 2:3 ratio perfectly.  When you're taking your blog photos, or searching for the perfect stock photo, consider where your text will fall on this image.  Sometimes you can use any 'ol image you take but sometimes you'll want to take a specifically framed image so that your text will balance nicely on the image.

If you want to step up your iPhoneography game, I've got a ton of posts with photo tips here.  Make sure your lighting is even and when in doubt, just make it black & white!

Adjust, Edit, & Include your Watermark

Subtle edits to create cohesiveness

If you're using a stock photo you'll want it to fit in with your current editing style.  Since you're starting with an image that fits the post and fits in well with your blog, you'll want to make sure the over all aesthetic of your blog is matched with any edits you normally do to photos.  Subtle edits work the best - these edits correct & balance with out creating an overly filtered effect.

I have two apps to recommend for these types of consistent edits - A Color Story & AfterLight The perk of both of these apps, and why I recommend them, is that you can save your edits as presets to use over and over again!  Talk about consistency!

A Color Story is my all time favorite app to use and I honestly use it on the daily.  The free Essentials filter pack is all you really need for subtle natural edits plus you can batch edit (which saves a butt ton of time) & you can see how your photo would look on your Instagram grid.  All of these features are part of the free version of the app!  Say what?!?!

Add branded text & watermarks

The key part of a pinable image is the text that draws in the reader.  Add the blog post title or other related key words to your pinable image as well as the web address for your blog + the watermark if you have one.  It is important to watermark photos with at least your web address because pins lose their links all the time.  Others also try to hijack images to claim as their own so your watermark deters this behavior.

My favorite app for this is Phonto.  It is super simple to use, you can save text as presets, and you can upload your own fonts.  So it is perfect for your branding!  Another app that is newer on the scene but seems amazing already is A Design Kit.  This app comes from the creators of the A Color Story app so they can work seamlessly together.  I don't believe you can save any presets, the there are quite a few text options available.  I also just reviewed an app called PhotoMarks that works amazing to add branded text!

Finally, organize your files

Push images through to your other devices

I've used my iPad for blogging before so my photo library is shared between my devices.  And if you use a Mac, it would be even easier to grab your files from the cloud.  I use Google Drive to push my files & photos between my devices.  I find it is the easiest and gives me the most storage to work with.  Once the photo is uploaded from my phone I can rename it in Google Drive and upload it to my blog post.

I will also have the images available to post to various social feeds, no matter what device I'm on.  Previously I would need to email myself the images so I could download them to my computer.  If I needed to edit or change something, it became a huge hassle!  This type of cloud sharing would be great for teams or blogging partners to collaborate.  Or even if you are a part of a group of bloggers that work closely together on content.


It is seriously that simple to create amazing, pinable blog images right on you iPhone.  I've been thinking of upgrading my phone to an 8 plus for the bigger screen since I do so much blog work on it!  These little guys pack a huge punch when it comes to convenience, creativity, and quality!


If you've got some older blog posts that need some TLC or you just wanna take the time to make sure you're starting out on the right foot, I've got a FREE ebook for you!  This guide to revamp your blog is an easy to follow 10 page book filled with 5 simple tips to get your blog working for you.  Plus you'll be on the 516 newsletter list!

I hope this post inspired you to start making your Pinterest images in the palm of your hand.  Sometimes I think we put a lot of pressure on ourselves when we blog to have the best software, the best camera, the best gadgets when really there are amazing ways to get things done simply & easily.  I want to share all of that with you!  So check out more of the Boost Your Blog series here and get to blogging!

How do you create pinable images for your blog?  How do you save time & work efficiently?
xoxo, Moe

2.21.2018

App Review // PhotoMarks

One of my favorite apps to download are font overlay apps.  These apps that allow you to add text to your photos in a professional way.  I was contacted by PhotoMarks to test & review their font overlay app and let me tell you it is a great app to add to your arsenal...especially if you are a blogger!  This app has a feature I love - you can save different templates (known as profiles) so that you can add your branded text to images over & over again.  You don't have to start from scratch each time!  This is also great for adding a watermark or logo to you photos as this app supports an uploaded logo!

What it is 

This is your basic font overlay app.  You load a photo, add your text, save to your camera roll.  While this app doesn't have the most sleek design, it does have great function.  It is a very intuitive app.  If you've used any app to load or edit photos, you'll be able to figure this app out.  You can customize the appearance of your photos by adding text or logos - you can even upload your own logo.  
PhotoMarks from Bits&Coffee is an elegant solution for visually watermarking or annotating your photos. Easily protect your copyrighted images or add beautiful text comments to your photos before sharing on Instagram, Facebook, Twitter, Email, or other options.
With PhotoMarks you can completely customize the appearance of your text and logo marks. Working with multiple layers is an easy and visually pleasing experience. Brand, trademark, and copyright protect your pictures with ease!
The app costs $4.99 on ios and it seems there are no in-app purchases, so you're getting the full experience right off the bat!  Plus, there is a desktop version in case you're not one to go to your phone for this kind of thing!

What it does

This app allows you to create seamless, branded photos with just a few taps.  Supporting full resolution & multiple layers, this app is a powerful too for your social media presence.  The best part is that you can save your work as a template (known as profiles) and then load them later to keep with your consistent branding.  The mutli-layer function allows you to add different text options & logos for easy arrangement. Exporting to your camera roll is easy & the app supports sharing to social media.
PhotoMarks can be a powerhouse design tool right in your pocket.  It offers quite a few fonts to choose from so you'll be able to find a similar font, if not the fonts you may use for branding.  You can also easily upload a transparent logo to use over & over again so that your photos are protected.

How it helps you

Consistency is key when building your blog/brand.  I've mentioned the idea of a style guide over here on the blog before and I personally find it important to stick with your one to three fonts across your platforms.  It is very tempting to change things up, espeically if you're a creative person, but when people see a photo they should easily recognize it as yours.  
I'll say it again, the best part is saving a template to use again & again for your blog or social media sharing!  This is so helpful when you've got a quite a few blog posts written but need to make your blog graphics quick.  I use my phone for nearly everything when it comes to the blog.  I only write my posts on a computer & everything else - photos, editing, blog graphics, etc - is done on my phone.  That makes my blog work so easy for me.  So having something like this powerhouse app is wonderful for my productivity.  So if you've got a 9-5 like me you can take a lunch hour to edit photos & create blog graphics, then drop them into any blog copy you have written.,
I've only got two downsides to this app - it doesn't support custom fonts and it's not that pretty.  If you can't find your font in their extensive collection, odds are you can find something similar.  However if you use a custom font there is no way to import that font into the app.  If you're also down for a pretty app - an app that really inspires you to use it - you may find this app a little chunky.  It functions well and is a really intuitive app to use, its just not that pretty.  So if function is more important than form you probably won't be bothered.

All in all this app is a great standalone or companion app to the apps you already use as a blogger.  The logo upload option means you don't have to have the image saved to your phone at all times to overlay in another app.  And the template or profile option allows you to pull branded content in easily.  Super functional app!

Download PhotoMarks here & get your branding on!

xoxo, Moe

2.20.2018

Beauty Review // The Balm Brand Overview

Since resolving to go Cruelty Free this year with my make up (and eventually my household products), I've had the chance to really examine what I love about the make up I buy.  There are a few obvious things - great shade collection, ease of application, long wear, pigmentation, etc.  But there are a few other things like packaging and affordability that impress me.  The best quality for the price is what really motivates me when it comes to cosmetics - I am known to purchase holiday kits from brands because they give you the most bang!
The Balm Cosmetics sort of got pushed to the back of my makeup collection but now, because I'm evaluating what is cruelty free, I discovered this brand doesn't test on animals!  I have a few products I love from this brand but now I'm open to trying more and keeping my eye out for new products.  Here is a quick brand overview if you're interested in trying their products!

Products Offered

The Balm offers a ton of different products.  They are, I guess you'd say, a full service cosmetic brand since the carry makeup, hair care, skin care, & nail polish.  Started in 2004, the brand boasts multipurpose products for a 'beauty in 5 minutes' mind set. Their signature, retro inspired packaging makes for a fun & funky make up collection.  You may be most familiar with these products by one of two things - the pinup girl illustrations or the tongue in cheek product names.  In recent years, The Balm has moved away from it's strictly 50's retro aesthetic to include more products that use a play on words as the product name.  There are now some packages that boast a comic book style and even something I relate to the 80's.
One of the best parts of the brand is there selection of palettes.  This is my favorite part of a brand because I like to get more bang for my buck!  Currently I am eyeing the Highlite 'N Con Tour palette as well as the In the Balm of Your Hand greatest hits palette.  These both offer a variety of product for a good price.

Their products are aren't tested on animals & are paraben free.  Their eye shadows & blushes are also talc free.  As far as I know they still use beeswax in some of their products, so they aren't a vegan brand.

Availability

This brand has become more widely available in recent years.  Of course you can purchase from their website but I often shop for the brand locally at my Khols.  It seems that the may either create exclusive palettes/products for retail shops other than their online storefront because some of the palettes I have aren't found on their website.  I haven't seen The Balm in stores like Ulta & Sephora but the makeup selection in Khols makes a trip to their beauty department worth it.
I was first introduced to The Balm on HauteLook ages ago and I still have some of those products!  This is another reason why I like palettes - less product for me to hoard!  Honestly, I completely forgot about HauteLook until writing this post so I can't tell you if they've been on there recently!  HauteLook is a great place to save on high end makeup.  I've also shopped for The Balm products on Amazon.  A quick search reveals a huge selection on Overstock.com (plus you can use Ebates for cash back from Overstock!).  Both Amazon and Overstock seem to be the best place to purchase this brand.

My Favorites

I typically purchase cheek products & palettes from this brand as I feel those are the most unique.  I have tried a sample size of their matte liquid lipstick, and while it's great I don't think it is too unique from collections I already have.  The palettes and cheek products also offer the biggest space for their fun illustrations, so they are functional and nice to look at!
My two all time favorite palettes from this brand are the Manizer Sisters Lumnizing Collection & the Girls' Getaway Trio of long-wearing bronzer & blush.  These two palettes appealed to me because of their slim & compact size and because of how travel friendly they are.  I don't travel often but multipurpose products/palettes make my morning routines faster.  Pulling out one palette is easier than deciding what bronzer, blush, & highlight to use each morning!  I like variety but I also like ease.  And when I do travel, I'm more likely to reach for something like this because it has all I need.  These two palettes go great together!

I don't have an extensive collection of their bronzers or blushes, more like a mix of the different lines they offer.  I am eyeing their new line of bronzers - Take Home the Bronze - in three shades.  Currently I have the Bahama Mama bronzer and I used to use it all the time!  But I've moved to more subtle bronzers now.  I would say that the Instain Blushes are the blushes I'd reach the most for & I really love the Cabana Boy blush for the fall/winter time.  I'd like to get their greatest hits palettes to have a more compact way of taking some of these colors with me.
Eye shadow is not my favorite from this brand.  The colors are OK and the formula is alright, but I much prefer the formula of something like Wet n Wild or Lorac.  I have the Nude'tude palette and two of the Smoke Balm trios but I don't reach for those at all.  It just seems that while this brand has amazing color choices...there's not a good mix of matte & shimmer for me.  There's not enough in each palette to make me feel like I can get a couple of looks.  I'd only use a few colors.  They do offer completely matte palettes and even an option to build your own palette.  I'm just not as impressed with their eye shadows as I am with other products in their brand.


I've seen a grouping of their Meet Matt(e) Hughes matte liquid lipsticks on Amazon so that would entice me to try more of those colors if it was for the right price!  Like I mentioned above, I am all about the groups of products for a good price!

I hope this gave you a little bit of information on the brand if you're interested in trying it.  I'm sure you've heard of it before but you might have been a little curious as to the value of the brand.  Their cheek products are my favorite!

Have you tried The Balm?  What brands are your favorite?
xoxo, Moe

ps. read how I plan to transition to cruelty free this year here.

2.15.2018

3 Productivity Tips for the Extremely Unmotivated

I like to think that productivity is a strong suit of mine.....but most of the time it isn't.  When I get to a task I can complete it, but the motivation to do it is rarely there for me.  So dishes sit undone, packages sit unmailed, emails go unanswered, and blog posts get pushed to the side.  Do you know what I'm doing while I'm procrastinating?  Nothing enriching, I can tell you that.
Productivity is part motivation but mostly discipline.  Discipline is doing what needs to be done even if you don't want to do it while motivation is just the push that makes you show up.  Procrastination puts off the inevitable, eventually you're gonna need to do that thing so why not just show up now & do it?

Here are my three, no fail tips for getting the motivation to be productive every day :


The 2-Minute Rule

Do you know how many tasks take less that two minutes to complete?  You could unload & load the dishwasher in less than two minutes.  You can take out the trash in less than two minutes.  You can wipe down your kitchen/bathroom surfaces in less than two minutes.  There are a lot of boring-yet-important tasks that can be done in less than two minutes.  So if it can be done in two minutes, just do it now.  Just. Do. It.


Set a 30-Minute Timer

Second question - do you know how many tasks can be completed in only 30 minutes?  You can tidy up a room in 30 minutes.  You can organize a drawer in 30 minutes (or less).  You can get a lot of stuff done in 30 minutes.  I set a timer for 30 minutes each night to clean one room in my house.  Set that time, get your butt moving.  The best part of this 30 minute clean is I'm also fitting in a bit of exercise - vacuuming really gets your heart rate up.


Just Show Up

You're already in the kitchen, might as well clean up.  This is the inspiration for this tip.  If you just put yourself where you need to be then you're already there and you might as well do it.  Pair this with the timer option.  Open your computer, set a timer, and start writing down and idea for a blog post.  Get some copy going, organize your points, and before you know it you have the meat of the post done.  If you've got graphics, elements, links, etc to add and you have more time than the 30 minutes you allotted yourself, then keep going.  Just showing up is half the battle!

These three tips help me to get my tasks in perspective.  We often see the whole picture rather than it's parts and we often think we can't consume the whale all in one bite.  But if we start small & show up, we can complete larger tasks.  Many goals have smaller supportive components that, when we focus on those, lay the ground work for completing the broader goal.  We can also get a grasp on daily routines that seem overwhelming by consistently showing up.  
The biggest example for me on tackling daily routines is in keeping the house tidy.  I am a messy person who should not be left alone with an empty table and free access to my craft supplies.  I've been known to have the coffee table, my craft table, and the dinning room table filled with something I'm working on!  I set things down where they don't go and I've been known to leave a glass or seven on the coffee table.  Because I hated cleaning my house all in one go on a Saturday when I could be binge watching Ancient Aliens, I created a cleaning routine that broke the house into zones.  Each zone is assigned a day and I show up to each zone on that day to clean for 30 minutes.  I don't tackle other rooms, I don't focus on the overwhelm, I simply clean for 30 minutes.  The Three Waves Cleaning method is what helps me to keep my mind focused only on this task.  Now, because I'm consistent in showing up to my task & completing it I don't need the full 30 minutes for one room any longer.  It now takes me about 40 minutes to tidy up the whole down stairs (save if my craft area is extremely messy) rather that just 30 minutes in the living room.  The downstairs in our house is the living room, my craft room, & a spare room I use for yoga/meditation.  So cleaning that up all in one go is amazing! 

The more I show up for my daily tasks the more I show up in other areas of my life.  The motivation just keeps going because you're on a roll...why stop now?  If you get up and start doing then the task will be done, done quicker, and you'll end up with more time on your hands!


This doesn't have to be for cleaning either.  I'll show up to my blog and spend an hour writing out the copy for a few posts.  Then I'm done with the hard part, have the majority of maybe 3 articles to publish in the next week, and can move on to the creative part like taking or editing the pictures.  Once I've showed up to the task I'm more likely to keep going because I've suddenly found the inspiration!

I hope this helps you to tackle the to do's that you're not really excited about.  Once you're in the routine you're able to get more done!

How do you manage your productivity? What motivates you?
xoxo, Moe

2.12.2018

5 DIY Gifts to Support your Best Galentine

Valentine's Day is this week!! I absolutely love February because it is all about love & expressing our love to others.  This year, I'll be focusing on giving some care to my self with a long bath & probably a good movie with a bottle of wine.  We all need a little me time.  But this Make it Monday I want to share with you some easy DIY projects that are supportive for your best Galentines!  Make something for them that will build them up and make them feel like they are awesome!!

Oh, and if you check out the bottom of this post you can in on the last minute registration for the FREE LIVE Essential Oils & Self Care class tonight!  So check that out too!

Printable Positive Affirmation Cards

Build your best gal pals up with a set of printable affirmation cards.  They can draw a card each morning and repeat it while they prepare to move through their day inspired and empowered.  This deck of 36 empowering phrases can be printed at home and assembled rather quickly.


A Handmade Mala Tied with Love & Intention

Speaking of affirmations, hand bead and tie a mantra for your galentine so that they can repeat their affirmation 108 times during a meditation.  Choose beads that you find inspiring - they don't have to be wood or crystal, just something you think they will love.  Choose the embroidery floss based on a Chakra you know your bestie is working with - red for the root chakra of groundedness & security, orange for the sacral chakra of creativity & desire, yellow for the solar plexus chakra of joy & and empowerment, green for the heart chakra of self love & gratitude, blue for the throat chakra of expression & communication, indigo for the third eye chakra of intuition & openness, or purple for the crown chakra of enlightenment & divine guidance.

An Energy Clearing Kit to get rid of any Bad Vibes

Set your gal pal up for a Spring full of good vibes with an energy clearing kit.  Include an essential oil or Palo Santo + a crystal aligned with some good juju so that she can break through anything that has been holding her back!


Custom Scented Bath Bombs

A long, refreshing bath is one of the best self care activities.  We take time to release ourselves from all other burdens to focus on our own well being.  Essential oils can help align us with the emotions we'd like to feel so we can become rejuvenated and restored.  Create a bath bomb for your gal pals that will help them feel they can reach their highest potential!


A Beautiful Journal to Keep Wonderful Thoughts

One of the best ways we can keep track of how awesome we are is to journal our thoughts.  A handmade journal using your Cricut Explore is a great way to get crafty for your BFFs.  Share a creative space where they can feel inspired & supported!

There is still time to sign up for the Essential Oils & Self Care LIVE class this evening!  Head over to the Facebook event page or register here for a FREE self care planner.  I hope to see you tonight!

How do you build up your besties?  

xoxo, Moe

2.05.2018

Make it Monday // DIY Bath Bombs with Essential Oils

YOU GUYS.  I am so damn excited for this DIY.  Have you ever made something and been like 'I understand how this is supposed to work, but I really don't think it's going to work that well.'  This DIY project surprised the HECK out of me with how much the end product FIZZED.  I didn't think it was going to be THAT FIZZY for an at home bath bomb!!  So let's get into it.
this post contains affiliate links, please read the full disclosure here.

The doTERRA product of the month for February 2018 is the Melaleuca Touch roller.  I don't have the roller but I thought I'd play around with the 15ml bottle I have.  This scent is a rather different one - it's sort of minty to me, but it is also woodsy.  The doTERRA website describes it as herbaceous and leathery.  The more I work with this oil, the more I understand it's scent so I thought I'd use it to make some fun bath bombs!  The blend used for these bombs is Melaleuca, Grapefruit, and Douglas Fir.  Here's how it's done :
supplies // baking soda, citric acid, essential oils, fractionated coconut oil, epsom & Himalayan salts, measuring cups, bowl, nitrile gloves, soap colorant, bath bomb mold or plastic ornaments for spherical bombs or a silicone mold, dust mask, protective glasses


Start by measuring out your baking soda & citric acid.  You'll want to wear a mask during the mixing part of this - the baking soda will go everywhere and you want to protect those lungs.  You'll need 1 cup baking soda and 1 cup citric acid.  I stocked up on citric acid when our Meijer started carrying canning supplies but you should be able to find this in your grocery store wherever they have their canning supplies, or you can purchase it online.  Add up to 1/4 of the epsom and Himalayan salts - I suggest adding only 1 tbsp of epsom and 1 tbsp of Himalayan.  If you add too much it will affect the way the bath bomb holds together.
Use your gloved hands to mix the dry ingredients together.  This is where the baking soda will really go flying so please, please use a mask!  Next begin to add your colorant.  Add a small amount at a time.  If you're using water soluble colorant you may notice a bit of fizzing.  I wasn't able to take a photograph because when that happens you need to work fast to blend in the colorant.  Keep adding and blending, adding and blending until the mixture is the color you'd like...but don't add too much that the mixture is starting to stick together.
Once the you achieve the color you'd like, add in your essential oils.  I added in 10-12 drops Grapefruit, 10-12 drops Melaleuca, and 5-7 drops of Douglas Fir.  Blend with your hands until it is well incorporated.  I want to make a note here on the quality and purity of essential oils.  I recommend using doTERRA essential oils as they go through a rigorous test to ensure purity and potency.  If an oil doesn't meet the Certified Therapeutic Grade standard set by doTERRA, the oil isn't used for production.  Essential oils you may find on your grocery store shelves can have additives that decrease the purity and the quality of the oils.  They may have synthetic proprieties even if the label says that the oil is a pure oil!
It is at this point that you want to check the consistency.  You'll want it to stick together like wet sand.  If you've ever played with that magic sand stuff, that's the consistency you're looking for.  The product needs to stick together when you squeeze it and stay together when you lightly drop it in the bowl.  Once its there, and if you need it, add it a couple drops of the fractionated coconut oil.  This will one help to release these guys from the mold and condition the water just a bit...since you won't need a whole lot.  
Now it's time to pack the molds!  You can use a bath bomb mold but these plastic ornaments are perfect for this.  Be sure to pack each half tightly.  Use the palm of your hand to compress the mixture into the mold and use your fingers to press the outer edges down.  Make sure each mold is packed full then over pack (just a smidge) one half of the mold.  Working over your bowl, press the two halves together letting the excess mixture fall into your bowl.  Squish and rotate the two halves until they meet and close as well as they can.  Then repeat for the second mold.  If you pack these guys tight enough you can remove them from the mold with in an hour and let them harden up out on the table.

Essential oils can really affect your mood and your emotional wellness since they interact directly with the limbic system of the brain - the system responsible for memory and emotion.  Inhaling an the aroma of an essential oil passes the scent over the olfactory system - the system responsible for processing smell - and interacts with the limbic system.  Since scent is so directly related to our experiences, memories, and emotions, inhaling any scent sends a rush of feelings and memories into our awareness.  Working with essential oils can help you to align your thoughts and your mood depending on what mood you're looking to change or enhance.


Grab the Free Ebook!

* indicates required


This recipe makes two bath bombs if you're using the ornament as a mold.  I found some silicone molds at Micheal's and some on Amazon that I can't wait to try out.  This scent is great for relaxing but if you wanna make something perfect for when you're sick try using On Guard, Oregano, Lemon, and Melaleuca.  I honestly can't wait to try this one.
Taking a bath can be an active, restorative, and supportive act of self care...especially when you're adding essential oils to support your relaxation and rejuvenation.  On February 12th I'll be hosting a free online webinar on using essential oils for self care.  We'll talk about what an essential oil is, how essential oils stimulate and align emotions, the 3 pillars of self care, and how to create your own active, restorative, and supportive self care rituals. Click here to find the Facebook event where you can register.  Once you register you'll receive a FREE self care planner!
Essential oils have become a wonderful part of both my physical and emotional wellness in the past year and I want to share their benefits with you!  So I hope to see you at the webinar!
Happy fizzy bath time!

xoxo, Moe