9.30.2014

Trend Tuesday // What's in my Purse Make Up Bag

I did a little post like this before (see it here) but I've changed it up a bit ever since getting my new purse - which I'm in love with - from TJ Maxx.  I no longer use my purse organizer from this DIY because it doesn't fit in the bucket style of this bag.  However, the style of this bag really organizes things for me.  Things fit perfectly inside it all neatly!  But this is just a post on my little make up bag inside my purse.
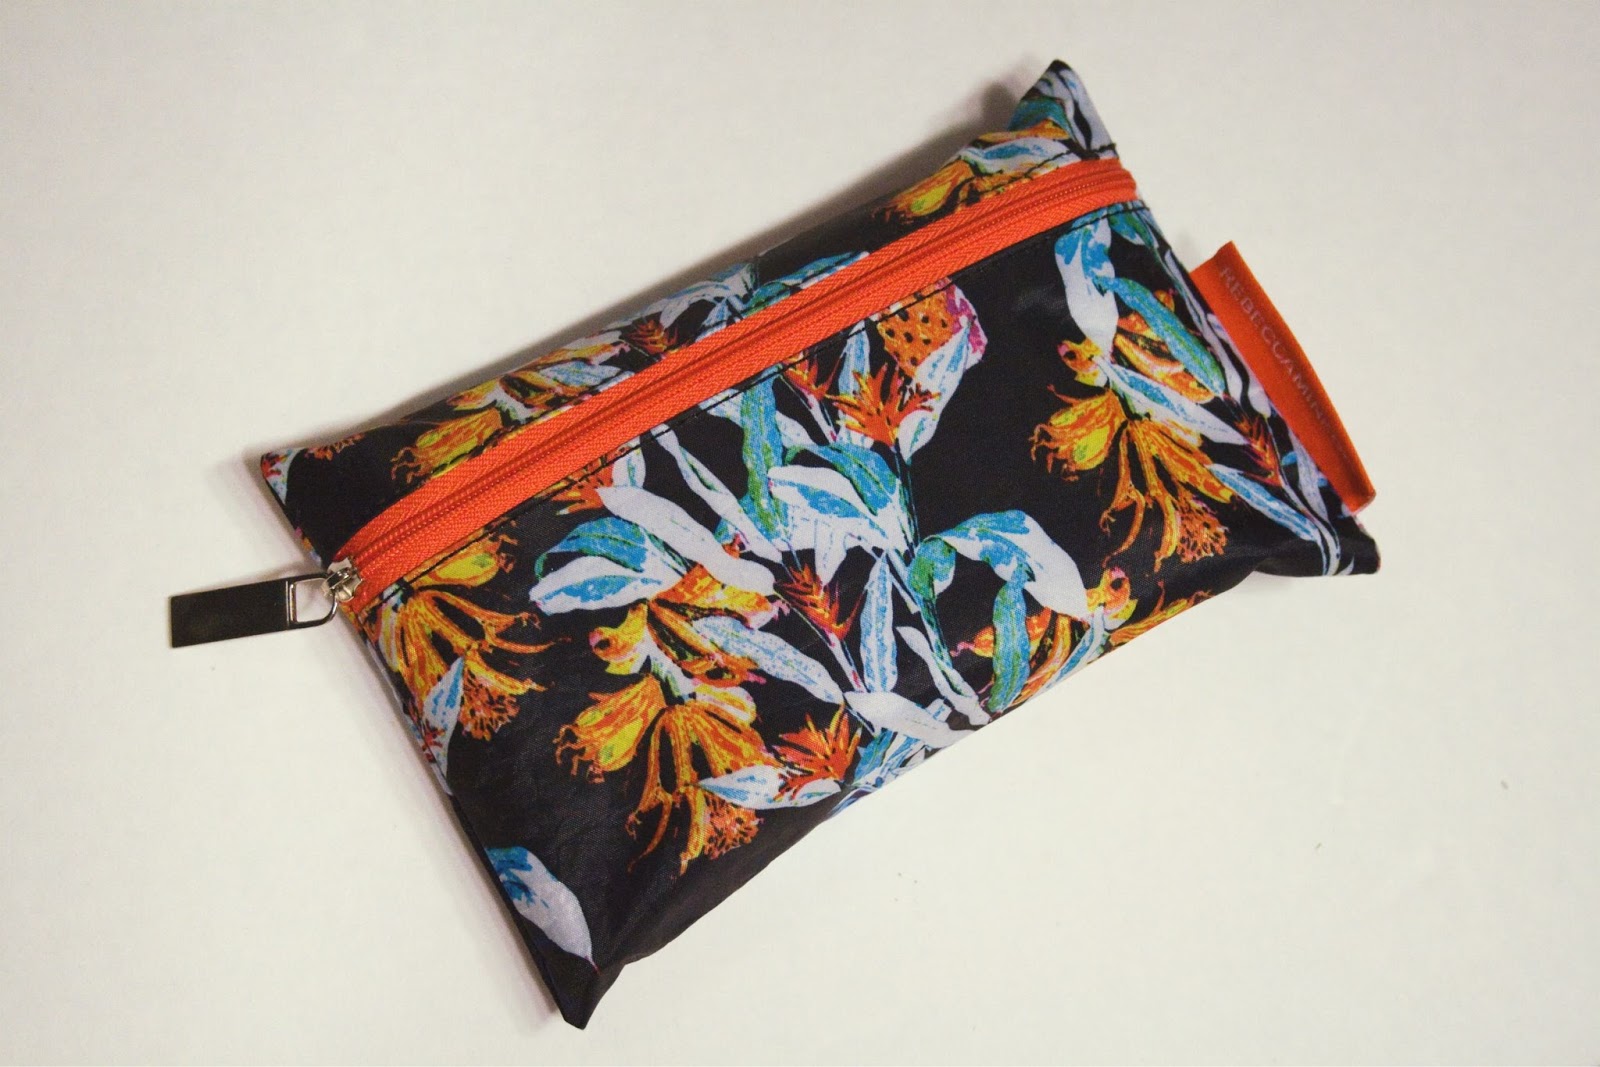
The bag is an old Ipsy bag from Summer 2014.  It has a fun pattern on it of some like pineapples and some leafy plant.  It's pretty bright and cheery which is what I like the inside of my purse to look like especially when I'm reaching into it at work.  It's the little things right?

Some Ipsy bags aren't that roomy but this one is big enough to fit what I need.  I rarely change out the items in here except for maybe when the seasons change - like adding in a darker or a brighter lipstick - but right now we're in neutral territory.
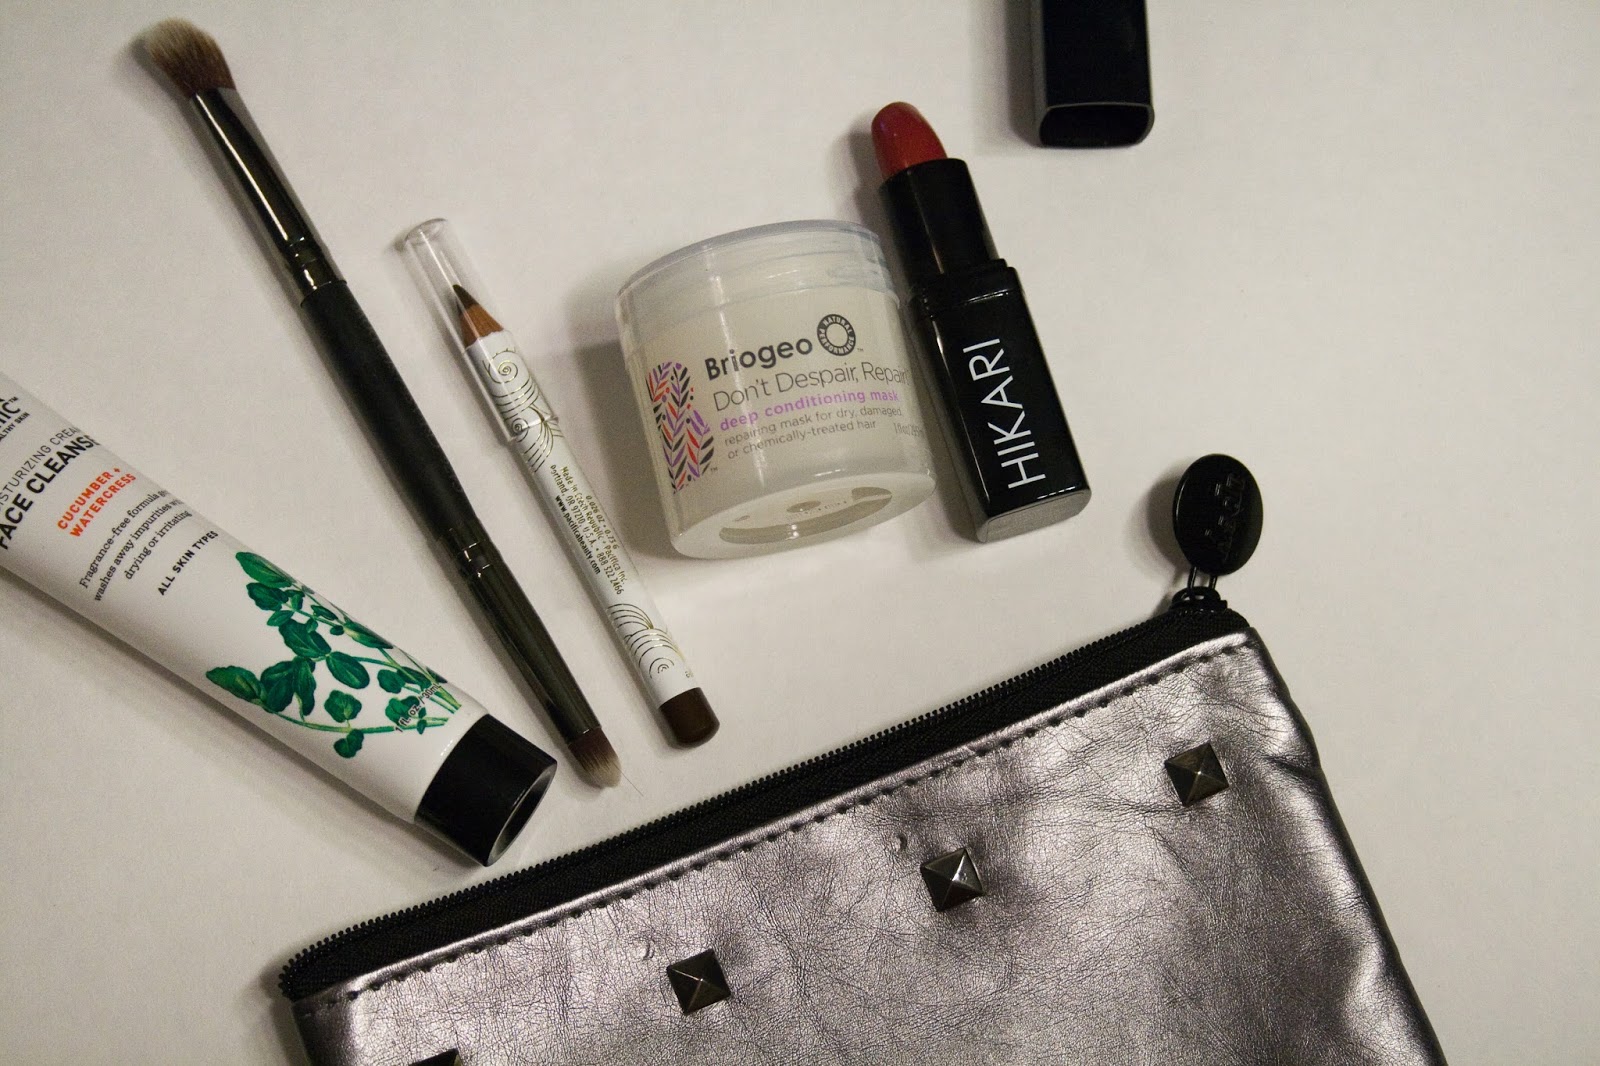
The two face products I won't be caught dead with out are my Mally Evercolor Poreless Face Defender and a pressed powder - right now I have an ELF powder in there because it's small enough.  I love the Mally Face Defender and the key to it is to press and blot it into the skin.  It really does take away the oil and refresh your make up.  I'm not sure what kind of magic is in there but it truly is magic.  The pressed powder also helps with oils and refreshing my make up.  If I've lost coverage in an area it helps to bring it back.  It also helps to have this in my bag to set any concealer I've reapplied.  I like the Revlon ColorStay Concealer Wand because it has pretty good coverage.

The remainder of this bag is all lip colors - which I'm realizing now are quite similar.  I keep neutral colors in this bag because they are easier to apply and very low maintenance.  While they are all kinda the same they are kinda different!

The Milani HD Advanced Lip Color (which I got a the Dollar Tree last fall) is a darker, more fall-like mauve color named Lovely Rouge.  The L'Oreal Color Riche lip color (which I got a Big Lots) is more of a pinky nude color named Rose Taffeta. and the NYC City Proof crayon balm is an in-between shade of these two called Riverside Rose.  You know, you have to have variety.  I might throw in a deeper shade now that we are going into fall but these are all super easy to throw on if I need to in a pinch.

I have two balms in the bag - the L'Oreal Colour Riche balm is also an easy hint of color but it does help with chapped or dry lips.  And the other balm is actually intended to be the last step of the Cover Girl long wear lip colors but it is a really nice, nourishing balm when you have dry lips.

This slips so nicely into my new bag along with my Filofax, wallet, pencil case, & just-in-case bag.  I'm pretty sure I could also slip my iPad in this purse if needed!

What are your make up on-the-go essentials?

xoxo, Moe

9.29.2014

September 2014 Favorites

September went by so fast and I took an unexpected little blogging break because I was buying a new car! Mine bit the dust a few weeks ago and I spent a week working towards deciding on buying a new one. I bought a 2014 Chevy Sonic LT - so that is one of my September favorites! Let's get into them all though
Before my car broke down I made the sort of big purchase of a ClamCase for my iPad. I have a ClamCase Pro & it is $160 but if you visit the website & sign up for emails you can get a $20 credit, that brings the price down and they have an option for free standard shipping which took about a week (I ordered on a Saturday or Sunday and got it by the following Friday). I love it because it turns my iPad into a small laptop! I can blog easily and the whole thing is no bigger than my Filofax. Which brings me to my next favorite - My Raspberry Saffiano Filofax. I really started using it in September and it came in really handy when I was car shopping! Right now I'm realizing that I use it mostly for blog planning and less for my week to week planning. I filmed a planner tour video and I hope to put that up on my YouTube channel soon. I just have to edit it...that is the part I don't really care for. I've also been loving my crocheted blankets as the weather has been getting colder.

Movie & TV favorites (and unfavorites) this month have been Silver Linings Playbook, American Hustle, and surprisingly The Colony. I sat down in front of Netflix one weekend this past month and saw the Silver Linings Playbook was available so I watched it. It was really good and a way different role for Jennifer Lawrence - I'd only ever seen her in the Hunger Games. So I decided to get my JLaw fix and watch American Hustle. I didn't realize that she wasn't the one of the main characters in the film and almost stopped watching half way through. It turned out different than I thought but it really wasn't the greatest movie, JLaw's character was good though. Zach & I watched The Colony on Netfix too and I'm actually surprised I liked that movie. If you've seen the movie Hell, which I believe is a German movie, The Colony is pretty much that but in a world where everything is frozen over instead of a world where everything is heating up. If you like end of the world type movies and aren't bothered by some gore, I'd recommend this movie. It also had me thinking way after the movie was done. As for TV I've been watching a lot of True Crime shows on Netflix and sometimes I fall asleep with them on. I've had at least one dream where I was being kidnapped. The only one I can rememeber was that I was being kidnapped buy a kid I went to camp with and Emrys. Em was still a dog but he could talk and was trying to kidnap me......what the heck?
And now for beauty and make up favorites! I've been loving a few face scrubs this month - the Charcoal & Black Sugar Facial Mask from Freeman's and the Tea Tree Squeaky Clean Scrub from The Body Shop.  The Freeman's scrub is actually a mask but I can' seem to understand why you'd have an exfoliant in a mask it's working like a scrub for me.  An Ulta has opened in my area so I've been popping in every now and then to see if there's something fun to pick up, which is where I got the Body Shop Scrub. 

I've also been loving my Wet n Wild Fergie & Mega Last lip sticks. I've been loving the deep, vampy fall colors.  The colors I've been loving are (from top to bottom) Cinnamon Spice, Ravin Raisin, Urban Night from the LE matte collection, and Ferguson Crest Cabernet. I've also been digging the Maybelline Matte lip color in Lust for Blush, the Hikari lipstick that came in my Ipsy bag this month in the shade Cabernet, and the Model Co Party Proof Matte Lipstick in Dusk til Dawn which I got in a BirchBox once.  It is the perfect 90's brown lipstick that is all the rage right now.  To apply my lipstick more evenly, since sometimes dark colors can get kinda unruly, I've been using the Elf small precision brush.

I've been using the Boots Beautifully Matte Makeup Base under my foundation and have really been liking it. I've been using Maybelline 24 Hour Foundation and the L'Oreal Infallible foundations this month.  Even though it's getting chilly out I'm still into wearing long wear foundations. I'm also pulling out my neutral blushes like this LE Milani blush in Warm Petals and this CoverGirl blush in Soft Sable, but also pulling in a new Bare Minerals Blush called Glee. For an eyeshadow base I'm still digging the Mary Kay cream shadow in Apricot Twist and instead of going all out with eyes, recently I've been putting my bronzer (Hoola, which I hit pan on!) in the crease and my blush color on the outer corner of my eye then using some mascara on my lashes. It's simple and natural, and is understated so my eyes aren't competing with the bold lips I've been loving.

So that's all I've been loving for the month of September....boy that was a lot! Here's to a fun October!

9.23.2014

September Ipsy Bag

I've bee subscribed to Ipsy for a good long while now - I'm pretty sure it's been a little over a year and I rarely mention it here on the blog because I feel like by the time I get the bag it's the middle of the month and by the time I test everything it's the end of the month and why would I show you something for a month at the end of it?  But I decided to try to start doing the post the week after I get the bag.  So here it is....let's see if we can keep this up!  September's Ipsy bag:

The Bag
The bag this month is pretty big.  It seems to be made of a silver pleather type material with 4 silver, metal studs and a black zipper.  The inside is unlined - like a majority of the bags sent through Ipsy - but the underside of the silver pleather is a nice tan color and it doesn't feel unlined.  July's bag which was really cute and pink had an inside that was really fuzzy.  It was the back side of the pink fabric used to construct the bag.  This month's bag measures 6.75 x 5.75 inches.
The Products
Hikari Lipstick in Cabernet | Pacifica Natural Water-Proof Eye Pencil | Briogeo Don't Despair, Repair Deep Conditioning Mask Nourish Organic Moisturizing Cream Face Cleanser | Crown Brush Infinity Shadow/Crease Duet Brush
Bonus Item from Points - Miss Ardo Eye Bundle (eyeshadow duo + lashes + glue)

Ipsy is the only monthly subscription I have right now.  I love Ipsy because I get to try new beauty products each month and I'm guaranteed beauty products and not just filler stuff.  The quiz you take and the feed back you give, I feel, really affect the bags you get.  I'm not really disappointed in any of the items I received this month.  If you'd like to sign up, I'd love for you to use my link here.

xoxo, Moe

9.22.2014

Make it Monday // Desktop Organization Background

I'm still sorta in back to school mode and am still craving some more organizational DIY stuff so I thought I'd go for another one of my favorite types of tutorials on the blog and that is tutorials using PicMonkey!  If you don't already know - PicMonkey is my favorite online photo editing and simple design platform.  You can use it for free, online at PicMonkey.com and if you want to test out the Royale feature click this link for a free 1-day trial to decide if you want to upgrade.  In the tutorial we'll use PicMonkey to create desktop wallpaper to organize your files.  This desktop background isn't relegated to just back to school season - you can use an organized desktop in general even if you're not in school.  It's great if you've got a lot of blog content to organize, documents for clients, family documents, etc. Ok, onto the tutorial!
First you'll need to determine the display resolution on your computer - PicMonkey is very helpful with that.  Head on over to the PicMonkey webpage & hover over Design.  Select Custom, then using the provided proportions, click Make It.
From the first screen you are directed to, click where it says No fixed proportions under the Crop heading.  Scroll down until you find the selection that says (your screen) beside it.  This gives you the exact measurements to fit your screen.  How helpful!  (I didn't do this at first and made an entire background at the wrong resolution....good for you though because both the ones I made are free at the end of this post!)
I chose a color palette from ColourLovers that I liked and went from there but you could also choose colors of your blog or branding as well.  Set your canvas color, add some design elements to make a nice background, then begin to add your boxes.
I made a list of the types of boxes I wanted to categorize my files in so I'd know how many boxes to make.  I chose Current Projects, Blog, To Print, and File Later.  But you could choose whatever you need.  If you're a student you could put class names if you type a lot of papers or work on a lot of projects.  Your desktop is supposed to house things you need quick access to....mine totally didn't do that...so make your titles things you access most often.
Add the boxes and arrange them in an order you like.  They could be all vertical, all horizontal, or staggered like mine.  Then add another little shape to act as your label and fill in with text.
At some point during your design process you might need to zoom in to make sure you are clicking on the correct element you're trying to move.  If you have a mouse, simple use the center scroll wheel to zoom in & out.  Or mouse over the bottom right of the screen to manually zoom in & out.  You can then use the box that appears to move your canvas over to the area you need to edit.
Once you believe you are satisfied, save your work.  But do not close out of PicMonkey!  If for some reason you set this image as your desktop then hate the widths, the layout, or the design all together you can simply go back to your PicMonkey screen and edit.  If you close PicMonkey your work is gone forever...so just don't close it just yet.  You may even want to organize your desktop before closing the PicMonkey browser just to make sure you do in fact like it.  I would also recommend saving a copy of the image with out the labels in case you want to change them later.  You can just open the blank image in PicMonkey and add new labels.

once image loads right click & save to your computer

Now organize your life!

How do you keep your desktop organized? 

xoxo, Moe

9.18.2014

Boost Your Blog // Three Important Blog Tips you Might not Know

I'll be the first to admit that Blogging is a personal journey.  Your blog is an extension of you, your likes, & your personality so it's going to reflect you in the design, the posts, the layout, etc.  I do this Boost Your Blog series to help your blog reflect the best of you because ultimately it's on the web for others to read & if you'd like to gain readers, somethings are consistent through all blogs with a readership.  In this post I want to bring it back to the basics - I'm not going to talk about HTML, design tips, or the pros & cons of platforms - I'm going to bring it back down to 3 extremely basic things that will improve the over all look if your blog and bring up to par with other blogs that you may love.
Bump Up Your Blog Posts
There are three things consistent in all popular blogs:  image size, font readability, and use of tags or categories.  Here's how they relate:

Image size
The biggest way you can make an impact on your blog is with photos.  And besides taking well lit, well composed photos your photos should take up the full width of your blog post.  It's more pleasing to the reader and visually inspiring.  To figure out the width of your post area is really simple if you're using Chrome as your web browser:
Scroll down on your blog, find a chunk of text, and right click.  Select Inspect Element.  Once the crazy box (thats a technical term) shows up at the bottom, hover over the lines of code until the text you just right clicked is highlighted in a box.  The first number, in the sequence 000 x 000 is the width you should make your photos.  For example, 666px is the width I should make my photos.  (You can also google to find out how to find the correct widths in your specific template or platform.)
Now, you can resize your photos in your editing program of choice and select original size when you upload your photo to Blogger.  Or you can go into the HTML side of your draft post and change the width section to that number (like the image above).  Then delete the height section so it doesn't give you a skewed image, your image will automatically fill out to be the correct height.  Do this step after you've uploaded your image.

Giving your image the same real estate that your post body takes up gives the reader a more pleasurable experience.  I also tend to only take landscape or square photos as I find long, portrait photos to take up too much space & not balance nicely with my bodies of text.

disclaimer: I don't follow my own rules here! My images on my blog are 640 px.  So sue me ;)

Font readability 
This one is also important for the comfort of your reader.  Have you ever tried to sit for a while and read cursive handwriting?  It can all run together, can't it?  Limit the frilly, handwritten fonts in your design.  Use them only for a blog header or accents.

Additionally, consider how the body of your post looks.  It is easier to read a sans serif font at a lower size than a serif font.  Currently (at the time of this post because I change up my design quite frequently) I'm using a serif font in my post body.  If the size were scaled down less than 12px it would be harder to read.  If it were a handwritten font it would be even harder to read at this size.  Sans serif fonts are the easiest to read at lower font sizes.

I chose to go with this serif font, however, because I love the way the font looks when it is italicized or bold.  It gives a different texture to the page...so that is another thing to think about when picking your font.

Use of Tags
This next tip is about organization.  A lot of the times in your blog you'll want to categorize your post as one that might go into a series of posts.  This is where the tags or labels option comes in.  When I first started blogging I believed that the labels section of my post was there for me to list every single word that could describe my post so it would show up in search engines.  That is not the case.  The labels section is there for you to create categories for your blog.

Try to limit the number of categories you have so that you can find the posts all related to one category later.  I have nearly a million because I started this too late!  Create a list separately of the types of posts you do and file your posts under only a few of those labels.  If you have too many you may forget which labels you've put things under and posts may get left out (I'm guilty of that with too many labels!)  It creates a better experience for you when you are trying to link to a series of posts and allows readers to search under a certain tag to find what they are looking for.

These three tips are some of the basic things that will get you off to a good start in blogging.  Creating an organized space visually will keep a reader interested in your blog for longer!

What are your three tips for blogging that get over looked?  Anything you instantly notice when reading a blog for the first time?

xoxo, Moe

9.16.2014

Why Pocket Scrapbooking Might Be For You

Pocket scrapbooking - or as you may know it as Project Life - has become pretty popular, don't you think?  I finally jumped on the train just as it was leaving the station and now I'm hooked.  I started by buying those cute little cards to add a hint of design and inspiration to my planner (hooray, this month I'm moving into my first, official Filofax!) but soon I realized that I wanted to do more with them.  So I decided to try out Pocket Scrapbooking.
I bought a bunch of different inserts from Michael's when they had a 40% off sale on paper supplies and jumped in, in the middle of August.  So far to get my feet wet I'm doing a mini-album of our relationship so far.  I crammed 1.5 years into a small, SNAP 6x8 album.  And let me tell you - I was afraid to start too big because I didn't want the pressure to fill every single space and I was afraid to start too small because I might out grow the album in a few, short pages.  For me, the 6x8 was the perfect size to jump into.  Now I think I might continue with the 6x8 size.

Scrapbooking was something I always wanted to do but never wanted to devote the time to.  I felt I wasn't creative enough to fill a whole 12x12 page.  I even tried digital scrapbooking for a while and that didn't do anything for me either.  But pocket scrapbooking seems to be perfect for me.  If you've want to scrapbook but aren't sure what to do, pocket scrapbooking might be for you - here's why:

It is a perfect blend of the ease of traditional photo albums and the creativity of scrapbooking - It really is this simple: Print photos, choose cards, slip in pockets, repeat.  You don't have to get fancy if you don't want to.  I've always loved the traditional feeling of photo albums with the plastic sleeves.  But I've also loved the twist that designing a page gives.  Pocket scrapbooking gives you the ease of both!  Cards are already designed to fit in with different themes, you can find them for free (check out my free September cards here), or even make your own.  Then all you have to do is add your photos straight from your at home printer (or you can have them printed by a 3rd party, of course) and you can have a page done in no time.  I believe the idea is to do a week at a time so in about 2-5 hours, depending on your dedication, you could have your spread done and move on.  I feel like there is less pressure to create something perfect because the idea is to capture your memories in the easiest way possible.

It appeals to the craft collector in you - I have always collected scrapbook paper just because it was pretty.  This year I wanted to use my scrapbook paper so I started off with it in my planner but now I've realized that adding the things I collect is a part of this scrapbook too.  You can add receipts, fortunes, leaves, or really anything to these pages by slipping them in the pockets.  You've got a small piece of a treasured scrapbook paper?  Throw it in there.  It adds to the design.  It gives you an excuse to collect the things you like to collect and a reason to keep them.  I've seen others do mini albums in addition to their larger albums just for certain memories - like a summer album where you put sand in a little pocket and tape it off just so you can keep that memory.  Collect all the things!

It's the easiest way to keep your memories - There is little to no stress involved...as nothing is truly permanent and nothing has to be perfect.  If you don't want to glue things down, don't.  Rearrange to your hearts content!  Don't have perfect handwriting? Even better, scribble on in there.  This is about keeping memories not perfection.  You'll be surprised how impressive your spread looks if you just go with the flow and slip in and out what you choose.  

Overall, I was surprised how much I found I liked doing pocket scrapbooking!  You can be as creative as you want to be and there's no right or wrong answer.  My favorite part has to be all the little cards you can collect and use.  They all are so pretty and they all fit great into different spreads.  Mixing and matching is fun and it takes the stress out of pulling elements together.

Do you like pocket scrapbooking?  What is your favorite part?  What sold it for you?

xoxo, Moe

9.15.2014

Make it Monday // DIY Clip on Charms + Planner Charm

If you've ever been to the craft store, walked down the few jewelry aisles, stared at all the crazy beads and charms, & wanted to take home all of them - this project is for you.  Usually when you're planning a jewelry making type of project you want to make sure you have all the same color metal findings - like all sliver chain, jump rings, and closures.  However this project for me was a teeny tine de-stash type of deal where I only bought the charms and mixing metals was what I was going for. 
Additionally, this tutorial can be used to make charms for a charm bracelet so if you're making a charm bracelet, the mixed metal gives the bracelet a more collected feel.  These charms all will have a lobster clasp to make them removable that way you can change them between bracelets, necklaces, and your planner charm

Supplies:  Assorted chains, lobster clasps, head pins, & jump rings in assorted metal colors, assorted charms, beads, needle nose pliers, wire cutters, a toggle clasp if making a bracelet

Since this project was a bit of a de-stash like I mentioned I started off with some charms/beads that I had lying around.  Eventually, to make my planner charm, I did go out to the craft store to pick up some charms that related to things I liked.  So the first step is to start there.  While I might not agree with this store's business strategy, it is the biggest craft store near me - I found the components for my planner charm at Hobby Lobby.  But of course you can go to any local craft place that has a good jewelry department or order charms online.  So first you'll want to select your charms.  I suggest selecting charms based on your interests but you can also just grab up anything that you find pretty.  If you are a hoarder of craft supplies you might already have some charms you've never used but picked up because they were on sale or pretty or whatever reason.
Some charms may have jump rings already on them but if they don't you'll want to add them.  If your charm has a jump ring you can open it and add the lobster clasp and be done.  However, this is the time to get creative with your charms:

Create a beaded cluster
To create a more interesting charm you can create a bead cluster with smaller beads.  You'll need a few jump rings in varying sizes, your needle nose pliers, and a lobster clasp.
Open a small jump ring and drop a few beaded charms.  Open up a bigger jump ring drop the smaller jump ring, another bead and your lobster clasp.  These types of charms add a lot of fill to whatever you're adding it to.

Create a drop charm
To create varying lengths for charms to add a bit of character you can create a drop charm with a bit of chain, 2 small jump rings, and your charm.
Cut a small length of chain, open a jump ring and drop an end of the chain and the charm, close the jump ring.  Open a second jump ring and drop the other end of the chain and the lobster clasp.

To create your Planner Charm
Cut a length of chain that is 2.5 inches.  Open a small jump ring and drop on the chain & lobster clasp.  This is now the base to add your charms on to.  To guage where to add your charms, clip in this chain to your planner (If you're adding to a six ring binder, like an A5 Filofax this length fits perfect for clipping on the middle ring of the bottom set of rings.  However you might need to customize the length for a 3 ring planner or a spiral bound planner).
At the very last link of the chain, add a bead cluster.  This gives the charm some weight and visually adds some finality to the charm.  Now using all the charms you made start clipping.  The drop charms come in handy as you start adding bulk with the thickness of the other charms.  The skinny chain helps to take away the bulk.
Now, of course you can create the charms to clip onto a charm bracelet - which might be more practical for a lot of you!  But if you're a crazy planner person, this DIY might come in handy too!

xoxo, Moe

9.11.2014

App Review // 3 Ways to Keep Photos Organized

So with my project life bug I've just finished an album on our first year and a half (October 2011 - December 2012) and have started a more traditional weekly layout style while I tackle 2013.  Both of these are in 6x8 SNAP albums from Simple Stories and I've found that organizing the photos is the hardest part especially if you're going back & doing previous years.  A big help has been my blog and, of course, Instagram but having to flip through post after post after post to categorize has gotten a bit tedious & a lot bit confusing.  I started surfing around to find some ways to organize my photos while I'm consciously documenting for 2014 and ways to organize photos from years previous.  Here are a few apps, online tools, and suggestions I've seen:
Instaport - If you're trying find a way to export all of your Instagram photos from previous years this website is pretty handy.  The site claims that you can export photos within a time frame, however when I tried that I got a .zip file of all my photos from the start date up until the current date.  It's not too bad because the file names are in the style of 2013-04-09 with the date first, the month, then they day and they automatically are in order by date.  I just went through and grouped the photos by week into folders and imported into Picasa.  Oh....and Instaport is free, though there is an option to donate.
Collect App -  This is an app that is great if you are currently trying to collect your photos for project life.  You can set it to prompt you to add photos to your calendar by day so you always remember.  The plus side of this app is that you can add multiple photos per day - perfect if you're not just focusing on your Instagram feed.  There's also an option to journal on with your photo and an in app purchase lets you change the design/font.  Another plus side is that you can add to albums - so if you're working on different physical albums for different things you can easily sort & print.  High quality photos are saved in the app so they stay there after you clean your camera roll.  Oh...this one is free too!

Creating a Weekly Marker - This one isn't really an app or a website but a tool you can create for yourself when going back through your Instagram photos whether on your phone or on Instagram online.  Using some fun design apps like the A Beautiful Mess app, Rhonna Designs app, Phoster, Phonto, or PicsArt you can create a nice weekly marker to post to Instagram however you divide your weeks.  For instance, post on Monday if that is the start of your week to show you where your photos for a specific week begin.  This separates the weeks out for you if you're looking back to see what was going on that week.

Of course, if you keep all your photos on your phone and are caught up with project life the Camera Roll on your iPhone offers a little bit of organization under the Photos tab if you back out until you see Collections.  They are organized by day/week....hopefully I'll get to this point next year!

How do you organize you past & present photos for scrapbooking?

xoxo, Moe

9.10.2014

Summer Memories 2014

The second Summer in Indiana has just flown by.  I can't believe it actually.  It suddenly went from 6 feet of snow to 2 feet of leaves and I don't know where the time went.  While I will say that September & October are my two favorite months there are still some Summer memories I'd like to keep forever.  I just finished my first Project Life book of October 2011- December 2012 (I'll post on it soon!).  I've started work on 2013 & on 2014.  I started with Summer 2014 first when I started work on the 2014 year, this was just a good Summer!  Here are some memories:
This summer, about the middle of July, there were so many fireflies it was like being in a movie.  Every time I went out side our house at night the whole landscape was lit up.  If you've ever been to Disney World and have seen how they light some of the bushes with twinkling lights it reminded me of that.  At the beginning of the Summer I saw maybe one or two or three fireflies.  I thought about how I hardly see them any more.  Then one night while taking the dog out I was surprised by the masses of fireflies twinkling into the night.  I want to remember the joy I felt and the magic of the fireflies in mid July because they are all gone now.  It was really a period of about 2 weeks!
Bubbles is the best place for ice cream.  There is a small ice cream & pie shop called Bubbles down from us.  We have to drive there but it's at the edge of a little neighborhood with nice houses.  It's across the street from a drive-in restaurant where they bring food to your car.  They have tons of flavors - my favorites are Birthday Cake and Lemon Marshmallow.  Waffle cones are the bees knees.  Sitting outside on their porch is nice especially because they have a bubble machine constantly blowing bubbles around.
Camping in a 2 man tent and dressing into my 1300's inspired dresses, cap, etc is hard.  We went to a few SCA events this summer - some we went back to back to back weekends.  It was fun to meet new people, learn knew things, and discover something to get involved in.  Sharing a 2 man tent and dressing a man and a woman in period attire is hard.  You have to take turns and hike up that dress to get out of the tent.  Meeting and eating and drinking with quite a few people was a fun, fun part of the summer and I can't wait to see what fall events we end up going to.
Some other memories - front porch sitting, steak cooking and eating, flea market & yard sale shopping, crocheting & crafting, walking the dog, cotton candy eating. afternoon nap taking, Pewter melting & casting, cherry picking & eating.

How was your summer memorable?

xoxo, Moe

9.08.2014

Make it Monday // That Time I Spun my Own yarn

You may not know this about me......I am a part of a group called the Society for Creative Anachronism, or the SCA.  (Read about it here for the full details.)  Pretty much it's a bunch of like minded people who get together and hang out.  We're all a bit creative, a bit into history, a bit talkative, and a bit different.  For me it's like a living art history class - we research and recreate the arts & skills of pre-17th century Europe.  It might seem a little weird but it's honestly the most creative group I've ever been a part of.
There are constantly Arts & Sciences competitions - on the local & the kingdom level (yeah, there are 19 kingdoms in the "Known World") - where participants research and explore techniques and skills of a certain, specific time period.  If you've ever done a Senior Thesis or the like, the dedication to the projects is on that level.  Some people dedicate their whole lives to developing a technique!  The surprising thing is that some of the people don't have any official training in the things they practice.  I find levels of dedication I would have expected from a trained artist - yet they are creating calligraphy and other art (and craft) objects from purely self taught skills.  There's research involved - much like you would have done to support any thesis you'd presented in school - that is done to back up techniques and creations these individuals submit.  Pretty much if you enjoy scholarly things - like research - and appreciate the arts & sciences of the middle ages, Renaissance, etc then the SCA is for you.

Oh yeah, and we wear funny clothes:
But this post isn't about the funny clothes - it's about the time I spun my own yarn from an Alpaca fleece from an Alpaca I know.  A few years ago when Zach's mother got two alpacas and decided to try out sheering them...I got the fleece.  It sat in the garage for a good long while until we headed down to southern Illinois last weekend to For Hands VII Metal & Glass.  An event featuring A&S (Arts and Sciences) classes in metal casting, metal work, jewelry work, and fiber arts.  Are you kidding me?  It's like I could feel my art degree quivering!  What could I learn from this event?  So Zach & I set off on Friday to spend three hot ass days doing some fun ass activities.  While Zach was busy pewter casting - I was over with the ladies all day doing a class called From Sheep To Shawl where I carded & spun some of the alpaca fleece I brought!  I also gave the other part of what I had away because lets be real...what the heck am I going to do with a whole bunch of alpaca wool!!??!?
So I took this wet dog looking thing (really it's just the alpaca fleece that's been sheared...I promise), combed it out with some dog combs (so clever!) and to speed up the process used a drum carder (that thing on the TV tray) rather than hand carders.  Here's the alpaca fur about to be carded:
Once it's been carded it looks kind of the same - still very long fibers in there.  But it reminds me of an old lady's long hair.  It was so thin and easily caught the wind so I had alpaca fur all over me and everyone that was in the tent!  I was even pulling it off my lunch.  So after it's carded, which I don't have a picture of....I spun it on a drop spindle.
And because I'm no pro I had a lot of over spin in my yarn.  When I went to ply it, it got so tangled!  Eventually the lovely instructor and I were able to get it under control and I walked away with a nice sized ball of yarn!
Now I don't know weather to keep it wound or use it for something!  I am so proud of myself and this even had to have been my favorite event so far.  Talk about putting my interests to good work.  This event was like adult summer camp, there were so many activities.
If you want to know where we were camping at - we stayed at Camp Dubois, the Lewis and Clark winter camp.  There was a fort too but since it was sweltering and the fort was more like an enclosed cabin type deal everyone who stayed in it said it was horrible.  But camping in our tent was horrible with the heat as well.  But all in all I thought it was a great weekend.

xoxo, Moe

9.04.2014

Four Simple Goals September 2014

Now that I'm back to blogging I'm really excited to keep up with these little goals.  Let me be the first to tell you how manageable goals have become to me now that I've been breaking them down in to smaller chunks.  I feel like I have a lot of experience with goals and goal setting - when I was in school they drilled into us about setting goals with the SMART method and a bunch of other stuff....yet I never really got the hang of it.  Now I feel like I can set & achieve smaller goals and feel accomplished.  Also this little check in helps as well!  Here are my goals for September:

Clean out the shed - Yep rolled that one on over to September because it did not happen in August.  I got side tracked on a bunch of other home goals that got done like the laundry room, and organizing my dresser drawers.  Oh, and I organized my craft shelves.  Hooray for that.

Bill Organization - I need to create a place to keep our to-be-paid & our paid bills.  It seem like it's just not something that gets prioritized and then I'm scrambling to find the things that need to be paid.  I touched on this problem in this post back in August.

More Freebies for the blog - I've been really into making free things to share on the blog and I want to keep it up.  So far I've been trying to make some free journalling cards to share showing how versatile the PicMonkey site can be (here are the ones for September).  Also, it's pretty great not having to bust open Photoshop to design things.  yes....I use photoshop to design things!  Always have :)

Another SCA Event - We got busy doing a bunch of other stuff recently and hadn't been to an event in while up until this last weekend.  I mean at the beginning of the summer we were gone like 4 weekends in a row!  I'm thinking the ones in the fall are going to be really fun and really want to go to at least one this September.

What are your goals for September?

xoxo, Moe

Connect on Twitter // Follow on Pinterest // Peep me at Hello Cotton

9.03.2014

Wednesday Decor // Five Tips for an Organized Home

Now, I'm not expert.  Nor am I the most organized person in the world, but we can all strive for greatness right?  Recently I've been trying to get and stay organized.  I've decided it's time to take control of my surroundings and keep myself accountable.  That doesn't mean there aren't a few junk drawers (or even some junk cabinets) but I will tell you that these five tips have kept me sane when it comes to cleaning & organizing:
Everything in it's place - 
This was the biggest realization for me...and while you may think this is a duh statement imagine this:  You've only been living a life of dorm rooms and communal apartments where your bedroom acts as a studio, lounge, sleeping quarters, study room, escape, movie theatre, craft storage, closet, etc.  With one room housing so much and doing so much I found that there wasn't really a place for everything I owned.  Now that Zach & I have a place that is distinctly ours - we share the remote so it can have a place in the coffee table with also share in the living room we also share - it's easier to have a place for everything because I'm not encroaching on anyone else's space.  So the point of this is to clear out the places serving double duty & only keep the thing that belongs there, there.  Create a clear space for something and that is where it lives.  For example when the remote is taken out of the coffee table drawer there is a space where it is missing from.  If you can clearly see that space, good job...it now has a home.

Clean one thing a day -
I used to do all my cleaning on the weekend because when I got home from work I was too exhausted to do anything else.  But then I realized I wasn't getting anything done on the weekends because I was cleaning all day.  Also, if we went a way for a weekend there would be two weeks worth to clean.  And I wasn't enjoying my time home because the house was a mess.  I resolved to clean one thing a day after work during the week.  I broke the house down into 4 zones - the downstairs, the bathrooms, the kitchen/dinning area, & the bedrooms.  I clean one of these areas each night of the week in a solid rotation and usually spend 30min to 1 hour cleaning (usually it's the 30 min).  If something needs a deeper clean it's reserved for a larger house goal that I add to my 4 simple goals or if I'm feeling particularly cleany I'll just spend a little more time on it.  Now I'm more productive on the weekends and can enjoy a cleaner house during the week.

Make a list -
I have the chore list I mentioned above but I also have a greater house goals list that I add to every time I think of something.  This list lives in my planner and while there are important things on there I don't hold myself to some lofty goal of crossing them all off.  I add to this list so I can pull from it for my two house goals in my 4 simple monthly goals.  It's also there so I can keep a running list of what really needs to be done so I can plan or arrange when needed.  Mental lists never work for me so this big list is there for me to pick from and I don't expect lines through every one of the items.

Don't focus on what you haven't done -
Try not to think about the huge mess you have to tackle in the fridge while your working on tidying the living room.  For me, those things aren't even on the same day so there's no need to even think about it!  The biggest stress reliever for me is focusing on the chore at hand.  I don't make the big lists so I can think about all the stuff that needs to get done, I make the lists so the chores sit there & not in my head.  For me the most important things to get cleaned in the living room and the bedroom and I only think about their mess when I'm in that zone on that day.  If I'm dreading what I have to do I won't do anything.  So just don't focus on how big the house or chores are as a whole only focus on the small chore at hand.

Don't beat yourself up -
So you've made a list but haven't checked anything off and you've divided your house to clean one thing a night but you missed the kitchen last week.  Thats fine, you're human.  Resolve to be better next week.  For me, if I miss the kitchen this week I do it next week.  Now you can't miss the kitchen every week, what would be the point of having this list if you didn't do it, right?  So I just do the chore I missed the next week.  I don't hate myself for it nor do I punish myself for it by doubling up the next day.  Sometimes things come up.  I also don't put house cleaning above family time or social engagements.  If we got to eat on Wednesday with a friend and I can't clean the kitchen, no stress there is always next week.  If Zach has had a particularly rough week and I can't clean the bedroom Thursday because he's sleeping, no stress there is always next week.  To me, keeping organized isn't about stressing yourself out it's about giving you less to be stressed about by giving your a plan of action to keep you sane.  Don't beat yourself up if something doesn't work for you....it took me nearly 27 years to figure out what works for me. :)  And I'm sure if/when we move into a new house I'll have to adapt.

The biggest thing in my organization journey is realizing how much less stress I feel when I can sit down in a clean, organized living room.  If I miss a day the mess stresses me out so the biggest reward is not stressing!  I tend to stay on track because I don't want to look at the mess I didn't clean up!  These are just 5 things I keep in mind when organizing and cleaning my home.

What are your tips for organizing your home?

xoxo, Moe

9.02.2014

Review // Wet n Wild Fall 2014 Color Icon 5 Pan Palettes

If there is one Drugstore brand that I get super hyped about when something new is announced, it's Wet n Wild. I just live for the new products with the changing seasons. Honesly, I can't wait for this holiday season as well! Here I have for you a review of two of the 5-pan pallettes from the Fall 2014 Wet n Wild collection
From the Website
Five amazing shades in one convenient package for an unbeatable price! Each eyeshadow palette features five distinct shades that can be mixed and matched to create a unique look for every style. From matte to ultra-shimmer, these long-lasting, highly pigmented formulas are satiny-smooth for crease resistant wear. Enriched with Macadamia Oil, each shadow provides continuous moisture that improves the appearance of the delicate eye area.
taken from the Wet n Wild website here.
First Impression & Application
These shadows come in the standard 5-pan configuration first released in the Spring 2014. The two collections I have are Melrose at Night and Smoke and Melrose. Melrose at Night has one satin-finish shade (Browbone) and 4 shimmer shades. Smoke and Melrose has one matte shade (browbone), one satin-finish shad (base), and 3 shimmer shades. First impression of this collection was that these were the only two I would consider buying and I'd probably only end up getting one of them since the looked so similar when I saw them online. However, when I was in the store (I found these at Walgreens) I realized while these are similar-ish, they are still very different.
If you've been disappointed in the texture of the previous 5-pan palettes, you'll be happy to know that the buttery texture you're used to with the trios is present (at least in these two). I credit this to the fact that there are more shimmer shades. The only original 5-pan I have is The Naked Truth and those shadows are matte. The texture of the shadows in the Melrose at Night and Smoke and Melrose palettes is much smoother, reminiscent of the original trios & 8-pan palettes.

Another first impression I had was that they reminded me of two other palettes - the Chocolate Bar palette from Two Faced and the Naked 3 palette from Urban Decay. There is a combination of deep, chocolate shades, rose shades, a bright cream shade, and a gold shade - characteristics of each of those higher end palettes.
 Melrose at Night
Smoke and Melrose
Wear Time
I'm pretty impressed with these 5 pan palette!  I was not impressed with the first set of 5 pan palettes that came out a bit ago but these do blow me away.  Like I mentioned above, the texture reminds me of the classic trios and 8-pan palette in that they are very smooth.  They do kick up a bit of powder, but if your familiar with Wet n Wild trios & 8-pan palettes, it's not flakey at all.

The lasting time is about the same as the original formula in their trios & 8 pans. I use the Mary Kay Cream Shadow in Apricot Twist as a primer because it is pretty much amazing and stays all day.  So with that primer these shadows stayed all day.  On an unprimed eye I would say they last about 4-6 hours.  These are highly comparable to the trios & 8-pans I love!

Overall Impressions & Recommendations
These have impressed me very much and I would say if you're looking to get that rose gold eye look that has been made popular by the Naked 3 palette, these two palettes are for you!  In comparing these two palettes to my Revealed 2 palette (a good dupe of the Naked 3) I totally see the comparisons.

Unlike the Maybelline The Nudes palette I reviewed a few weeks ago that just seemed mediocre - these two Wet n Wild palettes are must haves.  They have the same rose gold feature that's popular and you really can not find that in a drug store palette right now.  At around $3.99 each you also get a nice rose gold collection for less than the price of The Nudes palette (around $11.99).  The only reason I'm comparing The Nudes and the Smoke & Melrose and Melrose at Night is because these are two popular styles of palettes now: nude shade and rose gold shades.  So if you're going for something that is on trend right now, these two Wet n Wild palettes are worth it more so than The Nudes palette.

I can't get over the awesome colors of these palettes and how on trend & dupe-worthy they are!

What are your favorite drug store palettes?  Anything new for you?

xoxo, Moe