10.29.2015

Three Photo Storage Tips for your Next Vacation

A few months ago Zach & I got back from week long trip to Korea.  I know, I know....you've seen like 3 pictures of Korea ever.....I promise I'm working on that.  I really am.  When it came down to packing photo gear for this little trip I had one thing on my mind -  I am not packing my DSLR, it takes up too much space.  So I promptly went out and bought a 64 GB memory card for my old point and shoot (+ an iPhone external back up, just in case).
this post contains affiliate links, please read my full disclosure here.

When I got to Korea....turns out my old point and shoot can't handle a new fangled 64 GB SD card.....so I put my phone in airplane mode and used that as my video camera and my point and shoot.  I only have the 16 GB phone, so here's what I did to free up space for the photos I was going to take:

Delete apps you don't need
This is sort of a duh moment here but I went through and deleted all the apps I wouldn't use in Korea.  Like my Starbucks and Subway app - I'm probably not going to use those half way across the world.  I would suggest deleting the apps you have for fun if you're going on a trip in the US and will probably stop at a Starbucks.  If you have any games you haven't played in ages or photo apps you never use, get rid of them and add them on later when you get back from your trip.  Who knows...you might get rid of some and make room for more.....if you never used the apps anyway.

Move your photos through different apps
When I wanted to take a picture and do a bit of editing on it right there I found this tip to be the most helpful.  A good example, that I do often now anyway, is to start in an app like PicFrame.  Create your collage the way you want, then under the share option find other apps.  This feature will find the other photo apps on your phone so you can move the photo to that app with out saving it to your camera roll.  You've just freed up space for another picture!  So then you could move the photo to let's say, Afterlight.  Once you've finalized you're edits there, you could save to camera roll or select other apps and move it to Phonto, for example, to add a caption or other text over your photo.  Then from Phonto, you could save to camera roll oooooor move it to Instagram (or countless other apps!).  You've just saved one, fully edited photo instead of saving 4 images - one of each edit.  This leaves room for 4 more photos.  I think this is pretty cool!

Buy back up storage for your phone
I picked up a SanDisk iXpand Sync back up.  This one is super cool (and the only thing I've ever had like it) because you can create folders to organize your photos and you can set auto back up once you plug it in.  In the limited time we had before running around the next day, I'd pop in the back up, wait for it to sync, then go back - tap, tap, tap - and put the photos into the Korea folder for the corresponding day.  If later I wanted to go through and edit a photo on my phone, I could plug the back up back into the phone, save the image back to the camera roll and work from there.  This back up was a life saver for the videos I took on my phone!  The back up also has a USB end so you can plug the back up right into your computer and download your videos/photos there too.  Pretty awesome storage device!

These three tips are great for everyday storage saving on your phone but even better when it comes to travel.  I love the quality of the camera on the iPhone 5S....but honestly I can't wait to upgrade to the 6!  You can capture beautiful photos and video in the palm of your hand....and that is pretty amazing.

How do you store your vacation photos?  Do you use your phone as your main camera?

xoxo, Moe

10.26.2015

Make it Monday // Inspirational Charm Bracelet

When fall rolls around not only do I bust out the knitting needles and crochet hooks, I suddenly become an arm candy queen.  I don't know why - maybe it's the boots and the scarves - but I will stack up the bracelets like to tomorrow.  My favorite are charm bracelets with lots of dangly things.  I found some cool little charms in my stash and at the craft store the other day, so I knew I needed another 
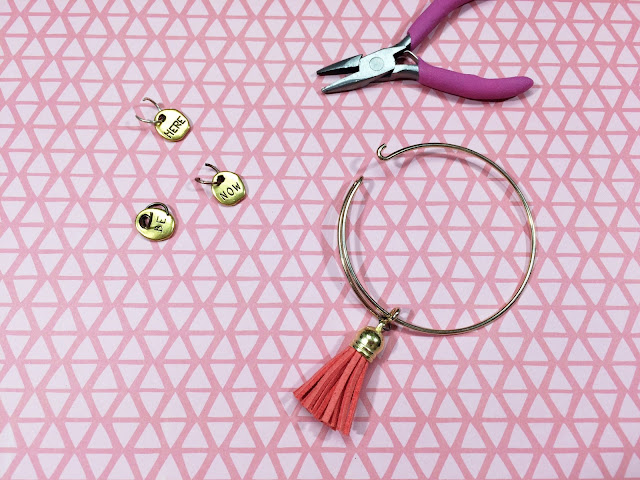
Supplies :: charm bracelet base (like these, found mine in the Joanne's clearance section), tassel charms, inspirational charms, pilers, assorted jump rings.

If you're unsure of where to find inspirational charms, check all your craft stores in the jewelry aisles.  I found these a bit ago and find any excused to use them.  This DIY is also about how to properly open a jump ring.  If I have one creative pet peeve it is the improper opening of a jump ring.  Instead of pulling the two edges apart, twist the jump ring apart.
Using the pliers in one and and your thumb and forefinger (or second pair of pliers) center the opening between the two.  The edge in the pliers twist toward you and the edge between your two fingers twist away from you.  You don't want to stretch the ring out as you want it to be able to go back to it's original shape.  Twisting it like this should do the trick.
Attach the charms to the loop on the bracelet so that the charms don't fall off.  You could also use a bracelet that is in a continuous circle for this DIY as well.
I love the sentiment of these charms - Be Here Now - is something that I'm really trying to work on.  When Zach is here I try to take the time to enjoy us together.  But of course I get wrapped up everyday things.  I need to try to enjoy the time we have more.

How do you remind yourself to enjoy the moment?

xoxo, Moe

10.22.2015

Boost Your Shop // Why I Keep Going Back To Etsy

When I first decided to dive into selling handmade goods, I turned to no other place but Etsy.  I posted my first pair of earrings for sale at a boyfriend's suggestion and it was a snowball from there.  My last year of college I challenged myself to make 10 sales before Christmas - I wasn't a successful seller really - and met my goal.  Then with Zach's encouragement I opened up my design shop selling blog designs.  With the invention of the instant download I was hooked.  We then opened up our vintage shop, 516Vintage (we've since shuttered the doors, but who knows...we may open up again).  Between those two things though I switched my handmade things to an ecommernce platform called Storenvy.  This switch had it's pros and cons, you can read that here.  You can also read a slightly dated Storenvy Rundown here.

But once I finally decided I really wanted to open up a shop again.....with out a doubt I chose to go back to Etsy.  Now, you may say that it costs too much to run an etsy shop, that you're going to be up against those who sell mass produced items from China...but I say the ease of use, recognition, and necessary evil of seller fees are great considering one has to do very little in the grand scheme of things to promote a shop.  Here are the pros, for me, for sticking with Etsy for my ecommerce needs:

They do the advertising for you - If you didn't know not only does Etsy promote through various targeted ads on websites, but they also have a crazy cool email marketing strategy, and even get their name in print.  I've seen adz for Etsy in various magazines in various doctors offices and waiting rooms.  This targeted marketing and promotion means that Etsy has made a name for itself.  Etsy has become the go to place to search for independent artists and creators.  Meaning it is a great market place for you - the artist or creator - to be a part of.  Millions of people all over the world are constantly searching Etsy for billions of keywords hourly (these stats are totally made up, but they make sense).  If you're a part of the largest market place you'll be a part of something big.

They do the ecommerce for you - Do you really want to be responsible for building & maintaining an ecommerce site?  Yes, you can add ecommerce to your Wordpress blog (Blogger platform forever!) but do you really want to deal with that?  Do you really want to be responsible for security certificates?  Do you really want to deal with a design?  Do you really want to figure out how to make your stand alone site mobile friendly?  Do you have all these resources? If you do, wonderful! But for the average hobby seller all this seems crazy.  Of course you could go with a place like Storenvy or Tictail for ecommerce, but when you have the biggest name in indie commerce behind you......why would you bother?  Everything is integrated from fees to shipping to instant downloads to revenue to stats to payments to label printing.  Storenvy has at least a majority of those things done through 3rd party websites.

Simplicity & ease of use - All those things above leads me to this point: Etsy is easy to understand for the novice seller.  You don't have to manage security certificates on Etsy because they do the eccommerce for you.  You don't have to figure out a mobile design because Etsy does it for you.  You can get to the creating, making, and listing with out having to worry about the crazy stuff.  Etsy is a great place to learn what works, what doesn't, what pays, and what you need to charge to make what you need to make.  If you end up being a big shot and going into your own website, great.  But Etsy is easy to use, easy to understand, and easy to build from with out having to worry about who's credit card might get stollen.  The fees are a necessary evil of running a shop where you don't have to deal with the things mentioned above.  Listing is easy, tracking is easy, hosting a shop is just plain easy.

You'll be among creators like you - I would say the majority of buyers on Etsy are looking for a creator like you.  Etsy is a leading name (in my opinion) in handmade sellers.  Buyers navigate Etsy to find something unique and made by an independent creator.  People want to support those doing things their own way.  Yes, you're also in the boat with mass produced resale from China but you're also among creators that like to create.  You can find tons of Etsy communities on Facebook as well to really reinforce the handmade community.

Using a site that does nearly all the important things for you is important to my sanity as a shop owner!  I love that Etsy is everything I need wrapped up in one site.  I hope this little post was helpful for you to see why hosting your shop on Etsy can many pros for the small time (and big time) shop owners.  If you're just starting out, there's not too much to be overwhelmed with.  If you're a seasoned Etsy pro, then you realize the importance of being a part of the popular market place.

So, if you're down for starting your own etsy shop....go ahead and get started here.

Do you love Etsy?  Is there another all inclusive ecommerce site that I need to know about?

xoxo, Moe

10.20.2015

Trend Tuesday // FLOWER Eyewear Review

The last time I got new glasses was probably my freshman year of college...maybe even before that. It was a long, long time. I would get contacts and just use my glasses when I didn't feel like wearing my contacts. Recently I've begun to see (or rather un-see) that I wasn't seeing very well any more. Remembering that my prescription was still good but still changed slightly, I decided to get a new pair of glasses.
Unfortunately, I don't have eye insurance. I knew I needed to find something super affordable so I thought about going to Wal-Mart or to Meijer. I always get my eyes examined at Meijer but I hadn't found any glasses the other times I'd taken a look around. A little while ago Drew Barrymore released a line of glasses through Wal-Mart - FLOWER Eyewear. You may be familiar with her beauty line (which I love) of the same FLOWER name that is exclusively sold at Wal-Mart.

I love anything and everything Drew Barrymore, so I was in. 
Something I truly love about the line is that there are multiple frame styles in multiple colors. So if you like a certain style, there are a few colors to choose from. The line also doesn't just include glasses - there are sunglasses too! I don't think that my Wal-Mart carried all the colors or styles but they had a good variety.
Each of the frames has the FLOWER logo in gold on the arms of the glasses. They styles were different enough to tell them apart - some have thick plastic frames, some have thinner wire frames, and there are some that have a floating frame. They are all classic looking with a retro feel.
The glasses I picked out were Rachel in Tort. I have to say that I really do love the coloring and the shape they are on my face. The big frames are something new to me but seem to be super trendy right now....I'm sure they've been on trend for quite a while now!
I can't speak for all the cases that come with the glasses - though I'd assume they are all the same - but mine is pink with the Flower logo. It's not as rugged as I'd like a glasses case to be. The case is hard and it could stand up to a tumble but the outter fabric covering it already has some dents and wear. I've never really cared for glasses cases before but this one is super cute....so I do cary it with me. The glasses also came with a super cute cleaning cloth - not just a standard boring one. This has a pretty floral design and the Flower logo as well. 
I think the whole design and execution of this eyewear collection is pretty and functional....and affordable! I would highly recommend this eyewear line and I plan on getting some sunglasses as well!

Do you have a particular brand you get really excited for?  Where do you find affordable eyewear?

10.19.2015

Make It Monday // Easy DIY Planner Paper Clips

There are quite a few things I used to not be.....a planner girl, a person into decorating their planner, a person into paper clips. I never look back, darling. It distracts from the now. (I also used to be someone who didn't watch the Incredibles at any chance as well.)
But today I am that person who thinks paper clips are pretty neat. But I am also that person that can not piece together tiny pieces of felt or card stock to create cute clips. While in the craft store the other day I saw these wonderful creations - preassembled little felt goodies. And I knew I could make some of those cute little paper clips I've been seeing. And because so many come in a pack, you can share them with your friends.
Supplies : felt appliques, E6000 adhesive, paper clips, small circle paper punch, scrap card stock. (Binder clips are optional)
There are two different kinds of little adhesive felt appliques that I've found - ones with little circle dots to attach them to your item and ones with a full adhesive backing.
If you have the ones with the little foam dots, it's not too hard to peel the dot off to start with a clean, even backing. Simply add a bit of the E6000 to the lower center back of the felt applique and place your paper clip over it. Don't add too much or it will totally squish around.
Make sure you've put the paper clip so the middle U is facing downward. Cover the glue dot and paper clip with a small circle punched from the cardstock. Use binder cllips if you'd like as a clamp to secure everything together while it dries.
For the appliques with full adhesive backings, I found that they aren't too easy to remove, so if you don't mind what the back will look like keep the adhesive backing on and glue your clip directly to the back. I haven't had trouble with mine coming apart.
The best part about these little premade appliques is that there are quite a few to choose from during the holiday seasons!! I also picked up some snowflakes and gingerbread men to make some for Christmas! You can have a whole themed planner going on in just a few minutes!
This whole set up was before I made my fall dividers - and I now will have an outdated flip through on my channel this month too!! What is my life????

Happy fall y'all!

xoxo, Moe.

10.15.2015

Why I Switched to a Vertical Planner Layout // Personal Sized

A bit ago I posted my Planner Journey and I talked about how over the past two years (ish) I've tried multiple planner systems and switched between planners. I've built up my ring bound planner collection and even have my eye on a few more. My planner peace currently is a single ring bound planner - my Filofax Original in Flouro Pink. I have a set up video from when I first moved into my Filofax but I've since changed it....and this is the post to talk about it!

First, if you haven't read my planner journey - click here.....I'll wait.

I've never purchased inserts before because I'm pretty creative with Word. I made my own from the beginning and experimented a lot with different styles. All of the styles consisted of a horizontal weekly spread. Week on one page, week on two page, week on one page with a graph page on the other side, all horizontal...all a weekly view. This became super overwhelming for me. I would see all I had to do for the week and just shut it out. I started getting into a weird planning funk and didn't do anything. It seemed like all I had to do was way too much. I've come to see now that it was the way the week flowed for me on a horizontal layout - I was seeing too much and I just couldn't get a flow down.
After purchasing a vertical Erin Condren Life Planner and using it for blog/youtube/etsy planning I fell in love with the vertical layout. Unfortunately I wasn't in love with the way uncoiling an EC and punching it for an A5 Filofax went......so I turned to other options. For a while there I was a 3 planner girl. I had my ECLP for the editorial calendar, my personal Filofax for weekly planning, and then a third, smaller planner for daily tasks. The ECLP was great because the 3 sections were perfect for blog/etsy/youtbue I needed to plan. The weekly planner showed me what I needed to do on the personal side of my life, plus if I needed to make sure I was free to film, or take photos, for the editorial calendar. The daily planner really helped me see only what needed to be done that day and I could just focus on what needed to be done a day at a time. Because of these three planners, I was able to feel less overwhelmed. But then I ended up with three planners.....and that was way too much.  I needed a way to simplify and get all of what I was loving about 3 planners out of 1 planner.
I restructured my whole personal Filofax. I took out the sections I really, really didn't need (I don't even know what those sections were anymore!) and paired it down to monthly, weekly, and daily section, two blank sections, finances, and lists and to-do's. I am thinking of moving my blog/etsy/youtube ideas & schedule back into those two empty sections. I created a vertical layout in Word with Monday through Wednesday on a spread and Thursday through Sunday on another spread. And I have to say I love it.

I feel less overwhelmed because I am seeing the first half of the week and then the second half. I'm not looking too far into the future where I feel like I might lose my shit because there is too much too do. I also like the vertical layout beccause my eyes go down the page and not across. I feel like this was the problem with the horizontal layouts I tried - my eyes went down the page and then onto the next meaning I was seeing everything that was going on and couldn't focus on one day. Thinking only a few days ahead is helpfulf for me. Plus seeing the first half of the week as a unit and then the second half as a unit builds me up then winds me down.
I feel gung ho at the beginning of the week - I can see my master to do list, see Monday, Tuesday, and Wednesday. I'm not focused on getting to the weekend I'm focused on getting things done. The smaller size means I also can't fill it too full, especially for the master to-do list. I found the A5 and the ECLP to be helpful but way too big. I'd end up scheduling myself way to much and unable to complete it. Especially in addition to the two other planners I was working with. I didn't need all the room they all gave me, I just needed the separation they established.

I found that I didn't like the size of my day on one page layout - it was too big, as well - but I liked what I was doing with it. When using my day on one page inserts I'd often repeat things - I'd have a Top 3 section, a section marked out hourly, a Tonight section, an Important section, and then sections for Blog/Etsy/YouTube. So I would often write mail orders for Etsy under the top three, the important, and the Etsy section. While this seems redundant, it helped me know what was important to complete and for which section of my life I was completing the task. I use this in my vertical layout too. The top of my column always has a Top 3 to do list - the top things to be done that day or the top things I need to remember to do, etc. Then the rest of the column gets decorative, I may repeat things, but I always know to go straight to the Top 3.
At the bottom of my column is my cleaning routine for the day. I would say that I sort of see the bottom section as the night section, but that isn't always the case because I'll work on things from the middle section after I clean. In my day on a page I would list out the chore for the day and then the 3 things I needed to do a long with that chore. Keeping this in one section means my eyes go straight to that read the three things, and I don't feel overwhelmed.

This leaves the middle to be decorated. I've also gotten into pretty planning and love the no white space sticker planning. I like that it's kind of like a work of art by creating a fun, well balanced design across a page. I can use decorative and fuctional stickers that are designed for the ECLP in the spreads I've made because the columns are 1.5 inches wide. This may not be important to a lot of people but I found it hard to decorate the way I'd like in a horizontal layout. Stickers felt out of place for me and after using the vertical layout of both the MAMBI Happy Planner and the ECLP I really liked the idea of stickers and themes.

Once I get to the end of the week in my spread by flipping the Tuesday/Wednesday page, I'm winding down. There are only two more days until the weekend, I can anticipate the fun things that will be done on Friday and Thursdays I try to make my big etsy work days - listings, organization, etc. So I can see that the week is coming to a close. I treat Saturday and Sunday like one big day so often I have a to do list either on a sticky note or on a list pad that I've punched with the six holes. I can just check off as a I go. Once it gets to Sunday I make time to plan my week out like this again.

I rarely use the monthly view as I find the boxes are too small - I loved the monthly space in the A5 and the ECLP. I'm thinking about using a sort of fold out insert for monthly because it would be helpful to include my editorial calendar in my personal filofax. Right now I'm sort of flying by the seat of my pants! I also only use the day on one page - designed to fit ECLP style stickers as well - when I have a super busy day. I have a full section for it but I hardly use it. This system is still ever evloving so I might take that out all together!

I hope this little post was a little insight into my reasoning from switching planner inserts. I felt that it was something I really wanted to share with other planner girls. If you're interested there is a free half letter size (nearly A5 size) free download on the blog but you can find a downloadable proper A5 size and personal size in my shop. If you're more the printed insert type, Sew Much Crafting on Etsy will mail you dated personal and half letter size inserts, so check out her shop!

How did you discover your perfect way of planning? Are you still on your planner journey?

xoxo, Moe

10.13.2015

Trend Tuesday // Art School Chic

The other day I threw on something that was so me when I was in college.  I was getting ready for work and decided to try something different - which happened to be a throw back to my college days - I threw on a triangle silk scarf.  I was also wearing a patterned shirt.  Back in college I was all about pattern mixing and there was no shame in my game.  Pattern mixing is still one of my favorite ways to play with fashion. I thought it would be super fun to share two ways to wear this Art School Chic look for work and for play
Art School Chic


Pattern & Color Mixing
The easiest way to pattern mix is to keep it simple - black & white + a colored pattern is a great way to start.  In this set this is done two ways.  A more fitted black and white striped shirt paired with a classy floral scarf in a neutral makes a classy look.  Switch the jeans for a dark fitted trouser for work.  My office is pretty casual, so both of these outfits would work.  For a casual day out look try a baggier shirt tucked in with a light floral infinity scarf and flat booties.  I am also in love with mixing neutrals.  it might be frowned upon to mix brown, black, and navy but if you have a sprinkling of all colors your outfit looks pulled together.

The Essential Bag
Any bag of mine has to hold a lot.  I've currently been loving Steve Madden bags, but when making this little set the bag featured above started it all.  It is a classy upgrade from a well worn thrift store bag I would have carried in college but still big enough to hold everything.  It is big enough to hold a laptop and some notebooks.  Great to stuff my planner in and get to work at a Starbucks.  The dark brown color is a great neutral to pair with a brown or a black outfit.

Upgraded Accessories
Tattered old boots don't really cut it in real life any more so I've been sticking to a nice pair of booties for fall.  A pair in a low heel and a pair in a raised heel give you options for casual or more dressy looks.  I find that brown boots work better for my style and wardrobe than black boots so that is what I look out for the most.  TJ Maxx and Marshall's are great places to find affordable, on trend styles.  Stackable jewelry can also give a classy vibe with simple golds and blacks or a bohemian vibe with more natural tones and wooden bangles.

Hope this little outfit set was inspiring!  I know that I felt a little bit more me when I threw on something I used to wear all the time!

What is an old fashion staple of yours?  Anything you always feel yourself in?

xoxo, Moe

ps. If you want to see some throwback outfits - check out my Let's Talk Fall series from a few years ago!

10.12.2015

Make it Monday // Classy Coral & Cream Knit Hat

If you haven't been down the crafty aisle at your local Target you need to run there!  If you haven't seen it, there is an aisle (or sometimes 2) with some really fun crafty and creative stuff.  I've seen yarn, washi tape, scrapbooking paper, and other little creative kits.  While this aisle may be aimed at crafty kids - I think it's great for the crafty kid at heart.  The majority of the creative products are under the brand Handmade Modern.
I picked up some fun yarn in a variegated coral and cream & a cream with a little bit of gold because I just knew I needed to have it in my life.  If you haven't noticed, around this time each year I pick back up my knitting and crocheting habit.  It is much easier to make yarny things when it's getting cooler out.  I've never been one to create any summer crochet projects...I just can't get behind them.
Anyway, this past week I sat down and made the easiest knit hat ever.  I shared 2 easy knit hats with out circular needles around this time last year....and this year I going to create the same thing.
If you know how to knit stitch, then you'll know how to make this hat.  You'll be making hat one from the post from last year using the garter stitch.  One of my favorite ways to change up the texture of the project I'm making when I knit is to use two different sized needles.  For this hat I held the two yarns together - both the variegated yarn and the cream/gold yarn - and used one size 10.5 needle and one size 13 needle.  This technique works better sometimes with really crazy yarn to enhance the fun texture but this technique gave a cool bubbly look to the yard from the bigger needle.
Pretty much you just knit a long rectangle - long enough to wrap around your head - then cast off and use the tail to sew it into a tube.  Use the tail to weave around the circumference of one end of the tube then cinch it up.  I also used the leftover yarn to make a huge pom pom.  If you make your hat long enough you can have a super slouchy beanie style or flip the brim up for a more traditional style!

If you're a beginner knitter, this project is super easy to whip up.  And the more fun yarn you use the better it will look.

I hope you pop by your Target to see if you can find this fun yarn!

Hope your fall is shaping up well!

xoxo, Moe

10.08.2015

Celebrating 4 Years Together // I Only Have Heart Eyes for You

This year Zach & I celebrate our 4 year anniversary & 3 year anniversary of being in the house.  Last year, I shared in this post a huge pocket scrapbooking set.  This year I still wanted to share one with you...but it is a little bit smaller this year.  I used some of my own tutorials to make some journaling cards using overlay apps + PicMonkey.  I swear that my iPhone & my iPad are great creative resources.  There's soooo much you can do with these little machines in your pocket or in your bag and I love it!!
this post contains affiliate links, please read my full disclosure here

I love finding new apps to play around with.  There are so many creative ones out there.  My favorite are the apps created by creative bloggers because they create apps that they know other bloggers will love!
Here are some tutorials you may like:

You can download this set here.  But please these are only for personal use.  Don't sell or distribute these as your own.  If you'd like to download the app I used to make these, the A Beautiful Mess App, you can right here.

If you'd like to see all app reviews on the blog, click here.  You can also find all tutorials using Picmonkey, here.

10.06.2015

Beauty Review // Macadamia Natural Oil Deep Repair Masque

Since I've been bleaching and dying my hair (click here for how I achieve vibrant purple hair at home!) my hair has become super, super damaged.  It wasn't until recently that I realized that my hair was feeling a bit like straw.  I think part of that was the heat I used on it while in Korea.  I curled my hair using my curling iron instead of my curlformers.  It was much easier to get up in the morning and curl my hair than stick in my curlers at night!  Anyway, as soon as I got back I used the Macadamia Natural Oil Deep Repair Masque and I thought I'd do a review for you.
this post contains affiliate links, please read my full disclosure here.
When I'd originally planned to do this review, I'd only been using the product for a week.  I was so keene on doing a review because I wasn't impressed with the product.  I wanted to do a review to hastily because of the hype this product gets and because of the claims on the back of the container.  I've since changed my drastic opinion and wanted to do a more solid review of the product.  

Anyway, let's just get into the review.

From the Website:
Macadamia Deep Repair Masque is a hair reconstructor that penetrates and rebuilds damaged hair for improved health, sine and elasticity with no weigh down.  Ideal for dry, damaged, or color treated hair of all textures.

This is from the back of the container:
Filled with Omega 3, 5, & 7, Macadamia oil mimics your scalp's natural oil production to revitalize dry, damaged, and color treated hair of all textures. Hair's natural texture is instantly renewed with healthy shine, bounce, and manageability.  

First Impression & Application
When I first used this in the shower I was impressed with the thickness of the product, which made it hard to get out of the container.  Because of the tub the product is in, it was harder to get the product dispensed and the cap back on the product so none of the shower water would get into the product.  
Scooping it out was easy enough, there was a lot of product in the container. But because of the slippery nature of the product it was hard to twist the cap back on easily.  The consistency of this product reminds me of mayonnaise - the texture was thick, yet smooth and felt very slippery.

Like I said the product was very thick but I was able to easily distribute it through my whole head. The directions say to liberally comb through clean wet hair and let sit for at least 7 minutes - so I washed my hair first in the shower then put the Deep Repair Masque and did the rest of my routine.

Wear Time
This is a weird little section since this isn't something I can really test the longevity of like a foundation but I still wanted to include this section as a what I thought through the time I was using the product:

Eventually I started by scooping out a hefty handful and putting it on top of my head in a big glob and then closing the container. I never had any difficulty distributing the product through my hair. After the first time I used it, I wasn't impressed with the results. I didn't think my hair's texture was instantly renewed. I decided to use it the next night just the same - the container does say to use it twice a week for best results - and I still felt unimpressed. For the entire time I've been using this deep repair masque I've been using it in place of my conditioner and I have to say I see average results.
As you can see in the images I've used up about all I can from the bottle.  I washed my hair about 3 or 4 times a week each time using this as my conditioner.  I do have to say I've seen improvements in my hair's textured but I do not think that the texture of my hair has been renewed.  I know I'm using this in a specific manner that maybe it wasn't intended for - dry, damaged, over processed hair - but maybe my hair is the best hair to see what the masque really can do?

Overall Impressions & Recommendations
Overall, I think this product is a decent, daily deep conditioner if you need it.  It does a decent job at conditioning and smoothing the hair, I'm not sure the damage I've done is repaired but my hair feels a bit more like hair and less like straw.  However, the price is what is crazy for an everyday conditioner - regular retail for this product is $36, I got mine for $19.99 at TJ Maxx.  

If you're looking for an affordable deep conditioner to use everyday my favorite is the Suave Morracan Oil line.  I plan on picking up more of that line once I run out of this and of every other condditioner I own (!!!).  In addition to the Deep Repair Masque, I have been using the Suave Morracan Hair OIl and that combo has really impressed me with returning my hair texture.

At the end of the day, I would say that I would buy this product again, but not at it's retail price.  I do think the results are comparable to the Suave Morrocan Oil deep conditioner but I like the thickness and the texture better.  So even though this isn't a stellar review, this product acceptable at most - in my opinion..

If we were at a store I wouldn't tell you not to get it....you know what I mean??

What do you do to keep your hair healthy?  Do you have any favorite deep conditioners?

xoxo, Moe

10.05.2015

Make it Monday // DIY Mini Travelers Notebook

A few weeks ago I posted a really affordable planner DIY.  I mean nearly everything was from the Dollar Tree!! Today I'm back again with a little how-to on making a mini traveler's notebook.  If you're not the tiny planner type, this can be easily translated into bigger moleskine style inserts - I just found these little lined notebooks at the Dollar Tree and knew I could do an amazing DIY with them
Supplies : polyfolders, mini notebooks, elastic, paper cutter, ruler, scissors, pencil, craft knife, Crop-a-dile Big Bite (or an awl or something pokey), measuring tape
this post contains affiliate links, please read my full disclosure here

First off, nearly all of this can be found at the Dollar Tree - I found the folders & the notebooks in the office section, I found some elastic back in their little craft section, and if you don't have a Crop-a-dile (which you totally need to get if you read this post) you can totally just find something pokey to use to make you're holes.  If you don't have a paper trimmer a ruler and scissors or a craft knife to trim.
Start by cutting the poly folder in half and then carefully slicing away the inside pocket.  I place the knife on the inside of the fold and gently pull up slicing along the fold.  Be careful but ensure that you are slicing as straight as possible.
To measure your width it is easiest to do with a fabric measuring tape.   Wrap the measuring tape around the stack of notebooks you'll be using to measure the width of your cover.  The height of the cover should be just slightly bigger than the measured height.  It is always good to assume you need to go larger so that you can trim excess later.  Mine ended up being about 8.75 inches wide by 6 inches tall
Once the cover is trimmed, gently fold it in half and mark the half way point.  You don't want to create a permanent crease so just gently fold and run the pencil along the valley you've created to mark the middle point.  
Begin to measure out where the holes for the elastic by measuring halfway down the line to mark the mid point (this will be for the strap that holds your notebook together) then make a mark up 1/2 inch and then up one inche from either end.  Once you're done measuring, you should end up with 5 dots.
Using your pointy object or the Crop-a-dile, punch each of the 5 holes.  Create the loop to hold the notebook together by wrapping a piece of the elastic tightly around the stack of books plus the cover.  Trim the elastic, slip it through the middle hole and tie a knot on the inside of the cover. 

To thread the rest of the holes, follow the images below:
starting from the second hole from the right, thread the elastic from the inside of the cover to the outside
Next, thread the end of the elastic that is now on the outside of the cover back through the right most hole.  The end of the elastic should now be on the inside of the cover.
Thread the end of the elastic through the left most hole from the inside of the cover.
Finally thread the end of the elastic back through from the outside of the cover into the inside of the cover through the second hole from the left.
Once the elastic is threaded through the holes. Slip a small notebook (the one that will be the middle of your traveler's notebook) through the longest of the elastic loops on the inside of the cover.  Tie a knot tightly and securely to hold the book in place with tension.  Trim the elastic.

Using the leftover elastic, create a second loop that will hold your other two books.
Slip the elastic around the middle of each book so that the two books are joined like the image below.
Next, slip the set of joined books under the middle book so that there is a book on either side.  You now have your own traveler's notebook style journal or planner!!
the completed journal should hold the three notebooks perfectly!
I decided to show you how to use this little notebook as a planner by dividing the pages with washi tape, using return address labels for the dates, and other assorted stickers to decorate.  I even used some printables from my shop and some other stickers designed to fit the Erin Condren planner.  You don't have to have a name brand planner to have a fun planner!!
Hope you enjoyed this tutorial! Remember, this notebook can be made in any size - so if you've found some other notebooks you're keene on, making a cover for them is super simple!

If you'd like to know how to add charms to your Midori or Fauxdori, watch this video on my channel.  You can also see a Fauxdori set up video here.  Or learn to bind your own notebooks for Fauxdori here.

xoxo, Moe