2.29.2016

Make it Monday // How to Fake a Repeating Pattern in PicMonkey

Here we go again!! Another fun PicMonkey tutorial.  If you read last week's post about using my blog to teach you'll know that one of my favorite things to teach are PicMonkey tutorials.  I have many different softwares I can use to digitally design things but if ever I want to get it done - good and quick - I choose PicMonkey.  The online program is very easy to use and honestly I haven't ever edited a photo in the program because I use it as a design tool every time I open it!  Today I want to share with you how to fake a repeating pattern (think digital scrapbook papers) in PicMonkey.
this post contains affiliate links, please read my full disclosure here

There is no option in PicMonkey to fill a shape with a pattern.  You can use some of the predesigned patterns under the collage tool or upload your own digital papers to use in the collage feature but there is no way to create your own.  Most of the time I want to create a pattern on a small scale - like for journaling cards - and I've found a little hack to create this look!

Pattern One - Using a DingBat Font
First open a 4x6 canvas from the home page.  I chose to design with the canvas vertical, but feel free to rotate it horizontal if that works better for you.  A while ago I shared this tutorial on using dingbat fonts in PicMonkey.  Today we're going to do a similar thing - download a dingbat font that you like (I used WM St Paddy's from DaFont) and choose a letter to be the base of your pattern.
Add a text box and fill the box with the chosen letter.  Create a line of text that is slightly winder than the canvas.  Keep repeating this line of a single letter until a box of text is created that is slightly larger than the canvas.  Using the rotate tool (the little knob at the top of the text box) to rotate the text you've created will give an even more impressive look.  Situate the text box so that the entire canvas is filled with the pattern.
To add dimension to the pattern, add a text box with only that single letter and change the color.  Position a few of these text boxes over your pattern.  Be sure to space them out so that they are visually equal all over the page.
Once you are satisfied with the pattern you've created, change it up a bit to get the look you'd like.  I inserted a larger rectangle, changed the color, and used the right click menu to send the rectangle to the back.  this put the rectangle under the layers of text boxes.  Then change your text boxes to the colors you'd prefer.  Working from a color palette is best for this (I suggest finding one you love on ColourLovers.com) so you can create a cohesive look.
Use as is (4x6) or crop down to 3x4 and add some text to create a journaling card.

Pattern Two - Using an Existing Overlay
Start the same way as pattern one - open a 4x6 canvas from the homepage of PicMonkey.  From the Overlays tab (the tab shaped like a butterfly) chose an overlay.  Position the overlay on the canvas, and make any changes - change the color, rotation etc.
Right click the overlay and from that menu select Duplicate Overlay.  Begin to fill the canvas with duplicates of the overlay.  Be sure to hang some of the overlays off the side of the canvas.  This gives the illusion of a repeating pattern.
Duplicate the overlay as many times to fill the canvas.  Then duplicate the overlay again (or add a new overlay) and make a change to it - size, color, rotation, etc - and use that as a new element to the pattern.  Duplicate this new overlay and fill the canvas with this new overlay.  Make sure to have some of the overlays hang off the edge as well.
Save this image as is to use later or crop to 3x4 to create a smaller patterned journaling card.  Add text and another overlay to add interest.
And there you are!! Some great ways to create patterns for journaling cards.  You can also totally create a pattern over a photo too.  (Sort of like a watermark - so check out this tutorial here.)  Additionally if you'd like this set of 3 journaling cards I've created a PDF for you to download!  Just click here.
Remember that the free downloads offered on the blog are for Personal Use Only!  Do not sell these, claim them as your own, etc.  Please play nice and direct others to this blog post and not just to the direct download link.  If you'd like to pin them, Pin this blog post and not the direct download.  

Check out more PicMonkey tutorials here.

xoxo, Moe

2.25.2016

Why I use my Blog to Teach

I've been wanting to write this post for a little while.  A post on why I use my blog as a teaching tool.  The main reason I want to share this is, since joining the Planner Community, I've come to find that a lot of people don't want to share any so called secrets to sticker making.  And it was surprising to me when my willingness to teach was met with surprise.  So I thought I'd do an honest blog post on why I use my blog, my YouTube channel, etc to teach others

First of I like figuring things out and I like sharing the things I figure out.  This is the first reason I teach.  I like to share my discoveries.  I want others to know them.  One of the quotes I live by is A candle looses none of its light by lighting another.  I want others to be able to feel like they too can be creative or make something.  I want them to be able to figure out how to start and then let their creativity blossom form there.  Teaching and sharing the things that I learn is my way of spreading creativity.  If you want to know how to do something, ask and I will tell you.  I always did that while in college as well.  Often, while in the studio, people would wonder why I shared the techniques I'd learned.  I share these techniques because they are building blocks.  The techniques won't get you the gold....they way you use them and develop your own style will help you succeed.  Same with any tutorial on the blog here or any Cricut tutorial I share on YouTube.  You can make an exact replica...but does that make you creative?  No.  I try to offer up tutorials that can be interpreted and customized.  For example - why would you want the same exact sticker I made in a tutorial for myself when you could make one to better suit your needs?  There are hundreds of ways of customizing nearly all of the tutorials and DIYs on my blog.  And that is what I hope I'm sharing.

Secondly, I make money sharing these tutorials.  Want to know why I'm always using PicMonkey for digital tutorials?  I make money through affiliate links and PicMonkey is one of my top earners.  If ever you read a post that says this post contains affiliate links I'm trying to promote a product so that I make money in turn.  However, let me be very clear - the only reason PicMonkey is a top earner for me is because I love the program and I can share how it works to create something amazing.  Another affiliate program I am a part of is for the Cricut products.  Currently I use a Cricut Explore and love making tutorials about using Cricut Design Space to create stickers.  I have earned zero money from my Cricut affliate program.  I have, however, made money on my YouTube videos since my channel is monetized.  I will continue to make these videos because I find them fun, unique, and informative.

Thirdly, I use my blog and YouTube to teach because I couldn't find the type of tutorials and the type of content that I wanted to read.  I blog because I like to read (and I have a YouTube Channel because I like to watch) what I create.  Call that vain - or call me crazy - but I love my space here!  I love reading past posts not only to see what was going on in my head back then but to see how I've grown.  I also like to see how I can improve on a project and maybe share with you how to improve it as well.

100% this blog is for me - it is for me to share what I create, it is for me to make money, and it is for me to read.  But I also know that if I was once searching for something, maybe someone else is out there searching for it too.

I use my blog to teach because I want people to learn.  I want people to develop their creativity.  I want to find people like me.

Hope this post wasn't too weird....but I really wanted to put it out there.  Thanks for making it through!

xoxo, Moe 

2.24.2016

Wednesday Decor // 5 Monthly Habits I'd Like to Start

I've fallen off the cleaning routine train in the past week and this week I'm determined to get back on it!  Because I've had cleaning on the brain I've been thinking about things that I really need to get going on every month.  This is all house/personal related stuff in regards to inside the home.  Here is a true fact - I am no good with outside home maintenance.  I'm just not.  I don't know where to begin, I don't know what to do, I don't want to do it.  So mainly the grass is just mowed and maybe the flower beds are weeded (but honestly probably not).  But all of that is for another post....hopefully.
There are a few things I know I need to do more than the blue moon that I do them.  The first step to that is making a list and acknowledging that these things need to be done, right?  Here they are:

Clean out the fridge
I hate the fridge being full of old stuff.  I am also a horrible leftover eater - meaning sometimes I don't eat all the leftovers.  I just can not eat the same thing 4 days in a row.  I can't.  Plus, being by myself means if I cook a full meal, there are leftovers.  I've started trying to cook things that I will eat all week....so far that has sort of worked out.  Anyway,  I'd like to clean out the fridge, wipe it down, throw things away, once a month.

Clean out my purse
As I'm sitting here, I know that my purse is a wreck.  I did have this purse organizer I used for a little while in my old purse so I'm thinking I may need to bust that guy out again.  Mostly I use little bags (like ipsy bags) to organize all the mess in my purse.  Right now one of those bags has fallen completely open and there are receipts in the bottom, maybe I'll find some treasure in the bottom.  Who knows.

Clean the washer
Our front loading washer tends to hold water in all it's little crevasses so I need to clean it out so it doesn't stink up the clothes.  I need to do a little bit of research on this too.  I did clean our old top loading washer when we moved in and that was pretty interesting.......

Monthly declutter
I'd really like to go through the house monthly and get rid of somethings.  I'm thinking of starting a bin in the utility room or something where I can just throw things I want to get rid of.  Currently I have a few bags of clothes and boxes of things that I need to take to the thrift store (they should really have an exchange thing going on - I'd be all over that....but then I'd have more crap!).  I've been waiting for it not to be so cold to really get rid of it.  I do want to start thinking about things to get rid of each month.

Cleaning the forgotten places
Ugh......have you ever looked up an was like WTF is that? when you see your fan?  Our kitchen fan is the grossest because of all the grease and what not that settles up there.  Our stairs also gather a lot of hair from the dog.  I should probably vacuum those when I clean the downstairs but I often forget because you don't see them until you turn the corner.  So I'll put everything away, turn the corner and then bam! pet hair stairs.  I also need to do a quick zip around the washer and free standing bureau in our laundry room.  That gathers dust bunnies like no ones business!

These are 5 things I need to mark off in my planner - I'm thinking in my home/routine section - so I can track their completion.  Here's hoping I get back on my cleaning routine.  My life would be so much easier!

What are some monthly tasks you complete?  How do you fit it all in?????? 

xoxo, Moe

2.22.2016

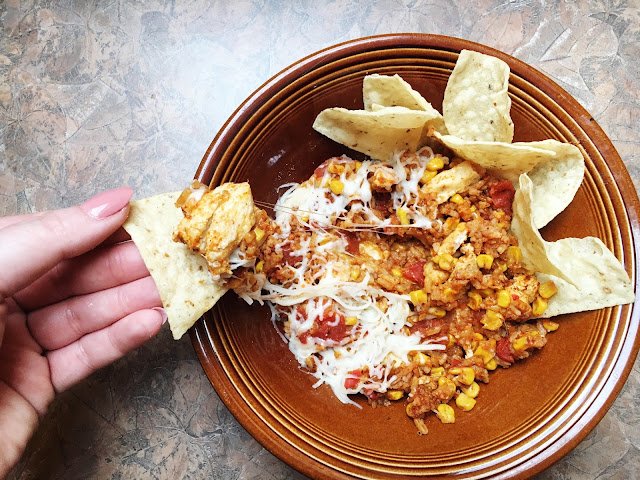
Make it Monday // Southwest Chicken & Rice Bake

One of my favorite easy recipes is a variation of rice, cream of whatever soup, and chicken baked in the oven for 45 minutes.  This is a super easy base recipe to add your own spin on to get a yummy dinner and it is the recipe I have in my recipe book. I can't tell you how many times I've varied the ingredients to create something different.
Southwest Chicken and Rice
Today I want to share with you how I made this delicious Southwest Chicken and Rice bake!  It is definitely a main dish - you can eat it with chips as a dip or use it as the fillings for burritos or tacos.  It is quick to make (it bakes for a bit, but you're not standing over the stove) and it's filling!
Quick Chicken Dinner Recipe
Here's how I made it

Ingredients:
1 can whole kernel corn
1 can diced/chili ready tomatoes
1 lb chicken breast (or more depending on your liking)
3/4 cup rice
Rotisserie chicken seasoning
1 packet Quesadilla Seasoning
1/2 Cup cheddar cheese (or queso cheese)
other veggies (peppers, onion, etc) optional
1 tbs olive oil

Start by defrosting your chicken if need be (one of these guys is great for this.  They defrost meat quick enough, with out a microwave!).  Next, slice it in to very thin strips.  Season the chicken with the Rotisserie chicken seasoning then saute the chicken in a pan with the olive oil for about 5 - 7 minutes.  I found that in the original recipe if I didn't cook the chicken just a bit before throwing all the ingredients together, the chicken would remain under cooked.  You can also saute the chicken with the peppers and onions if you'd like to soften them up a bit.  
Southwest Chicken Dip Recipe
Next, in a square metal pan or baking dish add the rice, can of corn, and can to tomatoes.  Do not strain these cans.  The liquid is needed to cook the rice.  Mix in the Quesadilla mix into the rice, corn, tomato mixture evenly.

Add the chicken to the top.  Sprinkle the cheese on the top. Cover with foil.

Bake at 375 degrees for 45 minutes.  After it is done baking, let it sit for a few minutes and then stir & serve.
Chicken and Rice Dip
Easy Family Meal
Like I mentioned above you can serve this as burrito or taco filling or as a dip for chips.  Or even in a taco salad shell with some greens.  I love the base recipe because you can get soooooo much versatility our of the same style.  This is my go to recipe for when Zach is gone.  Perfect simple bake it and leave it type of meal because I really do hate standing over the stove and cooking!

Do you have an easy go to recipe you use a lot?  How do you vary your recipes?

2.15.2016

Make it Monday // Three PicMonkey Planner DIYs

This past weekend Zach left for Amsterdam.  So there was a lot of me crying and him packing and me finding missing items while crying and him telling me not to cry, etc, etc.  So I really have zero idea what I will post on the blog this week.  I may just lay on the couch all week and do nothing (don't tell that to my planner) because I'll miss him.  I know I just need to kick my butt in gear because the more I do the less I remember he's gone.  And the faster time flies the quicker he is home.  Who knows...........Today I wanted to share three of my favorite planner DIY's done using the most amazing online editor that is PicMonkey!  Check the tutorials out below:

Hope you had a great weekend and don't forget to follow me on Instagram (@fivesixteenths) I think that I'll be more active over there this week!

2.10.2016

Wednesday Decor // Dollar Tree Cleaning Caddy

This idea is 100% unoriginal - I have to say I've probably seen about a zillion of these things going around Pinterest.....but I just had to throw mine in the mix.  I mean, have you seen how cute things at the Dollar Tree have become?  So, you know for the sake of all the pretty things I had to make my own.
I've mentioned before that one of the key ways I keep the house tidy is to have what I need in every room.  Luckily we have a bathroom downstairs and upstairs so I can keep my caddies under the sink.  I also keep a few extras in our utility closet and in the cabinets in the laundry room.

Another reason I wanted to put this together from the Dollar Tree is that if you're trying to buy multiples of cleaning supplies.....brand names can get expensive.  If you're just trying to get started in your cleaning routine you don't want to have to drop a million dollars.  When something runs out buy the brand name if you wish or stick to the Dollar Tree brand.  The only thing I couldn't find at the Dollar Tree were the Swiffer type duster things - I usually get the generic Meijer brand at a slightly affordable price.  I prefer these to the dusting cloths, but you can find the dusting cloths at Dollar Tree.  You can also find the wet pads if you use your Swiffer to mop as well.

The Essentials - under the sink
In the bathroom I like to keep a little caddy with all the elements I'll need to clean there.  In each bathroom I like to keep glass cleaner, disinfectant wipes, sponges, toilet & tub cleaner, & paper towels.  When I change the trashcan I do put extra trash bags in the bottom of the can that way I can switch them out with ease.  I keep a few extras in the caddy as well....because I'm lazy!

The Essentials - main rooms
In the utility closet & in the laundry room I keep a basket that I can place in a central location while I'm cleaning.  I also use this basket as the one to gather up all the stuff that needs to be moved into another room - everything that doesn't seem to belong in that room (as mentioned in this post).  Because these rooms need different things (no tub or toilet cleaner) I like to keep them separate.  In this basket I keep a duster, disinfectant wipes, full size trash bags, & fabric refresher.  Both our bedroom and the living room have mirrors but I just grab the glass cleaner out of the bathrooms when I need it.

This makes it so much faster to clean.  I don't have to spend time gathering the supplies to clean.  So helpful!  (And one less excuse!)

How do you keep your cleaning supplies stored?  Anything interesting?

xoxo, Moe

2.09.2016

Beauty Review // Affordable Drugstore Contour & Highlight

There have been a ton of new releases at the drugstore recently and I honestly can't get enough.  I am a drugstore beauty girl at heart and love picking up brand new things.  Today I want to share with you two affordable ways to highlight and contour using Wet n Wild products!  Both, I believe, are reformulated, re-releases - the highlight and contour duo is a reformulated version of the previous highlight and contour powders they released (I believe) in 2014/2015 and the shimmery highlighting palette is a new format of the Mega Glow powders (I'm pretty sure).  Either way these products have the brand new label at the drugstore and I think they both are they bomb!

This is going to be a different type of review on these products - I usually follow a different format in my previous reviews, but this is going to be more about the process and showing how to incorporate products into a routine.  Plus I'd like to do some posts featuring brushes to use or brushes that might be helpful for different products.  Hope you enjoy!

The Products
The Wet n Wild MegaGlow Contouring Palette in Dulce De Leche features two amazingly soft, blendable powders.  The powder on the left is a lighter powders - ideal for lighter skin tones - that can be used to set the under eye area and the center of the face, or any other areas of the face that should appear brighter.  The powder on the right is a deeper brown color that lends more neutral - not too orange or too ashy.  This color is perfect for creating a sculpted look.  Each powder is very, very buildable and blendable so there isn't a risk of packing on too much color.

The bushes I use with the Contouring Palette are the Elf Complexion brush for all over bronzing & contouring and the Elf Blush Brush to set the highlighted parts of my face.  Each brush is affordable and can be found either online on the Eyes Lips Face website or in stores (Target, Walgreens, etc.)

The MegaGlow Illuminating Palette reminds me of the smaller illuminating product the brand used to have featuring a similar stripe pattern.  There used to be a few shads of this product, but this seems to be a rerelease of this product.  I can't find this newer face palette on the Wet n Wild website.  This new palette features a wider surface area for each color and it is easier to target the color you might like to use.  Again, these powders are soft, buildable, and blendable for easy application.

The brush I love to use with any highlighter is the Elf Small Tapered Brush.  This brush has a smaller egg shape and is perfect for placing & blending the powders.  I have not seen this brush other than online at the Eyes Lips Face website.

The Swatches
rigth - highlighting powder // left - contouring powder
Wet n Wild MegaGlow Illuminating Palette in Catwalk Pink

The Process
After applying foundation but before setting the rest of the face, I use the flat side of the Elf Blush Brush to pick up the lighter powder in the contouring duo.  I gently place the powder under my eyes and down the center of my face.  Using a transparent powder, I then set the rest of my face.
Using the tip of the Elf Complexion Brush, I pick up some of the deeper shade in the contouring palette.  I start off by working the color into the hollows of my cheeks the up around my temples and hairline.  Then I work any excess beneath my jawbone.  This brush applies just the right amount and allows precise placement but also the ability to blend with out switching tools.
The broader side of the Elf Small Taper Brush is perfect for picking up highlighter.  I usually tap the brush across all colors of the Illuminating palette and then place, in a sweeping motion, the highlighter on the tops of my cheek bones.  I work any additional product up above my browbone as well.  This brush is perfect to build up the color.  I then use the pointed tip of the brush to blend in circular motions.  This creates a better blend between all of my face products.

Overall Review & Recommendations
These products impressed the pants off me.  If you're just getting into highlighting and contouring this contouring palette is my top recommendation.  It is under $5 at the drugstore and the quality is on point!  

While I do like the illuminating palette, I do thing the Fergie Center Stage Collection Shimmer Palettes are much better highlighters.  Plus, there are an assortment of colors in the shimmer palettes.  This Illuminating Palette is not a drugstore must have for me - there is a better option with in the brand, plus Elf has great highlighter options.

Hope this little review was helpful!  I have a ton more products I want to at least mention on the blog!!

What are your drugstore must have items?  Any new releases you're in love with?

xoxo, Moe

2.08.2016

Make it Monday // Easy Planner Paperclips from Stickers

One of my go-to planner decor items are paperclips.  I swear guys, I never used to be that girl with the stickers and the paperclips and the decoration........but I've become here.  And I ain't even mad.  There is nothing wrong with being that girl I just never thought I'd be her!  There's also nothing wrong with minimal or no decor in your planner.  It's all about what works for you.  I still find my planner to be functional with the decor that I use - I find it fun to work in and fun to look at.
Like I said I do love paper clips as a fun decor item but when it comes to purchasing all the lovely ones on Etsy, I just can't pull the trigger!  I'm much more happy to make some myself since I can have it immediately and I don't feel so bad about not liking the design after I'm done (that has happened before!)

For this DIY I was inspired by the fall scrapbooking elements I used to create planner clips.  I haven't been able to find any die cuts that I've liked since, so I decided to use some stickers I had in my stash plus some scrapbook paper!
supplies :: stickers, coordinating scrapbook paper, small/precision scissors, laminator, laminating pouches, paperclips, e6000

First, gather the scrapbook paper and desired stickers.  Place the stickers around the piece of scrapbook paper leaving room to trim with precision scissors.  Depending on how conservative you're being, fill the whole page or place the stickers in a way that the remaining scrapbook paper can still be used for another project.
Trim around the stickers with the precision scissors.  I got my scissors in a kit at Joanne's so they aren't anything special.  Trimming with smaller scissors gives you more control over the cuts you're making.  Another tip is to move the item you are cutting around the blades of your scissors instead of moving the scissors.  You'll get a smoother curved line this way (learned that trick from the old HGTV show The Carol DuVall Show)
Once the stickers and scrapbook paper are trimmed, place them in a laminating pouch allowing enough room around each sticker for a second round of trimming.  I've used 3 mil laminating pouches.  Run the pouch through the laminator a few times to ensure a good seal.
Using the precision scissors again, trim around the image leaving enough of the laminate around the perimeter of the image so that it doesn't peel apart.

Flip each laminated sticker over so the back is facing up.  Using the e6000, adhere the paperclip to the back with a drop of the glue.  Be sure you have room on your desk or in another area to let the paperclips dry undisturbed.  This is important so that the clip doesn't move or become detached from the laminated sticker.  E6000 has a super strong bond and I personally haven't had any problems with the clips falling apart.

Of course the back isn't the prettiest thing in the world but I don't mind it!
Now you can create tons of decorative paperclips with any extra stickers you may have on hand!  I can't wait to use up some of my sticker sets to create cute paperclips!!

xoxo, Moe

2.04.2016

Free Circle Date Stickers for your Planner

If there is one thing I need most in my sticker stash, it is number stickers.  I use the undated inserts that I sell in my shop - both the undated monthly and the undated vertical week on 4 pages - so instead of handwriting in the dates I love using stickers.
Today I have for you a free Silhouette file + a PDF with assorted colors of number stickers!  These colors match the rainbow color scheme I have in the shop but will look create with an assortment of any other stickers you may have!
The Silhouette file already has cut lines so you can just print and go.  If you have the Cricut, I'm thinking you might be able to use an online program to change the PDF to a PNG and upload it to the Cricut Design Space.  You'll have to clean up the image and the print area will be too big, but you should be able to crop the image down when you upload it to Design Space.  I'm going to try this and share with you here if it is possible!

Download the files here.
Please remember that these files are for personal use only.  Do not claim these as your own, sell them or redistribute the file.  If you'd like to share this file with someone, please link back to this blog post.  

Hope you enjoy!

xoxo, Moe

2.02.2016

Happy Valentine's Day from Minted

Who kind of wishes that they still were able to participate in elementary school style Valentine's Day card exchanges?  I totally do - though I'd really like it to be with all my friends and not with like my coworkers!!  Plus we're grown ups now, so we could drink wine and what not.  It would be great, it really would.

If you're wanting to host your own Valentine's Day card swap, or maybe you have some little ones that need class room cards, Minted has some stinking cute ones!! Of course if you need to send some photo cards to relatives, Minted has you covered as well.

this post contains affiliate links, please read my full disclosure here.
For all my crafty ladies, I'd totally give you this sewing machine card!! The vintage look of this is so cute!
The hand drawn look of this one is adorable. I want to attach this to a little friend gift!  The shades of pink and red with that yellow just speak to me!

If you're in the mood for some Valentine cards, Minted has some promos for you as well:
Enjoy 15% off Valentine's Day Photo Cards with code SENDLOVE (valid 1/31-2/5)
Enjoy FREE expedited/rush delivery on Valentine's Day cards with code FEBSHIP (valid 1/31-2/5)
Enjoy FREE 3-day shipping on classroom valentine card orders $60+ with code SHIP60 (valid 2/1-2/4)
Happy Valentine's Day everyone!

xoxo, Moe

2.01.2016

Make it Monday // Brush Font + Dingbat Font Journaling Card

I haven't made a journaling card post in a long, long time here on the blog.  The truth is I sort of gave up on my Project Life albums.  They are still in the back of my mind and I'd like to get back to them but (prepare your hearts) after we lost our dog Emmy it became really hard to look back on photos from when he was with us.  I still really, really, really want to go through and do something to document the years - and maybe I'll try to start fresh this year - but I'm not 100% sure yet.
this post contains affiliate links, please read my full disclosure here.

But today I did want to share with you a way to create a fun journaling card using a Brush font and a Dingbat font (you could easily translate this into an art print or planner dashboard as well!) all with in PicMonkey.  Did you see where this post was going?  Yay PicMonkey!
First off hand lettering & calligraphy is all the rage right now.  If you're like me and aren't able to create that beautiful brushed look, brush script fonts are the second best thing.  Secondly, when using a program like PicMonkey you're unable to import vector images so a dingbat font is the second best thing to a vector image.  Much like a vector, a font can be sized endlessly and still retain acceptable print quality.  If you've ever pulled an image from the web and then resized it only to find it pixelated or blurry you'll know what I mean about stretching something and it not retaining the quality.  Vector images are designed to do that - they can be stretched endlessly and never pixelate.  Today I wanted to share with you a cute pairing of fonts to create a set of fun journaling cards.

If you want to learn more about font balance, check out this post.

To start, you'll want to download & install some fonts to your computer - these are the two I will be using found on DaFont.com:


Be sure to research installing fonts for Mac or installing fonts for Windows to be able to use the downloaded fonts successfully.
Navigate over to PicMonkey and from the design tab select 4x6.  Crop the canvas to the size needed for the finished project - if you'd like to make a personal sized dashboard the iPhone 6s crop should work nicely, but today I'm going to crop to 3x4 (I like the smaller jounaling cards).
Next, from the side menu choose the text option.  A great thing about PicMonkey is that it allows you to use the fonts already installed on your computer.  Of course, if you'd like to use some of the brush style fonts PicMonkey offers, that is totally and option.  In fact if you sign up for the Royale feature you'll get access to even more fonts, overlays, etc.  Click here to enroll in the monthly plan for $4.99/mo or the yearly plan for $33/year.  Such a great deal for such a fun design machine!
From the text option, select 'Yours' and locate the two fonts you'll be using.  I just discovered that on Windows computers, Chrome has a hard time displaying some fonts.  So if your main browser is Chrome you might have to switch over to Firefox or IE to complete this project.  Click add text and start to type in your phrase in the Justin Road font.
I like to open the DaFont.com page I downloaded the Dingbat font from to see all of the icons available in the font.  From this page I know which letter to type to get the icon I want to use.  In this case the letter o is a coffee cup in the Hipster Icons font.  Add text, select Hipster Icons Font, and type the letter o so that the coffee cup displays on the screen.
It is now that playing with the scale will give you the overall aesthetic you're looking for.  I chose to keep my designs near the middle of the canvas.  Using this same set up - brush script phrase + dingbat icon - to create some more hilarious journaling card!

As always, if you don't want to create your own or if you're just really digging the journaling cards created in this post, you can download the set here.  Remember these are for personal use so please don't distribute them, claim them as your own, or sell them.  If you'd like to direct people to this awesome printable, please link back to the blog post.  And thanks for downloading!
it's hard to see in the picture but each card has a faint trim line around it to make trimming easier.

If you're looking for more free journaling cards, check them all out here.  Plus read all of my other PicMonkey tutorials here.

Have fun creating!

xoxo, Moe