1.30.2015

Free Journaling Cards February 2015

Remember last weekend when I'd realized I'd forgotten the free journal cards for January?  Yeah, it was a creative goal of mine to keep doing them...then I totally spaced!  Here's the second installment of 2015's free journal cards!
Of course they are for Valentines day and as always they are designed in PicMonkey (learn how to design your own here!)  I love the ombre look of the Ombre Amour option to add some fun pink touches to the cards.  This would look great on photos as well to create a cohesive look.  It is a part of PicMonkey's Royale feature - so sign up here ($4.99/mo or $33/year).
As always the PDF of 8 journal cards are free so go ahead and click here to download!  Please play nice though, as I work hard to make these free cards for everyone each month and really, truly enjoy it!  Remember to either pin, link, or share the post and not the link to the cards.  These are for personal use only - do not sell them or claim them as your own.

Check all the free cards here!

xoxo, Moe

1.29.2015

Revisiting January 2015 Four Simple Goals

January is over.  What the actual heck is happening?  Why is time moving so fast?  Why does everyone say that?  Anyway, today I'm going to revisit my January goals.  I am so in love with setting four goals for the month and then reporting back.  It's like baby steps for getting things done!

Discover my word for 2015 - I've already written a whole post on it here but my word for 2015 is explore.  I'm excited to see where this word takes me as I'm ready to explore different parts of my life and to see what it is I really, really want from life.

Work on the upstairs - Zach has been great about working on the upstairs and now it's my turn.  We've picked up the rest of the drywall to get it up around the stairs.  I've learned about mudding the drywall, and then it's my turn to paint.  I am not looking forward to the rest of the work but I am looking forward to it being done.

Plan our Kentucky trip - So far I've gotten the days down

Make a list of blog tags - This was so hard to do but I made a list of over arching tags then a list of the tags that would go under them.  Next month is to work back on a few posts and align them with the new tags.  Hopefully I won't mess up any links that I have with in my blog but I don't think I'm changing anything major when it comes to tags.

So there you have it, my little Four Simple Goal catch up for January 2015.

What did you accomplish the first month of the new year?  What will you do next month?

xoxo, Moe.

1.28.2015

How I Chose my One Word for 2015 // Explore

This year I really thought about my process in picking my One Word for the year.  It is Explore, by the way, and it took a while to get there (read about my 2015 word here).  Last year Focus just fell in my lap and it worked.  By picking a word last year I felt like I knew I wanted to pick a word for this year.  Here are three things I did to pick my One Word for 2015:
Find a definition that reflects the life you'd like to live
I had a definition or a phrase in mind when I went into picking my word for the year.  This made it hard but also made it easy as well.  It was hard to find a word I was satisfied with but I also knew exactly what I was looking for.  Runners up were Simplicity, Forward, and Brave.  The reason I went with Explore was the connotation of the word.  Brave seemed too fast, too lofty, too scary.  Simplicity seemed too short of a word to live by, it seem too easy, too lazy.  Forward seemed too vague, too much like I could make anything work.  Explore seemed more achievable.  It seemed like it fit where I was and where I was trying to go.  I didn't feel too pressured or too relaxed when I though of it.  It also seemed more specific to me and less vague.

Find words that speak to you
I used Pinterest for this because it is a treasure trove for quotes, words, and inspiration.  I played around with search words until I found phrases I loved or words that stuck out.  You can also look through your own pin boards for quotes you may have pinned but have forgotten about.  It is here that I got the idea for a phrase or definition and worked from there.  I found a lot of adventure related posts but knew that wasn't really the word I was looking for.

Make a list and ponder over it
Like I mentioned above, I made a list once I found some words that spoke to me and I kept it on my phone. I thought about them often and added, subtracted, revised, etc.  One important part of choosing a word is making it visible.  So by consciously thinking about my list and making it something to work towards I was able to finally pick a word.  I even made it a part of my Four Simple Goals for January....and here we are in February and I'm still all about it.

I hope this little post helped you out in settling on a word to live by.  I've heard people choose multiple words a year, or even one every month.  If you find yourself changing that often then go for it.  I like to see how I can evolve in my word and see what it means at the beginning of a year versus the middle and even end of the year.  If you're growing, that's all that matters.

Have you chosen a word for 2015?  How did you choose yours?  What does it mean to you?

xoxo, Moe

1.27.2015

Beauty Review // Wet n Wild To Reflect Shimmer Palettes

If you've watched my recent haul (right here) you'll see that I sort of went mad with the new Wet n Wild products for 2015.  I love Wet n Wild and one of my favorite products from them is their To Reflect Shimmer Palettes.  I have every. single. one.  Every one.  I have the Limited Edition ones from holiday & summer sets and when there is a new one I am all over it.  So today I wanted to do a quick review and swatch fest of them all!  So lets just jump in:
this is a Limited Edition Shimmer Palette from Summer 2014 in Photo Bomb but it is the one where you can see the packaging clearly.
From The Website
Perfectly-coordinated shimmering trios in a beautiful pearl finish. Each palette provides an instant bronze or a slight hint of color for a glowing complexion. The baked technology delivers high pearl and high pigment payoff, and can be worn wet or dry.
info taken from the Wet n Wild website here.
First Impression & Application
I can't really give you a first impression here because I've had these for a while and looooove them.  But I'll try to just describe them here:  The packaging is very, very nice.  I wouldn't say it reminds me of something high end (like I commented on the Elf Pressed Mineral Blush packaging) but it's not cheap-o feeling.  The compact a rounded square shape with silver detailing and a clear plastic window.  It is pretty secure with a little clasp type closure and I'm never afraid it will open on me.  
left to right: Hollywood Boulevard, Rose Champagne Glow, Rose Golden Goddess, Carnival in Rio
There are several different looks to this product as they release different ones when there are limited edition collections.  The three original shimmer palettes as well as the new, permanent one for 2015 are all marbled.  Carnival in Rio has bee discontinued to make room for Hollywood Boulevard.  Since I now have a MAC Mineralized Skin Finish in Lightscapade I can tell you that the marbling in these products is more chunky if that make sense.  Reminds me more of an Hourglass Ambient Lighting Blush.  I am so happy that the new permanent collect offers more of a range.  I felt like Rose Golden Goddess and Carnival in Rio were too close in shade.
left to right: LE Holiday 2013 (no name that I can find!), Video Bomb, Photo Bomb
Then there are the three limited edition palettes I have that range in texture (is that what you'd call it?).  The LE one from Holiday 2013 is much like the Bobbie Brown Shimmer Brick kind of style. Photo Bomb from the Summer 2014 collection is one solid color and reminds me of the Ambient Lighting Powder in Diffused Light.  Video Bomb from the Summer 2014 collection is also marbled.

I apply these highlighters with a small brush - specifically the Elf Blush Brush.  It is small and flat so it is great for precision application.  I also use the slightly pointed tip to blend it out if I've used too much.  A large fan brush is also a great way to apply this product.

Wear Time
For a drugstore highlight, these do last rather long.  I'd say that they last anywhere from 5-6 hours.  Since I have oily skin I feel that sometimes the product gets blotted off through the day so I find it doesn't last a whole day because of that.  If you have dry skin you may find these last longer for you.
these are heavy swatches under my soft box to show the underlying tones/color of the product
I only put this product on the tops of my cheekbones and down the center of my face.  Unlike the Ambient Lighting Powders I would be afraid to set my whole face with these.  They do have a lot of pigment and may be too sparkly for that.  These are my favorite drugstore highlighters though.
here they are in overhead lighting to show how they blend out and how shimmery they are.  It is hard to capture but these are very glittery.  There are very fine shimmers in this product.  It's more visible in the top swatches of Hollywood Boulevard and Rose Champagne Glow.

Overall Impressions & Recommendations
If you are on a drugstore budget but you want an high end glow - I would be all over these.  They are so affordable - around $5.99 at my Walgreens - and you can always find a sale going on.  Because they have different shades I would recommend Rose Golden Goddess, & Carnival in Rio for darker skin tones (medium to deep) because of the bronziness of the shades.  I would also say Video Bomb is dark enough to give a nice highlight to medium to darker skin tones.  If you have fair skin Rose Champagne Glow & Photo Bomb would probably be perfect for you.  And one that falls right in the middle for medium skin tones but could go for fair or deeper is Hollywood Boulevard.  It is super golden toned so it depends on the look you're going for.

Overall these are my favorite highlighters for the price.  I can't stop collecting them when the come out!

Do you have a favorite drugstore product you just die over?

xoxo, Moe

1.26.2015

Make it Monday // DIY Printable Planner Sticky Notes

One of these days I'll stop with the planner DIYs....then again, maybe I won't.  I got inspired to do this after poking around on Pinterest for free planner DIYs.  So I turned to my favorite online photo editor, PicMonkey, to help me create some wonderful square shaped images to print on my own sticky notes.  I'm always on the hunt for affordable/cheap/free ways to personalize my filofax because stationery can get expensive.  Even if you're a Target Dollar Spot hoarder chances are you're still looking for the perfect note.  You probably already have some solid color sticky notes in your collection so here's how to create some personalized notes. Below you'll find detailed instructions for creating your own or you can scroll all the way to the bottom of the post to print a predesigned template.
Supplies: printer, 8.5 x 11 printer paper, plain 3x3 sticky notes, PicMonkey.com online editor

First, go over to the PicMonkey website and from the design option select a square canvas.  You don't have to select a custom canvas with a custom size because we will shrink them down later when they are added to a word document.
One of my favorite things about PicMonkey is the variety of check mark boxes they offer as clip art - found under the Scrapbooky section of clip art.  I love that you are able to add the boxes if you're using the free version of PicMonkey.  You can also add geometric shapes and text to create custom graphics for your sticky notes.
Once you have the design you like, save it to your computer.  Create 6-8 designs just so you have a variety to print.  You might find that your designs get better as you go so you may design more.  If you want access to a ton more design elements sign up for the Royale feature of PicMonkey for $4.99/mo or $33/year here.
Next we'll move into Word.  If you don't have Word, you can use any similar word processor - Open Office is a good alternative as well.  I set my all the margins in my document to .5" then inserted a 3 column x 5 row table.

Since I work from a Mac I have a tool bar on the right side of my screen where all the custom options live.  You may have to find the specific table options in your word processor for this.  Set the first, third, and fourth row height to 3", set the second and fourth row height to .18", then set the first column width to 3", the middle column width to .19", and the third column width to 3".  If you have room at the bottom of your template, write the word BOTTOM so you know which way to face your sticky notes and to feed into your printer.  (You can also just go ahead and download my template here.)  Save this as a separate template.  Print out a few copies of this sheet.
Now it is time to add your graphics.  Select the cell you'd like to add the sticky note graphic to and from the Insert tab, select Picture, then From File.  Select your image and insert.  Or you can open the folder you have your images saved in and drag and drop them into your Word document.

You'll find it's way, way, waaaay too big but don't fret!  Under the picture tab select the Lock Ratio if it has been deselected and set the size to 3" x 3".  Keep adding your images to the 3x3 cells, resizing them as you go, until your page is full.
You may find that your cells seem to have gotten larger than the set 3x3 inches you made them in the first step.  My solution was to move the graphics behind the text and then use my arrow keys to align them in the center of the cell by eye.  Since I had the tool bar on the side I found Arrange and selected Behind Text.  On a Windows version, you may have to access the Picture tool bar at the top to do this.  This is important because you've aligned your sticky notes to a blank template that may not match your filled template.  You can always print the two templates out, place them on top of each other, and hold them up to the light to see if anything has changed.
I also moved into Publishing View to more specifically align my images with the arrow keys as seen above.  Sometimes my arrow keys moved the image too far to the left or right so moving into Publishing View always gives me more control.  I then set the table borders to be white or transparent.  Save this as your second file - this is the file you will print repeatedly onto your sticky notes.
Grab the blank template you printed and align your sticky notes.  Keep in mind how your printer paper feeds.  This is why the word BOTTOM is helpful!  After you've aligned your sticky notes, feed your paper back into your print tray.  For my printer I turn my page face down with the word bottom facing towards me.  You may have to experiment to find out the best way to print to your specific printer. Print the page filled with your sticky note designs out.  This should print your designs out onto your aligned sticky notes!  Repeat as needed.
And there you have it, personalized sticky notes!  Stick 'em where ever you want 'em.  I think these would be great to personalize and stick in lunches, on your correspondence, around the house, any where really.

Also, if all that blabber was too much for you here are three simple steps:
1. Print this template
2. Align your sticky notes with in the 3x3 squares
3. Feed your paper with sticky notes back into your printer & print this template

How do you customize your planner?  Any sticky note tips you have to offer?

xoxo, Moe

1.24.2015

Free Journaling Cards January 2015

I am oh so very late with the journaling cards this month.  I'd actually forgotten that I didn't do some for January when I sat down to do the cards for February!  These cards are all black and white because I can't wait to color my year with so many things.  I feel like we can start off fresh anytime but the new year always speaks to me.  
They were also sort of inspired by Saved by the Bell!  I loved the TrashHand font for free on PicMonkey and decided to pair the hand written font with the tall and skinny Tall Dark And Handsome font also available for free on PicMonkey.  I love the simplicity of these cards - all they include are two fonts and a geometric shape.  All part of the free options from PicMonkey.  If you want to learn how to design your own cards with PicMonkey, check out this post.
Download the free .PDF here.  Remember to play nice - these are for personal use so don't resell or claim them as your own.  Additionally, pin this post and not the direct link to the printable.  Thanks!

View all free journaling cards here.

xoxo, Moe

1.23.2015

Word of the Year 2015 // Explore

Thanks to the help of a few lovely tweeters, I've come up with my word for the year.  It is Explore.  I was leaning towards Simplicity, Explore, or Forward for this year but something about the word Explore just spoke to me.  Also in the running, but pretty far back, was Brave.  Honestly, I was terrified of Brave.  I thought I couldn't live up to it...but if my word this year is Explore maybe next year I can be Brave (I'm already feeling it....Brave will be the front runner next year if 2015 goes the way I hope it will go).  First off, if you want to read my post about my word for 2014, go ahead and click here.
I feel like this little project in 2014 really helped me reflect from the beginning to the end of the year, even though I felt like in the middle of the year I felt like I'd lost touch, I really think this helped me.  So for 2015 I plan to Explore more.

I want to take the time to Explore what I really want out of life.  How is what I'm doing now helping me get to where I want to be?  Where is it that I want to be?  I want to Explore different ideas, different places, etc.  I plan on planning and taking small family trips, our first one will hopefully be to Kentucky in May!  I want to Explore different places with Zach.

I want to Explore what I really want out of my blog and YouTube channel.  Where do I want to be?  What do I see in the future?  I've found that it's hard to run this blog as a business and really want to Explore how I can get the most out of it for me.  I'm really bad at interacting with a broad number of people but I do want to step up my blog to the next level - advertisers, sponsors, etc - because I really would like to earn some revenue for my efforts even though I do a lot on this blog because I find it fun.  I'd like to Explore if that is a good option for me or not.

I want to Explore my career options.  I remember in 2013 writing a post called What if this is it & What if I am Happy? and it still speaks to me.  I didn't think I was ready to start out on my own.  I don't think I am able to be my own boss - it's stressful!  But that doesn't mean I'm a failure and it doesn't mean I'm not a hard worker.  While my job isn't my favorite thing to do for 8 hours a day it pays for me to collect the things I love, to save for the things I need, and I can finally feel like I'm contributing to our little family.  I can be responsible and that shit is the best feeling ever.

So 2015 is going to be a year of changes - like every year is - where I try to find out more about myself.  Using the word Focus in 2014 made me hone in on my life where as Explore will help me learn more about what I really want and hopefully I can be Brave in 2016.  That's a lofty goal!

I hope you've enjoyed this little post and I hope that you're 2015 has stared off amazing!

What is your word for 2015?

xoxo, Moe

ps. You can totally right click and save that image above to print as a 3x4 card for your pocket scrapbook albums if you want.  I think I'll be putting it in my planner once I get my set up put together!!

1.22.2015

Planner Printable // Free Blog Planner

I've been loving using my Raspberry Saffiano Filofax that I picked up on Amazon for a steal way back in August/September of 2014.  And the part I've been loving the most is my Blog Planner that you probably saw in my Blogging Kit 2.0 post (ps - original Blogging Kit is here).  I had this section in my old planner and just moved it over to my Filofax & fine tuned it.  Today I want to share with you a free printable blog planning calendar like I use when I sit down to blog.  I've gotten a lot of requests on YouTube and in general to share the actual inserts - and I'm here with them today!  (All downloads are at the end of the post!)
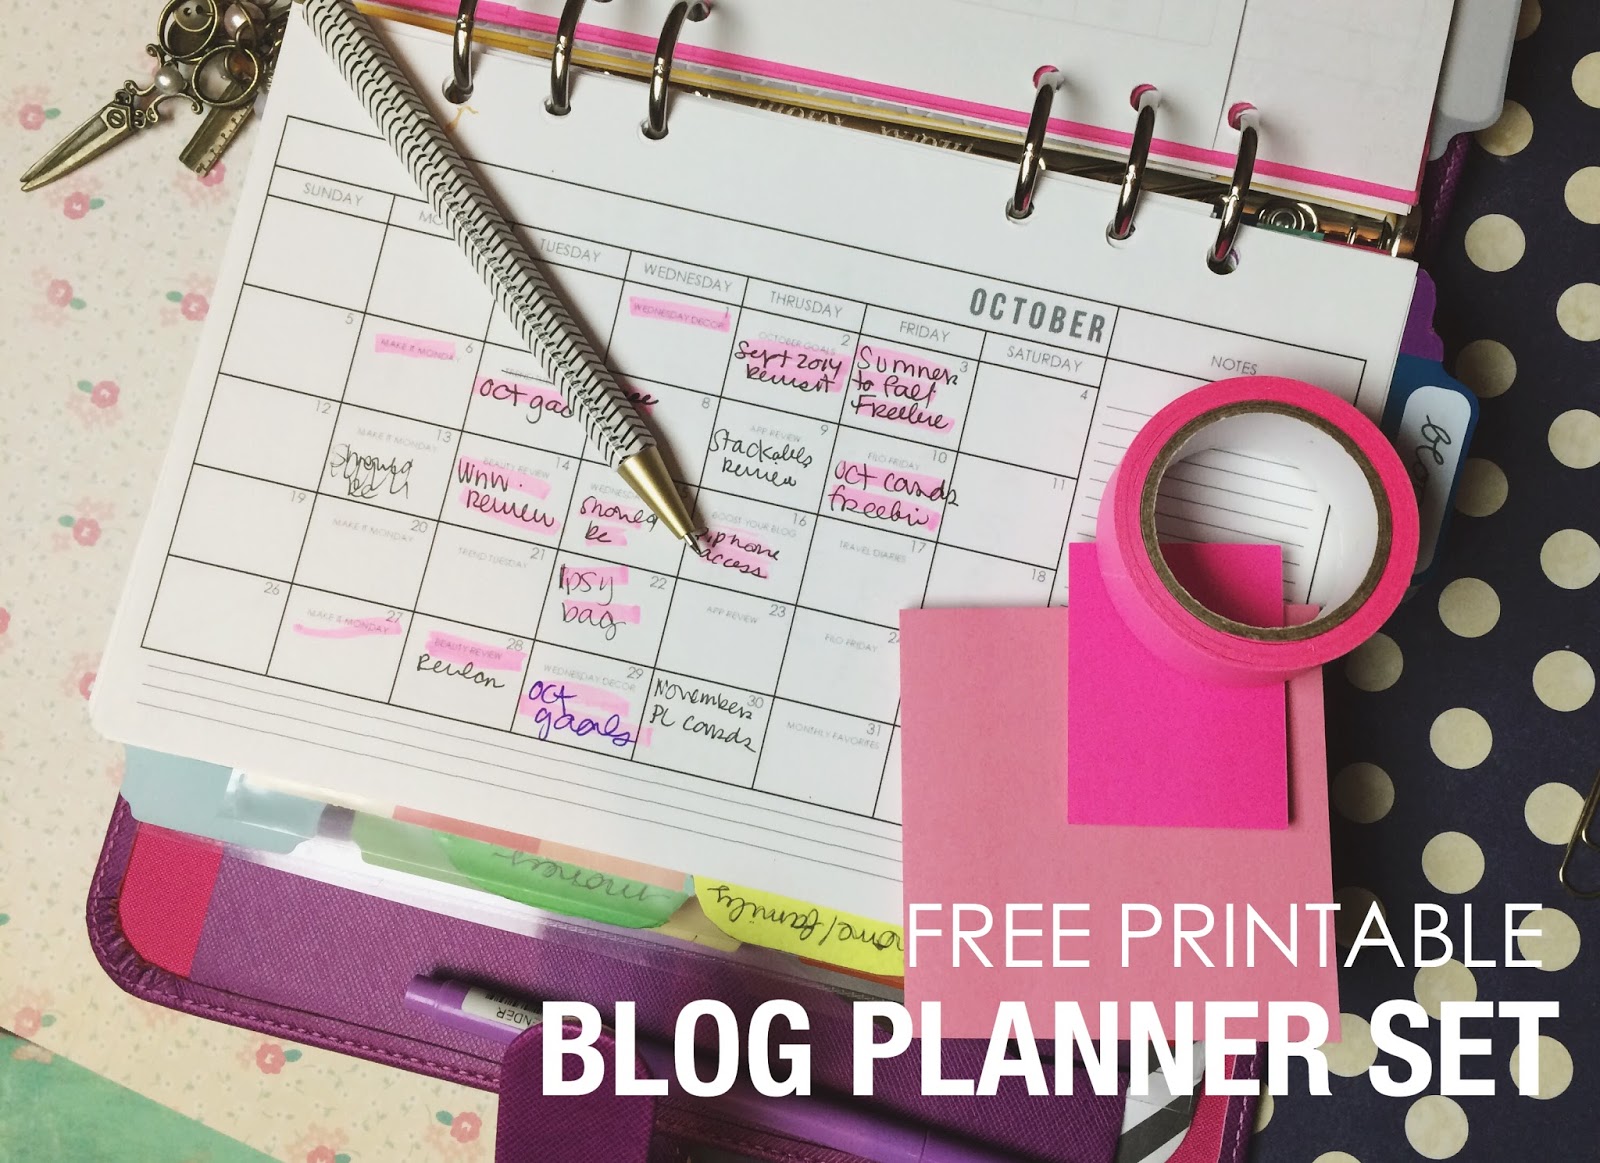
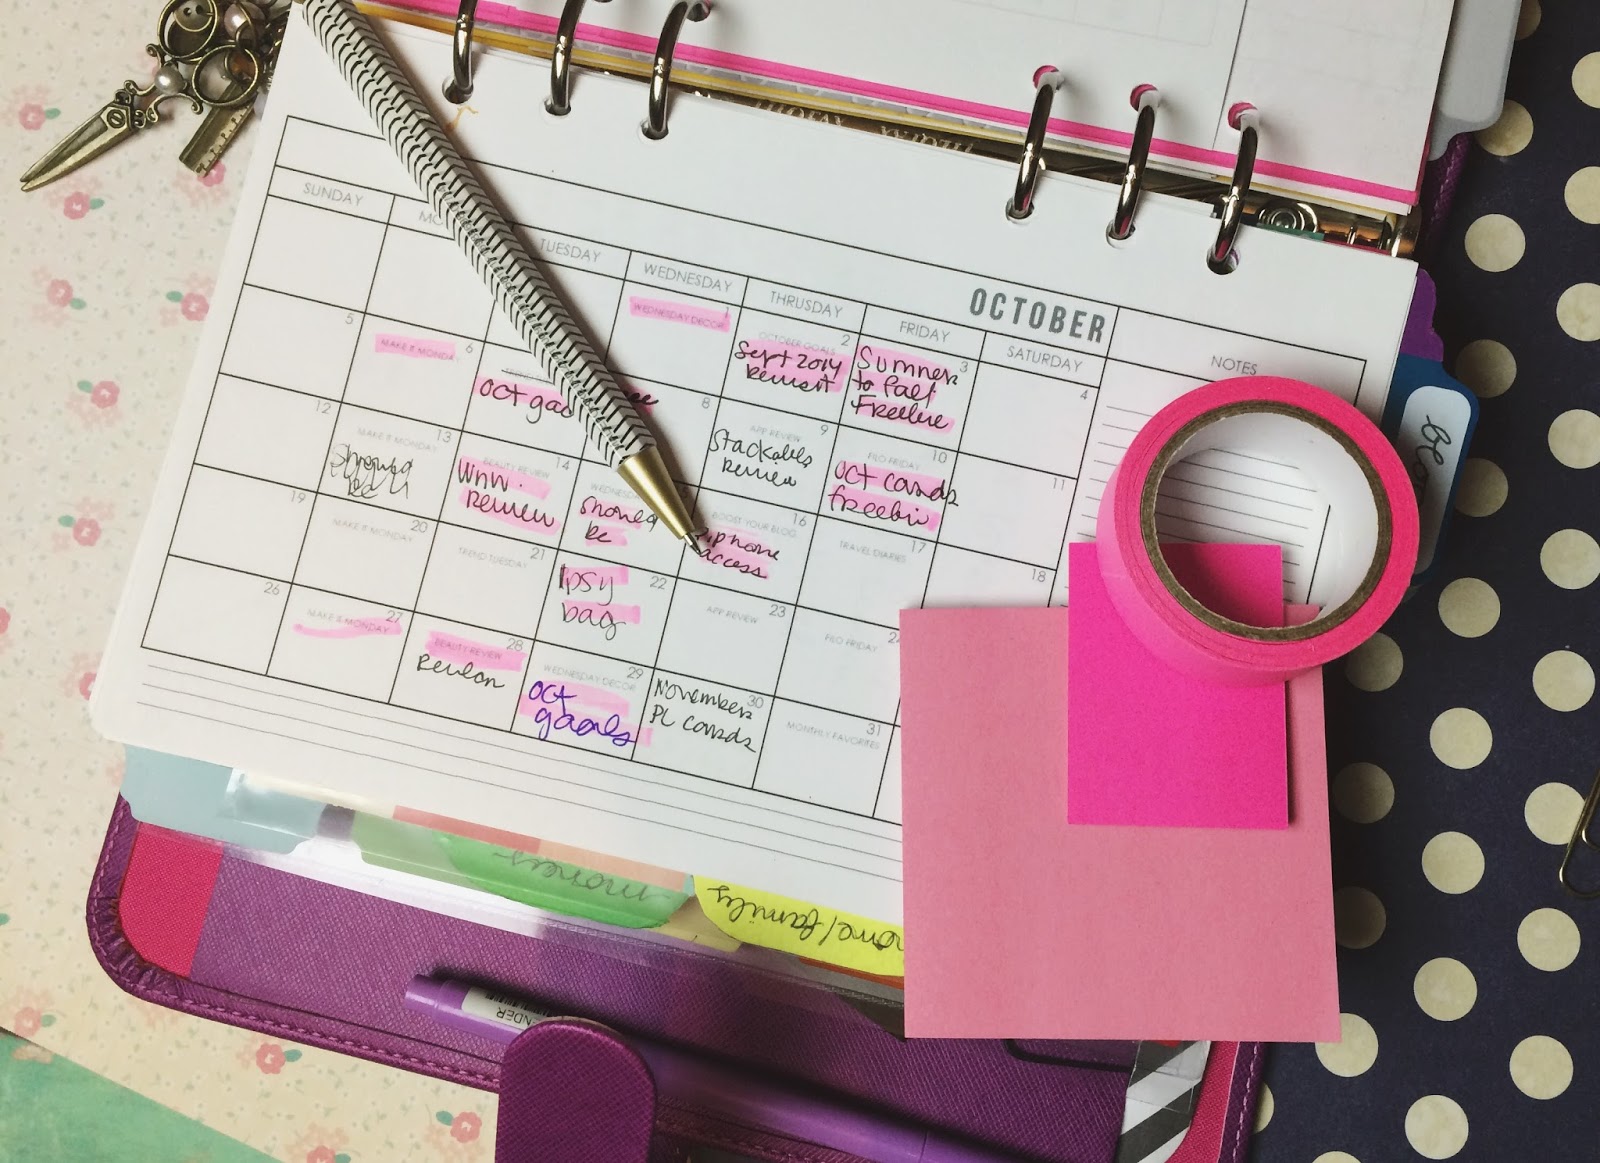
Editorial Calendar
First off I sat down with my calendar open in word and mapped out all the reoccurring posts on my blog.  I used to this in my original blog planner - see that here - and it worked really great to keep me organized and motivated.  I just did a digital version in word this time on a month on one page calendar I designed.
By filling in all the reoccurring posts, I know exactly the open spaces in the month and exactly what needs to be done the week before.  There are weekly segments - Make it Monday, Trend Tuesday, Wednesday Decor - and monthly segments - Boost your Blog, Monthly Favorites, Goals, and Goal Review - and new segments I've added bi-weekly - app reviews, Beauty Reviews, etc.  This gives me a good outline but because it's my blog nothing is really set in stone!

I don't hold myself to this, though.  If things need to be moved around - I move them around.  I'd rather go with inspiration than feel limited to a rigid schedule.
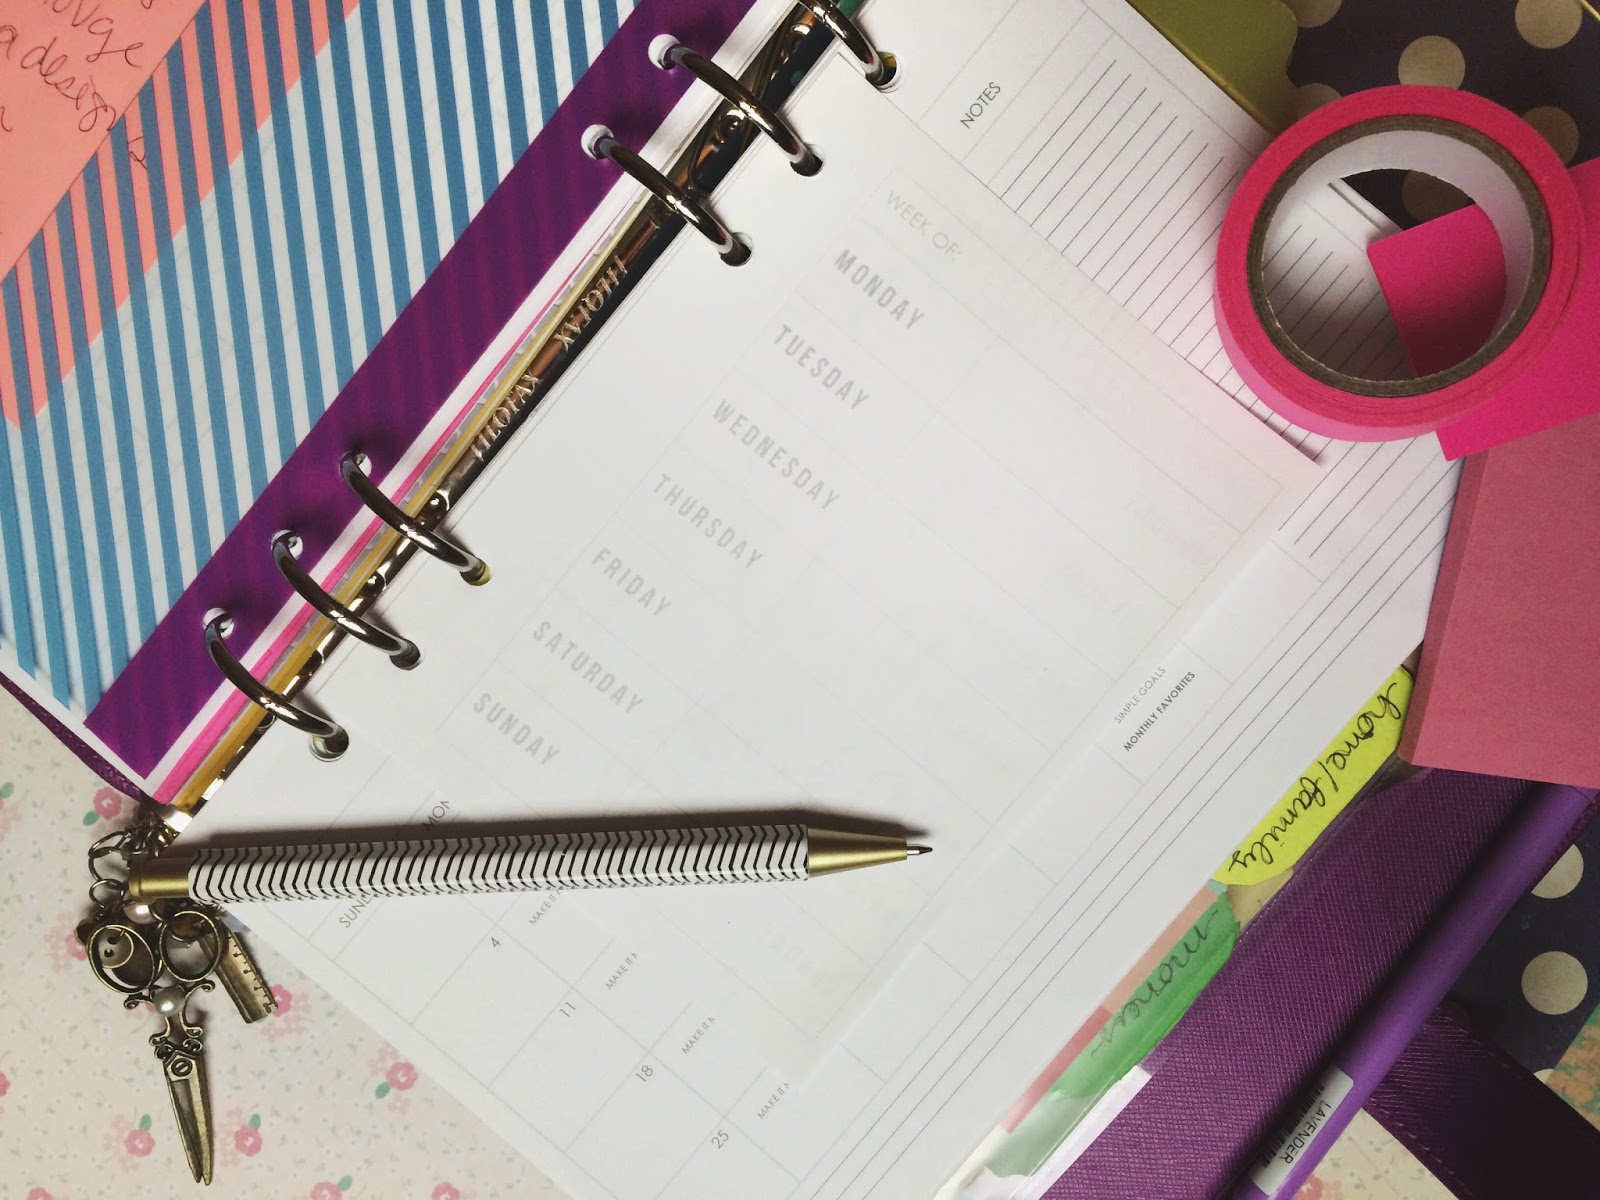
Weekly Scheduler
Between my calendar and my idea pages I have small 1/4 page weekly planning pages.  These pages are where I write down exactly what I have scheduled for the week.  Since my editorial calendar can get to be just a generic overview these weekly pages get the name of the post on the corresponding day/date after it's been scheduled.
I try to plan a few weeks in advance and this just gives me an idea of exactly what is happening on what day and I can see more clearly exactly what is going on in a specific week.  I can also see what week is missing posts.  I don't pressure myself - if I have a full week of posts, amazing! But I try to shoot for 3 completed posts that I'm proud of.  I focus on quality over quantity!

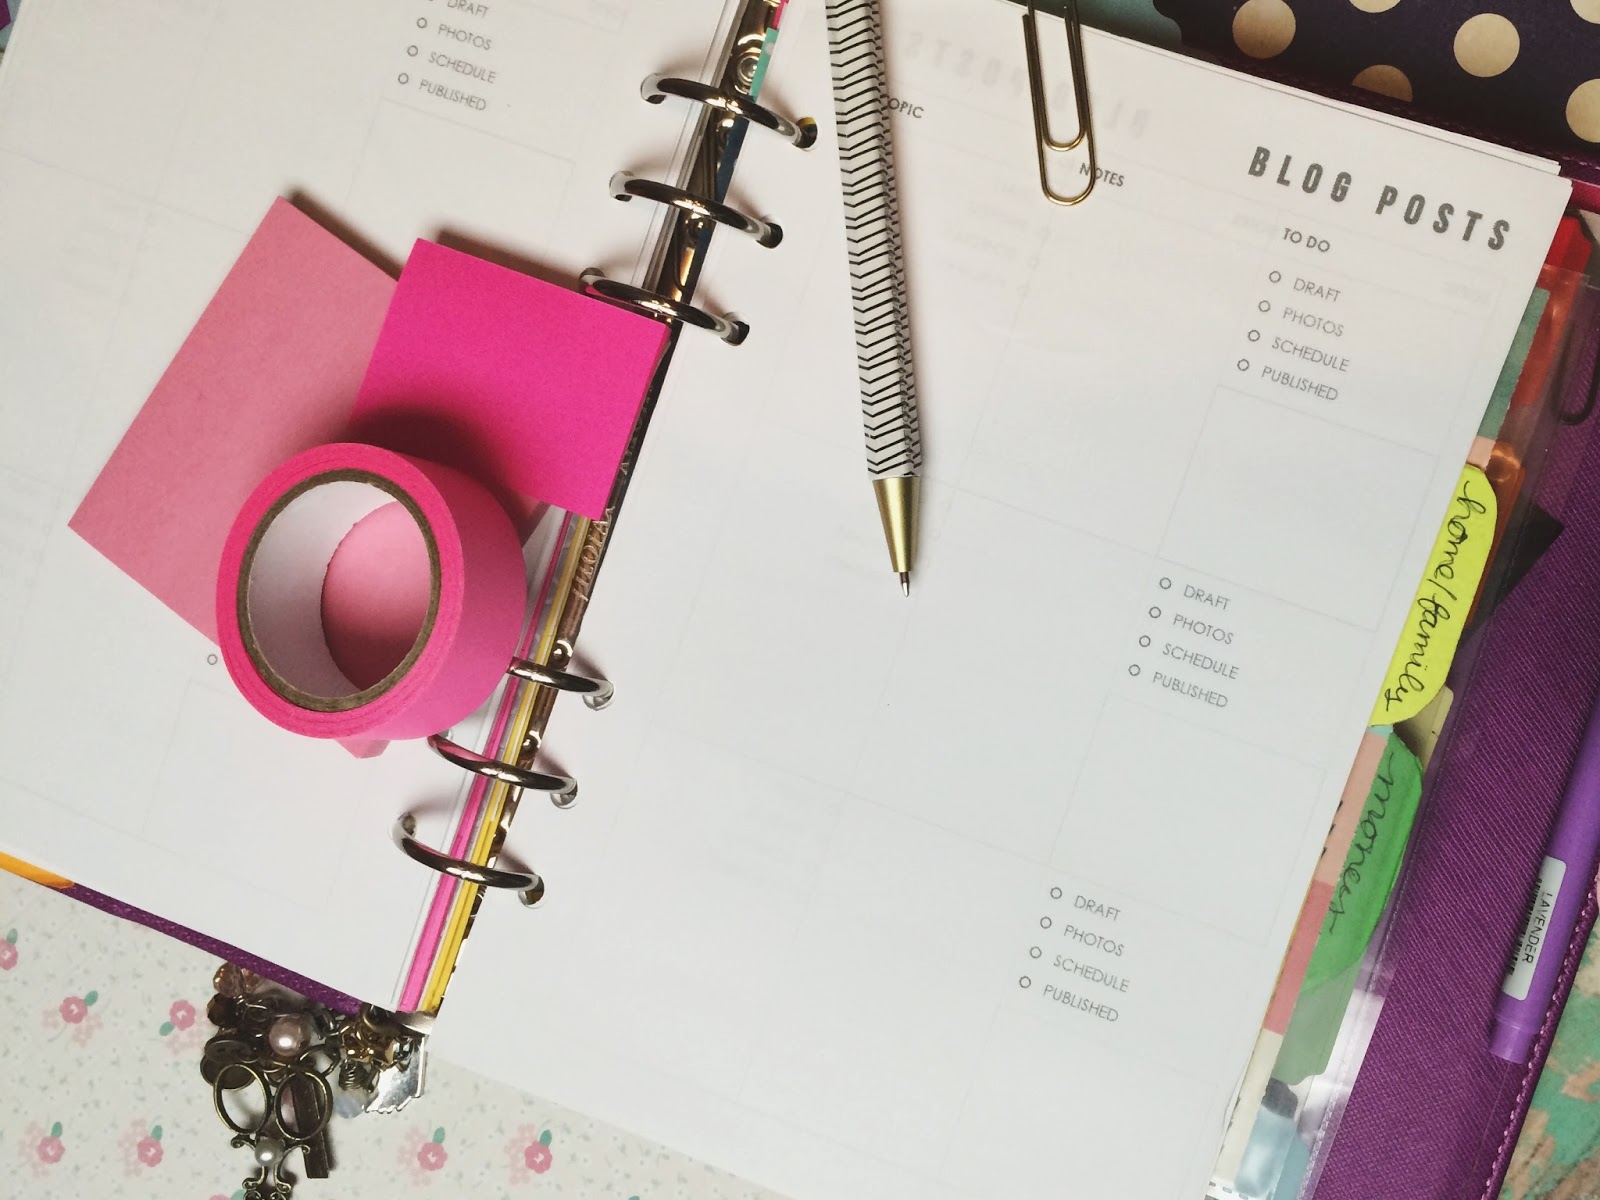
Blog Post Idea Pages
The next part of my blog planning arsenal are blog post planning pages. Once I have an idea that I want to really focus on developing in to a blog post I move it over the these Idea Pages.  Because of the 3 columns I can see the idea to completion more easily.

I like that I can compartmentalize my ideas.  I find that if I have a broad idea that I can't break down I get overwhelmed & it gets pushed aside.  I have plans to reopen my etsy shop but because I can't compartmentalize the designs I want to sell, I can't find myself working towards it.  I need to create a system for that!  So the first column is for the topic idea which may turn into the name of the blog post.  In the second column is a notes feature.  Here I write any notes about what I want to share, any steps I need to remember, etc.
Then I can move it to my to do list area in my weekly planning pages.  From there I can work on the post during the week checking off the boxes in the 3rd column.  Since I try to squeeze in blogging where I can I might photograph for a few posts one day, right the draft post another, etc.  If the post is checked off as scheduled that means I'm totally done with it and I can just wait for it to go live.  The publish check box just lets me know what ideas have been seen all the way through.

So today I have for you the downloads of all three of these things!!  Now, don't hurt me but I'm not 100% sure these will work!  I designed them in Word and that calendar should be editable - there is a Word document and a PDF inclueded.  You should be able to type into the template your own editorial calendar.  Additionally, these are made to print on paper trimmed to 5.5x8.5 inches - so half-letter size.  I use half letter size in my A5 Filofax because it fits just fine for me!


I hope these printable planner pages work for you!! These would be great for an A5 size filofax, a half size binder like I used to use, or you could bind them however you wish!  You could trim and punch them to clip into a coil bound planner as well.

Please remember that these pages are for personal use.  Please play fair - don't disseminate these as your own, only link to the blog post, don't sell these, and just all around be nice.  Hope you enjoy!

xoxo, Moe

1.21.2015

Wednesday Decor // Upstairs Remodel Update

About 3-4 ish months ago we tore up the carpet in our upstairs bedroom and the old living room of the house in hopes of turning our home into a 3 bedroom house.  First off...how amazing will it be to have 3 bedrooms?  We don't need three bedrooms, but boy there will be so much room for activities!  
The upstairs sans carpet before all the walls:
I'm standing with the dining room behind me looking down our long empty space.  The bifold doors on the right are the laundry doors (it's just a closet type deal) past that is our old bedroom.

While Zach was off at the end of last year, he had our contractors come in and help him tear out a wall, replace some vents, and map off where the new door to our old bedroom would be.  We had to move our bedroom door in order to fit a hallway in front of it.  When you come up our stairs to the second floor the kitchen is in front of you  Right now, we're leaving that alone but when you turn to the left there is our dinning area.  We are expanding that to be bigger and putting a wall up to frame the closet of the 3rd bedroom.  Along the wall where the bathroom and laundry room is will be a wide hallway.
In the image above, to the left is the beginning of the laundry table deal.  It is across from the laundry room and we really needed more storage for cleaning supplies etc.  We'll move that into cabinets above the counter (which could be used as a mini command station!) and put a stacking washer and dryer in the laundry room to free up space for a linen closet type deal.  The right image is the walling off of the closet to our new room and our room.  The laundry counter thing sticks off the outside of the side wall of the closet.  Where the ladder is in the images above is the inside of the closet and on the other side of the door is our room.  These two images were taken from the same angle and the ladder only moved a couple of feet towards the outer wall.
Standing a few feet back from where I was standing in the first image you can see the dry wall is covering the wall that is the back of our closet.  It is also the back wall (or front wall?) to our dinning room.  The hallway me made was huge - to make sure we can fit the furniture around the sharp corners and to give room for someone to walk by with the laundry doors open.  Right behind that wall is our closet and the laundry counter thing is behind it as well.  If you go down the hall and turn left at the end you'll enter our bedroom.  If you go down the hall and turn right you'll end up in our old bedroom.
Behind that leaning drywall is the laundry counter thing.  Our new bedroom is on the left and then our old bedroom is on the right.  The third bedroom will be slightly bigger and we'll move in here once it's all said and done.  There will be a small walk in closet as well.  All in all we're finally getting some work done on the place.  Man do I hate the work part!  Can't wait to share it with you!

xoxo, Moe

1.19.2015

Make it Monday // Sew a Small Notebook

Remember this post on 3 ways to make lined pages for your Filofax or ring bound planner?  Remember how I said I had something else up my sleeve regarding that DIY?  Well here it is!  How to sew a small notebook!  Ever since I decided that I'd start of 2015 in a Fauxdori style planner (video walk through to be up soon!) I knew I'd need to make my own little notebook inserts.  However, this little DIY is perfect to create any little notebooks to supplement your current planner set up or just to carry around with you.  You don't have to be a planner addict to appreciate this DIY.  I am including a free, blank month on two page insert in case you do want to make your own little calendar.
My first introduction to making a book was in college.  I took a book binding class and really did not care for it.  It takes a lot of time and planning and neatness to make a hardback, hand bound notebook.  I made about three in my life time because they were so annoying!  I'm a more of a big picture person and less of a detailed person if you know what I mean.  But I did really like making simple, saddle stitched pamphlet style books.  They are simple and still look really nice.  Here's how to make one:
Supplies :: printed pages or blank pages to bind (I used a standard 8.5x11" printer page), scrapbook paper, scissors, paper trimmer or ruler and blade, scrap printer paper, awl or something equally pointy (I used a pottery tool), thread (cotton crochet thread, embroidery floss, etc), needle.
First, print your pages back to front.  I find that about 10-12 pages make a good book that's not too thick and is easy to bind.  You can used lined pages from this tutorial, plain white printer pages, colorful printer pages, this free calendar printable, or any pages you'd like to bind together.  This would be fun to use up some scrap patterned paper to make a smashbook style notebook.

Next, trim down your scrapbook paper for the cover.  Use a paper cutter or scissors to trim down your covers to fit your page sizes.  I found some 8.5x11" scrapbook pages from Michael's a while ago so I didn't need to trim mine down.
Gather your pages together and fold the stack in half making sure the printed pages are sandwiched between the cover pages.  You should end up with a small booklet measuring 8.5 x 5.5".
Now we need to make the guide to punch the holes.  I always take a spare piece of the printer paper and cut off about a 3" strip.  Fold this strip in half to make a thin 1.5" strip.  Unfold the strip.  Fold the strip in half so you have a smaller 3" strip.  Then fold that strip into thirds.  Where the folds cross will be where we punch the holes to bind the book.  I always decide that one end of my guide will be the top so I tear a little slit in it so I don't get confused.
Next, place the guide in the center of the pages + covers you wish to bind making sure the slit you've torn in the guide is at the top of the book.  Using your awl, gently punch through the guide and all pages in your booklet.  Be careful here, that shit is sharp!  Move your finger out of the way!  I start at the middle then work my way to one side and then the other.  Repeat on all booklets.  Remove the guide before you begin to sew in the next step below.
Now for the sewing.  Using your thread we are going to saddle stitch the pages together.  Starting on the inside of your booklet insert the needle in to hole 1 (as noted in the photo where you punched the holes into the signature) leaving a small tail on the inside of the booklet,  moving to the left insert the needle down into hole 2.  From the inside of the booklet insert the needle into hole 3 and then moving to the right, insert the needle back into hole 2.  From the inside of the booklet insert the needle into hole 4 and then moving to the right insert the needle into hole 5.  From the inside of the booklet insert the needle back into hole 4.  Finally insert the needle, from the outside of the booklet, back into hole one.  Using the two tails, tie a knot around the long string between hole 2 and hole 4.  Take your time and I'm sure you'll be able to complete this step.  You're done!
You can use a ruler and blade to trim down your booklet to have straight edges but the raw edges don't really bother me.  I used mine in my Fauxdori planner system for 2015:
Hope you have fun making a zillion little notebooks for all your little needs.  Keep a look out for my Fauxdori walk through on the YouTube channel soon.

xoxo, Moe

1.16.2015

2015 Creative Goals

I've been feeling like I've been putting crafting and creativity on the back burner for a while now but with my new love of my Filofax, I have a way to track everything I think of!  So I thought I'd make some crafty goals for this year to keep my creative juices flowing:

Try 4 New Crafts
This was one of my four simple goals one month last year and the craft that I chose - loom knitting - was not my favorite so I never talked about it.  But this year I want to try - or continue with - some new to me crafty things.  The first is weaving.  I've been inspired by Rachel of Smile and Wave and by Alicia of Habitual Homebody and want to try my own take on some weaving projects.  I have some circular weaving ideas in mind as well as some more complex god's eyes.  I want to stretch the idea of weaving just a little bit.  The second is to continue with sewing.  I want to make a few shirts, a few maxi dresses/skirts, and just some other simple stuff so i get the hang of my sewing machine.  I'm not sure what the other two might be - maybe some polymer clay stuff, maybe I'll do more spinning of yarn, maybe I'll do some print making..who knows.  I just want to make, make, make.

Project Life 2015
First, I want to finish off my 2014 albums - still have to do September, October, November, and December (I am sooooo behind!).  The last trimester (?) of the year...thats what I call it...still needs to be completed.  I want to continue with my current breakdown - 4 months per 6x8 SNAP album - but instead of doing the 6x8 instagram collage at the front of the album I think I want to do a full 6x8 page of a word or saying that speaks to me that month.  I want to try to put a little bit more design into it.  I also want to include Zach in the album more.  It is so hard when it's just the two of you.  So far those are my only real Project Life goals this year.

Continue to Design Pocket Cards each month
I've loved doing free cards last year - find them all here - and really can't wait to continue to do it into 2015.  I plan on offering 12 sets of cards this year, one for each month.  I think I started with September last year and want to keep on going.  I also want to offer some fun free sets like I did for our anniversary in 2014.

Set up the garage, for real this time
Every time we clean out the garage to set up the studio (that has been a goal, for what like 3 years now?) more crap gets moved in there and we don't get it done.  We need to clean out the garage and make room for the studio.  We need to get rid of a lot of crap we do not need and get the garage set up for its intended purpose.  This is one of the goals that is stressing me out because we try every year and every year it doesn't go through.  Maybe one day it will fall in place.

What are your creative goals this year?  Anything you're gunning for?


xoxo, Moe

1.15.2015

On Being Vain // Vanity, Pride, and Humlity

Guys....vanity is my favorite sin.  I will be the first to admit to anyone that I am vain and I am proud.  I do however also consider myself a humble person.  How is that?  Aren't those two - vanity and humility - mutually exclusive? Nah, bro.  Here's why.

I think it is important for women to be proud of themselves and to be vain.  Post selfies everywhere, look at your naked ass in the mirror and live for it, buy clothes and wear clothes that make you feel damn good, put on that bright purple lip...why?  Because the world needs more of you!  
The world needs more women who don't apologize for themselves.  These women become role models for young girls who see their complexion, their hair color, their weight as something that defines them.  They see these things as something they have to live in the confines of and apologize for not being the opposite.  Society seems to chop us up and gives us back an idea of who we are supposed to be.  So for all of our lives we have to do something to make up for our shortcomings.  When we should be embracing ourselves - no matter what.

Now, don't get me wrong - we all feel the insecurities.  And the trick to being confident - at least for me - is to recognize that everyone is insecure so you should feel no better than anyone else.  That's weird right?  I think it's weird because we associate confidence sometimes with arrogance.  And it's not true.  I consider myself to be really confident yet in person I'm shy when meeting new people.  What makes me able to get in front of a crowd or muster up the courage to talk to someone is that they are just like me - they feel insecure about something.  Everyone is just like you and they probably are pretending they aren't.

Now I want to get to why I am also humble - while being proud and vain.  I'm the type of person to be the first to teach you what I know.  I remember in college I'd be the first to tell you how I did something because (one of my favorite quotes) A candle loses none of it's light by lighting another.  Being a confident yet inspiring person is the person I want to be remembered as.  I am slow to judge and a huge believer that everyone goes through life differently.  The reason I blog is because I want to be someone that others might be able to find and relate to....to know they aren't alone.  I often feel like I don't give the best advice because I know that everyone has to learn a lesson on their own.  I think back to all the advice I've ever asked for or been given and how, no matter what, I've had to learn on my own.

The biggest thing about being vain for me is that I am so proud of the person I've become and so happy to know that because of that, I will be proud of the person I will become.  I take responsibility for me and that's what makes me feel so great about being vain.
Another part of my vanity is that I can take pictures like the one above and still think I'm damn cute.  Also, I'm secure enough with my insecurities to show others my vulnerable self.  No make up, brushing my teeth, dirty mirror, Transformers tshirt.  I'm real...and I'm not afraid of it.  It's taken me a long while to really feel great when I'm not wearing make up.  Part of that has been taking care of my skin and finding new products that work for me and the other part of that is realizing I need to be happy in my own skin because it's where I'll be for the rest of my life.

This was sort of a weird post to write but I feel like I haven't been super, dooper honest on my blog in a long while and I just wanted to do something about that.  So go out there and post selfies.  Do it!

xoxo, Moe

ps. if you're vain too, follow me on instagram so I can look at how beautiful you are - @fivesixteenths

App Review // PicFrame

A bigger goal I have in 2015 is to do an app review or two each month on the blog.  Hopefully I can keep it up!  The first review this year was on the app Phonto which can help you create some really great and easy graphics for your blog, Instagram, pocket scrapbooking, etc and today I want to share with you another app that can help you out in both blogging and in pocket scrapbooking.  You gotta love a two-for-one!  Today I'm sharing with you an oldie but goodie app - it's called PicFrame.  This is an app I've had for ages, I am 90% sure this is one of the first apps I downloaded and I keep going back to it because it is perfect for what I need it to do!  It does cost $0.99 buuuut it's so worth it for the ease of use.
What it is
PicFrame helps you combine multiple photos and videos into amazing looking frames and share them with your friends and family via Instagram, Facebook, Email, Twitter, and more!
With 73 fully adjustable frames supporting up to 9 photos or videos, text labels, rounded corners, photo effects, shapes, shadows, music, plenty of patterns and an easy color picker you will always have a unique look.
info taken from the iTunes description here

What it does
Well...it does what it looks like - it is a collage app.  Not only does it create collages with ease, I just love the design.  It is a no fuss app that gives me what I need - a collage in a few seconds.
Choose your frame type, there are 73 to choose from, then choose your ratio, there are 7 options to choose from including a square option.  This app can help you create square collage for instagram - great for showing a process or examples of something.  You can also use this to create a horizontal or vertical collage graphic for your blog.  (Pair it with the Phonto app and you can really get the info graphic juices flowing.)  I have been using this collage option recently to create a 16:9 thumbnail for my YouTube channel.
Adding effects is easy in app as well.  There are a few filters to choose from to create an artistic effect or go Andy Warhol style.  You can also create a sllouette cut out shape to add interest to your photo.  My favorite fun effect is to create a mirrored image in a split frame.  It's pretty neat.
To adjust the width or the color of the frame select the style option.  Another option, one I find least helpful mainly because it's not as aesthetically pleasing, is that you can add labels.  I prefer to mix my apps and use Phonto to add text to my collages.

How it helps you
This app really helps with on the go blogging and social networking.  If your main camera is your phone you can create beautiful collages to use on your blog from your travels or your day to day life.  You can use it to create process collages for a tutorial on your blog as well.  It is great to showcase a collage of different photos on Instagram as well.  I love it to put a face of the day photo together with close ups and products.
You can use this to create a collage for your pocket scrapbook as well.  If you print from an online printer you can create a 4:3 collage to two vertical images to get the perfect 3x4 prints on a single 6x4 print.  This app is an all around helpful app!  You can also use some of the unique framing options to create in a digital scrapbook type of fashion.  The app supports pretty large printing so you can order prints big enough to fit in your scrapbook albums.

What collage apps do you use?  Any others you can recommend?

xoxo, Moe

1.13.2015

Beauty Review // Elf Pressed Mineral Blushes

If you've followed a long on my Beauty channel for a while you may have seen me mention the Elf Mineral Blushes a few times.  In my November Makeup Basket, my Fall Get Ready With Me, and my Current Elf Favorites I mentioned these blushes because they are pretty much amazing.   I wanted to do a more in depth review of the current four shades, so let's just get into it:
Clockwise from the top - Cabo Cabana, Jet Setter, Wanderlust, Sweet Retreat

From the Website
Create a beautiful flushed look with this all-natural, enhancing blush. This innovative pressed powder creates a silky smooth texture that blends like a dream for everyday wear. Infused with Vitamin E and Grape to nourish the skin and provide anti-aging benefits for a more revitalized look.
info taken from the Eyes Lips Face website here.
ps. use ebates to get a percentage of your purchase back to you!
First Impression & Application
When I first got these blushes in the mail I was truly impressed with the packaging.  If you thought the studio line was amazing, wait until you see the mineral packaging.  For me the cardboard packaging is more professional looking - it looks more high end, more luxurious, and more grown up (is it weird to think that packaging looks adult?).  The actual blush is in round black packaging with a clear center section in the top embossed with the elf logo and the words Pressed Mineral Blush.  The shade name is on the back which is great because a lot of times I can't find the shade name of the product after I've thrown away the packaging.
These blushes are very smooth to the touch and feel very, very high end.  They are creamy, not too powdery and the color pay off is very much impressive.  If you have experience with the blushes from the Studio Line you'll be pleasantly surprised that these are much, much better.  I apply this blush with my Real Techniques Blush Brush and feel like I get an even application.  It is easy to go a bit heavy handed with the dark shades but you are able to blend them out with a clean powder brus.
from left to right - Sweet Retreat, Cabo Cabana, Jet Setter, Wanderlust
Wear Time
The wear time on these is pretty impressive as well.  I find when I wear these blushes I get at least 7-8 hours of color on my cheeks.  I find that sometimes blush is gone by about the 4-5 hour mark.  However these last all day for me.
clockwise from top left - Sweet Retreat, Jet Setter, Cabo Cabana (you can see the little bit of glitter in this one), Wanderlust

I work an 8 hour + day sometimes and I really like to look put together all day long and even when I come home from work.

Overall Impressions & Recommendations
I. Love. These. Blushes!  The colors are gorgeous, though there are only 4 shades (and some are a bit similar) each color suits different seasons.  I love the deeper shades for Fall/Winter and the lighter shades for Spring/Summer.  The quality of the blush is impressive as well for the price of $5.00.  I would recommend these over the Studio line blushes any day!

I also want to mention to be careful with these blushes.  Because they are so finely milled and perhaps because they are a pressed mineral product.... do not tap your brush on the side of the product.  I did that with the Pressed Mineral Bronzer in Tan Toffee and it shattered everywhere.  So be extra gentle with them, please!

Overall I totally would recommend this blush to anyone and everyone.  I think it's great on different skin tones and totally worth the $5.

Do you have a favorite Elf blush?  I'd love to know!

xoxo, Moe