1.27.2017

Free Sticker Friday // Watercolor Lipstick Stickers

Who's excited for all the new items at the drugstore?  I am so excited to see all the new things from Wet n Wild, I hear NYX has some new stuff, Flower Beauty seems to be rocking it at Wal-Mart.  When make up companies release new items...it's like Christmas all over again for me.
I've splurged on a lot of the new Wet n Wild Lip Suedes...and I think they are awesome.  Do you think I should bring beauty reviews back to the blog?  I haven't really been feeling them recently but I did like doing those posts!  Let me know what you think!
Today's Free Sticker Friday is all about the lipstick.  These cute watercolor lipsticks are great for marking date nights, make overs, girls nights, pampering days, make up appointments for special events, even when you have special events to do make up for!  I love the different colors because you never know what color you're feeling until you get ready.

DOWNLOAD LIPSTICK STICKERS HERE

As always, this file includes a PDF to cut by hand (though I hear good things about this tool!), a studio file to cut with your Silhouette, and a PNG to cut with your Cricut Explore!  Please remember that these files are for personal use only.  Do not sell the image, file, or printed product.  Do not claim this design as you own and do not disseminate in mass quantities.  Please link or pin this post and not the file download.  Thank you for playing nice.

Shop Related Products on Amazon!

If you want more free stickers, check out all Free Sticker Friday posts here.  Find all the Cricut Ready Stickers here.

What is your favorite drugstore brand of make up?  Any recommendations you have?

xoxo, Moe

1.23.2017

Make it Monday // Your Handwriting as a Cricut Cut File

When I first purchased my Cricut Explore it came with a few projects to complete.  I immediately tossed those aside and worked on figuring out Print then Cut.  Since then, I've been super satisfied with this machine!  I figured it was high time to work with vinyl - one of the big reasons to pick up a Cricut Explore!  Have you seen all the amazing things people create with vinyl???
(this post contains affiliate links, please read my full disclosure here.)

Last week I showed you how to digitize your handwriting for use as an overlay over your photos.  Handwriting and hand lettering is all the rage now.  What if I told you that you can digitize your handwriting and use it as a cut file with your Cricut Explore?  What if I told you that you didn't need crazy software - just your phone?  Here's how to do it :

supplies // iron on vinyl, Cricut Explore die cutting machine & mat, digital image of your handwriting (follow this tutorial), small pouch (similar here), iron, weeding tool (optional, you can use something like a tooth pick instead)
Start off by following this tutorial to create a digital image of your handwriting.  Stop once you have an image where the text is black and the background is white.  Once you have the black and white image saved, email it to yourself - or use an app/service like DropBox or Google Drive - and then save it to your computer. Then move on to the steps below.

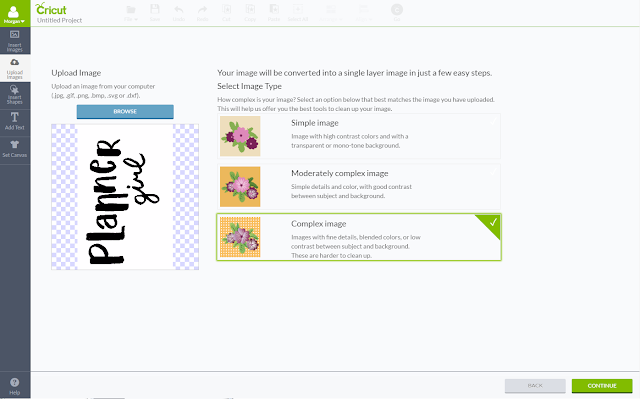
From a computer, navigate to Cricut Design Space and open a new canvas.  From the left hand menu choose Upload Image, click on Browse and locate where you've saved the black and white image, and select open.  Choose Complex Image, then click Continue.
From the clean up screen, use the magic eraser tool to clean up all white areas.  Zoom in if needed to clean up all white in between letters.  Use the Preview button at the bottom if needed.  Once the image is cleaned up, click continue.
On this final screen, choose Save as Cut Image.  It may take a moment for this all to load, so be patient!  This will turn the image into a cut file allowing you to cut the words from a material like vinyl.  Save the file & add the saved file to the new canvas.
Size the image on the canvas properly, then select Go.  Prepare the vinyl and the mat.  From the Go screen select Mirror for Iron on.  On the Cricut Explore machine set the dial to iron on.  Load the mat & cut the phrase.
The Cricut Explore is such a versatile machine.  I love that I don't have to do any guesswork when it comes to what depth to set the blade, etc.  The Smart Touch Dial is super easy to read and super easy to use.  At first I thought  the blade didn't cut through at all....but I was so happy to know it did!
Once the phrase is cut, remove the negative image of the phrase and then weed out any vinyl between the letters.  Next, iron on the vinyl according to the directions - I used the Cricut vinyl and the instructions were super easy to follow!  I was so impressed that I was able to do this!
The best part about this little pouch is that it will fit smaller planners.  It fit my personal size Filofax Originals, a small fauxdori, and my Medium Lilac Kikki.  But you can totally use this to tote around supplies (or even make one as a gift perfect for a make up bag!)

Find more Cricut Explore posts & projects here.

What would you make with vinyl?  What have you made with vinyl?

xoxo, Moe

1.20.2017

Free Sticker Friday // Junk Food Stickers

It is time for another Free Sticker Friday post!  I've been having a blast making these fun stickers for you all to use.  If you haven't already checked out my YouTube channel, please pop on by to learn how to design your own stickers!  This past weekend I reimaged my old MacBook in the hopes of offering some tutorials on programs that are offered on that OS.  I think that InkScape is a little finicy on Mac OS so we shall see.
(this post contains affiliate links, please read my full disclosure here.)

These cute little hand drawn fast food icons are great for marking cheat days, office donut days, ice cream dates, or cook outs when the weather is warmer.  Oh and pizza parties.  Are you really ever too old for a pizza party?


As always, this file includes a PDF to cut by hand (though I hear good things about this tool!), a studio file to cut with your Silhouette, and a PNG to cut with your Cricut Explore!  Please remember that these files are for personal use only.  Do not sell the image, file, or printed product.  Do not claim this design as you own and do not disseminate in mass quantities.  Please link or pin this post and not the file download.  Thank you for playing nice.
If you haven't joined the Cricut Ready Stickers Group on facebook, head over and request a join.  There are a ton of free stickers posted there too - mainly multicolor options for icons and headers!

Find more Free Sticker Friday posts here.  Find all Cricut Ready Stickers here.

1.19.2017

Boost you Blog // Free Boss Babe Stock Photo Sites

A little while ago I shared tips and insight on creating a style guide for your blog.  Style guides are important to maintaining a cohesive look not only on your blog, but on your associated social media sites.  I know that it is hard to get those perfectly styled blog photos all the time.  We've got actual words to type here guys, we don't always have time to photograph.

Enter the stock photo.
Stock photos are a great way to keep your branding consistent through out all of your social media platforms.  A trend I'm really loving now is the bright and feminine look.  I call this the boss babe look...I'm sure I'm not the first too call it that, but this look reminds me of all the inspiration of carefully lettered text over a bright and inspiring background.

I shared 5 free stock photos on the blog here and I've also shared tips to help you create the best flat lay photos for Instagram....but where do you get more Boss Babe inspired stock photos?  If you've found that a lot of stock photo sites are too sterile, I've got a few more FREE sites for you to check out.

This website has the largest mix of free stock photos.  You are required to sign up but as soon as you do you are directed to a library of wonderfully bright and inspiring images.  I love this site for that bright and colorful boss babe look but you can also find a ton of different style aesthetics helpful for any brand.

Here you'll find a set of 15 awesomely styled stock photos geared towards the planner girl in all of us.  If you love bright colors and stationery, these stock photos will suit you perfectly.  To access this set you'll need to sign up for the email list as well - but I can already tell it's going to be a great list to be on.

This is the first site I found that offered free stock photos.  I used a photo of her's in this post!  Sign up to get access to monthly packs (and past monthly packs) that are bright and colorful.  If you're a planner girl or just generally creative, she's got you covered!  There are also some more classic looks too.

These 10 free stock photos don't fit my style at all.  I am the colorful boss babe in this equation...but these are prefect for that black and white, classy look.  Think marble, coffee, simplicity.  Love them!  These are not behind an email list sign up, simply download them from the blog.  Sleek and clean looking, these are great for any lifestyle blog!

I think it is great that other boss babes are out there creating communities for bloggers, instagrammers, and other content creators.  It is wonderful to have access to these awesome libraries at your fingertips!

If you'd like to find more photography tips for your blog, check out all my iPhone-ography tips here.  Read more Boost Your Blog articles here to get your blogging mojo going.  And don't forget to follow me on Instagram for some boss babe and planner girl inspiration!

What do you love most about being a content creator?  Where do you get inspiration from?

xoxo, Moe

1.16.2017

Make it Monday // Digitize your Handwriting with your iPhone

Hand lettering has become all the rage recently.  I've seen it all over instagram, in my facebook groups, and it is huge in the planner community.  There are even fonts designed to mimic this gorgeous calligraphy.  If you've been practicing your handwriting I've got a great tutorial for you today.  How great would it be to have your own handwriting as beautiful digital image to work with? 
Today I'll show you how to digitize your handwriting to create a beautiful PNG overlay to work with when you're creating Instagram photos, photos for your memory keeping, or general inspiration for you.
supplies // iPhone, Superimpose app, iScanner app, Negative Me app, PicsArt app, brush marker, white paper, decent lighting.
First practice writing out the word or phrase you want to digitize.  I used my One Little Word for the year which is Mindful.  I did not have a black brush tip marker so I used dark purple.  It is best to use black or a color as dark as possible for this tutorial.  If not, you risk not creating a black and white image.  You can make a black and white copy of your phrase if needed, the follow the steps below.

Next, open the iScanner app.  Find a room in your home with bright light that will cast few shadows.  You may have to step outside for this, you may have to focus a lamp on your space, but be sure not to cast a shadow over the phrase to be digitized.
Use the iScanner app to photograph the word or phrase. Once the image is processed, align the blue rectangle around the phrase to digitize.  When prompted, choose chose the filter that creates the most solid fill to the letters.  I find the right most filter on the bottom row gives the most solid fill.  If needed, choose a shade from the menu at the top to achieve the darkest fill.  Click the check mark and you'll be prompted to save the image to the app.  From the next page select the arrow in the bottom left and save the image to the camera roll.
I find the best way to use this overlay is as a white overlay over a photo.  To create the text in white, open the Negative Me app (you may be prompted that the app will slow down your phone, it is a pretty old app that has not been updated!).  Choose the photo saved from the iScanner app.  This app will invert the colors - black to white, etc.  Tap the save button in the upper right hand corner - an ad will pop up but simply tap No to save the image to the camera roll.
To use the overlay, open a photo in the PicsArt app.  This app requires a sign in and to create a profile but you can set your photos to private.  From the bottom menu choose Add Photo.  Chose the image of the phrase where the text is white from the camera roll.  Position the phrase over the photo, scaling and rotating to your preference.  From the menu at the bottom choose Blend.  Chose the Lighten blend mode to create the overlay.  Tap Apply, move the slider next to only me so that it is pink, tap Save and Share.  This will set your photo to private, share to your profile, and save to the camera roll.
I plan on making quite a few of these not only to use on Instagram but to use in my Vision Planner to focus on my word for the year.  You could also use the overlay created here along with this PicMonkey tutorial to add glitter to your handwriting!

Be sure to check out my YouTube channel to be notified when I upload the video about my Vision Planner!

How do you use your handwriting in your craft projects?  

xoxo, Moe

1.11.2017

Why it is OK to just, Not

Does the title of this blog post make sense?  There's been something on my mind recently .... and it's that i'm just Not.  I'm just Not doing anything.  I'm being lazy, I'm falling out of my routines, I'm just Not.  I'm just Not feeling like myself.
(if you want to not use this in your own journal, planner or scrapbook you can download a 3x4 image here and a white PNG overlay here.)

I want to say that it is ok to just Not.  The only thing pushing you is you and maybe you need a break from it all.  It gets exhausting working towards goals and sometimes you get caught up in the getting there that the journey gets annoying, defeating, or lost.  

I think that is where I am right now.

My word of the year for 2017 is Mindful.  And I want to be more aware of my journey....not just reaching the destination.

So it is is ok to just, Not at certain times.  Just stop.  Stop working, stop striving, stop pushing and evaluate where you are.  Where are you in your journey?  Are you spinning wheels?  Are you stuck and not moving forward?  Enjoy where you are now before pushing yourself forward.  Sometimes it takes a little bit of reflection and intention to get start to move forward again.

In 2016 I focused on the word forward.  I just wanted to move confidently in the direction of my dreams (pretty sure I saw that quote on Pinterest) but I think as we got closer and closer to 2017 I stalled out.  That was evidenced by the lack of YouTube videos and blog posts.  I wasn't focused, I wasn't aware, I didn't have intent.

That is what mindful for me in 2017 is - awareness and intent.  To be comfortable where I am and to move forward with intention.

So, if you need to know...sometimes it is ok to just, Not.

Enjoy your Wednesday!

xoxo, Moe

ps. for the month of January not only am I working on the One Little Word prompt from Ali Edwards I'm also doing January Reset from Allie Scraps in planner form.  I'm going to be sharing more on the blog and in a YouTube video shortly!

1.10.2017

Trend Tuesday // New Planner Goodies from Webster's Pages

The other day I was looking for some inspiration for a new journal I want to try in my traveler's notebook (for real this time, not disc bound like my listing journal) and I found myself on the Blitsy website browsing some Webster's Pages items.  Before I new it I'd found some brand new things that caught my eye and knew they were perfect for a few projects I have in the works.
First, remember the Joanne's exclusive mint floral planner & traveler's notebook? Man I was on the hunt for that thing like nobody's business!  I never found it in my own store but low and behold here it is - both of them - in the Blitsy store!  I picked up the Mint Floral A5 planner from a lovely person I met through Instagram, but unfortunately that one came with a damaged ring.  So then when I saw the A5 again on Zullily I picked up there fearing it was a fluke, that I'd never see it again.  And here they are on the Blitsy site.  I couldn't believe it.  So the Mint Floral Traveler's Notebook is what I'm going to be using this year to journal about my One Little Word (which I'll have a post about here shortly!)
Secondly, you gotta have something to go into the traveler's notebook, right?  They have a bunch of new, cute designs for their notebook inserts (this set & this set).  There are two to a pack - one lined and one grid, both with pink lines.  I love the matte, rubberized texture of the outside of the journals.  The cover is thick and sturdy and the paper is also thick.  I have already worked with mine and the pages hold up to stamping and using a glue stick.  They are pretty nice quality notebooks!


Finally, Webster's Pages has come out with a variety of photo pocket inserts for planners!  You can find both an A5 planner and personal size in a variety of designs.  This is perfect for memory keeping or everyday inspiration in you planners.  I picked up the A5 size to use in my vision planner and can't wait to use them.  They fit standard pocket card sizes - 3x4 & 2x2 - and slip right into your planner binder.  This will work with any A5 or personal size six ring binder, not just the Webster's Pages ones.

If you've been a follower for a while you may remember my first review of the Color Crush brand of planners.  Let me tell you that this brand has changed so much, and for the better, since that review.  This is a brand of planner that I will continue to purchase.  I think they are on trend and innovative. 

In fact, watch this video from Scrapbook.com to see some more amazing things to be released from this brand!  There should be new planner colors coming out too this year.  I can't wait!

Another thing I can't wait for is CHA where a ton of new scrapbook and planner stuff should be announced!  We've got MAMBI, Heidi Swapp, Webster's Pages.....I know I've probably missed a few brands.  OH! Have you seen the new planner aisle at your Micheal's stores?  The planner stuff isn't just thrown on and end cap or center aisle display...it has its own aisle!  How awesome is that?

What new planner accessories have you found?  What are you most excited about this year?  

xoxo, Moe 

1.06.2017

Free Sticker Friday // January Mini Kit

Hooray for 2017!!! This is my first real spread in my 2017 Mini Happy Planner.  I've been needing a change and I think this is just what I need.  A new way to plan, a new way to be creative with the space I have, plus I've divided up the way I plan a little better.  You can see that in the 2017 Planner Plans video on my YouTube channel here. 
(this post contains affiliate links, please read my full disclosure here.)

Since I didn't do any decorating for Christmas, and I kind of regret it, I decided to do a fun winter inspired spread for the first full week of January.  This has some snow, some snowflakes, and some post holiday cheer. 
I love this layout because it is just enough.  This would work perfectly for a memory planner or a small planner like the Mini Happy Planner, personal size planner, or A5 size.  This works especially well if you're into white space planning too.

DOWNLOAD JANUARY MINI KIT HERE


As always, this file includes a PDF to cut by hand (though I hear good things about this tool!), a studio file to cut with your Silhouette, and a PNG to cut with your Cricut Explore!  Please remember that these files are for personal use only.  Do not sell the image, file, or printed product.  Do not claim this design as you own and do not disseminate in mass quantities.  Please link or pin this post and not the file download.  Thank you for playing nice.
Backgrounds from the Harper Finch blog here.

If you haven't yet already joined my Cricut Ready Planner Stickers Facebook group, check it out here!  I offer a ton of free printables for basics + tips, tricks, etc.  Come on over and join the community!

xoxo, Moe