Here we go again!! Another fun PicMonkey tutorial. If you read last week's post about using my blog to teach you'll know that one of my favorite things to teach are PicMonkey tutorials. I have many different softwares I can use to digitally design things but if ever I want to get it done - good and quick - I choose PicMonkey. The online program is very easy to use and honestly I haven't ever edited a photo in the program because I use it as a design tool every time I open it! Today I want to share with you how to fake a repeating pattern (think digital scrapbook papers) in PicMonkey.

this post contains affiliate links, please read my full disclosure here
There is no option in PicMonkey to fill a shape with a pattern. You can use some of the predesigned patterns under the collage tool or upload your own digital papers to use in the collage feature but there is no way to create your own. Most of the time I want to create a pattern on a small scale - like for journaling cards - and I've found a little hack to create this look!
Pattern One - Using a DingBat Font
First open a 4x6 canvas from the home page. I chose to design with the canvas vertical, but feel free to rotate it horizontal if that works better for you. A while ago I shared this tutorial on using dingbat fonts in PicMonkey. Today we're going to do a similar thing - download a dingbat font that you like (I used WM St Paddy's from DaFont) and choose a letter to be the base of your pattern.

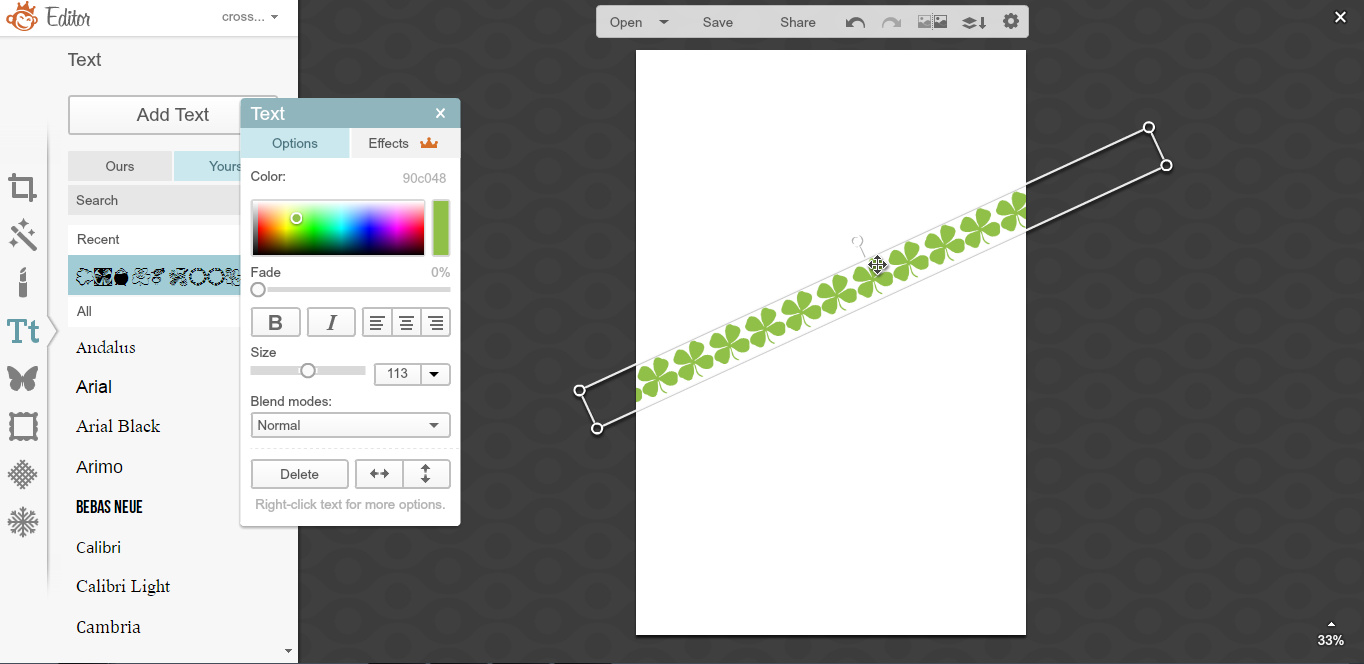
Add a text box and fill the box with the chosen letter. Create a line of text that is slightly winder than the canvas. Keep repeating this line of a single letter until a box of text is created that is slightly larger than the canvas. Using the rotate tool (the little knob at the top of the text box) to rotate the text you've created will give an even more impressive look. Situate the text box so that the entire canvas is filled with the pattern.


To add dimension to the pattern, add a text box with only that single letter and change the color. Position a few of these text boxes over your pattern. Be sure to space them out so that they are visually equal all over the page.


Once you are satisfied with the pattern you've created, change it up a bit to get the look you'd like. I inserted a larger rectangle, changed the color, and used the right click menu to send the rectangle to the back. this put the rectangle under the layers of text boxes. Then change your text boxes to the colors you'd prefer. Working from a color palette is best for this (I suggest finding one you love on ColourLovers.com) so you can create a cohesive look.

Use as is (4x6) or crop down to 3x4 and add some text to create a journaling card.
Pattern Two - Using an Existing Overlay
Start the same way as pattern one - open a 4x6 canvas from the homepage of PicMonkey. From the Overlays tab (the tab shaped like a butterfly) chose an overlay. Position the overlay on the canvas, and make any changes - change the color, rotation etc.

Right click the overlay and from that menu select Duplicate Overlay. Begin to fill the canvas with duplicates of the overlay. Be sure to hang some of the overlays off the side of the canvas. This gives the illusion of a repeating pattern.

Duplicate the overlay as many times to fill the canvas. Then duplicate the overlay again (or add a new overlay) and make a change to it - size, color, rotation, etc - and use that as a new element to the pattern. Duplicate this new overlay and fill the canvas with this new overlay. Make sure to have some of the overlays hang off the edge as well.

Save this image as is to use later or crop to 3x4 to create a smaller patterned journaling card. Add text and another overlay to add interest.

And there you are!! Some great ways to create patterns for journaling cards. You can also totally create a pattern over a photo too. (Sort of like a watermark - so check out this tutorial here.) Additionally if you'd like this set of 3 journaling cards I've created a PDF for you to download! Just click here.

Remember that the free downloads offered on the blog are for Personal Use Only! Do not sell these, claim them as your own, etc. Please play nice and direct others to this blog post and not just to the direct download link. If you'd like to pin them, Pin this blog post and not the direct download.
xoxo, Moe
So helpful! Thank you.
ReplyDelete