Showing posts with label picmonkey. Show all posts

8.14.2017

Make it Monday // 8 Planner DIYs for Back to School

It is time to go back to school!!! Many probably have already started, some are starting in the next few weeks, and some may start after Labor Day...either way, it's time to get some learning on.  When I was younger, our elementary, middle, & high schools didn't go back until after Labor Day.  We went back to college around this time each year though.  Move in day was always my favorite and least favorite time.  You get to see your friends....but you have to move all of your stuff!
this post contains affiliate links, please read my full disclosure here.
Then you've got that first week or two where you're not quite into doing homework yet and you've still got a bit of the summer brain going.  Man, those were the days.

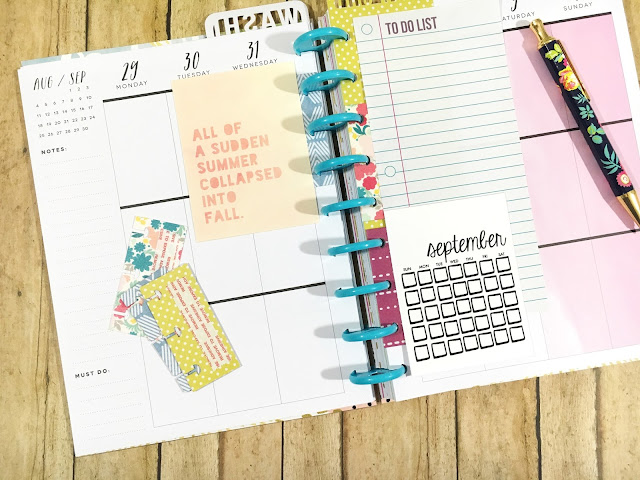
I have zero kids..so no one I know is really going back to school.  But I still thought it'd be a perfect time to share some planner DIY's to get in you in the school spirit.  The projects use a lot of my favorite tools, two being PicMonkey and the Cricut Explore.  I hope that you have a ball making somethings to get you organized & off to the right start!

Print Your Own Sticky Notes

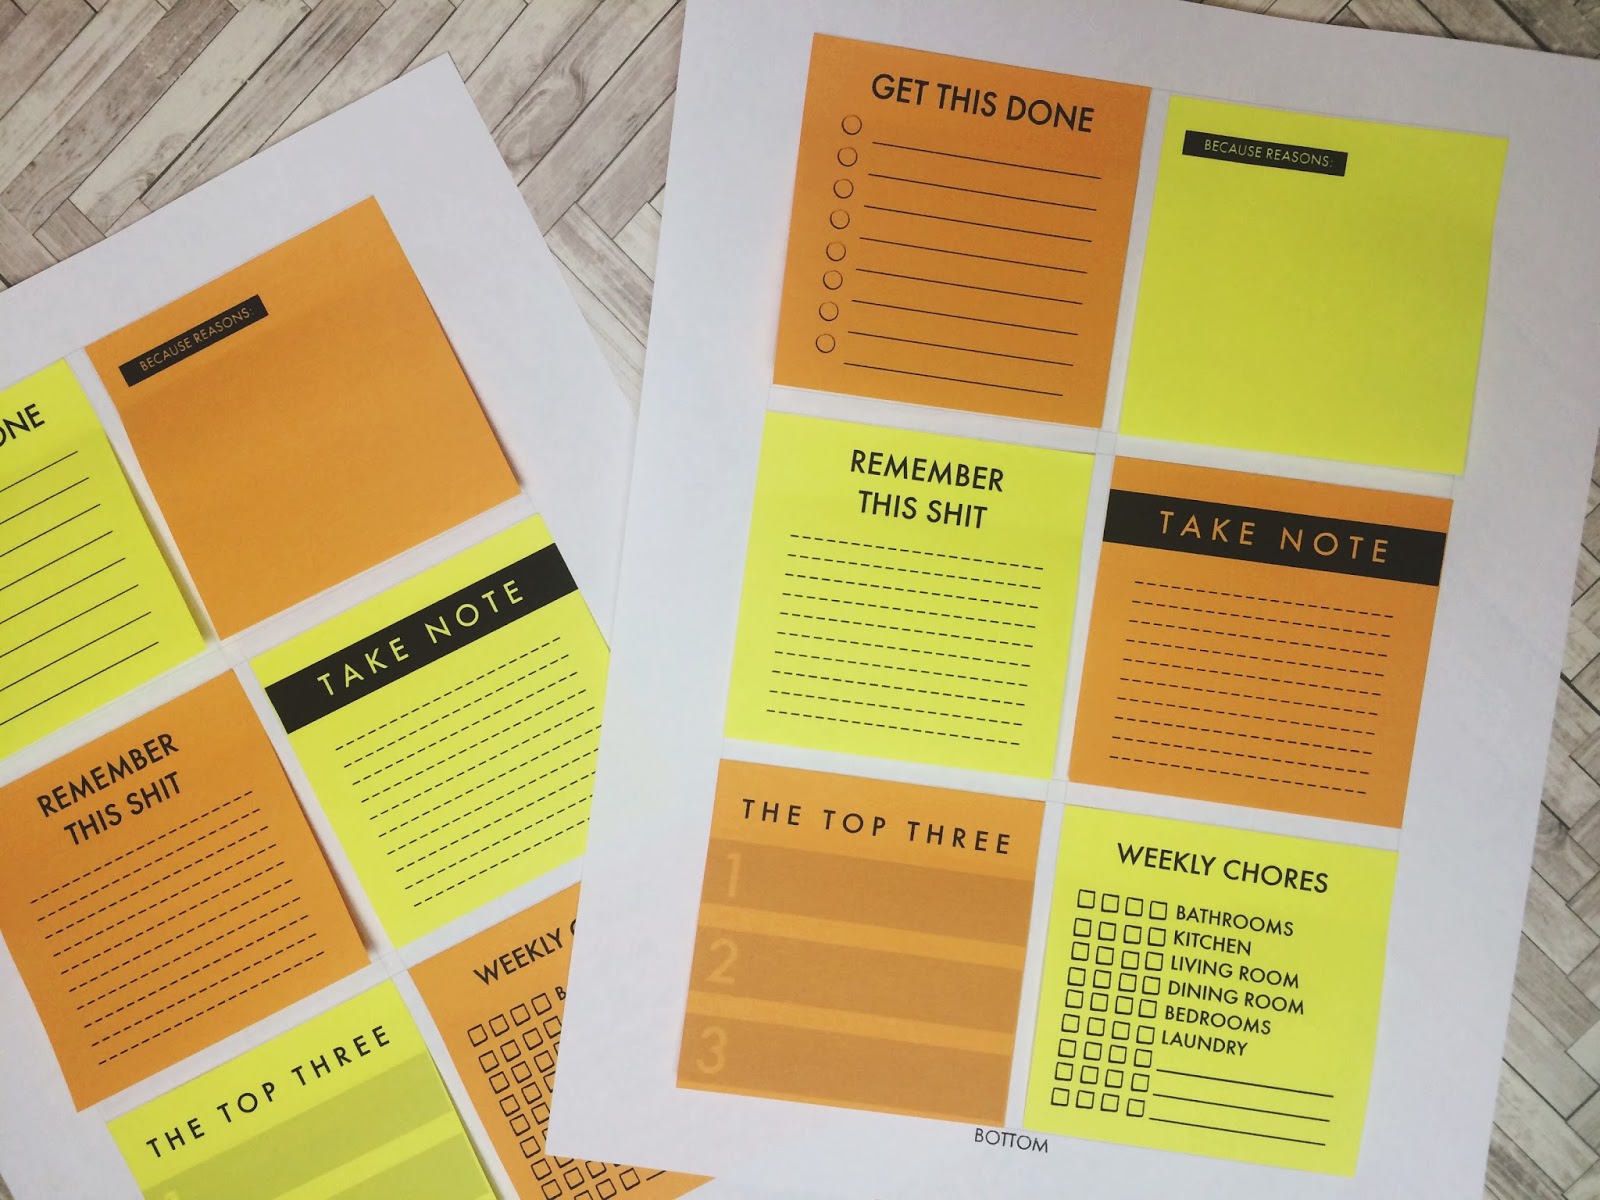
This is super helpful if you have quite a few repeating tasks but you need to move them around in your planner.  It's also great if you just like to customize and create things!  I love making my own sticky notes!

Stylish Class Schedule with PicMonkey

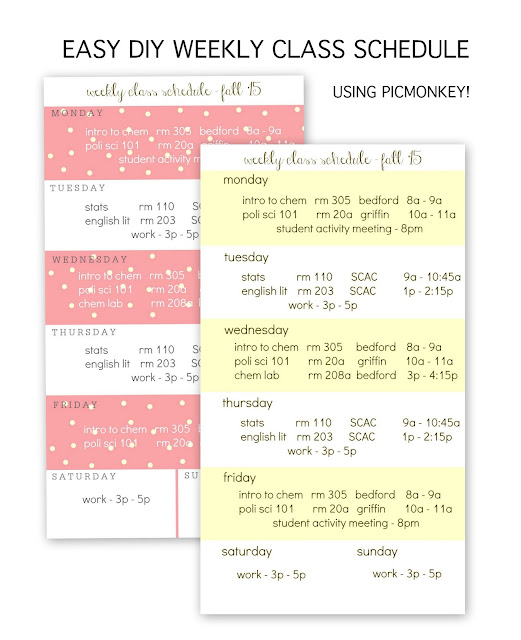
Go back to school in style!  This DIY is inspired by the Target Dollar Spot weekly notepads.  You can punch this into any planner.  It is designed for a personal size but you can add it to any planner you choose.  Since the original post though, Pic Monkey has added in a grid option.  That means aligning your designs is easier than ever.

Stamped Habit Tracker

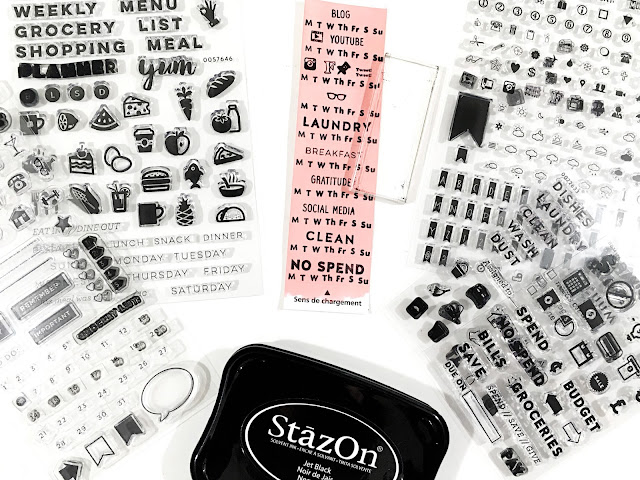
If you love the look of stamps but really can't be bothered to whip them out every week, you can create your own weekly habit tracker.  It can even be customized with other stamps.  Learn how to save money on planner stamps here + find my planner stamping playlist on YouTube here.

DIY Planner Stamp Hack

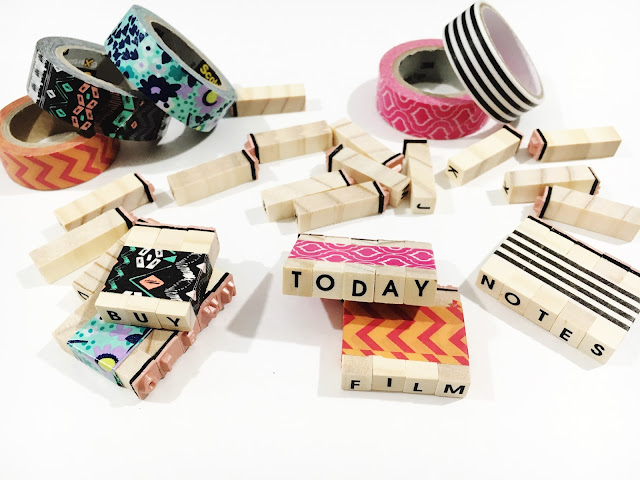
Speaking of planner stamps - if you don't want to dish out the dough for expensive photo-polymer stamps you can DIY your own with some small alpha stamps and washi tape.  These are easy to store and affordable to make!


Custom Clip in Tabs for the Happy Planner

Have something you really don't want to punch but would like to add it to your Happy Planner?  Or maybe you don't have a Happy Planner punch yet...make your own custom clip in tabs with scrapbook paper & your Cricut Explore.

Design a Planner Dashboard with the Rhonna Designs App

The Rhonna Designs app is one of my favorite apps to play with.  It is constantly updated with new overlays, sayings, and textures to help you create the digital design of your dreams.  Use some planner girl inspired images to create a fun planner dashboard.  Customize with your name and you're the real winner here.

Happy Planner Bookmarks + Cricut Cut File

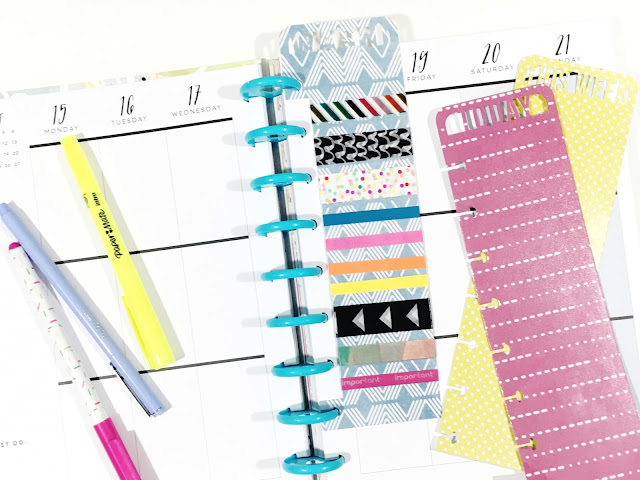
Creating clip in tabs for your planner using the Cricut isn't the only DIY I've got for you - make some awesome bookmarks too.  Mark your place in style and even store your washi where it won't be in the way.  Check out all the Cricut Explore DIYs here.

DIY Shaped Paper Clips

Keeping your papers in order doesn't have to be boring.  Use some pliers and craft wire to make your own shaped clips.  Sometimes they come out perfect and sometimes they give you a laugh!

I hope that you're having fun going back to school and it's not too stressful for you.  DIYing your own supplies is half the fun of the new year.  Gives your stuff a personalized look and you feel like you've got a little bit of home right where you want it.

Have you or anyone in your family started school yet?  What have you DIYed for your school year?

xoxo, Moe

7.10.2017

Make it Monday // Branded Blog Image Templates Using PicMonkey

A while ago, PicMonkey introduced Templates to their photo editing options.  These are great for making graphic projects like cards, invites, social media posts.  But, I think the greatest thing you can use this feature for is to create branded blog images!  Pair the template feature with Hub + some stock photos and you've got yourself a consistent look in no time.
this post contains affiliate links, please read my full disclosure here.

Start by choosing a template to work with.  You may want to choose from the Long Pin tag or the Pinterest tag.  To show the template tags (these act like categories) look on the left hand side.  You may have to select Show More Tags to see other options.
Choosing a template that is longer than it is wide is the best way to ensure peak performance on Pinterest.  I used to be a horizontal girl, and it wasn't until recently - like last week! - that I decided to take the leap into vertical images for my blog.  One of the key points to remember when adding images to your blog, though, is to use maximum real estate in the body of your blog post - make your image the width of your body content (learn how to find the width of your blog post here).  PicMonkey limits the width of each of the Pinterest templates to 600px.  If that is too small, you may need to try something like a 6 x 9 inch template, filtering by size.  Additionally, subscribing for the Premium or Supremium account will get you access to many, many more templates (and fonts, and what not!)
Once you've chosen your template, its time to add your image.  Stock photos are a great resource for this if you don't have photos you already take for your blog.  Here's a list of a few stock photo sites I love as well as some tips for using stock photos on your blog.  Today, I'll be using some of the free stock photos I offered here.
Add your image by selecting the butterfly icon on the left hand column, then click on the Your Own button, and selecting My Computer.  You can also use images from Facebook, OneDrive, Flickr, & DropBox.  A little note here - make sure you have permission to use the images you choose commercially.  Free stock photo sites are plentiful, so don't steal any images from google!
Size them, stack them, do whatever you need to do to get the layout you need.  You can also create a collage in PicMonkey first (tutorial here) then upload that collage through the same process.

One of the new features I love is the layers pane.  This places your elements in front of or behind each other to achieve the look you're going for.  Send your pictures behind your text using the down arrow on the pane.  You can also use the Overlay pane to flip the images horizontally or vertically depending on the design you're going for.  I chose to use one image, flipped vertically for this example. 
If you've made a style guide for your blog already, get that info out.  A style guide is a way to keep your blog cohesive, it is in line with your branding.  You'll most likely have 2-3 fonts & colors that you'll use consistently through your blog design, images, and other materials.  Here's another blog post on pairing fonts.
Use these colors & fonts to create a cohesive look to your image.  PicMonkey allows you to access fonts already on your computer as well though their library is pretty extensive too.  If you're designing your blog header in something like PicMonkey you can stick with the fonts they have.  You can even choose fonts that are close enough to the fonts on your template and get away with it.  For example League Gothic is a lot like Bebas Nueue, Didactic Gothic is close to Centruy Gothic, etc.

Change the sizing of the text as needed,  Pay attention to how it looks here - you don't have to be a design pro to understand when something looks yikes!, meh, good, or great.  If it looks off, change it...don't just settle for meh!
Once you have the image the way you like it, select the Save button with the little monkey by it on the top of the screen.  This will save your image to the Hub.  The Hub is PicMonkey's cloud storage system.  This way you can edit the template (or photos) over & over again.  This is GREAT for creating branded blog images!  You can go back to your template, with your custom colors, and your custom fonts again, and again, and again, and again!  In order to access hub you'll need a Premium or Supremium plan - it's totally worth it for the access you get to fonts, overlays, storage, etc.  I currently have the Premium plan that only allows 50 hub images.  If you're just creating templates there's really no need to save the image you create every time so you may not even use up the 50 images.  If you create a lot of brand images, the Supremium plan will allow you to categorize your images through Hub.  I suggest upgrading!  You can start a free trial too! Sign up here!

To save the image to your computer, click the Export button at the top.  This will save the image locally to your computer or you can choose either DropBox or OneDrive.  Next, upload the image to your blog post, size it properly, and you're ready to share!  When you're ready to add an image to your next blog post, simply open the image from Hub, Save it as a copy, and edit away! Easy peasy...no complicated software to work with.


I've recently created a FREE ebook called Five Ways to Revamp your Blog Today!  This 10 page book will give you great tips on reviving old posts, automating your process, and keeping you on the right foot!  You can download it by signing up for the newsletter above or by clicking here!

I hope this tutorial inspired you to try PicMonkey for your blog branding.  Its always hard when you're new to something to get a grasp on the process.  PicMonkey makes it super easy to create perfect Pinterest images with out shoveling out hundreds of dollars on design software.

Check out even more of the tutorials on the blog using PicMonkey here!

Happy blogging!

How do you use PicMonkey? Let me know in the comments below or over on the Five Sixteenths Blog | Live Creatively Facebook group!

xoxo, Moe

3.27.2017

Make it Monday // DIY Digital Mantra Vision Board

I have been working on my vision planner (check out how I work in my Vision Planner here!) which also coincides with my first official year doing the One Little Word class by Ali Edwards.  The March prompt was all about vision boards.  But it was about vision boards in a different way.
I often think about a vision board as a (sometimes) cluttered mess of things you like all pasted onto poster board and then shoved into a spot in your room/office/home where you look at it...but it may not speak to you.  This idea has always frustrated me because I don't find order in that approach.  It wasn't until I watched a few vision board and goal setting style videos that I realized creating a vision board is a unique experience and should reflect the creator.  There isn't a one size fits all vision board.

And that is where my vision planner came in.
I have this guy divided up into some areas of my life I'd like to focus on all while keeping my word of the year Mindful in mind.  I also have sections for each of the One Little Word prompts and when I happen upon something that fits with in these prompts I roll with it an put that in there too!  I am not going to get too much into my vision planner sections right now...but the section I'm working on right now, today, with you is my spirituality section.  I hesitated to name it that all they way up until this blog post because I am not religious.  I see the word spirituality as a slippery slope into religion.  But I recently happened upon a free webinar by Alexis AKA Miss Trenchcoat called How to Manifest a Successful Astrological New Year and I realized that all signs are pointing to the things I'm becoming interested in - essential oils, meditation, working with crystals, etc - is culminating in a desire to explore my spiritual relationship with myself.  I can't deny it, I have to embrace it.  I've always been a believer in signs.  So I knew that this little section I'd originally called Wellness needed a better suited name if I was also going to start working with astrological signs and tarot.  Long story short - signs are pointing me to look inward, reflect, and work on discovering myself.
this post contains affiliate links, please read my full disclosure here.

So....February's prompt was to practice something everyday.  I didn't do it.  I didn't.  But March's prompt was to create vision boards regarding your word.  Ali suggested pulling a full page from a magazine and finding words that inspired you.  I thought I'd combine the two and create some vision boards with images I found that reminded me of my word and my intent and added some quotes that I could meditate on during the month.  Here's how you can make some mantra vision boards for yourself - make them as phone wall papers, computer backgrounds, or print them out like I did.

supplies // inspiring digital images, PicMonkey.com, card stock, printer

I highly suggest the images you use for this project be royalty free images and not images from Pinterest.  My favorite place for royalty free images is Unsplash.com.  It literally is like flipping through a digital magazine.  The best part is that you can search images by keyword.  I searched my word mindful but I also searched meditate, mindfulness, etc.  I looked into the collections as there were few results of images labeled with those words.  So just flip through and find images you like.  Save them to your computer or your device to work with later.
Find quotes or mantras you identify with.  In the original prompt, Ali suggested just trimming words form the magazines that inspired you.  They didn't have to directly reflect the word you've chosen for the year...just words that spoke to you.  I searched Pinterest for Mindfulness Quotes and created a board of the quotes I loved.
For this tutorial we're going to work with PicMonkey.com and their new(ish) Template Feature.  This is something rather new to me but it is super cool if you're not design inclined all the time.  The designs are premade for you - you just fill in the info!  Choose a template you like - keeping the size of the end result in mind -iPhone wallpaper, printed image, etc.  Once you've selected the template, right click on the main image to replace it with the image you've saved from Unsplash.
It is now that you can manipulate the text.  Try to choose a template that will fit your text/quote with out too much change.  That way you'll still get the feel of the template you chose.  This one with bold text supports a smaller quote.  If you find the color of the text doesn't really match the feel of the photo change it to better reflect your feelings.  I always choose either black or white to keep it simple.
Here is another example of a template I used - I liked the layout of the text but the end result doesn't resemble the original template.  You can see this one started off as an invitation but I changed it to be more poster like.  It is ok to start off with something interesting but change it up to fit your design aesthetic.
One of the new things I love about PicMonkey is the layers pane.  Not only are these templates pretty cool but the layer pane really helps you be precise with your designing.  You get more control with out the process becoming to complicated for the average user.  There are some special options & special templates that are available only if you're a Premium or the new Supremium customer.  While you can do a lot with this editor for free, these two subscriptions allow you to do more, more, more!  And work with the Hub feature that allows you to save your work!  How cool is that?  Learn more about the subscriptions here.
Now you're ready to print the mantra vision boards out or add them as backgrounds on your mobile device.  The way these guys work for me is something that I can reflect upon while meditating, something I can fall back on and repeat when I need the support, and words that I can work towards emulating in my everyday life.
You can also create these digital designs with various other tutorials I've shared on my blog - digitize your hand writing and use that as an overlay, use transparent clip art to add to your design, create these digital designs on your iPad with the Phonto app, or choose a few of these overlay apps to add to your mantras.

Shop Related Projects on Amazon!

Share with the Five Sixteenths Blog | Live Creative community on Facebook your mantras for the year.  You can also subscribe to the newsletter for more awesome & mindful inspiration.

What words do you use to help you meditate?  Have you created a vision board for yourself this year?

xoxo, Moe

9.26.2016

Make it Monday // DIY Personal Size Halloween Countdown Inserts

Last year around Christmas time I shared a little DIY Christmas Countdown insert for your personal planner.  Today I want to share with you a similar DIY but to countdown to Halloween instead!  On Friday I will have some countdown stickers - but they may be too big for personal size planners.....so I knew I had to keep everyone covered for this countdown!  We'll be doing something similar in this tutorial as with every tutorial where I use PicMonkey to make planner inserts - like here, here, here, and here.  The biggest thing I want to feature in this tutorial is something new with PicMonkey - Hub. Hub is an exlusive for Roayle members and a great way to store projects your working on, make copies, and create templates.  This is perfect if you'd like to create a new or different planner insert because you don't have to start from scratch every single time!  Let's get started
(this post contains affiliate links, please read my full disclosure here.)

From the home screen, open a blank 8 x 10 canvas.  Use the crop feature to size the image to a proportion that will work with your personal planner - iPhone 6 is a good choice, it is not exact but the proportions come out pretty close.  Deselect Scale photo to give you the best quality to work with.  Click Apply. Choose a canvas color, I chose a purple color.
From the Overlays tab (the one that has a butterfly icon) overlay a Halloween border and a rectangular box.  Be sure to move the box so that it is resting on the right side of the page leaving room on the left side for the hole punches.  Make your best judgement with alignment since there are no grid lines.
Adjust the transparency of the rectangle and the Halloween border.  Add 31 pumpkin overlays - or any other item you'd like (bats, candy corn, ghosts).  Once you are satisfied with the arrangement flatten all layers together using the Combine all image elements button in the lower middle menu bar.  This will flatted all elements together so that you don't move them while continuing to add to the design.
Add the text you would like - I used the font Coolock Black to add the label Halloween Countdown at the top and the font Flavors to add the numbers over the pumpkins.  The 31st day on this countdown is Halloween so start with the number 30 then count backwards.  Coolock Block is a Royale font and I highly encourage you to upgrade from the free subscription to a paid one.  The Royale subscription gives you access to a ton more fonts and overlays and most importantly, the new Hub feature.  Did I mention hub lets you go from desktop to mobile?  Storing your creations for you to use again and again?  For only $4.99/mo or $39.99/year, the subscription is sooo worth it.  Find out more here.  Save this to the Hub by clicking the Add to Hub button in the top menu.  Name your creation, and save.
Using the undo button in the bottom menu, undo everything you just did (yikes!) to get back to the base layer.  Move the rectangle over to the other side leaving room for punching this insert on the right hand side now.  You can use this to make anything you'd like - I made a movies to watch list.
Once your satisfied, click on Update in Hub in the top menu.  You should see a pop up that asks if you want to Update (overwrite the original design) or Make a copy (save your new design as a copy).  Chose Make a copy and you'll see the copy show up in your Hub.  Use the tail end of this tutorial to create a document using your new inserts for printing.
Now you have a fun printable countdown (and one for a friend since printing this guy back to front will yield you two  inserts!).  I've also created some stickers for you to place over each day as you count down.  And if you'd like to skip the tutorial all together, download the countdown inserts below as well.


This download includes the PDF inserts, a PNG file for cutting the stickers with your Cricut Explore (size the width to 5.5 inches, keep the proportions locked), a Silhouette Studio file for cutting the stickers with your Silhouette, and a PDF for cutting the stickers by hand or using a gyro tool as found here.
As with all printables on the blog these are for personal use only.  You can not sell the digital image or the final product.  You can not distribute these in mass quantities.  Do not claim this project, design, or file as you own.  If you would like to share this project on you Pinterest or social media, please share the link to the post, do not Pin the file download only.  As always, thank you for playing nice.

And if you'd like some more Halloween inspired notes pages to print out - the sugar skulls and pumpkins & bats - find that post here.

Have fun counting down!

xoxo, Moe

6.27.2016

Make it Monday // Printable Episode Tracker Insert

I've been watching a lot of stupid TV recently - like every night for the past few weeks I've settled in with my History Channel app to watch Ancient Aliens.  The good thing about watching something on Netflix or an app on your Apple TV is that the program keeps track of your progress.  When you're watching a current TV show - like Game of Thrones - you may need some tracking.  For example I have zero idea what episode I was on when I stopped watching Game of Thrones...I honestly think I'm like 2 seasons behind!
(this post contains affiliate links, please read my full disclosure here.)
So I decided to pop over to my favorite little design program, PicMonkey, and whip up a fun episode tracker.  This is great for any current shows your watching or to mark what episode you're on when it comes to Netflix in case you find yourself using someone else's Netflix while on vacation!  I've done a few DIY's like this before - monogrammed notes pages, Christmas countdown, Halloween notes pages, school class schedule planner inserts - and I used the same technique for this tutorial.
First, head over to PicMonkey.com.  Under the Design tab, open up a new 4x6 canvas.  Crop this canvas using the iPhone 5 proportions.  Uncheck the scale photo box in order to maximize the print quality.
Overlay the text you would like - in this case the title Episode Tracker.  Make sure that you're kepeing the text and images over to one side of the canvas.  This will leave room for the holes to be punched later.  One of the things I love about PicMonkey is the array of fonts they offer.  I also love that I can use my own fonts, but this fonts I used here are part of the free selections.  I'm subscribed to Royale - which offers a greater selection of every aspect of PicMonkey - but the free version works great for simple designs as well.

The font for the main text of the design is Geo Sans Light.  This font is clean and simple.  It looks great in a block of text.  Use that font to create your episode guide.

Next, overlay some rectangles in a gray color.  Right click and select send to back.  Copy and paste the text boxes and rectangles down the length of the insert. 

Once the insert is complete, save your work but do not close PicMonkey!  You'll want to then click on each element and using the arrow keys move each element over to the other side of the page.  This will give you the opposite page to punch the holes on the opposite side.  Save this image
Now you'll want to open your images in a word processor - you can use Word, Pages, or even Open Office (like I'm using) to insert the images into.  (Here is a video to follow along.)  Insert both images, align the right page to the right of the document using the arrange and align feature of the program you're using.  Align the left page on the left side of the document using the same process.  Be sure that each insert is lined up at the top or the bottom so that double sided printing works with the document.  You may also need to add a border around the image so that it is easy to print.  This should be under border settings.

Then print!  Once you're fully satisfied, close out your PicMonkey screens and save your document for future printing.  If you're not down to make your own, you can download this one here.  Remember all things on the blog (unless otherwise stated) are for personal use only.  If you'd like to share, please link to this blog post.

What are you currently watching?  Anything good to catch up on?

xoxo, Moe