One of these days I'll stop with the planner DIYs....then again, maybe I won't. I got inspired to do this after poking around on Pinterest for free planner DIYs. So I turned to my favorite online photo editor, PicMonkey, to help me create some wonderful square shaped images to print on my own sticky notes. I'm always on the hunt for affordable/cheap/free ways to personalize my filofax because stationery can get expensive. Even if you're a Target Dollar Spot hoarder chances are you're still looking for the perfect note. You probably already have some solid color sticky notes in your collection so here's how to create some personalized notes. Below you'll find detailed instructions for creating your own or you can scroll all the way to the bottom of the post to print a predesigned template.

Supplies: printer, 8.5 x 11 printer paper, plain 3x3 sticky notes, PicMonkey.com online editor
First, go over to the PicMonkey website and from the design option select a square canvas. You don't have to select a custom canvas with a custom size because we will shrink them down later when they are added to a word document.


Once you have the design you like, save it to your computer. Create 6-8 designs just so you have a variety to print. You might find that your designs get better as you go so you may design more. If you want access to a ton more design elements sign up for the Royale feature of PicMonkey for $4.99/mo or $33/year here.

Next we'll move into Word. If you don't have Word, you can use any similar word processor - Open Office is a good alternative as well. I set my all the margins in my document to .5" then inserted a 3 column x 5 row table.
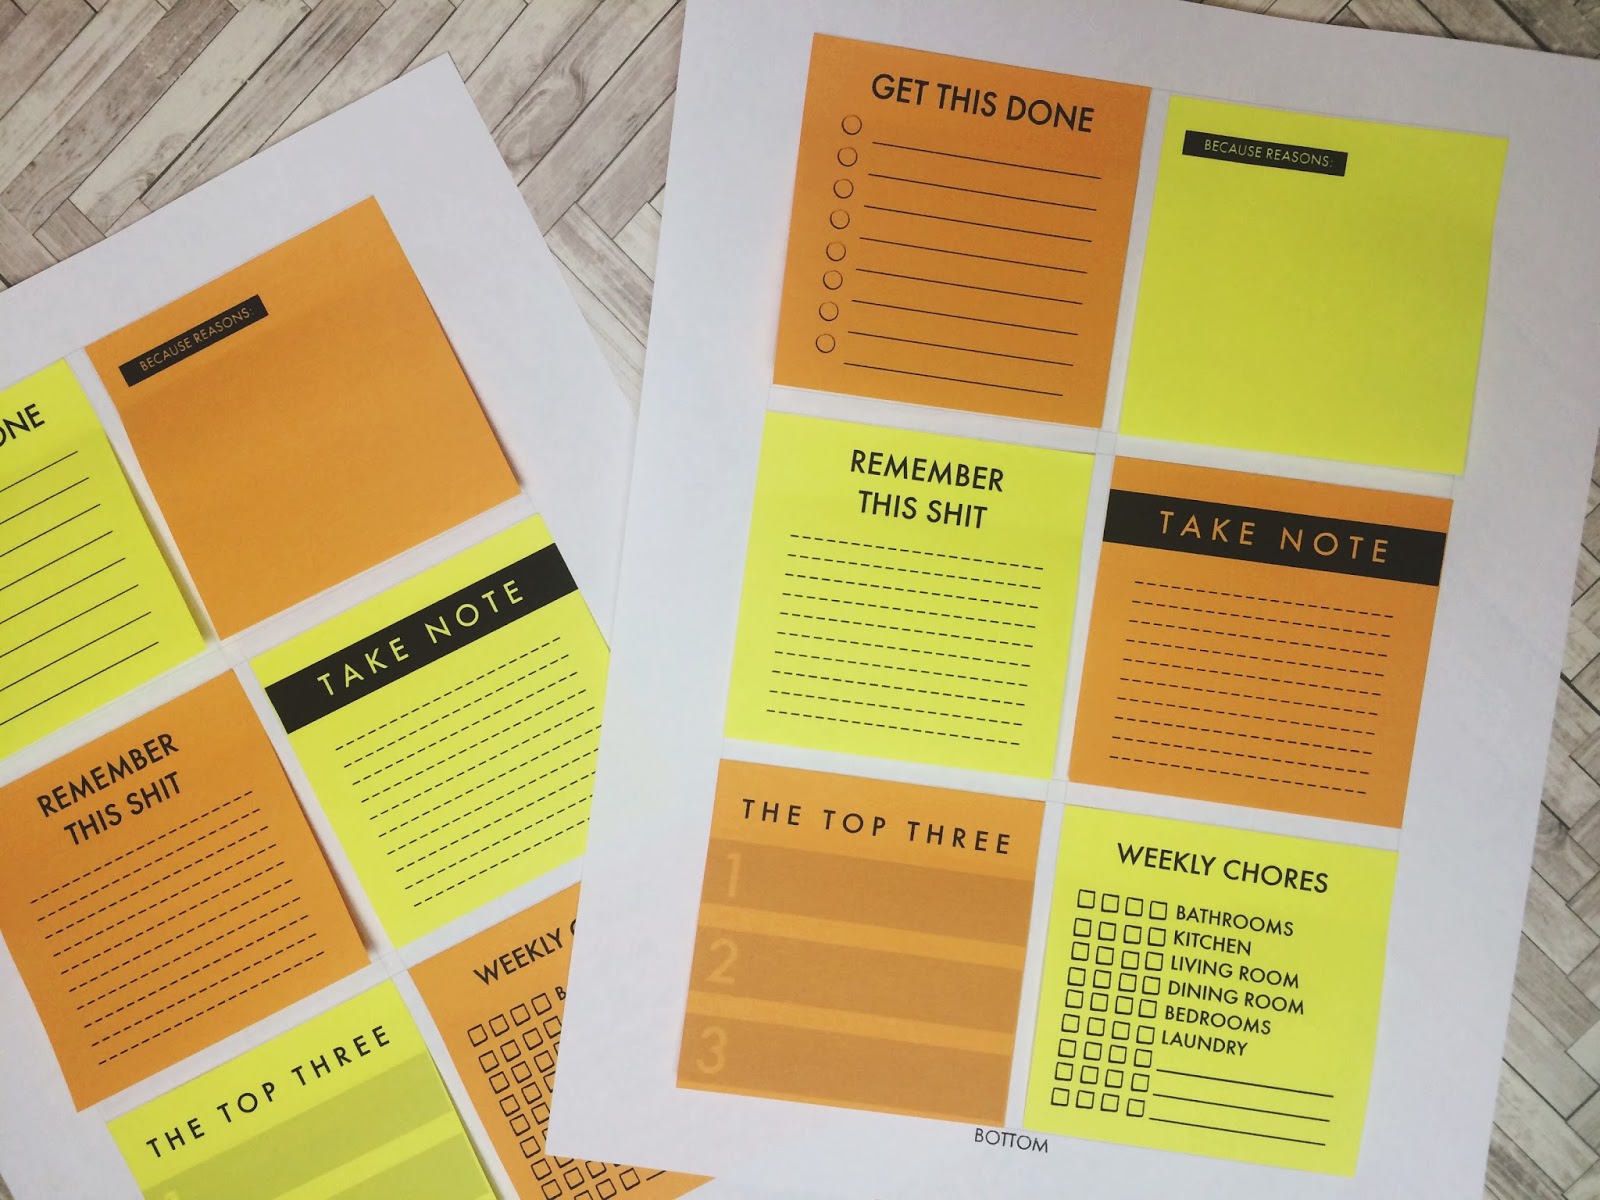
Since I work from a Mac I have a tool bar on the right side of my screen where all the custom options live. You may have to find the specific table options in your word processor for this. Set the first, third, and fourth row height to 3", set the second and fourth row height to .18", then set the first column width to 3", the middle column width to .19", and the third column width to 3". If you have room at the bottom of your template, write the word BOTTOM so you know which way to face your sticky notes and to feed into your printer. (You can also just go ahead and download my template here.) Save this as a separate template. Print out a few copies of this sheet.
Since I work from a Mac I have a tool bar on the right side of my screen where all the custom options live. You may have to find the specific table options in your word processor for this. Set the first, third, and fourth row height to 3", set the second and fourth row height to .18", then set the first column width to 3", the middle column width to .19", and the third column width to 3". If you have room at the bottom of your template, write the word BOTTOM so you know which way to face your sticky notes and to feed into your printer. (You can also just go ahead and download my template here.) Save this as a separate template. Print out a few copies of this sheet.

Now it is time to add your graphics. Select the cell you'd like to add the sticky note graphic to and from the Insert tab, select Picture, then From File. Select your image and insert. Or you can open the folder you have your images saved in and drag and drop them into your Word document.
You'll find it's way, way, waaaay too big but don't fret! Under the picture tab select the Lock Ratio if it has been deselected and set the size to 3" x 3". Keep adding your images to the 3x3 cells, resizing them as you go, until your page is full.
You'll find it's way, way, waaaay too big but don't fret! Under the picture tab select the Lock Ratio if it has been deselected and set the size to 3" x 3". Keep adding your images to the 3x3 cells, resizing them as you go, until your page is full.


Grab the blank template you printed and align your sticky notes. Keep in mind how your printer paper feeds. This is why the word BOTTOM is helpful! After you've aligned your sticky notes, feed your paper back into your print tray. For my printer I turn my page face down with the word bottom facing towards me. You may have to experiment to find out the best way to print to your specific printer. Print the page filled with your sticky note designs out. This should print your designs out onto your aligned sticky notes! Repeat as needed.
And there you have it, personalized sticky notes! Stick 'em where ever you want 'em. I think these would be great to personalize and stick in lunches, on your correspondence, around the house, any where really.
Also, if all that blabber was too much for you here are three simple steps:
1. Print this template
2. Align your sticky notes with in the 3x3 squares
3. Feed your paper with sticky notes back into your printer & print this template
Also, if all that blabber was too much for you here are three simple steps:
1. Print this template
2. Align your sticky notes with in the 3x3 squares
3. Feed your paper with sticky notes back into your printer & print this template
How do you customize your planner? Any sticky note tips you have to offer?
xoxo, Moe
This is my favorite planner post this week! Thank you. I referred tons of planner people to it.
ReplyDeleteWonderful!! So glad it was helpful :)
DeleteI have been printing on post its for a few years now, but never thought to use Picmonkey to create them--GENIUS! Thanks for the great ideas!
ReplyDelete