Showing posts with label planning. Show all posts

5.13.2020

5 Mommy Routines to Track in your Planner

As a new stay at home mom, there are several things I didn't know I'd need to keep track of in my planner!  With a little guy at home my routine has been shaken up, to say the least.  And then every dang month the routine changes.  Of course this is how it goes, right?  But when you're thrust into this for the first time, plus add in mom brain on top of that, keeping track of things can get daunting.
this post contains affiliate links, please read my full disclosure here.

I'm a planner girl and a planner person by nature.  With Marcus home for the first 3 months I was searching for anything that would give me a sense of structure.  It wasn't until he was about 4 months old that we got any semblance of a routine.  Then we were throwing starting food in the mix, gotta brush the teeth, now we're eating solids 3x a day, AND at one point he had a prescription to take.  That's a lot of stuff for one mamma to handle.  I've got like 77 habit trackers in my planner right now!
Before we dive into the 5 routines stay at home mom's should track in their planners I want to share with you two things: first, check out this video on how I made a daily routine page for Marcus at 6 months & second, check out this post on tracking spirituality in your planner because some of the tools can be the same.  But lets jump into the list.

Cleaning Routine

If you've been following the blog for a while you'll know that one of my biggest goals EVER is to have a sustainable cleaning routine.  I've got post after post on cleaning here on the blog but my two favorites are this one on creating a cleaning routine and this one on the 3 Waves Cleaning Method.  Just like with the old house, when we moved I broke our new house up into zones or sections and clean one zone a day.  I created a routine page for my planner and then each day I clean that zone for 30 minutes.

Morning/Evening Routine

Getting ready and unready for the day can really set the tone for yourself.  Waking up with intention and going to bed with intention can mean you get the most out of each part of the day.  I have a few chores I like to get done before the baby wakes and after the baby goes to bed.  It is also important to prioritize your time and couple time when you're a mom (or a dad).  Baby's shake up a lot of stuff and getting down a simple morning and evening routine that can revitalize you is important!

Feeding Schedules

I am obsessed with structure.  This is hard to manage when naps and appointments and big poop blow outs can throw things off.  But you can create a general daily schedule for yourself and the baby to track in you planner using hour stickers, daily pages, or an hourly planner.  I have a loose idea that Marcus will wake up at 7 am and eat, then eat cereal at about 8:30 am, then go down for a nap around 10 am.  I started with an app on my phone when Marcus was born to kind of gauge his schedule, but again it didn't get really cemented until about 4 months.  So don't stress about this in the beginning!  I don't want you to get stressed out when the baby's needs are all over the charts but I can understand the need for some semblance of a schedule.

Bath Time/Teeth Brushing

We bathe Marky boy everyday as a part of his night time routine.  (Night time routines are important for babies, why the heck wouldn't they be important for us!?!)  But not everyone does.  The Happy Planner has a Pregnancy sticker book with bath time stickers.  Use these to mark the days you give the little beeb a bath.  Things can get busy so maybe you can't bathe them one night.  If you start to track it then you'll know if you've gone a little two far between baths.  Marcus has just broken two teeth so we've been starting to brush his teeth and gums.  I can't tell you how many times I've forgotten to do this though!  So I have a habit tracker dedicated to it in my planner now!

Meal Planning

Of course we all know at the end of a long day - whether you're a stay at home mom or work outside of the home - the last thing you want to do is make dinner.  I stink at this right now but meal planning is a great thing to track in your planner.  Use something like a weekly sticker to write out what you're going to make and track the use of leftovers.  I've not been doing this like at all!  Even at the beginning of the day I don't want to think about dinner! And now that Marcus is eating food I've got to think about feeding him too?!?! I share in this post 3 ways I prep food easily for him.


Being a new stay at home mom has created a new routine for me and I need to keep track of it!  Whether you use different stickers for different routines or a planner layout (like the Teacher planner layout), tracking what needs to be done when can give you an idea that you've got your day under control!  I really have loved creating these little daily schedule pages for my planner.  Marcus is constantly growing so it's been wonderful to see how his schedule has changed as he's grown.

What mom life routines do you track in your planner?

xoxo, Moe

listen to this blog post below:

9.06.2018

How to Write Actionable To Do Lists (and Why You Should)

To do lists are a big part of my planning routine.  They don't usually reside on my weekly pages (though there are exceptions to the rule!) because I like to write specific and actionable lists - so I break things down.  This requires extra space in my planner - either graph filler paper, extra inserts, or sticky notes.
this post contains affiliate links, please read my full disclosure here.

If you've ever looked at your planner and felt complete overwhelm, then an actionable to do list might be something you should focus on.

How to Write Actionable To-Do Lists

Brain Dump

First, you may find there's too much in your head to keep anything straight.  Make it a habit to brain dump all your thoughts & to do's into one master list somewhere in your planner.  This is going to be the place you turn to when you need to get it all out...it will be your master list (and it will be messy!).  Give yourself permission to get messy, scribble, and get it all out.  From here you can prioritize and even eliminate.  Refer to this list often - you will add to it and you will subtract from it, but you may also find you will eliminate the things that are either no longer important, not worth your time, or are unnecessary.

Get Specific

From your brain dump it is time to get specific.  Which projects are you working on?  Which big tasks can you see?  This is especially helpful if you're running something like a blog - instead of marking down write posts, get specific and write down exactly which posts need to be written.  Then you can, again, prioritize from there.  It may help to have a few different sections in your brain dump area - one master list, then other lists around certain areas of your life.  But don't make this too complicated.  Come up with a method that works that you can quickly refer to and fill in as time goes by.  Make it something you'll actually use.

3 Action Steps

Once you've prioritized your list - like outlined the specific posts you'd like to write on your blog - then you can get to the action steps.  I am a big fan of 3 action steps under each to-do.  This helps you realize exactly what needs to be done & shows you your progress as you move through the steps.  It also makes completing the whole task easier because you're seeing the bigger picture.  Once you get into this routine you can also start to see how certain actions over lap to other tasks and you're more likely to complete them out of habit!  It can be as simple as outlining laundry in your planner - wash, fold, put away.  For me seeing the steps means even if I haven't completed everything I can check my progress and feel more productive.

If your to-do is a bigger project you can make a project planning page in your planner to house everything that needs to be done.  For inspiration, check out my wedding planning video where I use the project planning pages to outline this big project!  I also use the project stickers from the Student Sticker Books when I need to plan out projects.  

Why You Should Write Actionable To-Do Lists

Short answer: because you get more done!

Actionable to do lists help us plan better.  They help us allot time in a more efficient way, help us prioritize tasks, and help us say no to things that won't or don't serve us.  Through actionable to-do lists we can meet ourselves where we are and eliminate overwhelm.  We can understand how long it takes us to complete tasks & that can help us estimate our abilities in the future.

When we're breaking up tasks into their moving parts we're seeing the bigger picture and are able to understand a timeline better...even if it's just a Sunday afternoon and we need to get laundry done for the week!

Ever since I started creating a plan of action rather than a running to do list, I've been able to get projects done on a better time line!  No parts are missed, nothing is left to the last minute, and there's nothing unexpected.  One of the best parts is being able to translate what I've learned from one project or task into another, similar task or project.  I've also sort of been able to create 'templates' of reoccurring tasks to help me in the future.

Want to find some printable planner inserts that can help organize your life?  Check out the Etsy shop here for A5 & Personal Size inserts. Or join the Printable of the Month Club over on Patreon for an exclusive printable each month!

How do you write to do lists?  What helps you get the most done?

xoxo, Moe

9.05.2017

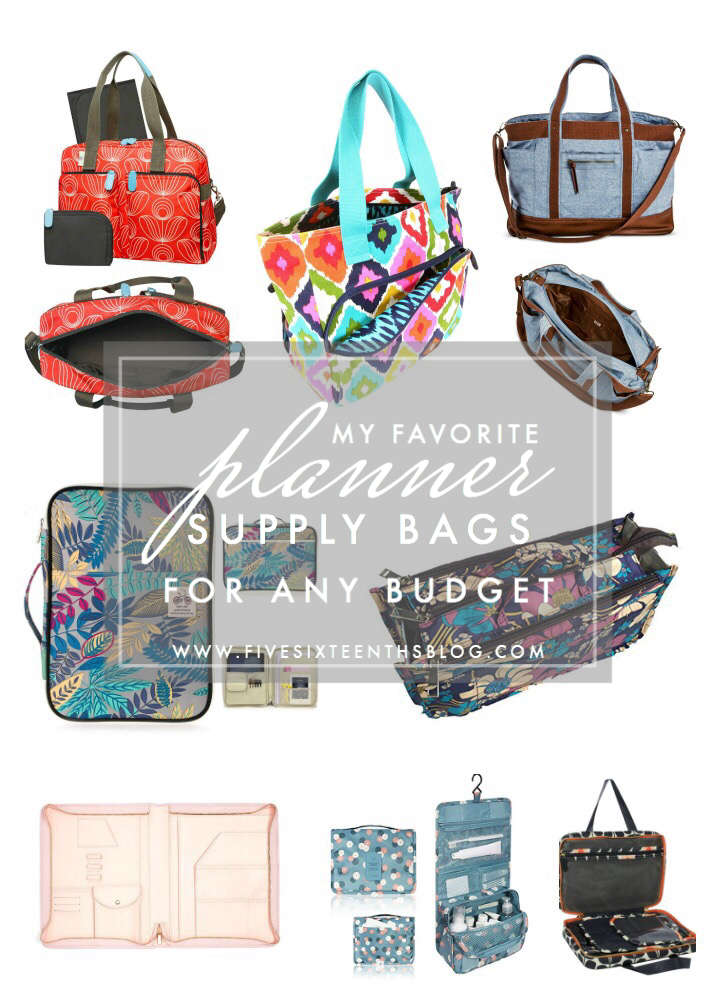
Trend Tuesday // Best Planner Bags for Any Budget

I have grown through my fair share of planner bags.  I started out with a tiny one and now I am at like a weekender size!  Though I tend to tone it down when I'm going to a planner meet up.......sometimes.  Planning should be something that is personal to you.  Some people use a ton of stickers and really like to collect things.  Some people only use a few colored pens and washi.  Some people use planner stamps each week.  Some people have multiple planners that they use all the time.  All of this is correct. 
this post contains affiliate links, please read my full disclosure here
Side note: don't let anyone shame you for what you do or do not have.  You do you.  Whatever makes you happy is the planner route you should take.

Since I've grown through so many bags I thought I'd do a round up of all the types of bags I've used (and a few that I haven't) that make perfect planner bags .... for any budget!  Of course there are bags out there marketed as planner bags but the patterns & prints are limited.

The Folio


This little guy can hold a spiral planner (like an Erin Condren planner) and a few slim supplies.  If you've got a few sticker sheets, pens, and washi samples, this packs up nicely & is practical.  Carry other important document with you and slide it easily into another bag.  It's not too bulky & depending on the brand you can get different patterns & pockets.

The Purse Organizer


This is the most affordable one of these guys.  Sometimes you can find them in stores but most are under $10 on Amazon.  If you find one with handles you can use that to tote around what you need.  This is the first bag that I used and it held a lot!  I didn't have a lot back then so if you're minimal, just starting out, or need something small for just the every day essentials this is best way to go.  Not only is it affordable but you can totally find colorways and styles that match what you're looking for.  If you have a bag that you'r using as a planner bag already you can even sew you own organizer with this tutorial!

The Toiletries Bag


I love these guys for organizing planner supplies for a trip.  Since they are designed to hang over the back of the door, they are really slim but with a ton of storage.  These guys have quite a few dividers so you can organize smaller bits better.  You can stash this in another bag which gives a way to divide things up if you're using one bag for everything.  Nothing will fall to the bottom & get lost.

The Make up Bag


There are quite a few different make up bags that will work as planner bags but my favorite are the weekender style bags.  Often they have one large zipper around the bag that opens the bag into two halves.  Sometimes there's a little middle flap with extra brush storage that works great for storing pens!  These are larger, have dividing pockets, and look like small tote bags.  I like these because you can use smaller bags to divide & store your growing supply stash!  In the deeper bags you can even use that purse organizer for more pockets!

The Weekender/Yoga/Diaper Bag


This is where we get into the big momma of the planner bags.  This is when you've gone head first into the sticker books, subscription boxes, journals, & memory planners......and you need to take it all with you.  These are the bags I take on trips, to planner meet ups, and around the house when I need to plan.  They hold almost everything and make planning a breeze!  Use your other smaller bags to organize inside of these & use their built in pockets, too.  I love my French Bull Yoga Bag from Target.  I also have a bigger weekender style back that I've used as a planner stuffed carry on before.  (Fun fact : the strap broke in the airport!)  But I have been eyeing the Orla Keily Diaper Bags from Target for a while.  This is where the planner bag can get expensive.  Depending on the brand of bag you can spend $20 - $100+.  It's all up to what you're looking for in a bag.  


I love bright and fun planner bags because I can incorporate patterns that may not go with my everyday outfits.  Make up bags & the like tend to come in these amazing prints, colors, and patterns....it is hard for me to turn them down.  Every time I'm out I stroll through the make up bag aisle to see if I need a new one!

I've got two planner bag videos on my channel - this one is my original planner bag video using a deep, hanging toiletries bag & this one is the updated tour that's got a lot of different sections using some smaller bags to organize.  Let me know what you think!

Like I said, your stash is your stash.  What is important to you for planning is valid!  So if you need a bigger or a smaller bag...great.  As long as you're enjoying what you're doing!  Get creative any way you know how!

What is your current planner bag?  Have you grown through a few of them?

xoxo, Moe

5.31.2017

Minimalist Monthly Planning in a Mini Happy Planner

I have shared quite a few posts regarding my every evolving planner journey.  Every few months (like 6-8 months) I think 'Oh wow, I've got it this time' and then....I don't.  I've gotten away from planning because I like to plan my planners and usually that means just sit around and not use them all while feeling completely unorganized.
Minimalist Mini Happy Planner
this post contains affiliate links, please read my full disclosure here
.
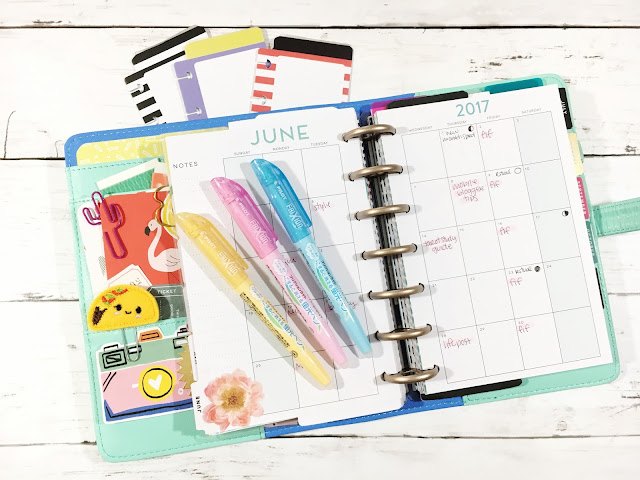
Here is my minimalist monthly layout in my Mini Happy Planner:

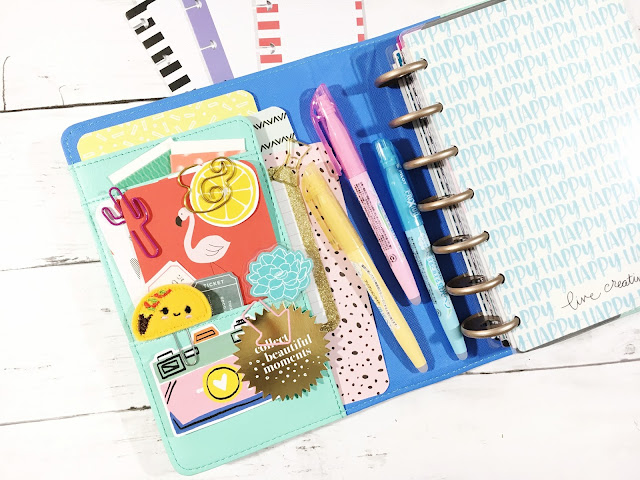
I use this planner for my blog planning, YouTube planning, & everyday life stuff.  All of these things require rescheduling more than half of the time so my favorite pens to use are the Pilot Frixion pens.  When we were in Japan I went into a store called Itoya (thank you Zach for being the map man and finding it for me!) where I saw a bazillion Frixion pens.  We were leaving the store and I was like holy heck, all the pens!  I picked up my favorite guys - the Frixion Slim - in a few colors but I really only use the black.
Monthly Layout Mini Happy Planner
I love this pen because the point is very fine and is perfect for writing in smaller spaces like the monthly spaces of the Mini Happy Planner.  I also think the slims erase easier than the .07 tips of the original Pilot Frixion pens.  I do use the .07 tip for my cleaning tracker that I draw on some graph paper and transfer every week.

To differentiate between the blog and YouTube calendar, I go back to my old school color coding - pink for the blog and blue for YouTube.  This is the same color coding I've been using forever and I go back to it each time I need to simplify.  I also will tend to write the blog post at the top of the box and the YouTube video at the bottom of the box.  This spacial coding I've been doing since the days of my OG editorial planner.  This just helps me know visually when I look at a page, a long with the color coding, what is what.  The only other color I will use in my monthly view is yellow.  Yellow marks the new and full moons so I know when to plan my rituals.
Mini Happy Planner Set up
The highlighters I use also have to erase - so I use these wonderful pastel Frixion Highlighters. The colors are soft but vibrant and they erase just as well as the Frixion Slims.  This is great for adding in post names because usually I just lay out the frame work for my posts and then add in the names/titles later so I know what to work on for the week.

All other events in my monthly planner are simply written in pen. I don't color code events mainly because I find it confuses me!  If it's not highlighted then it's just regular life.  So doctor's appointments, bills, and events are just written in pen.  That way I keep the whole aesthetic of the layout simple, clean, and uncluttered.
Pen Only Mini Happy Planner Spread
There are some other Frixion markers I want to mention in this post.  I picked these up in Japan thinking they were the highlighters...but they are markers.  This might be better for something like the Erin Condren Planner where the boxes are bigger.  For me, they don't work in this layout but I had to throw them in since we are talking about my Frixion pen love!
Mini Happy Planner Monthly
Above is an example of what the month usually starts out like.  I map out the blog post themes, then the videos, any classes/meetups, bills, and the new, full, & quarter moons.

Keeping this guy as simplified as possible keeps me focused.  It has just enough decoration to be inspiring but not enough to for me to feel it is tedious to work in.  I've moved on from doing a lot of my memory planning because I find it too tedious and it's not where I want to focus my energy right now.  While that makes me sad....I find it important to move on.  I try to keep some decor in my weekly layouts in my Mini Happy Planner though to get some creativity in there.  

Shop Related Products on Amazon!

So if you're looking for minimalist, pen only style layout...it is totally doable and totally inspiring.  And if you need to change things up all the time, Frixion pens got your back.  OH! Did you know you can fit the classic Happy Planner rings in the Mini Happy Planner covers? You totally can!

How do you organize your monthly layout?  Are you into pen only spreads?

xoxo, Moe

4.27.2017

Tarot Diaries // April 2017 New Moon Reading

If you follow me on Instagram you may have seen my recent foray into the Tarot.  I chose to work with the Tarot as a self development tool.  It's nothing to do with any deity, gods, or otherworldly forces....it is simply an attempt to come in line with my higher self.  I've also decided to get into some work with the lunar phases - so woo woo, I know.  Enter the New Moon, a time for setting intentions.  I've also been wanting to work with the Wild Unknown Tarot deck I picked up recently.
The Wild Unknown Tarot Spread
this post contains affiliate links, please read my full disclosure here.

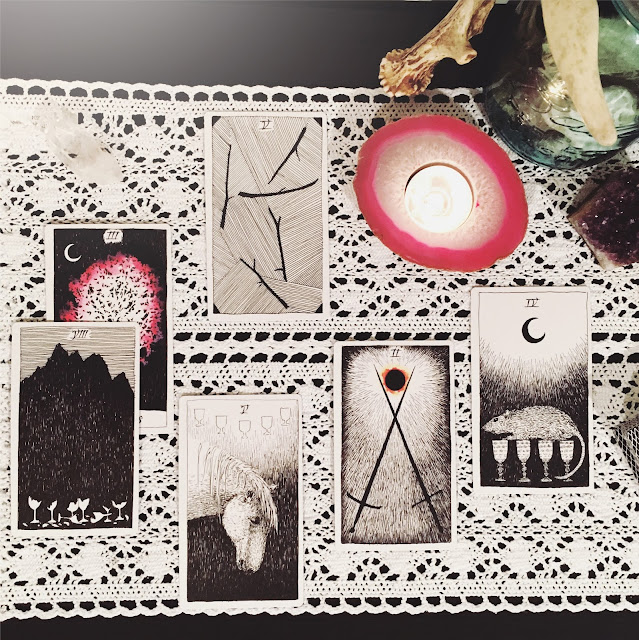
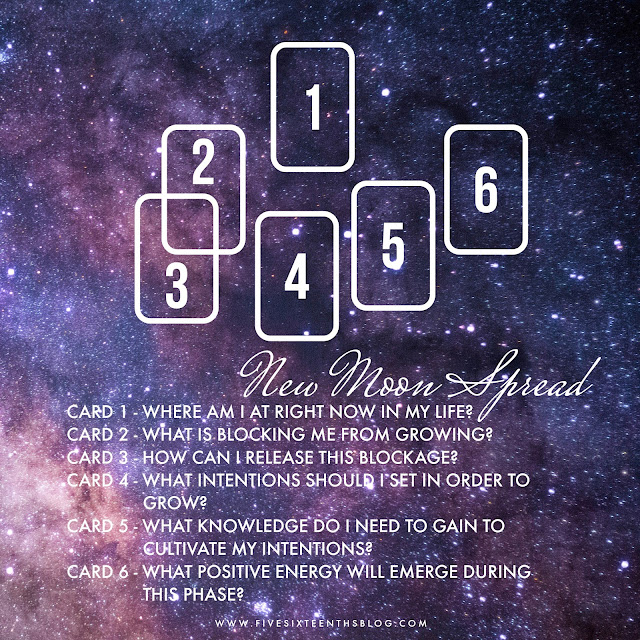
April 26th 2017 marks the New Moon.  This will be the first New Moon I've worked with to set intentions and I wanted to share with you today (or tonight rather, as this was a super last minute blog post!) my first New Moon Spread.  I do know that this New Moon is in Taurus......and that is the extent of my astrology knowledge!  The New Moon is the best time to set intentions and to set plans for the new month.  I'm considering starting my time keeping and monthly spiritual planning around the new moon instead of the begging of the calendar months because of my new found love of the Tarot.  So the spread I worked with is based on this spread I found on Pinterest but I added another card to clarify.  Here's my take - and the layout grid is at the end of the post : 

card one
Where am I right now in my life?
Five of Wands

The Five of Wands is a card of conflict.  This conflict is dealing with manifestations, actions, & ambitions. Unlike the other suits which can be rooted in something that is easily grasped - swords as thought, cups as emotion, and pentacles as money - the suit of wands is a bit more abstract.  This is the suit of energy, motion, action - the suit of the spirit.  The Five of Wands represents a conflict you may have with yourself about manifesting something right now.  You can't get what you want to do in line with actually doing it.  You may feel unable to move forward or that you can't get you're thoughts in line enough to make a plan.

card two
What is blocking me from growing?
The Empress

The Empress is a card of growth, of abundance, of creativity.  This is a card of awesomeness.  Overall, this is an extremely positive card - but because this is the only Major Arcana card in this reading, I see the blockage as maybe an excess of creativity.  So much is wanting to be manifested that it is causing havoc on the spirit that is trying to manifest it.  The Empress is a number three card, the card of moving into action but there may be too much happening that you can't handle it, you can't process it, and the over abundance isn't helping you.

card three
How can I release this blockage?
Eight of Cups

Let. It. Go.  The Eight of Cups seems to be personally haunting me!  The Eight of Cups is about the emotional strength to let it go.  Look, now is not the time to keep thinking about why you're creativity - the thing that you'd think would enable you to, you know, be creative - is blocking you.  Don't dwell on in because you keep coming back to it, pouring emotional energy into something that isn't rewarding you (setting up the cups), and yet nothing changes.  Have the emotional security to step away and accept.  Just leave the cups.

card four
What intentions should I set in order to grow?
Five of Cups

Another five card, a card about conflict.  This time the conflict is on an emotional level.  Because you've got an abundance of creativity but you can't get it to manifest into anything, you feel like the things that make you happy are no longer apart of your life.  The truth is, they are still there...you're just not seeing them because you're in this mindset of self pity.  If you're only look up for a minute you'll see that these things are still here.

Set an intention to consciously do things that fulfill you in order to open yourself back up to emotional gratification.  Take time to appreciate small breakthroughs and creative successes.  Ask yourself what you're ignoring. discover what you're not currently doing.  Set intentions to make sure you're doing things that fill you're cup.

card five
What knowledge do I need to gain to cultivate my intentions?
Two of Swords

As a two card the Two of Swords is about balance.  The energy of this card is is about balanced realization, about fair judgement.  Take the energy of the Two of Swords and use that to judge the actions you're taking - is this action helping you come in line with your intentions?  Is this action helping me to feel bountiful and fulfilled?  How is what you're doing aligning with your intentions.  

as and example: watching mindless TV for 3 hours after work.  You may feel exhausted and that something mindless may help you but is it really bringing you into alignment with your higher self?  Is this helping you to work through your creative blockages in order to manifest something?  I don't think a Netflix binge is the answer here.

card six
What positive energy will emerge during this phase?
Four of Cups

Emotional stability.  By setting intentions that help you feel fulfilled, you'll find that you become more emotionally balanced.  Being purposeful in what you do and reflective on what is working for you will help you bring the conflict of your spirit in line with the current conflict of emotion and ultimately bring about emotional stability.  The fours represent a solid foundation but they also represent this idea of stagnation.  So once you reach this culmination, don't just say 'this is it, I'm done'...leave room to grow.  Keep an open mind towards more growth and just like the Five of Cups, don't ignore what else might come to you.

Shop Related Products on Amazon!

I love this type of spread because it helps me to realize what is happening around me that I might not be in tune with.  Usually my questions revolve around the energy I should channel in a certain day with out any consideration to a bigger plan I should set.  So after these types of bigger readings it is important to set intentions that fall in line with card four.  Then you can focus you're daily draws or smaller readings on manifesting what you realized from this New Moon reading.
New Moon Tarot Spread Five Sixteenths Blog
I don't think you have to just do this reading around a New Moon.  Any time you feel the need to plan a new beginning you can utilize this spread.  Let me know how you like my interpretation of the cards and if you use this spread.  Happy reading!

Do you have an interest in the Tarot?  What are you attempting to manifest this month?

xoxo, Moe

6.10.2016

Free Planner Stickers // Vacation Countdown!

Anyone love free, printable stickers?  I know I do! I have a family reunion that I'm going to in July and that is counting as a little mini vacation for me so I decided to whip up some vacation countdown stickers for myself!
Every year since I was little my family has gone to Lake Gaston just of the border of Virginia and North Carolina.  This year will be the first year in a long, long time that I've actually been able to go.  So I thought I'd make some fun countdown stickers.  These little palm trees are awesome + there are some little deco stickers at the bottom for your vacation week!


There are 3 files included in the download - 1 Silhouette Studio file, 1 JPG with gray cut lines to upload to Cricut Design space (watch how to cut PDF printable using your Cricut Explore here), 1 PDF to print & cut by hand if you don't have a cutting machine.  

After you convert the PDF with the gray outlines to a JPG, it will require you to clean it up after uploading to Design Space - simply use the magic eraser to erase the entire background, then use the precision eraser to erase the text.  After you add the image to your canvas, size the width to 5.5 or 6 inches and it will still fit in the 6 x 8 inch print area.
And remember - these printables are for personal use only.  Do not print these in mass, give away the physical or digital file, claim these as your own, sell the physical or digital file, etc.  Play nice, these are for personal use only.  If you'd like to share this with your friends or add this to a Pinterest board, please pin the blog post and not the file itself.  Thanks!

Are you looking forward to a vacation this summer?  

xoxo, Moe

6.08.2016

Anatomy of My No White Space Planner Layout

If you watch any of my Plan with Me videos, you'll know I layout my planner each week nearly the same way.  I am very picky about my 'little things' options, my weekend banners, my checklists, and the shape of my icons.  All because my planner layout is a visual way for me to clearly see what I need.
A no white space spread may look busy to some but to others it totally works.  For me, my layout is a spacial way of coding my life.  Much like color coding - all appointments are yellow - this way of using space as a way to code - all appointments are on half boxes with a time icon - is a visual language you are creating for yourself.  Even if you color code (or do a bullet journal type of thing) your planner may look way crazy to someone who doesn't use your same system.  Pink means something to you...but I don't know what it is.  A circle with a dot in the middle means something to you.....but I don't know what it is.  A half box with a laptop icon means something to me.....but you have  no clue what it means. 

My no white space layouts are all about dividing the space in to consistent pieces.  Every week is the same and that way I can go back, week to week, and see what has and hasn't been completed.  The biggest example of this is that I put a cleaning checklist on the bottom of each Monday - Thursday in my ECLP.  I've done this for a long, long while....and this week I can look back and see that man, I really need to vacuum the living room because for the past three weeks I haven't.  (You can read more about my cleaning list and cleaning routines here)  So much like another may look for a certain indicator like a color or a doodle, my indicator is the space the task/thing/item takes up.  My indicator is where the task is located or how it is noted.  I'm going to go through and break down one of my no white space spreads for you in hopes that it inspires you to try out no white space planning....or just helps you understand why some of us planner girls cover our pages in stickers!!!

Before I get into that though, I do what to say something - it took quite a while to build up to a no white space layout.  I watched a lot of videos to find exactly what I liked.  I picked on thing from this video, or another idea from another video, or combined this and that from these three videos to create my own style.  A planner only works if it works for you.  You have to be doing something that works for you.  Maybe no white space is not your cup of tea or maybe it is just what you've been looking for - either way I hope I can make sense of the spacial aspect behind no white space planning, for me.
To Do List
Every week my To Do list is located at the top of the column (under what used to be the morning header)  I always put my to do lists here as well as an Instagram icon to mark my posting schedule.  When I open my planner to check my specific daily to do list, my eye knows to go there first.  These are tinier tasks - tasks that don't have a specific category, on the go tasks, or things to remember.  Though these tasks may go into another category (like edit PWM or create kits) they most often are done on these days to keep myself on track.  I've mentioned in this routines video about how I work on specific things on specific days - blogging is Monday, YouTube is Tuesday & Thursday, Etsy is Wednesday and Thursday, etc.  But if something is in a to do list on a day it isn't assigned to, I need to do it to stay on track.  Or it was carried over.  So in short, the first part of my daily column is a to do list
Cleaning List & Little Things
At the bottom of my daily column is my cleaning list (only on Monday - Thursday) where I mark of the area of the house I'll (try to) clean that day.  You can read more on my cleaning routines in the link near the top of the post, but basically I divided the house into 4 parts and take 30 min a day to clean that part of the house.  So I mark what I need to clean and either check it off....or use an arrow to push it off!  Sometimes I use icons to denote where I'm cleaning - vacuum is the living room/office, dishwasher is the kitchen, cleaning bottle is the bathrooms, second vacuum is the bedrooms.  This helps me because more often than not recently I've been pushing off the chores.  So I can look back each week and find my cleaning checklist for each week, in the same place, and see what I've put off.  Sometimes things get pushed to the weekend but sometimes I just close the door and ignore it!!

Above the cleaning checklist is the Little Things area.  This term is quite popular in the planning community.  I am very picky about the icons I need in this section and that is why I prefer printable kits - I can color match my own little things.  In this section I track meals, tv shows, blog posts, YouTube videos, and other little things not to forget go in this section.  When I'm looking in my planner I can easily see what the next blog post is, what I watched last weekend, and how often I'm eating cereal for dinner.
In Between
In between the to do list and the little things and cleaning list areas is an extended version of what used to be the afternoon section of the column.  This is my Today section.  I put the full decorative boxes here and put stickers marking what needs to be done.  It is in this section that I add my blogging, YouTube, and etsy checklists, my appointments, gas reminders, bills due, packages, trash, meetups, etc.  This section is sort of like the decorating section.  I'd like to say this section is decorated because I'm excited about the things - like meetups - but that doesn't really apply to boring things - like taking the trash out.  It is for everything that sort of doesn't fit in my version of the other two categories.  I know where to find my blogging checklist, my planner meetup info, if it is recycling this week too, and what bills may need to be paid.
Other Tidbits
My grocery list is always a checklist on the bottom of Friday.  My weekend cleaning tasks are always a checklist on Saturday.  My weekend blogging and YouTube tasks are always small checklists at the bottom of Saturday and Sunday.  In every layout it is the same.  When I open my planner and what to see my grocery list, I know where to find it.  
Sidebar
My sidebar is for all the things that either don't have a timeline to complete or things to remember for next week.  I have an Important and a Goals section which are two different things.  I also have a Next Week section to jot down what I need to remember to do next week.  This will just get migrated when I plan the next week.  The sidebar gets changed up if I have different stickers from different kits, but usually the content is the same.

I hope this little breakdown helped you to see the spacial relation to no white space planning.  Not every planner does no white space the same way.  Some change it up every week.  But for me, things laying in the same place opens me up to using a lot of fun sticker kits!
If you're looking for a good example of someone who does the same type of spacial layout, Kristen Michelle on YouTube does the same sort of thing.  She will layout day by day but uses her space in the same way - school goes in this area, etc.  So check her out!

If you found this helpful, let me know!

What is your planning style?  Did it take you a while to develop it?

xoxo, Moe

4.20.2016

How I get More Done // 5 Tips for Productivity

A long while ago I started on this journey to be productive and organized.  This started with purchasing a planner, developing a cleaning routine, expanding on that cleaning routine, finding planner peace, and talking more about my cleaning routine (cleaning routine & cleaning routine).  I credit this obsession with my cleaning routine for making me more productive.  Today I want to share with you 5 tips on setting your mind frame in order to create more productivity in your day.
Decide what activities are important
This is the first part to being productive.  There are things you do in your daily life that take priority over other things.  The first thing to do is decide what is most important to you.  For me, I decided to make cleaning a priority.  I made it something that had to be done in my daily life and I sucked it up and did it for a few weeks straight until it became habit.  You may find that there is an activity you want to complete during the day but haven't made time for it - make this activity a priority for a few weeks, then it will become habit.  Also there is no easy way to do this - suck it up and get it done.  Then it will seem out of place to not do it.

You may also need to prioritize things differently.  I love to sleep the frick in on every damn day of my life.  I dislike what 5am looks like.  But I found during my day to day life if I woke up 30 minutes before I have to leave for work, my day tends to stink.  I get to work still tired, I'm thrown into the thick of if still hazy, and I'm yawning well into 1pm.  I found that if I woke up early enough to enjoy time to myself and allow my body to adjust to the burning sunshine my day was more pleasant.  I wasn't playing catch up with myself all day.  (Pro tip on waking up - don't hit the snooze, it will only make you feel more tired.  I'm not a scientist, but I do play one on TV)  Re-prioritizing something that you may think is important when in actuality it might be detrimental to your productivity levels, may help you.

Create & Test Routines
Re-prioritizing things in your day to day life may lead to new routines.  I find that if I complete certain tasks in a certain order I feel more efficient and more productive.  Even if it is in minor increments, keeping to a schedule is key to feeling productive.  In the morning I wake up at 5:10am, I take Sweetie potty and am back inside to have her fed and my coffee brewed by 5:25am, then I cuddle back up with her in bed and mess around on my phone, watch TV, etc until 5:55am when I start to do my make up (if I feel like it), I get dressed by 5:18am, put up Sweetie, and if all is on track I'm out the door a little before 6:30am.  I didn't sit down and decide on 5:18am being the time I start to put my pants on, I just found that by re-prioritizing the things that made my morning better that this was the routine the fit best for me.

By creating and testing different routines you'll be able to develop what works best in what order.  I can't give you the scientific breakdown of it but you should be able to develop a routine that flows together organically.  For me it is pointless to walk to the kitchen and brew my coffee before going into the bathroom because the bathroom is before the kitchen.  So then I'll get that over with, wash my face, etc.  Then my dog has to pee so of course we'll go downstairs and outside, etc, etc.  The routine you develop should be organic.

You may find that if you switch this and that you're more productive (or less) and you should evolve your routines.  One thing I am absolutely horrible at is adapting my routine when something changes. I am horrible at it and my whole life is thrown off for weeks at a time.  

Write (Specific & Helpful) To Do Lists
I find that the more specific my To Do List is, the more helpful it is.  It also helps to see what actually can be done in an allotted amount of time.  If you have a task, simply writing task reminds you about the task.  If the task has certain parts to complete it, I find writing down all that needs to be done is very helpful.  Not only is a metal thing where you can check off more things but it shows your progress.  I try to break down a task (if it needs to be broken down) into 3 to 4 steps so I'm not overwhelmed.  Laundry is a great example - wash, fold, put away.  Laundry also doesn't happen all at once so you can see your progress even as your working on other things during the day.  Breaking down the task into smaller tasks makes me feel like I'm staying on track and getting things done.

I find being too specific is unhelpful to me.  I also find that creating a general, non-intimidating heading to be super helpful.  So instead of a generic YouTube as a task, I'll put Schedule Videos and break it down into edit, upload, finalize the list of videos I have.  That way I know what I'm doing but I'm not overwhelmed.  I work in batches too - batch edit, batch upload, finalize them all in one go.  Batching is super helpful when it comes to To Do lists. 

Hold Yourself Accountable
A planner does this for me.  Also, remembering the feeling I have when my house is clean and my shit is done helps me stay accountable.  Find something that works for you - because, in general, no one gives a crap about your productivity except for you.  (your job is a different story, though.)  No one cares if you got your mascara on before 6:05am in order to finish curling your hair by 6:45am, except for you.   No one cares if you clean the family room on Tuesdays or on Saturdays, except for you.  You get what I mean?  Find something that pushes you to complete your tasks.  But also don't stress on it if you can't get things done.  Creating routines and To Do lists will show you what you can feasibly fit in your amount of time.

I hope this post was a little bit helpful - it is how I approach productivity in my daily life and how I get a handle on things!  Creating routines and just seeing what I can do and when I can do it gives me a little more control over my life, you know?  And I think that is a very helpful thing to have a tiny bit of control over!

How do you stay productive?  How do you keep on top of daily tasks?

xoxo, Moe

1.28.2016

Three Ways to Use Icon Stickers in your Planner

I have probably claimed another sticker as my favorite sticker, but for today's post - icon stickers are my favorite type of sticker.  They are very versatile (obviously) and I'm hoping I'm not sharing with you something that is so blatantly obvious that you navigate to another page, but I've got three ways I use icon stickers to add a bit of dynamic design to my planner layouts.

The biggest part of a weekly spread for me is the design element.  I like a well balanced design, complimentary colors, well designed patterns....it's weird, but it gives me all the feels.  All the aesthetically pleasing feels!

Over an icon label you won't use
There are always some icon labels that won't be used so put I usually cover whatever icon is on the label with an icon sticker.  It adds a bit of dimension if you use two different colors and makes the label more prominent because of the contrast.  I like to use this in the middle of my vertical columns and not at the bottom where I put my little things as the contrast created adds emphasis and takes away from the sleekness at the bottom of my vertical column.  But that is purely an aesthetic thing.
Over a tear drop or flag sticker for emphasis
In my editorial planner (and in regular every day life) I use an icon over a tear drop sticker as a section break.  Placing the icon up higher on the tear drop will allow for a bit of room to write and identify what the icon may stand for.  Things may be obvious like barbells mean work out, but for me a filming slate may mean to film or to upload that day.  It depends on the icons provided in the kit I'm using or if I just don't have any of a certain type of sticker.
As a header/title label
This is one where I thought I was super creative!  When I was home for the holiday I conveniently didn't bring any of my header stickers - like YouTube, Blog, Shopping, etc.  so I improvised with an icon sticker.  I use a circle sticker from a Simple Stories washi set and then another icon from a Simple Stories icon set to create my headers.  So a camera denoted what to film, a cart was what to buy, etc.  It was a very visual week for me that week!

Sometimes using stickers can be blatantly obvious, but sometimes we can get a little be creative.  (Just a little bit!) I hope this post wasn't too 'duh!' for you and maybe helped with a little bit of inspiration.  Using icon stickers in a consistent way - like one of the three above - gives a little bit more of a cohesive look to a design that may lack unison.  So if all you're icons are on tear drops, no matter the size or style of the icon, you're overall spread will look more put together.  It's all about the balance!!

What is your favorite sticker?  How do you use stickers in a new way?  How do they work best for you?

xoxo, Moe

12.24.2015

Three Tips for Choosing a Planner

Planning is becoming something that is very mainstream, every where you turn around there is a new planner coming out.  Even scrap booking companies are getting in on the planning game.  Because there are hundreds, if not thousands, of planners to choose from it becomes important to realize that not every person fits every planner.
this post contains affiliate links, please read my full disclosure here.

A little bit ago I got an email from someone asking what planner I'd recommend, and my response was long.  But the gist of it was decide what is right for you.  Today I want to share with you three tips on choosing a planner that I think can help immensely when it comes be being satisfied with your planner.  If you're new to planning or just trying to find planner peace in the new year, here are some tips:

Make a List

Before you even reach for the first planner you see, you should sit down and make a list of what you need your planner for.  Do you have kids?  Are you juggling their schedules as well?  Are you constantly in meetings or traveling?  Do you own a business?  Are you going to need to juggle both your personal and business life?  Are you dealing with anything medical related?  Will you be budgeting and keeping track of your fiancees?  Are you planning for yourself or for you and your partner?  Are you planning for a family of 3? A family of 7?
A5 size Filofax is nearly equivalent to half letter size.  On the left is an A5 Filofax and on the right is a half size binder from Target

Obviously everyone's answers will be different.  Someone who has 4 kids, a business, and needs to keep track of their spouses nights off from being (I dunno) a firefighter is going to need a much different planner than a twenty something starting their career and juggling book club and community involvement.  You can see that this list will be very helpful for you!  The list will determine the size you might need as well as whether you'd like to have a customizable system (where you can take pages in and out) or if you'd like a more standardized option.


Choose your style and size

There are a few common styles of planners - ring bound, spiral bound, arc bound, and those that are bound like a traditional book.  I'm not going to mention the latter because, honestly, these have never worked for me.  There are also tons of sizes.  You can get an A5 size (slightly larger than a half sheet of standard printer paper), a personal size (about a quarter the size of the A5), the Erin Condren planner is 7.5 x 9.25 inches, there are smaller planners like those from big box stores like Walmart.  The sizing is endless.
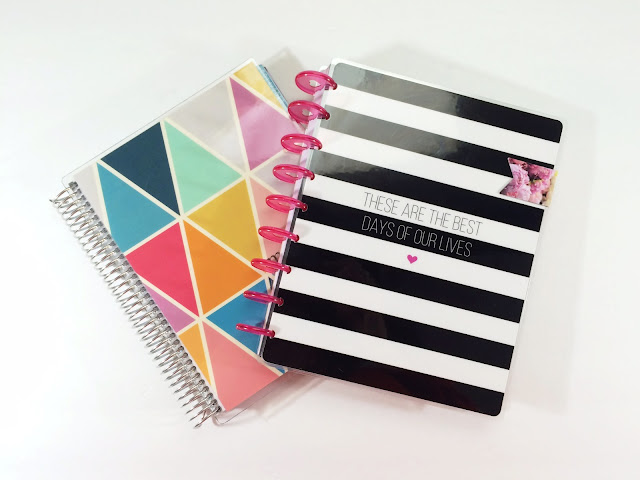
Erin Condren Life Planner on the left and undated MAMBI Happy Planner on the right.  ECLP is spiral bound and MAMBI is disc bound.

A ring bound planner - like the Filofax or Kikki K - is going to be more customizable.  You can create different sections, move pages around, change things up on a whim.  Because it has a binding like a three ring binder, you can be more creative.  Often this style of binder will have an elastic, zip, or snap closure.  You may choose a personal size (or medium size if you're ordering a Kikki K planner) for portability, but you will be limited on space to write.  You may choose the A5 size (or large size if you're ordering a Kikki K) because of the space you'll have to write.  While that size is still portable, it is less compact.  Then you can get even smaller in the Filofax world - Compact which is smaller than a personal size but fits the same size pages, and Pocket size which is so small often others us this as a wallet.
Vertical layout comparison between the ECLP on the left and the MAMBI on the right

A spiral bound planner will offer more structure.  Pre-made spiral bound planners like the Erin Condren, Plum Paper, and Inkwell press offer a set class of sections.  You won't be able to change things around or add things in easily.  You can't up and decide you want to move something from the front to the back because the inserts or guts of the planner are pre coiled together.  This might be better if you feel you can make a planner work for you.  If you find that store bought planners tend to help you out with out the customization then this style might be right for you.  I'd suggest researching the insides of each planner to see which style of spiral bound will work for you.


Disc bound planners are a blend between the two.  While this arc system is an investment up front - you have to purchase a punch that will accommodate the unique binding style while a ring bound planner offers the ability to use a $1 single hole punch to get your stuff done.  It is harder to add things to the planner (investment in the punch) but it is possible.  You get the benefit of the ring bound planner in the style of a spiral bound.  The arc system can get a little bit bulky but this system is used in a variety of sizes.
UPDATE - there's a couple of new things in town : a horizontal layout in the classic size of the Happy Planner and a Mini Happy Planner.  The Mini Happy Planner is my current favorite planner and the one I've been using for quite a while.  The minis are great because you've got the portability of the smaller size and the flexibility of the discs!  You can flip these guys back around like a notebook and remove pages!

So based on the list of needs you have for using a planner, this will determine the style and the size you may need.

Test it Out

There is no need to spend the big bucks up front on something you're not sure you will like.  I suggest starting out with something equally similar to see if you like the system you've decided on.

If you're thinking about a ring bound option - the Filofax or Kikki K - why not try out a small, half size three ring binder first?  Target has some freaking cute ones but you can also pick some up at places like Office Max and Staples.  Avery makes some great inserts for small binders but you can also find half size (or desktop sized) printables on places like pinterest and even here on the blog.  When I first started planning, I used a half sized three ring binder to see if I really wanted to do this.  and I really liked it.
Webster's Pages Color Crush planner on the left and the personal sized Filofax on the right.

If you're thinking that the half size binder might still be too big, I suggest seeing if you can get your hands on a personal size Webster's Pages Color Crush planner.  It is one of the most affordable six ring planners out there.  The personal size planners have HUGE rings!  You can stuff these full.  I loved my Color Crush because it was so small yet I could fit everything I was using from my A5 in there.  If you're thinking that you may not like a Color Crush (they do have some flaws) another affordable option is the Filofax Saffiano.  This is the most affordable (I believe) of the Filofax brand and if you move down to the personal size, you're gonna find it even more affordable.

If you're thinking you might want to start off in something like the Erin Condren Life Planner, why not try the Classic Happy Planner The HP is a disc bound system while the ECLP is spiral bound but the inserts are set up quite the same.  They each have three daily sections - morning, afternoon, evening - but you can use them for whatever divisions you'd like.  Another key difference is that with the HP you can add bigger discs and add in different sections.  You can pull things out, add things in, etc - where as the ECLP you can't easily do this.  However, these are total dupes of each other so before you drop the big bucks on the ECLP try out the HP and use a coupon at your local Michael's, Hobby Lobby's, etc.  (I even found them at my Meijer!)

Of course you can also try out planning in general in any planner.  If you're just looking for super cute ones, Target has so many it's ridiculous.  You may have heard of the Day Designer, but they also have some cute neon ones (I found them in the craft section of my Target) and some generic ones in the notebook aisle.   If you're lucky, you might even be able to find the Heidi Swapp planners at your local Michael's.

If you'd like to read more on how I found my current planning style, read my planner journey here and the reasons I switched to vertical style inserts here.

How did you decide on your planning style?  What was your first planner?

xoxo, Moe