Showing posts sorted by relevance for query planner stamps. Sort by date Show all posts

3.07.2017

Trend Tuesday // How to Save Money on Planner Stamps

Planner stamps have become my jam.  I am in love with the crisp way they look in my planner.  I can't get over it!  My favorite place to use planner stamps is in my Mini Happy Planner which has become my main planner.  Who would have thought that would happen!  I also love the way they look in the 800 memory planners I have (I haven't decided on what planner I want to use this year for memory planning....)
this post contains affliliate links, please read my full disclosure here

The whole reason I bought planner stamps is was to save money because they are reusable.  You know what happened?  I can't stop buying stamps!  These collections can get pretty pricey.  Personally I can't wait for the new MAMBI clear stamps that I saw at CHA this year!  As with everything on the blog, I really want to show you how to save money while still having fun with this hobby.  Here are 5 ways to save money on planner stamps:

You all know I love Blitsy.  Whenever I want to find something new but I'm on a budget I turn to my trusted pal Blitsy.  Their planner stamp section has planner stamps from WaffleFlower, Hero Arts, Technique Tuesday, Lawn Fawn, Prima Marketing...so many brands.  It is best to keep a close eye on the site as the stock rotates (and comes back) often.  You may miss out on something if you don't check often.  I love that shipping to the contiguous United States is free over $30 and if you sign up here you can get $10 off your first order.  Once you sign up, you can share your own referral code.  You know what that means?  Rewards for you whenever someone uses your link to make their first purchase!  So you can get more planner stamps!!

This is a brand new site I've found, a sister site to Peachy Cheap where you can find discount scrapbooking supplies.  Peachy Planner Deals offers a new deal each day - the true meaning of a flash sale site - related to planning.  I've seen two offers for stamps on the site so far so it's worth a check if you're in the market.  Sign up for their email to be notified of the deal each day too.  The stamps I've recently purchased from Peachy Planner Deals are from Chic Tags...I love them!

Amazon might not be the best deal on this list - I suggest checking the other two first - you may find some good deals on something that is sold out on a site like Blitsy.  The benefit of Amazon for me is the Prime shipping since I'm a Prime member.  An added benefit of the site is visiting the Amazon Smile site allows you to donate a portion of your eligible purchase to a charity of your choice.  So get a good deal, get your stamps in 2 days, and donate to a good cause.  Win, win, win!  Check out some planner stamps here.  There are some of the Jessica Lynn Originals stamps there that I reviewed in this video.

Facebook Groups/Instagram
Another money saving way to buy stamps is from someone destashing.  I've gotten a few Studio l2e sets from someone destashing on Instagram.  I've also found a few Facebook groups that sell off individual stamps that the seller may not need from a stamp collection.  That is great if you're not trying to buy 30 stamps on in a set when you're looking for just a few.  It takes a bit of time, negotiating, and trust...but pay through something like PayPal Goods & Services (for a small fee) so that you're protected if the seller falls through on their end!

Etsy
In addition to any shop coupon codes you may find, Etsy also offers cash back through Ebates.  It is usually at 1% cash back but sometimes it will jump to 2%.  This is a great way to save a tad bit of money and buy from an independent business owner.  Etsy has so many shops to offer - I just found Starving Artist Stamps with a crazy set of clear planner icon stamps!  Do a quick Etsy search of Planner Stamps and you'll find unique sets as well has some name brand ones.

I can't get over the fact that after all the planner stamps I've purchased....I still need more!  So many planner stamps, too little time.  If you'd like to watch a few of my Planner Stamping videos, there is a playlist here on my YouTube channel.

Have you started planner stamping?  Any new planning thing you're interested in?

xox, Moe

5.02.2016

Make it Monday // DIY Planner Stamp Hack

Recently I've been getting into planner stamps.  I'd say about a year ago I thought 'I'd like to try stamping in my planner.' and just now it has come to me actually doing it.  There was some build up, but now I'm here.  And with any new thing I try, I always have to find a way to DIY something.  I am also very impatient and very frugal when it comes to something I'm not 100% I'll be into.  So when I started eyeing some photo-polymer cling stamps to use in my planner I didn't think spending $14+ on something I may not be into, would be a good thing.  So I decided to see if I could DIY myself some word stamps....and it is totally possible.

this post contains affiliate links, please read my full disclosure here.
I found these Studio G wood mounted rubber stamps in the small crafty aisle of my Meijer (but I'm pretty sure this same brand is sold at Joanne's and Michael's in their little dollar section) for a $1 each.  I've found some on clearance before for .50 cents, so these really don't break the bank.  If you're looking to create a lot of words, you may need quite a few sets - but even spending $5 on these is worth it because you can get A TON of words out of the amount of letters you have.  I chose to stick with two sets (because that's all my Meijer had!) and still got 5 words out of the two sets.  I'm sure I could get more, I just can't think of any more right now!
supplies // small wooden alpha stamps - set of two, various washi tape strips

First,separate the stamps from each other.  These come in a little block where the rubber part of the stamp is connected. Be gentle, and pull the letters apart that you'll need to use.  Start grouping your letters together and setting them aside.
Once you have the words together, make sure that the stamp side is flat and flush against each other.  I found that on some stamps I needed to gently pull the rubber part off of the wooden handle and re-position it.  The adhesive used on these stamps is rather sticky and has a good hold, but you can pull it off and stick it back on.  I'm not worried about the rubber part falling off after doing that either.  Lining the stamps up like this is important so that the ink is distributed evenly across the stamp and to ensure that even pressure will stamp a full image.

Now that the letter stamps are lined up well place a strip of washi along the handles of the stamps.  Make sure the washi is long enough to wrap around the whole set of stamps that make the word.  The best part about this is the washi isn't permanent.  So if you want to make a new word you can unwrap the washi and use the letters again.  When I first thought of this DIY I thought that super glue would be the best.....but now I know that washi is the best idea!
Now you have a set of functional word stamps for a great price!  I am thinking about finding a few more sets of these in the same font to make a few more words....


You can also find my Planner Stamping playlist here on YouTube & find ways to save money on your planner stamps here.

Is there something you've been wanting to try but haven't committed yet?  Anything you DIY to see if you really want to jump in?

xoxo, Moe

8.14.2017

Make it Monday // 8 Planner DIYs for Back to School

It is time to go back to school!!! Many probably have already started, some are starting in the next few weeks, and some may start after Labor Day...either way, it's time to get some learning on.  When I was younger, our elementary, middle, & high schools didn't go back until after Labor Day.  We went back to college around this time each year though.  Move in day was always my favorite and least favorite time.  You get to see your friends....but you have to move all of your stuff!
this post contains affiliate links, please read my full disclosure here.
Then you've got that first week or two where you're not quite into doing homework yet and you've still got a bit of the summer brain going.  Man, those were the days.

I have zero kids..so no one I know is really going back to school.  But I still thought it'd be a perfect time to share some planner DIY's to get in you in the school spirit.  The projects use a lot of my favorite tools, two being PicMonkey and the Cricut Explore.  I hope that you have a ball making somethings to get you organized & off to the right start!

Print Your Own Sticky Notes

This is super helpful if you have quite a few repeating tasks but you need to move them around in your planner.  It's also great if you just like to customize and create things!  I love making my own sticky notes!

Stylish Class Schedule with PicMonkey

Go back to school in style!  This DIY is inspired by the Target Dollar Spot weekly notepads.  You can punch this into any planner.  It is designed for a personal size but you can add it to any planner you choose.  Since the original post though, Pic Monkey has added in a grid option.  That means aligning your designs is easier than ever.

Stamped Habit Tracker

If you love the look of stamps but really can't be bothered to whip them out every week, you can create your own weekly habit tracker.  It can even be customized with other stamps.  Learn how to save money on planner stamps here + find my planner stamping playlist on YouTube here.

DIY Planner Stamp Hack

Speaking of planner stamps - if you don't want to dish out the dough for expensive photo-polymer stamps you can DIY your own with some small alpha stamps and washi tape.  These are easy to store and affordable to make!


Custom Clip in Tabs for the Happy Planner

Have something you really don't want to punch but would like to add it to your Happy Planner?  Or maybe you don't have a Happy Planner punch yet...make your own custom clip in tabs with scrapbook paper & your Cricut Explore.

Design a Planner Dashboard with the Rhonna Designs App

The Rhonna Designs app is one of my favorite apps to play with.  It is constantly updated with new overlays, sayings, and textures to help you create the digital design of your dreams.  Use some planner girl inspired images to create a fun planner dashboard.  Customize with your name and you're the real winner here.

Happy Planner Bookmarks + Cricut Cut File

Creating clip in tabs for your planner using the Cricut isn't the only DIY I've got for you - make some awesome bookmarks too.  Mark your place in style and even store your washi where it won't be in the way.  Check out all the Cricut Explore DIYs here.

DIY Shaped Paper Clips

Keeping your papers in order doesn't have to be boring.  Use some pliers and craft wire to make your own shaped clips.  Sometimes they come out perfect and sometimes they give you a laugh!

I hope that you're having fun going back to school and it's not too stressful for you.  DIYing your own supplies is half the fun of the new year.  Gives your stuff a personalized look and you feel like you've got a little bit of home right where you want it.

Have you or anyone in your family started school yet?  What have you DIYed for your school year?

xoxo, Moe

12.15.2017

Free Sticker Friday // Birthday Week Planner Stickers

So this week (today actually) I turn the big 3 - 0.  That's right...I am 30.  Over the past few years I've had to change my bios on various websites like Twitter, Pinterest, and even this blog.  What started out as 'a post grad southern girl' changed to 'twenty-something Indiana transplant'.  But as I've moved through my late twenties, I changed most of my bios to say something like : 'I'm Moe, a 9-5er, Southern at Heart, Indiana transplant & sweet tea enthusiast'.  So no longer am I post grad or twenty something...I'm 30!! 
this post contains affiliate links, please read my full disclosure here.

One of the the biggest things I've learned in my 30 years is to make sure I'm doing what makes me happy.  Over Thanksgiving when I was at my parent's house, I was sitting on the couch putting stickers in my memory planner & my everyday planner.  I thought to myself 'You know, some may think this is pretty childish.....playing with stickers.  But it makes me feel creative and expressive, and it relaxes me.  So I'm going to keep doing it even though I'm 30.'  Life is too short not to do the things that make you happy.  Life is also too short to keep doing things that make you annoyed, sad, frustrated, etc.  So I need everyone to resolve with me to continue to do the things we love...no matter what it is.
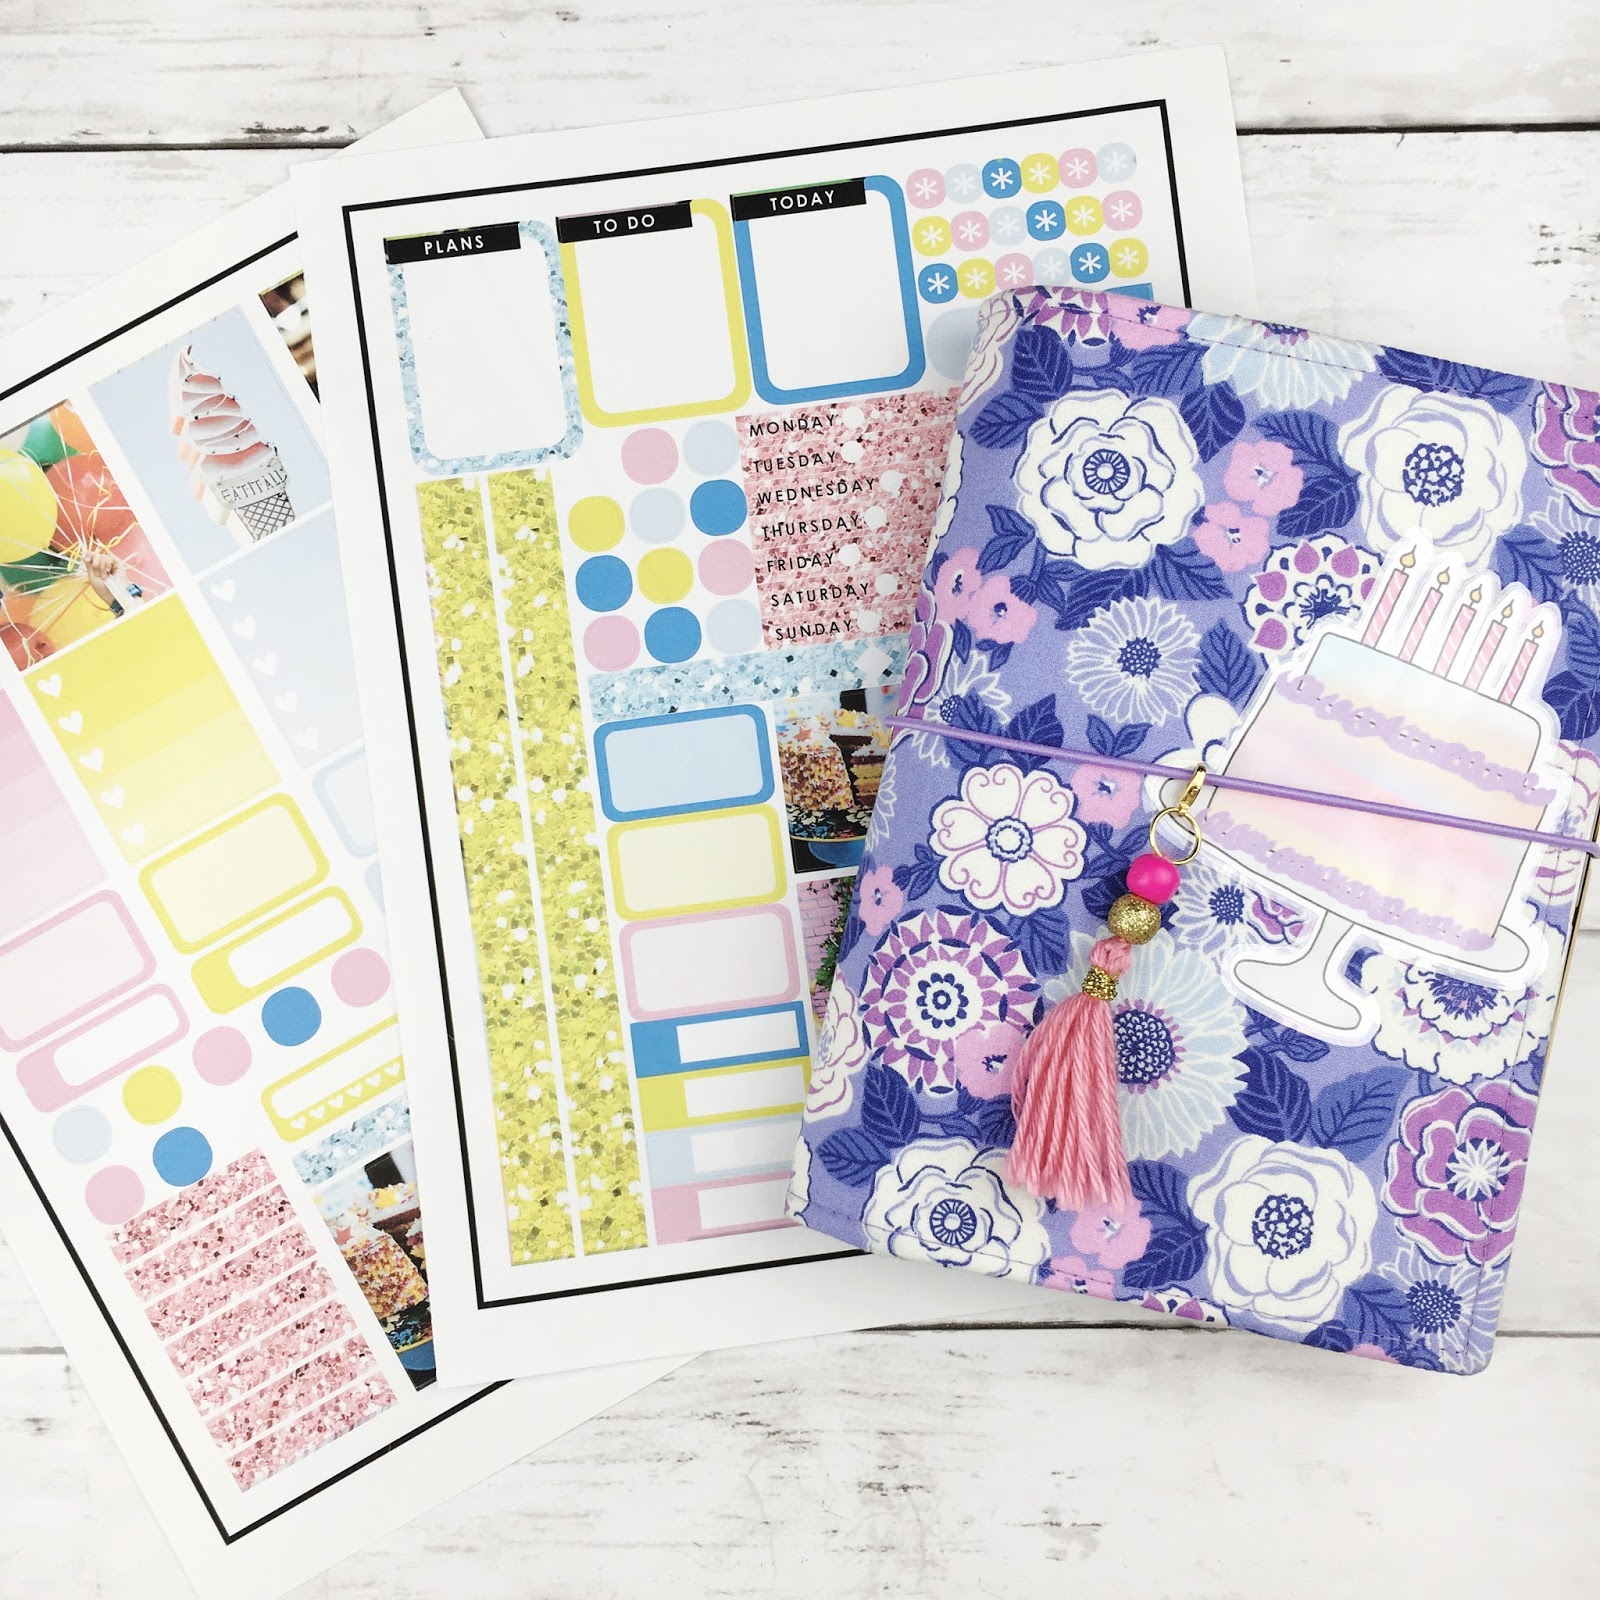
So, in honor of my birthday - and for the fact that I figured out the sizing for the Mini Happy Planner - here is a free printable you can use during your birthday week.  This week I left the icon circles blank because I really loved using my planner stamps for the icons.  Leaving these blank means that you can customize them with planner stamps or digital icons of your own!  How many times have you purchased a weekly kit only to find that you  don't use all of the icons or don't even need some of them?  This way you can create the ones you need.  And hey, bust out those planner stamps if you haven't been using them.  Learn more about how I use planner stamps here.


Remember, all printables on the blog are for personal use only.  Do not sell the printed or digital design, do not claim any of these as your own, do not print an disseminate in mass quantities.  As always, thank you for playing nice.  The glitter textures are from EyeInspire and all photos are from Unsplash.
Included in the download are the files for both the Erin Condren sized & Mini Happy Planner sized stickers in the following formats - PDF for printing & cutting by hand, PNG for uploading to Cricut Design Space, and Silhouette Studio file to cut with your Silhouette.  Be sure to size the PNG to 6.75 x 9.25 inches when you upload it to Design Space.


If you're interested in the birthday cake die cut, you can join the Printable of the Month Club over on my Patreon page!  For $3 a month you'll get access to an every growing library of printables totally unique to that subscription.  That means the printables you find over there will not be replicated in the shop or on the blog....they are exclusive for my Patreon family.  Check it out & subscribe here.

What is something that makes you happy?  What is something you want to start doing?

xoxo, Moe

ps. my planner cover is from Sew What Else is New on Etsy.  I love it, I have 2, and I need more.  Check out the shop for amazing planner covers & traveler's notebooks!  Don't forget to use Ebates when shopping on Etsy for the holidays (and any time really) to get cash back on your purchases!  Sign up here.

1.19.2018

5 Ways to Decorate your Planner...Functionally!

How you use your planner is a hot button topic in the planning world.  You can't use stickers, what's they're purpose?  You can't use just pen, that's too boring?  Where's the space to write anything? Where's the space to be creative?  Well...I've got one thing to tell you: how you use or decorate your planner is up to you.  If it works for you, you get to do it!
this post contains affiliate links, please see my full disclosure here.

I've gone through a ton of planning systems over the years.  First, I graduated from a pen only, Mead planner to an A5 filofax, then I got a Happy Planner, then I grabbed up every singe personal size binder I could find, I switched to vertical planning, then I used multiple planners, then I used a traveler's notebook, then I got a memory planner, now I'm in one planner.  Guess what?  By May I might be doing something totally different! (and that is ok!)

Today I want to share with you 5 ways that decor can serve function in your planner!

Simple yet Creative Monthly Layout

In my planner I like to keep the monthly layout simple.  Because the Mini Happy Planner has smaller space in the monthly layout and I personally have a lot to put in there...I keep it simple with pen & highlighters.  Highlighters help add color coding & decor to keep me inspired.  And the Frixion pens mean if something changes I can erase it!  Frixion also makes highlighters...so that is a plus.  To add stickers in, focus on the edges.  Don't let the stickers take up too much real estate but you can still use them!

Make your Routines Colorful

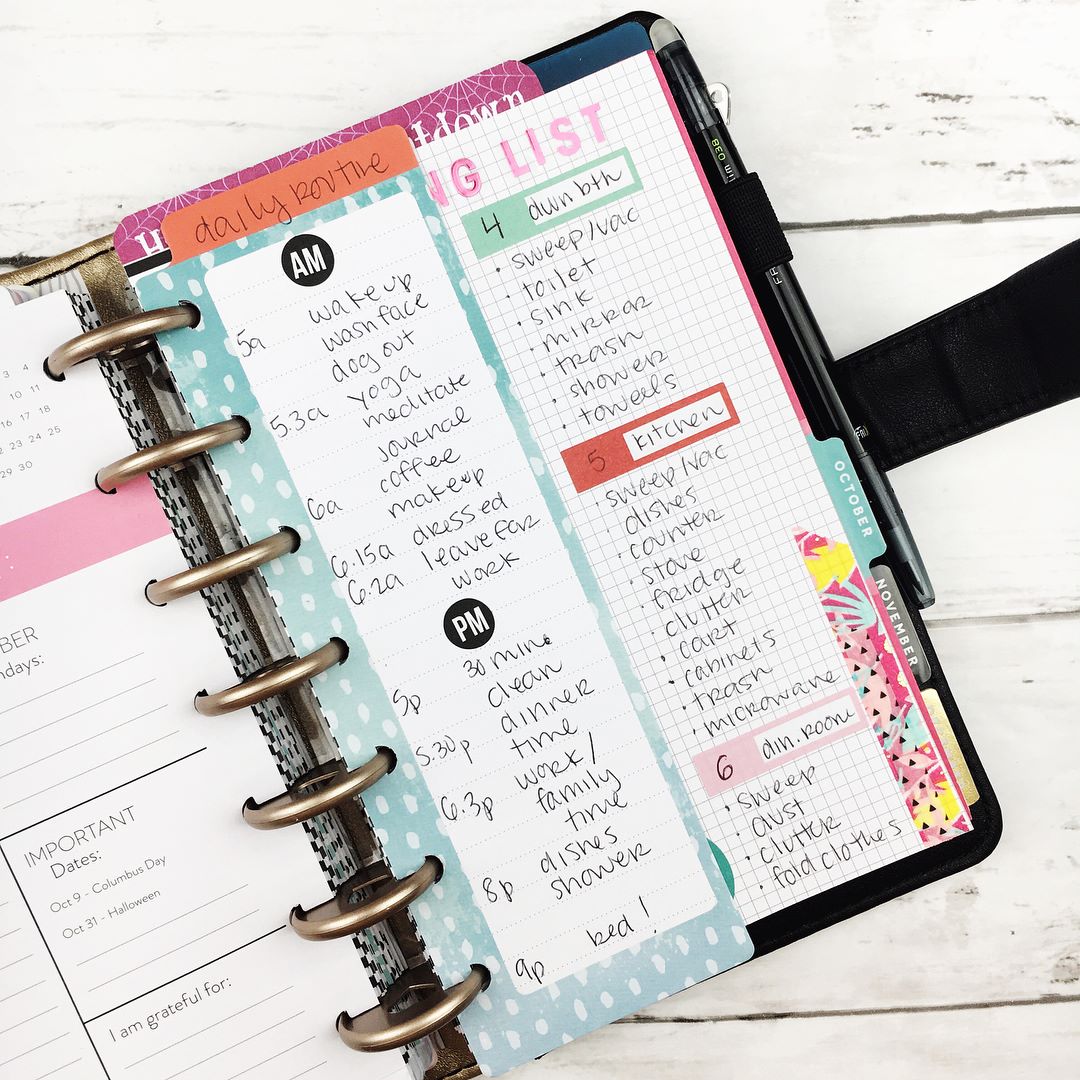
One of the best things about all the Happy Planner Sticker books is that they come with a ton of functional stickers.  The Productivity book (both for the classic & the mini size) is one of my favorites.  I also got these letter stickers from a Student sticker book.  By organizing out our ideal routines onto a planner page we're more likely to be able to conquer the task!  For my cleaning routine I've broken my house up into multiple areas.  I focus on one area a day, then do my morning & evening routines to keep the house in order.  A huge goal this year is to get back to my routine!  As I type this our living room is a wreck!

Fun Icons & To Do Lists

In smaller planners, quick reference icons can help us to see where tasks are assigned quickly.  I like to throw in an icon on check lists or in the daily box so I know when something like the trash needs to go out or when I need to get my yoga on.  Putting to do lists over a few days also keeps me on track with when tasks should be completed.  I usually have beginning of the week tasks and then weekend tasks.  I get to overwhelmed if I assign something to a certain day!

Stamped Habit Trackers

If you're down for a cleaner look - like the simple monthly layout - the planner stamps are a way to keep it sleek but still get creative. There are a ton of planner stamps out there to get creative with.  There's a set from Fun Stampers Journey that includes a set of banners.  When I didn't know what to do with them I used them as a habit tracker!  The best thing about stamps is that you'll never run out of an icon you use.  Stamp it every week for years to come.  I don't know if they are more economical because I find myself still buying them!  (Here's how I try to save money on them!)

Get Inspired

One of my favorite ways to decorate my planner is with the Sticker Cluster.  Most of the time I use this to create inspirational clusters in the lower right had part of my Mini Happy Planner spreads.  These guys inspire me to keep reaching for my goals through the week!  Sometimes pure decoration serves a functional purpose!

Anyway you use your planner - pen only or stickers galore - as long as it's working in the way you need it, the way you are using it is valid.  Some people use planners for tasks lists, some people use them for memory keeping, some people use them for project management, some people use them so their kid actually gets to dance class on Tuesdays.  You do you boo boo!

Wanna find more planner posts?  Check out all the planner related posts on the blog by clicking here.  Want even more planner stuff?  Join the Printable of the Month Club over on my Patreon page $3 a month gets you access to an ever growing library of planner printables.  Planner inserts, journaling cards, die cuts, stickers!  Go ahead and join here.  Can't wait to have you.

xoxo, Moe

5.01.2018

three ways to meal plan in your planner

Meal planning is something I've been doing recently to make sure that I'm not only on budget but that I am eating well.  I can't tell you how many times I've just poured myself a bowl of cereal because it was convenient and I was lazy.  So meal planning (and my instant pot) have helped me to be accountable in two areas of my goals this year - budgeting better & eating better!

I don't like to make my planning process overly complicated with extra planners and the like just for meal planning.  I also don't write out breakfast or lunch in my planner because I usually eat the same thing everyday.  Breakfast is spinach, eggs, and a little bit of cheese and lunch is usually leftovers or a chicken sandwich with snap peas.....see, easy peasy.  Meal planning is also a task that is done every two weeks to coincide with each pay period.  I also make sure to buy ingredients that will last the two weeks and plan meals according to freshness.  That way I don't  have a head of cauliflower rotting in the crisper drawer that I forgot about!


Housing everything in one planner is the way I go and there are a couple of ways I've used stickers & inserts to track them.  I just added these ombre weekly stickers to the Five Sixteenths Etsy shop so I thought I'd highlight three awesome ways to meal plan simply in your planner:

Weekly Ombre Sticker

This is one of my favorite stickers.  I used to use it to track my daily tarot pulls (I need to get back into that!) but they make the perfect meal planning stickers.  These stickers are compact enough not to take up too much room on your weekly spread and totally functional.  I also use the frixion pens in my planner just in case something changes.....because usually it does!

Week on One Page Insert


My Mini Happy Planner is the perfect size for all the things!  It also fits personal size inserts rather nicely.  So most weeks I will put a week on one page personal size insert right into the weekly spread.  These in the shop have a week on one side and then a weekly habit list and to do list on the back so you're getting double duty on the productivity!  Since I get my groceries delivered through Shipt, I don't really need a grocery list in my planner.  I add everything to my Shipt cart as I'm meal planning then check out.  The groceries show up at my door and everyone is happy!

Stamp (or Write) it Out

Planner stamps are another great option to add meals into your planner.  If you get in the mood one day just stamp all your pages with a 'dinner' or other menu planning stamp and you won't have to worry about matching stickers!  These two stamps are from The Happy Planner stamp set called Meal Planning.  I found them on Blitsy so be sure to sign up here to save some money on planning supplies!!  I love that stamps create simplicity in your planner and can make it look like the page was pre-printed with your own custom sections.

So there you have it!  Three easy ways to meal plan right in your planner.  I am actually waiting on groceries to be delivered as I type this.  Shipt is so dang convenient.  I really do not like going to the grocery store....it just is not fun and I've got a ton of things that I'd rather be doing.

How do you keep it simple in your planner?  Any meal planning tips?

xoxo, Moe

7.04.2016

Make it Monday // DIY Stamped Habit Tracker

This has been a few planner DIY posts in a row - but currently I'm on vacation and this is the only back up I have!! I've been loving being creative with my stamps!  And if you haven't seen the new Studio G stamps in the dollar section of Michael's you need to get there super quick and snatch em up!  This is a great way to use stamps in your planner with out having to pull them out each week to plan.  I love the idea of a mass stamping session then using them all up.

Supplies// Studio G stamps (or these from Studio l2e work great too), Avery 8167 (or equivalent) labels, paper trimmer, alcohol markers, planner stencil (learn to make one here), assorted other stamps, acrylic block, stamp ink
Use the paper trimmer to cut the labels apart and trim to 1.5 inches.  As the labels are they are a bit too big (comparison above) to fit in your Erin Condren planner.  These may be the perfect size for other planners so if you chose not to cut them that is ok as well.  These labels have a few black lines at the edge of the page.  If you line those up and trim that section off it is easier to trim each column to 1.5 inches.
Next color the column with your alcohol markers.  These markers are great because they create one solid color across the column instead of showing a darker overlap where you may overlap the color.  These markers actually came from TJ Maxx so there were more affordable.


The Studio G stamps have a set of letters for the days of the week that are perfect for this DIY. Align the stamps on the acrylic block, ink it up, and stamp at the bottom of each sticker.  Continue for all columns.
Use the planner stencil (or another rectangle stamp) to add the box to write your habit in...or use another stamp from your collection to create your own habits.  I love my Marion Smith stamps for a social media tracker (unfortunately I don't think these are available any more).

Now you can have the look of stamps with out having to pull them out every week!

Have a happy 4th everyone!

5.23.2018

5 Supplies you (Kinda) Need to Start Memory Planning

Have you jumped on the memory planning trend?  If you have, you've probably seen there are a zillion ways to do so!  Just like with everything in the planner community there are a ton of people that want to tell you the right and the wrong way to use your planner.  Well I'm here to tell you the only right way is to actually use it!  Memory planning can help us keep our memories close with out being intimidated by scrap booking.
this post contains affiliate links, please read my full disclosure here.
Tons of people memory plan in personal size planners, in A5 size planners, in Mini Happy Planners, in Classic or Big size Happy Planners.  Some people use Erin Condren planners, some people use recollections planners, and some people even use Traveler's Notebooks.  I equate how you plan to how you take your coffee - it doesn't matter because it's personal to you!

However, I do identify that there is something I call planner anxiety.  We feel pressured or intimidated because we're maybe over stimulated with ideas.  We don't want to touch the pages because we don't want to mess up this beautiful book!  I have faced this and I feel that it is a valid fear or struggle to have.  As creative people we're often subject to judgement and we don't want to hear the criticism...even when it is just from ourselves. 

Well I'm here to tell you the only five supplies you need to get started and give you some examples of things you may want to include in your little memory keeping kit.  

Planner

There are a few planners designed for memory planning but let me give you a tip - any planner can be used for memory planning!  In previous years I've used a vertical Erin Condren planner but this year I'm attempting to use a Classic Size Happy Planner that is horizontal.  I tried using the Happy Memory Keeping Planner but since that is 8.5 x 11, I found it to be way too big for me.  There's even now a horizontal Carpe Diem spiral bound planner that I thought of using this year, so any planner can be used as a memory planner....if you try hard enough!
It is really going to depend on you & your preferences for the size, I can't tell you how to live your life!  But I can show you the differences in sizes & how different A5 planners look.  Check out the video below to see the best planner to use for an uncoiled Erin Condren planner.

Printer/Photos

You'll need some memories to put in your memory planner.  Most likely you'll be putting pictures on the pages (or in some pocket pages) as you go.  I've compared the ways I print photos in this post, but here's a little rundown - you can either print the photos yourself or have them printed for you.

Print at Home Options
Obviously you can use your home printer and print on photo paper using either your computer or an app like Print to Size for iPhone.  Or you can get a smaller, more portable one like the Polaroid Zip, HP Sprocket, or LG Pocket Printer.  A sort of mid-size photo printer is the Cannon Selphy.  This one happens to by my favorite as it prints the best quality photos and is quasi portable.  Recently though I've been using my Zip as it is a lot more portable than my Selphy! 
Print & Ship Options
I'm sure you've used something like the Walgreens 1 hour photo to print your images for you so you can scrapbook or Memory Plan.  But I don't really like going out to get them, you know?  So I use a free app (yes, it is free) to print my photos and have them delivered to my doorstep.  It is called Free Prints.  You get 85 4x6 prints each month delivered to your door just for the cost of shipping!  So if you like to do some memory keeping all in one go you can totally order a batch from the previous month, no printing or running around involved.

Stickers/Decor

There are several sticker sets out there designed specifically for memory keeping.  The Happy Planner has a line of stickers just for memory planning but you can also use any stickers, washi tape, and decor that you'd like to use.  Journaling cards can even be a nice touch to your planner pages.  Washi tape & stamps can also make a really cool memory spread.
I like to mix it up between stickers designed for the Classic & Big sized happy planners.  Since sometimes I use my memory planner as more of a journal and I like smaller sized pictures, I'll opt to use the Classic sized books.  If I'm doing a more photo-centric spread, I may use the Big sized or Memory Planning stickers.

You're also not limited to a certain sticker book or style if you're using different sized inserts - if you're using an A5 planner it might be fun to use oversized stickers.  This process is for you!

Pens

I think the best type of pens to use for memory planning are those that have a felt tip.  I personally like the U Brands pens because of how find the tip is & because they are much easier for me to hold.  I am one of those people that believes her handwriting is affected by a certain pen!  Another popular brand of felt tipped pens is the PaperMate Flair pen.  Then there's the Le Pen felt tip pens.  All of these guys come in a ton of different colors so they are perfect if you like to color code or just get more creative in your planner.
You may also want to consider something like the Tombow brush tipped pens if you're attempting to learn to hand letter.  Though there are a ton of videos on YouTube on how to do faux hand lettering too!

Pocket Pages

Another thing that's been introduced to the world of planing for many different planners are pocket pages!  If you're going to be adding in photos that aren't on the actual planner page, these pocket scrapbooking pages are the best.  The Happy Planner has them sized for the Mini, the Classic, and the Big/Memory Planner.  This is great because you don't have to worry about punching a plastic pocket page!  The way these are sold, however, means you'll get multiple page layouts in each pack so if you fall in love with one style you'll have to buy a full pack just to get that specific one.  So a coupon is always nice!
Webster's Pages has come out with pocket pages for the A5 & Personal size.  The best part is they aren't just for their specific planners!  These pocket pages will fit any standard 6 ring binder!  You can also buy them in different design packs - so if you like let's say Design C you can buy just a pack of Design C pocket pages.

If you're using something like an uncoiled & hole punched Erin Condren planner the standard 6x8 pocket pages will work great!  They come with 2 holes already so you'll just need to punch 4 more and they will line up with your 6 ring A5 binder.  I have a whole video here on finding the best A5 planner for an uncoiled Erin Condren Life Planner!

Of course there's a whole ton more you can add that you'll find helpful but hopefully this inspires you to get started!  You can find some printable stickers here on the blog to get you started.  (Be sure to tag me on Instagram when you use them!)

Memory planning opens up a whole new world of getting creative.  I love that planning can mean so much to different people and I love that we all get to express ourselves the way we feel most inspired to do so.

If you want to check out some more posts on memory planning you can find all my posts on memory planning here.

How do you memory keep?  What inspires you to get creative?

xoxo, Moe

9.05.2017

Trend Tuesday // Best Planner Bags for Any Budget

I have grown through my fair share of planner bags.  I started out with a tiny one and now I am at like a weekender size!  Though I tend to tone it down when I'm going to a planner meet up.......sometimes.  Planning should be something that is personal to you.  Some people use a ton of stickers and really like to collect things.  Some people only use a few colored pens and washi.  Some people use planner stamps each week.  Some people have multiple planners that they use all the time.  All of this is correct. 
this post contains affiliate links, please read my full disclosure here
Side note: don't let anyone shame you for what you do or do not have.  You do you.  Whatever makes you happy is the planner route you should take.

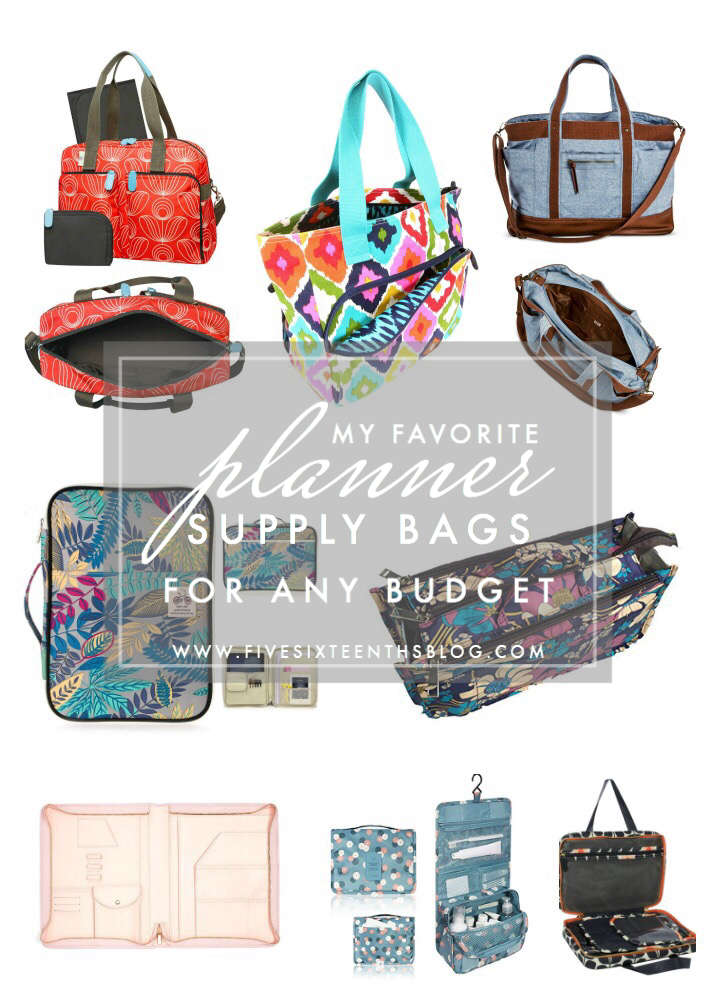
Since I've grown through so many bags I thought I'd do a round up of all the types of bags I've used (and a few that I haven't) that make perfect planner bags .... for any budget!  Of course there are bags out there marketed as planner bags but the patterns & prints are limited.

The Folio


This little guy can hold a spiral planner (like an Erin Condren planner) and a few slim supplies.  If you've got a few sticker sheets, pens, and washi samples, this packs up nicely & is practical.  Carry other important document with you and slide it easily into another bag.  It's not too bulky & depending on the brand you can get different patterns & pockets.

The Purse Organizer


This is the most affordable one of these guys.  Sometimes you can find them in stores but most are under $10 on Amazon.  If you find one with handles you can use that to tote around what you need.  This is the first bag that I used and it held a lot!  I didn't have a lot back then so if you're minimal, just starting out, or need something small for just the every day essentials this is best way to go.  Not only is it affordable but you can totally find colorways and styles that match what you're looking for.  If you have a bag that you'r using as a planner bag already you can even sew you own organizer with this tutorial!

The Toiletries Bag


I love these guys for organizing planner supplies for a trip.  Since they are designed to hang over the back of the door, they are really slim but with a ton of storage.  These guys have quite a few dividers so you can organize smaller bits better.  You can stash this in another bag which gives a way to divide things up if you're using one bag for everything.  Nothing will fall to the bottom & get lost.

The Make up Bag


There are quite a few different make up bags that will work as planner bags but my favorite are the weekender style bags.  Often they have one large zipper around the bag that opens the bag into two halves.  Sometimes there's a little middle flap with extra brush storage that works great for storing pens!  These are larger, have dividing pockets, and look like small tote bags.  I like these because you can use smaller bags to divide & store your growing supply stash!  In the deeper bags you can even use that purse organizer for more pockets!

The Weekender/Yoga/Diaper Bag


This is where we get into the big momma of the planner bags.  This is when you've gone head first into the sticker books, subscription boxes, journals, & memory planners......and you need to take it all with you.  These are the bags I take on trips, to planner meet ups, and around the house when I need to plan.  They hold almost everything and make planning a breeze!  Use your other smaller bags to organize inside of these & use their built in pockets, too.  I love my French Bull Yoga Bag from Target.  I also have a bigger weekender style back that I've used as a planner stuffed carry on before.  (Fun fact : the strap broke in the airport!)  But I have been eyeing the Orla Keily Diaper Bags from Target for a while.  This is where the planner bag can get expensive.  Depending on the brand of bag you can spend $20 - $100+.  It's all up to what you're looking for in a bag.  


I love bright and fun planner bags because I can incorporate patterns that may not go with my everyday outfits.  Make up bags & the like tend to come in these amazing prints, colors, and patterns....it is hard for me to turn them down.  Every time I'm out I stroll through the make up bag aisle to see if I need a new one!

I've got two planner bag videos on my channel - this one is my original planner bag video using a deep, hanging toiletries bag & this one is the updated tour that's got a lot of different sections using some smaller bags to organize.  Let me know what you think!

Like I said, your stash is your stash.  What is important to you for planning is valid!  So if you need a bigger or a smaller bag...great.  As long as you're enjoying what you're doing!  Get creative any way you know how!

What is your current planner bag?  Have you grown through a few of them?

xoxo, Moe

6.09.2017

Free Sticker Friday // Floral Geometric Washi Tape

One thing I've really tried to get behind in the planner community is the bullet journal.  There is so much inspiration over on Instagram but I just can't seem to settle on the perfect layout.  I know the whole point is to be flexible....but I just can't do flexibility when it comes to planning.  When there are too many options I get overwhelmed!  I've tried a layout in a grid journal, in a lined journal, and now one these dot grid half letter size inserts.  I like the way this monthly layout looks.....but I don't know if I'll keep up with it.  Seems too much to layout all at once.  But maybe if I go ahead and do a month at a time I won't feel so overwhelmed.
this post contains affiliate links, please see my full disclosure here.
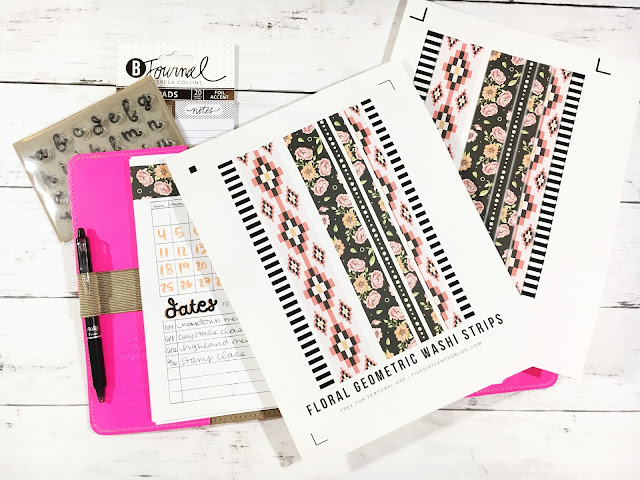
I found some clearance bullet journal supplies from Teresa Collins at my local Joanne so I thought I'd play around with a spread for the month.  It's a perfect way to use my planner stamps!  The script letter stamps were from Joanne's too - they have a new 'dollar bin' style area where things are $1-$4.  These stamps were $1.99 & I used the coupon I had on them!  I always think it's so funny to use a coupon on something that is super cheap to start with.  But hey, gotta save where you can!  (OH! And Joanne's is on Ebates - sign up here to save even more moolah when shopping online!)

The point of today's post though is free, printable washi tape!! I love floral washi tape.  One of the best things about floral washi tape is how beautifully it can be paired with geometric prints.  In this printable set you get varying widths of washi strips at a length of 8 inches wide.  It should fit various places in various planners - but you can see it comes just shy of the height of a half letter size page.

 DOWNLOAD FLORAL GEOMETRCI WASHI TAPE HERE

Included in the download is a PDF to cut by hand (though this tool is pretty awesome), a PNG to cut with your Cricut Explore (be sure to size to 8 inches wide in Design Space) and a .Studio file to cut with your Silhouette Portrait or Cameo.  Remember that all files shared on the blog are for personal use only.  Do not claim any part of the design - printed or digital - as your own.  Do not sell the work - printed or digital - at all.  Do not print and distribute in mass quantities.  If you've like to share or Pin this freebie, please link to or Pin the post and not the file.  As always, thank you for playing nice. 
The best part about washi strips is that you don't have to buy a whole dang roll!  Just print when you need it and use it how you like.  I like to use these like I would regular washi - tear it off and use it to hold in pieces of paper.

I hope you're having a great week - can you believe that we're already in June? Like...where has the time gone???  Happy Summer everyone!

Shop Related Products on Amazon!

ps. If you're looking for even more free stickers, check back every Friday - or click here.  And if you haven't joined the Cricut Ready Stickers Facebook group...what the heck are you waiting for?!?!

Have you tried the bullet journal trend?  How to you bullet journal?

xoxo, Moe