8.29.2014

August 2014 Favorites

It's that time again - monthly favorites!  I don't think I'm going to be bringing back up my YouTube channel consistently anytime soon so I still want to keep on with monthly favorites here on the blog.  There was a lot I fell in love with this month:

My favorite cosmetics this month were all over the place!  I'm really digging the new Lorac Pro 2 palette and I just saw on Instagram that there is supposed to be a Mega Palette release in I think November. From what I saw it looks like the size of both of the Pro palettes together - like 4 rows of shadows!  I've still been digging the Wet n Wild Cover All concealer (review here) for highlighting.  I've used up most of the shade fair and even picked up a back up from Kmart.  The new Revlon blush in Naughty Nude has been a go to this month because of its neutral shade.  It's just the right amount of flush.  For eyes the new for Fall 2014 Wet n Wild 5 pan palette (soon to be reviewed!) in Smoke and Melrose has been a go to.  I love the rose gold shades.  For contouring I've been using this L'Oreal True Match Powder in a deeper shade along with a large, flat paddle brush to chisel out my cheekbones.  I haven't been contouring everyday, but when I do I find it really defines my face and the darker face powder is matte so there's worry of any sort of glitter/shimmer because that's not supposed to be in face powders!  (Though...if you look closely at the Maybelline Fit Me Powder there's glitter in there!)  When I need to blend out my contour I use this pink brush from this collection I bought on Amazon about a year ago.  Let me tell you, these brushes have held up wonderfully!

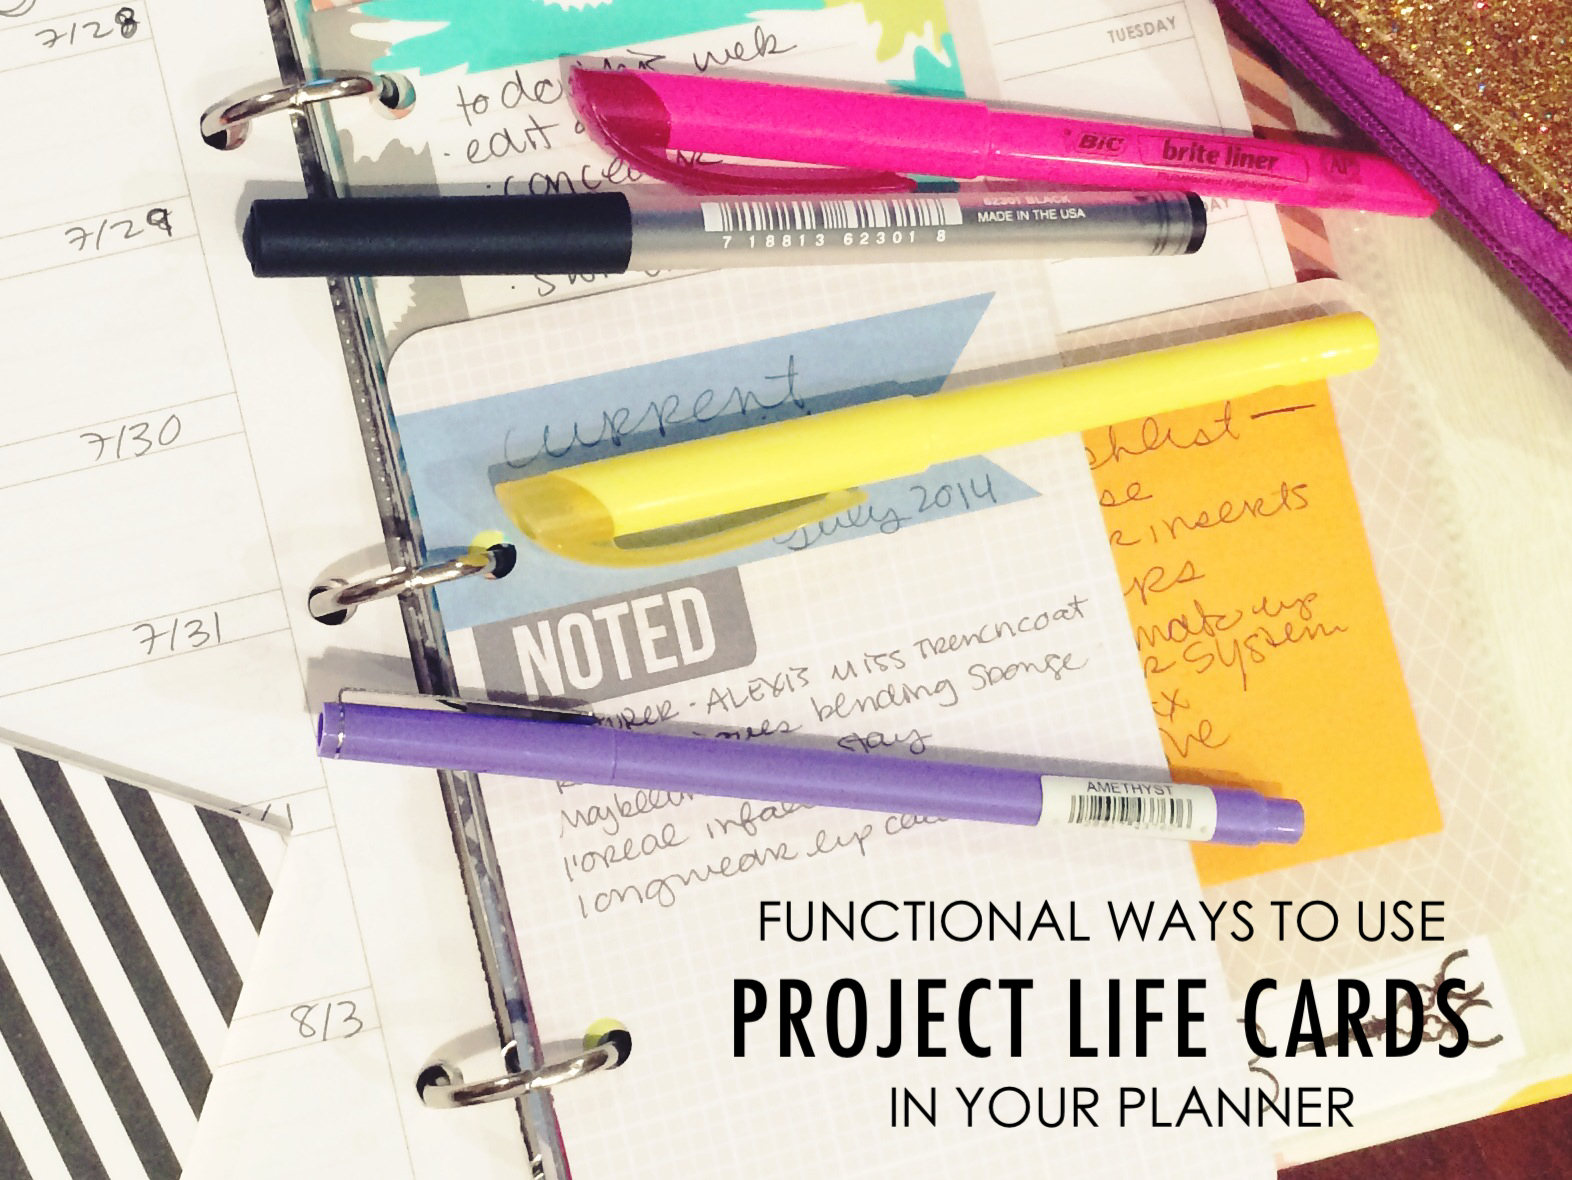
I've also gotten into Project Life and have been loving some scrapbooking supplies.  Mainly the tape runner...how did I ever adhere things with out one?  Seriously! The one in the photo is a permanent bond but I have - and lost - a repositionable one.  I'm also really digging these Precision Pens for both journaling in my albums and planning in my new Raspberry Saffiano Filofax.  I would include that in this round up but I haven't really used it yet.  I'm waiting to bust into it for September.  But in this round up I did include some purple washi tape....I've really been back in love with my favorite color this month.  Give me purple everything!  Another thing I want more of (is it weird to own 2 PL core kits of the same type?) is the Project Life Sunshine Edition Core kit!  Gah, I just love the colors and patterns!  And it goes perfect with the Project Life Midnight Edition Core Kit that I grabbed up on clearance.  Black and white with pops of color is my life right now.  I also want the 12x12 papers, dividers, and digital downloads that go with the Sunshine Edition.  Next up on my wish list is the Seafoam Edition which seems to bee on sale on Amazon right now!

Some other random faves are everyday necessities.  I've currently got 3 cases of La Croix in my kitchen and am loving the Grapefruit flavor.  Sparkling water is something I've liked for a long time but this summer is the first time I tried La Croix.  I can't seem to find the peach flavor which a lot of people have recommended though.  My Sweet Mint EOS lip balm has been at my side at my desk all week too.  Another first for the Summer!  Finally who doesn't love gold paper clips?  I think they look great in my purple planner!

Favorite blogs this month all revolve around Project Life & design - Caylee Grey, In a Creative Bubble, Big City Quiet, & Papered Hearts.

Hope your August was fun and here's to a fun September!  

xoxo, Moe

8.28.2014

App Review // Write365

Welcome to the second installment of the App Review series here on the blog!  This week is going to be a review of an app called Write365 created by a wonderful & inspiring blogger - Kam from Campfire Chic.  Campfire Chic is a blog I go to when I want productivity inspiration.  Kam works 9-5 in an office yet has time to be the most awesome person I've never met.  And while doodling around on her blog that apparently I've forgotten about, I found that she released an app - this app, Write 365.  So, of course I downloaded it.  And today I want to share with you how simplistically awesome it is.
What it is
A simple, distraction free tool to help writers overcome writer's block.  Open the app, click Get Inspired to find your next blog topic or creative writing challenge.  Write356 was built with bloggers, scrapbookers, and jounalers in mind.  Option to email the topic to yourself for later creative writing.
taken from the app store description here.
What it does
It is a distraction free, simple app that gives you a prompt when you request it.  This app is a no frills way to get inspired.  The by thumbing through hundreds of writing prompts.  If you find a good one, don't let it pass! Email it to yourself to start on later.

How it helps you
If you're a blogger, scrapbooker, or jounaler who just needs a little push, this simple app can nudge you in the right direction.  If your someone just starting out in journalling and find it hard to find fun prompts easily - this is the app for you.  I have always wanted to create fun journaling projects but rarely find the inspiration.  The no-nonsense interface gives you a prompt and lets you roll with it.

If you've lost your groove and need it back, Write365 is so simple to push you back on track.

If you want more productivity ideas, you should totally check out Kam's blog here.  Download the Write365 app here.

Found any other journaling prompts?  Let me know!

xoxo, Moe

8.26.2014

Trend Tuesday // Black & White Love

For the longest time now I've been digging the simplicity of Black & White.  I'm loving it in my planner and the little pops of color added by neons and other colors just really make it awesome for me.  So here is a wonderful little collection of black & white for your Tuesday enjoyment:
view the set on Polyvore here

Isn't this little collection just the best?  I think the best thing about black & white is that the pattern stands out from the contrast.  I love that you can really be inspired by the forms and the patterns with out all the color in the way.  When I was in school I always thought it was weird when I'd hear a professor say something like start your design in black & white.  I always felt like I couldn't figure what I wanted if I started in black & white - but now I kinda like it.

xoxo, Moe

8.25.2014

Make it Monday // Make & Use your Own Overlays in PicMonkey

A few weeks ago I posted a tutorial on making your own journalling cards for scrapbooking, etc using PicMonkey.  If you remember, in that tutorial I showed you how to make a transparent version of your design & to save it as a .png file.  If you don't remember - heres the run down:
From the design tab on the home page of PicMonkey select your canvas size.  I chose a 4x6 canvas since I was just going to use it for smaller photos.  If you want to use it for bigger, full size photos go for a bigger canvas.  Then under the Basic Edits tab set your canvas color to transparent (you could also set the canvas color to transparent after you've made your design, but we're gonna do it first here).  This is an important part - your canvas color must be set to transparent.
Next, add your design.  I used the font Eight Fifteen that I'd downloaded to create this fun handwritten feel.  Add text or other overlays.  Adjust the color to your liking.  I find that white or faded gray designs work best for overlaying photos.
Now save your photo as a .png file.  This is important too!  The checkerboard background won't show up so don't worry but it needs to be a .png.

Once you're .png photo is saved to your computer, go back to PicMonkey & open up a new photo.  I chose a photo of a bridge from back home that I'd edited in the Camera+ app way, way long ago!
I cropped it down to be 4x6 for my Project Life album but you can use whatever size you need.  This is where it becomes more important for the size of the .png file to be bigger if you're going to use it over a bigger photo.  For this example the two sizes worked out alright.  Now we are going to add the overlay.
Click on the Overlays tab (it's the one with the butterfly!) and at the top select Your Own.  From the drop down box select My Computer and find where you saved your .png file.  Open it.
There's your custom overlay!  Adjust it to the size you need.  Like I said before, for this small project the smaller sizes are ok.  The reason the overlay is smaller than the photo is because they don't have the same pixels.  But thats fine for this smaller project here, especially for an album like Project Life or for even putting onto your blog.
I've adjusted it to where I want it to be and you can see this overlay gives a nice vintage type texture to the photo.

You can create overlays with type or your own designs.  You can also use this technique to create a watermark - but there's a whole separate tutorial on the blog here if you're interested.

And thats how you can create fun overlays for your photos for your blog or your memory keeping!  Hope you found this helpful!

xoxo, Moe

8.22.2014

Free Journaling cards for September

Hooray!  It's September - one of my two favorite months.  Spoiler alert: October is my other favorite month.  Since I've been loving to include Project Life journaling cards in my planner recently - both ones with sayings or quotes and ones with space to write or use as note jotters.  I thought about how fun it would be to create my own journaling cards for my planner now that I know what I'm looking for and what better way than to do it by month!
This  month is back-to-school themed and I actually used this tutorial I posted a bit ago to make journaling cards using PicMonkey.  All of these have free clip art from the site a long with my own downloaded fonts.  Some of the clip art is from the Royale feature so if you're inclined to try your hand at it be sure to use this link to get a free day of the Royale options.

These cards are great for scrapbooks like Project Life, for any journaling or list making your do, and for sprucing up your planner.  The free file includes four of each 3x4 cards and 4x6 cards.  You can trim & round the corners if you like or keep them square.  I plan on hole punching a few to spruce up my planner for the month of September - even though I'm not going back to school!
This theme really inspired me because of the lined clip art option in PicMonkey.  Knowing that I love those types of quick jotters I was sure to include one in this set.  Here's a bonus though: click this link to go to another file with only the lined jotters!  4 per page!

These journaling cards are free for personal use - please feel free to send the link to your friends and create to your hearts content but do not claim these as you own.  Do not sell or reproduce them commercially.

Download full collection here | Download just the jotters here
**Links should work now!!!**

Hope you enjoy!

xoxo, Moe

8.21.2014

Boost Your Blog // 3 Blogging App Reviews

About a month ago I posted about blogging from your iPad and touched on 3 apps that I've been using to try to have the best experience with mobile blogging. These three apps are Blogsy, BlogGo, & the Blogger app. Below I'm going to outline the pros & cons of each of these apps, how I like the, how easy they are to use & what is important to me when using these apps.
blogging-apps-for-ipad
This is the most comprehensive app for blogging. You have access to a lot (and I mean a lot of things) when using this app. In fact, I'm blogging from this app right now! First off this app works with a lot of platforms - since I'm only concerned with Blogger, I'm glad it works with Blogger. You can set up your accounts and from the side of the screen you are able to access a web browser, your photos, flickr, picasa, instagram, facebook, youtube, and vimeo. You can post to multiple blogs on multiple platforms and save drafts to your account - meaning the mobile app pushes the post to the web.  You can save it to your account for later editing on the web or you can save a local draft to Blogsy as well.

You can set the font, alignment, page breaks, bullets all with in the text editor of the app. You are also able to fully edit the html of the post. If you swipe with three fingers (or click the at the bottom right hand corner) you have full access to the html of the post. Adding links is easy with the in app browser. Something that was important to me was adding affiliate links. So far the in app browser works pretty well with my Amazon affiliate account but not so well with my ShopSense account. Pulling in images & videos is easy with access to your own camera roll, instagram, and flickr accounts. I'm not sure why you would need access to facebook - I've never needed to pull something from Facebook into my blog before! But access to photos that are in different places is super convenient. You can also adjust the size of your images by double tapping the image you've dragged in to se the size.

I could keep going on because this app is so comprehensive and complex that it will probably fit a lot of the needs you have for full control of your blog posts. You can add tags, schedule posts, post between different platforms, it even saves drafts automatically for you which is really helpful- this is all the stuff I've just recently found out from this app and I know there is more to discover.

Some cons about this app - not only is it the priciest on this list but sometimes it doesn't post to your blog & gives you errors. I've found that if I've left the app for a while and maybe it needs an update it can cause some weird errors that aren't in their error help log. Usually I just uninstall & reinstall the app because even after the update it sometimes causes me problems. Additionally for the Blogger platform you can not preview posts. So usually when you want to check out how a post looks on your blog from your Blogger account on your desktop/laptop you would preview it. Unfortunately that isn't an option in Blogsy.  I've also got some wierdness with my photos recently but I'm attributing that to user error rather than a problem in the app.

This app is $4.99 and even with the bugs sometimes I think it's one of the best out there and for five bucks I'd give it a shot!  Download it here.

This app was created by Dana of the Wonder Forest blog & I have to say this is a pretty interesting one. Unlike Blogsy, BlogGo is also available for your iPhone so if you think you might be using your iPhone to blog as well the $1.99 price tag makes it even more appealing. BlogGo is also a lot cuter than Blogsy and is easier to use (which is due to the fewer features). But the colors and layout of the app really appeals to the pretty lover in me!

This app offers a lot of control but not as much control as Blogsy. You can post to multiple blogs you have on the same blogger account though & I would assume if you are an author of a shared blog (which I know you can do on Blogger) that would show up too under your account.

The ease of adding links and photos is reminiscent of the Blogger online platform. The buttons to add links & photos are at the top of the draft post body just like in Blogger. You can add photos by either choosing the camera or by adding from your camera roll. Much like the Blogger online platform you can choose the size of your photos between small, medium, large, extra large, & original size. To center photos once they are added tap next to them and select the proper alignment. Aligning text & formatting text is easy as well because the buttons are located at the top of the draft post body as well.

Another pretty cool feature of BlogGo is that you can see & respond to comments from the app. It will bring you to your blog which you can directly reply to comments. This is a great option since I am horrible at replying to comments. Also, you can add your blog feeds through Feedly and keep up with your reads in one comprehensive app. The ease of use and all-in-one nature of this app reminds me of the features of Blogger.  You can also use this on your iPhone or iPad - unlike Blogsy

Some cons - BlogGo only works with the Blogger platform so you're out of luck if you don't blog through Blogger. Another thing that is inconvenient with this app is that you are unable to schedule posts. You must save the draft to publish manually later and the drafts don't save automatically. This is inconvienet as well because I zone out to something else in background and the iPad will go to sleep which wouldn't be a problem except BlogGo also bugs out when you go from the app to another app, close & reopen it, or allow your iPad to go to sleep. You also can't push the draft to your account like you can with Blogsy meaning that you can only edit your post in the BlogGo app.

At $1.99 this app offers more control an can fit into your blogging routine if you plan on using your phone to blog.  iPhone download here & iPad download here.

Blogger App
The app created by Blogger has come a long way from this first post I did on the app but it still offers you little control over your blog post.  The best thing about this app is that it is specifically designed for Blogger so you know it's not going to mess anything up.  You can now add photos where every you'd like them to be in the post.  Before, the photos only showed up only at the bottom of the post.  Now, in settings, you can control the image size & set a default.  For example, I like my photos to be a the X-Large setting when I add them in Blogger.....setting this as default means I'm not posting an image that doesn't match with the other images on my blog.

There is the option to change the font style from regular to bold & italic so if you're creating a separate section in a post there is the option to define that section with your font style.  You can also take photos through the app in case you're blogging as something is happening (??) which may be nice if you're blogging then want to capture how cute your dog looks but that image doesn't save to your cameral roll for use later.

You can easily switch to different blogs you may have on the blogger platform.  You can also view your published blog from with in the app, however you can not preview it.

Some cons - Blogger, obviously, only works with Blogger.  I'm using Blogger as my blog platform so that's great but it's not an option for other platforms.  Unlike Blogsy you can't push drafts to the web app for editing later but the web app pushes to the mobile app.  There is also no option for scheduling a post and you must save it to publish manually, much like BlogGo.  There also is there an option to preview which BlogGo has but Blogsy does not.  Unlike BlogGo, there is not comment moderation or feed option with in the app.

Download Blogger here.

These three apps have been fun to play with and offer various things for on the go or everyday blogging.  Each offer different things - different strokes for different folks.  I think all of these are great in their own ways & playing around with them may offer another tool in your blogging arsenal.

What are some of your fave apps for blogging?  Share them, I always need more!

xoxo, Moe

8.20.2014

Wednesday Decor // 3 Home Projects I Hope to Try

Back in February I posted my Home Organization plan for 2014 - well I kind stayed on top of it!  Yay for the word focus for this year, right?  Since I've been on an organizing kick lately I decided to add a few more things to the list of home stuff I want to complete this year.  Maybe this is part two of the organization plan...who knows!

Fridge Mat / Organization
From what I read from this post on I Heart Organizing, these are actual Fridge Coaster brand fridge coasters....redundant much?  But I've also seen using placemats as fridge coasters & since I found 12 bright yellow chevron placemats at Meijer for $0.50 each, I think I'm going to use those!  How fun would it be to have a gussied up fridge?  Weird but awesome right?

Laundry Room Baskets / Organization
Just like this little laundry area, our laundry closet has wire shelving and is just a plain mess.  Hopefully in the next renovation my laundry room dreams come true.  What, you don't have laundry room dreams?  I've been searching everywhere for wire baskets that weren't $16 a pop and finally found $5 baskets from Dollar General.  They were bright colors so I got some Rustoleum Metallic spray paint & had at it.  I can't wait to get the laundry closet all organized.

Bill / Finance / Etc Command Station
If there's one thing that is the biggest annoyance in my life - it's how I have the bills organized.  Pretty much when mail comes in the door I stand between our two desks and divide it up.  I get my stuff & Zach gets his stuff and bills.  So that means it gets misplaced or covered up and I forget when they are due.  The image above is from this post & that blog is where I got inspiration for my bills tracker in my planner.  The one provided in the post was 8.5x11 and I needed 8.5x5.5 for my half sized planner.  But I really want to get a central place for bills and our past bills because those are upstairs when bills are paid downstairs!

So here's to another 4 months of organizing!

What do you want to accomplish in your home during the rest of the year?

xoxo, Moe

I've been playing around with the app Wtrite365 from an awesome blogger Kam of Campfire Chic.  One of the prompts was 'DIY projects to try'.  So I skimmed my Pins to see exactly what I could do to stay on track with my Home Organization Plan this year.

8.18.2014

Make it Monday // Five Back to Campus DIY Projects

I am 3 years out of undergrad.  I haven't been back to school in 3 years.  But that doesn't mean I can't get in on the back to school spirit.  Is it weird that a 26 year old loves back to school time?  I hope not!  I loved getting back into my campus during college & finding new ways to decorate my dorm or my apartment.  Since things changed every year I could really switch it up often.  Man I miss those days!

Here are 5 ways to spruce up your dorm life & campus wear for the 2014-2015 school year:
Add a pencil case to your small, three ring binder or planner using this tutorial.  You'll need a plastic pencil case, sewing machine, and hole punch.  
Make a simple, 10 minute abstract painting with this tutorial.  You'll need paint, these squeegees or an old credit card, and a hair dryer.
Knit two simple hats to spice up your campus wardrobe with this tutorial - no circular needles required!  You'll need large needles, chunky yarn, scissors, and a little bit of time.
Revamp a thrift store tray with paint & stencils using this tutorial.  A great way to spruce up your dorm or college apartment.  You'll need a thrifted tray, these Handemade Charlotte stencils, paint, and brushes.  
Create a key catch all with this tutorial to add to your decorated tray.  You need a small wooden bowl from the thrift store, chalkboard paint, sand paper, and a brush.

Just for fun, here is 2012's Back to School DIY round up.  Why didn't I do one in 2013???

Happy back to school time!

xoxo, Moe

8.14.2014

App Review // Afterlight Photo App

I may or may not have my groove back y'all and I'm going to take it where I have it!  Another feature I want to add to the blog here are app reviews - and this review is the perfect follow up for the Instagram post from yesterday!  Trying new apps is a fun thing to do and finding new apps is one of my favorite past times.  I find that sometimes I'll find app after app after app and other times I'm stuck in an app rut.  So I thought I'd rekindle my love for some of the apps I've downloaded in the past but have forgotten about.  Our iPhones are the new junk drawer, don't you think?  I found a video saved in an app from like 2012, no lie.  So it's time to go back through and sort things out.
Today I wanted to review for you an app called Afterlight and I totally forgot it was on my iPhone until I was looking for new photo editing apps. 

What it is
A quick & straightforward photo editing app.  Offers a simple design with powerful tools to give you the look you want in seconds.  Costs $0.99 has 15 adjustment tools, 59 filters, 66 textures, 128 frames, and a new double exposure feature.  (Some in app purchases required.)  Download it here.
taken from iTunes app store description here.

What it does
Edits your photos beautifully!  With wonderful editing options you can change the contrast, brightness, and exposure quickly & easily.  It give beautiful dream like photos in seconds.  Throw on one of the beautiful filters & adjust it's strength for those perfectly whimsical photos you love to see.

In app purchases give you access to many filters & the filters offer a sliding scale to intensify or reduce the filter over your image.  If you're into the beautiful photoshop filters you can find all around these days but don't have photoshop or don't want to spend the money, this app is a great tool
You can also add light leaks and frames.  There's even an option for silhouettes & a new double exposure option.  You can create stunning & gorgeous artistic images in this app....it is small but powerful.  The image below was featured on the Afterlight Instagram page & shared by @beckybird - so all credit goes there!  And if you follow Afterlight on Instagram you can see some amazing photos & learn some tricks about using the app which can come in handy when trying to use the effects on your own.
How it helps you
If you're the average IGer or blogger who wants to achieve those dreamy photos you see but can't afford the photoshop or photoshop actions to do so - this app is for you.  With very little investment you can get super creative.  If nothing more it is the best app for control over slight adjustments like brightness & contrast and offers you more adjustment options than other apps.
I use this as a blogger & IGer to create bright, beautiful photos with just an air of dreaminess to enhance my blog posts.  This app doesn't let you go over board with over processing your photos but lets you have complete control over tiny adjustments.

I definitely believe this is a must have app on your iPhone if your a blogger or IGer wanting to amp up your photos and have complete control over slight edits.  With very little investment you can get the effects of having a sophisticated photo editing set up.  Download it here.

What are some of your favorite photo editing apps?

xoxo, Moe

8.13.2014

Four Ways to Gain Followers & Likes on Instagram

Everyone likes to be liked right?  We all want that gratification of the little heart that shows up when someone has liked your Instagram photo while you were not looking.  A little self promotion here - follow me on Instagram if you're not already here.
Now, you don't really need the approval of others to use Instagram.  I struggle between the notion of documenting real life and making my life seem perfect.  I feel like that is the duality of Instagram - you're only taking the best, most composed photos but then you take that random picture of your dog sleeping.  At least that is what I do.  But if you're thinking you want to grow your Instagram base for your blog or business here are some tips to gain likes and follows:

Focus on photography - If you want to have a perfect feed for your blog or business consider setting some limits on what you post.  Will you post that dark, grainy image of your dog being a fool?  Or will you only post perfectly curated photos that reflect your blog/business?  Thats up to you but if you want to appeal to others focus on the principles of photography to take well lit, well composed photos.  Here are some posts to help you learn more about photographing with your phone - 5 Pictures to Improve Blog Photography,  iPhoneography Tips + Tricks,  Phone Photos Become Blog Worthy

Participate in Photo-a-Day Challenges - Currently I'm doing a Planner Photo-a-Day challenge (search the hashtag #PCAPE to find it) that is helping me get back into my planner & being creative with it.  By participating in a photo challenge you're guaranteeing that others will participate as well.  This gives you a base of people to gain likes from.  If you tag your photo with the appropriate challenge hashtag you'll have eyes pouring over your photos in no time.  Participate in the challenge to meet people & follow others but you'll gain likes too.

Pay if Forward - If you want to have people like your photos you'll need to like some.  I know when someone likes one of my photos I go over to their page and flip through their feed.  If I find one I like....I like it.  To me, it lets them know I appreciate their like.  Also, sometimes I just flip through different hashtags.  When I like a photo sometimes that IGer comes to my page & likes something in my feed.  Sometimes we'll follow each other.  I try not to follow a zillion people on Instagram so I understand trying to tone down your own feed - but likes will equal likes.

Hashtag the Hashtag - Hashtags can get annoying, I know.  But a tip I read on a blog a long time ago (and I can't remember which one now) was to comment on your own picture with all the hashtags you want to include after you post it with your caption.  Then you can go back later and clean up your feed by deleting your comment.  That way all the relevant hashtags show up on IG when others may search for it, but if you're posting to Twitter or Facebook the hashtags won't show up in your original post.  Just keeps your social media cleaner - unless you want all those hashtags.

So there are just a few tips to get those likes going on Instagram.  Instagram has to be my first choice social media platform.  I can't remember the last tweet I posted that wasn't from inside Instagram.  

What are your tips for gaining followers & likes?

xoxo, Moe  

8.12.2014

Trend Tuesday // Nude Awakening

So it's August wish means it's nearly September, which means it's nearly fall. I know - I don't want to wish Summer away but with the cooler weather here lately I've been dying to drink Toffee Nut Lattes, wear camels & nudes, cuddle up in scarves & sweaters, and watch the leaves fall. Last year I decided that September was my favorite month and I really can't wait to feel the cool weather. However, I know oh so well that by the end of October we will have already had snow. October is also my favorite by the way.....I think those are my two favorite months of the year. Sheesh, I do love fall.....

Nude Awakening

I've been craving the beautiful nudes that come along with the cooler weather, but more specifically the ivory nudes. This whole round up post was inspired by the Filofax Original Organizer in Patent Nude. It is right at the center of this lovely little collage and isn't it the most gorgeous thing you've ever seen? I sure think so. Right now I'm debating on getting a filofax and currently the one I want is sold out on the Filofax website. So I guess that's good for the wallet right?
Other nude things I've been loving are nude cosemetics. The Sonia Kashuk Hidden Agenda Palette is great for concealing, the Sonia Kashuk 12 pan eyeshadows are also pretty awesome. And finally - if there is a nude nail polish & I see it, I will probably lust after it.
Coffee has been making my life run right now. Currently I'm enjoying the Starbucks Iced Coffee in a huge jug from Meijer. Pour that over ice in a to-go cup and I'm awake until 1pm. I've also been adding a bit of hazel nut creamer because it reminds me of fall & Toffee Nut Lattes. Which, by the way, if you know how to make an at home, DIY version please share. I need it in my life!
So there you have it, I'm wishing Summer away and I know I will regret it soon.
xoxo, Moe

8.11.2014

Make it Monday // Create Journalling Cards with PicMonkey

Last Friday I mentioned my love of using Project Life cards for practical yet pretty uses in my planner.  Today I want to share with you how to make your own journalling cards for use in your scrapbooks, mini albums, or planners using the free photo editing site, PicMonkey.  I'm not going to be using some Royale features here in this post so if you can totally do this for free....but if you want a free day to access more of the awesome features through Royale, click this link <- that's the only link to the free Royale feature in this post.....so click there if you want the free day!
Let's get started:

First, head to PicMonkey & select your canvas.  I started with the 4x6 option since thats the size of the largest Project Life style cards.  These cards I'm going to show you are very, very simple...mainly because I'm loving black & white right now.  But please, make your cards fit your layout with colors, overlays, text, etc.
Now let's add some text.  I used some quotes from my Quotes board on Pinterest.  The best thing about PicMonkey is a new feature where you can use fonts already on your computer!  You can download a whole slew of free fonts all over the interwebs so this feature is awesome - especially because PicMonkey gives you amazing freedom to design!
Simply add the text, arrange & save.  I loved using the thin, bold font Bebas Neue for the quotes.  A fun font to pair with Bebas is Halo Handletter.  The bold lines and curvy swirls are really nice!

You can also create a texture with your text if you use a really scripty font, like in the example below.
In this design, I used the font Eight Fifteen to create a fun texture.  I stretched it out and copied my text of the best things in life aren't things to create a beautiful texture.  For this one, play around a bit....you might be here for a while finding the best layout.
If you start out with 4x6 cards you can crop the design down to the 3x4 (or 6x4 to 4x3).  To get the design to be horizontal rather than vertical, select the rotate option.  
Creating fun things for holidays is super easy as well!  I chose to create some halloween options because I'm wishing Summer away & can't wait for Fall right now!  But you can make Spring, Christmas, Back to School, etc themed cards.  When I was looking at Project Life style cards, I found that the themed cards - for certain holidays, seasons, etc - came in packs that had a lot of cards.  What if you only want to do one layout with them?  Or you're not using them for scrapbooking but for a mini album or your planner?  That's a lot of leftover cards.  If you're like me, you think well I'll use them next year but you know you'll be wanting to do something else or not into it at all.  So this is a way not to have a zillion cards in your stash!

Just as a little side note - if you make any cards you just looooove why don't you go ahead and make the canvas color transparent and save it as a .png file.  Select transparent canvas under the canvas color tab.  You can add your design before or after you make the canvas transparent.
Make sure you save it as a .png file because there will be another DIY using these little cards or images on your photos when editing them on your phone very shortly......

Now onto printing.
Now you can print your cards various ways - the easiest for the sake of this video was using Picasa .  Simple select your images using the control button (command on a mac) to only select the images you want to print with your mouse.  Hold down the control (or command) key while selecting each of your images.  If you use Shift+select option you will select every photo....including things you might not want to print.  Then from the bottom of the screen select the print icon.  On the next screen select 4x6 and two will print to a page.
To add guidelines for cutting, click the Border & Text Options button.  Ever. So. Slightly. Move the little guide under Border Width to the right.  Select a light gray color for the border, and uncheck even with border.  Now you have a light border around your card to make it easier to cut out.

Printing the 3x4 cards are bit tricky but still pretty easy.
The easiest I found to make two 3x4 cards fit on a page is to select the two 3x4 cards, create a collage, and then print two 4x6 to a page with the border.  Then you can just slice down the middle - either eye ball it (if you're that good) or make that your first cut by measuring to the middle & slicing.

The best way to cut these guys out is with a paper slicer & a fresh (or pretty fresh) blade.  The guides make it very easy.
I used a corner rounder on some of the cards but found out afterwards that the roundness of my corner rounder didn't match the roundness of my collection of cards.  If you're using these in Project Life layouts....you might need to find a smaller rounder to match the other cards.  But for my planner, the round corners were fine.

Other ideas.....
Use this post to create color palette for your cards/planner/mini album/scrap book.  Create a few and then decide which palette you're feeling.  You can also use the palette to go shopping for cards/paper to match your idea.

Use this post to create fun backgrounds to use on the background of your cards by uploading the image to PicMonkey, cropping it, and adding your text or overlays.

Use this post as inspiration to create a cover page for your planner or mini album with descriptive words all about yourself.

Hope this post was helpful and that you got some ideas for journalling cards!  If you are loving black & white or really want ones I've made you can click the links below & download the cards:

Happy With a Calm Life
4x6 | 3x4

If Your Dreams Don't Scare You
4x6 | 3x4

The Best Things in Life
4x6 | 3x4

Halloween Faces Light
4x6 

Halloween Faces Dark

xoxo, Moe

8.08.2014

Three Functional Ways to Use Project Life Cards in your Planner

Since I've gotten back in to my planner I've been wanting functional, yet pretty ways to divide & use my planner so I stay inspired to use it. Not only does this house my editorial calendar - which is what I was planing on only using it for - but it also houses some life plans & inspiration. I wanted this place to be a place where I can dump all my inspiration & thoughts and then draw from later. I want to keep it functional yet pretty.
While at the craft store the other day I found some Project Life & other Project Life style cards on major clearance so I picked some up. I was surprised at the amount of cards that come in these packs & I'm totally stocked up for life. I found the Midnight Collection on clearance and am so excited because it's pretty much all black & white which means I can rely on colorful accents to create an inspiring place. Don't tell Zach but I'm really into black & white right now.....I used to complain about black & white sooooo much! But I find that these cards - both the B&W and the colorful ones I picked up, washi tape, sticky notes, etc add the color I crave and the organization I need.
Dividers - The bigger, 4x6 style cards are great to use as dividers! If you punch them on the longest side you can create a top divider & if you punch it on the shorter side you can create a side divider. Then the bigger space offers a place to put relevant sticky notes or goals for that section. I think these are better to divide a bigger section into smaller, more manageable sections. I also use them to flip to the current day.
Note Jotters - The smaller size cards are great to grab & write a small note on. If something is important - like an appointment or date or phone number - I keep a stack of pre-punched small cards in a pencil case for easy access. Since they are smaller, storing them clipped into my planner I find bulks up the planner and makes it uneven. But these small, decorative scraps are perfect to fill out and then toss when you're done with the task.
Running Lists - I currently keep a Project Life card on the current week in my planner with my cleaning schedule on it. The card itself is broken into a Sunday - Saturday schedule perfect for a cleaning list. I do this because I realize when I don't clean during the week I am unhappy on the weekends. Project Life cards offer a lot of prompts in addition to plain cards so these are great for keeping running reminders or lists that need to be carried over from week to week.

Another thing I want to accomplish with my planner is to use the stationery I love to hoard. My problem is that I buy stationery too pretty to use - and that's not what it's for! Getting some of these PL cards on clearance means I don't feel too bad about ripping them out when I'm done.

How do you use your favorite craft supplies to stay organized? Any other tips for Project Life Cards?

xoxo, Moe