Showing posts sorted by relevance for query cricut. Sort by date Show all posts

5.22.2017

Make it Monday // 8 Planner DIY's for the Cricut Explore Beginner

One of my favorite creative tools is my Cricut Explore.  I bought this guy a few years ago, and let me tell you - best investment ever!  If you oohh and ahhh over tons of lovely planner stuff but you really want to save some dough and make it yourself - invest in a digital die cutting machine.  For planner DIY's my machine of choice is the Cricut Explore.  While I do also own a Silhouette (read about my unboxing experience here) I prefer me Cricut Explore because it is a work horse.
this post contains affiliate links, please read my full disclosure here.
You can cut though tons of materials & even add custom depths, the software and interface are easy to use, plus the machine itself is a lot quieter.  And the newer Explore machines cut even faster!  The best part is no only does this guy cut through laminated scrapbook paper like butter but you can also print then cut planner stickers as well- that delicate kiss cut is key.  If you're down to learn some designing tips & trick, check out my whole YouTube playlist here.

Today's post is a round up of eight DIY's for someone who's just opened their Cricut Explore.  In a few tutorial you'll learn how to use certain Design Space features like weld, slice, and flatten.  If you're just into cutting things out, some tutorials provide the cut files for you.  Simply upload, size, & cut!  Here's the round up:

Create Planner Stickers

Using only simple shapes and Cricut Design Space, learn how to create an easy image to Print then Cut using the Cricut Explore.  Learn how to use the flatten feature and assemble your own unique images using basic shapes.  Plus here's a post on some tips & tricks for the print then cut feature.  Find the DIY here.

Planner Pocket

Do you have a planner that just doesn't have enough pockets?  (ahem - Filofax original) Make an extra pocket with this SVG cut file for your Cricut Explore.  Fits perfectly in Personal size planners - or punch it to fit any size planner!  Find the DIY here.

Washi Bobbin Storage

If you have enough washi to fill a bath tub you may find it hard to take all your favorites with you on the go.  If you don't have a Happy Planner and can't utilize the DIY above why not check out this DIY on making your own little washi bobbins.  Learn to use the weld & slice feature in Cricut Design Space.  Find the DIY here.

Printable Planner Paper Clips

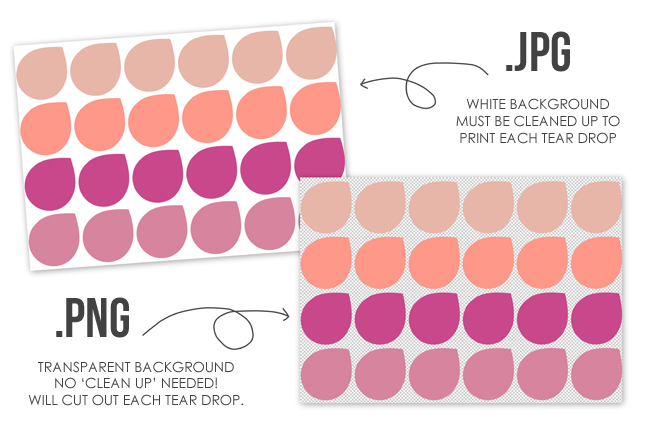
In this tutorial you'll find a video on how to clean up an image for Print then Cut.  This is a super simple way to make planner clips - still one of my favorite ways!  Find the DIY here.

Sushi Bookmarks

Get ready for some summer sushi dates with this easy DIY.  You'll learn how to use the Print then Cut feature with laminated paper.  Make three different magnetic bookmarks to use through out your planner.  Keep them for yourself or make a set to gift to a friend!  Find the DIY here.

Unicorn Paper Clip

Speaking of clips - how about a beautiful unicorn paper clip!  Using card stock and glitter scrapbook paper you can whip up something magical in no time. Find the DIY here.

Happy Planner Clip in Tabs

Need to add something you your Happy Planner but don't want to punch the object itself?  With this SVG file you can cut out custom tabs from scrapbook paper, add adhesive, and snap in some precious memories.  Find the DIY here.

Happy Planner Bookmarks

Speaking of the Happy Planner if you need some day or week markers as well as some on the go washi storage - check this DIY out.  Create 3 clip in book marks to help you mark your place!  Find the DIY here.

I hope you've found a simple project to work on this week - I mean, 8 brand new things for your planner all in one week seems like a good deal!  Be sure to check back often to find new Cricut Explore DIY's.  If you want to find all Cricut Explore related posts on the blog, click here.  If you'd like to find a bunch of free printable stickers ready to be cut with your Cricut Explore, click here.  Don't forget to subscribe to my YouTube channel for more Cricut Explore tips & tricks as well.

ps.  Don't forget to join my Cricut Ready Stickers Facebook group too!  Request a join here & find even more free printables as well as tips & tricks from a learning community.

What is your favorite thing to make using your Cricut Explore?  How have you become creative using that tool?

xoxo, Moe

If you like the content you see here on the blog, please consider becoming a patron!  Joining the Patreon Family as a financial contributor means you get access to exclusive content only for you!

11.14.2015

5 Reasons I Love my Cricut Explore

The holidays are coming up and I've never felt more crafty!  I have the ultimate tool sitting right under my desk and it's pretty versatile - the Cricut Explore.  You have seen my posts on using the Cricut's Print then Cut feature to create planner stickers (here, here & here) but there are thousands (upon thousands) of other projects you can do with it.  My current favorite is the easy of use to design my own tabs/divider styles through design space!  Cutting them out from my favorite scrapbook paper with the machine is much easier than doing it by hand.
this post contains affiliate links, please see my full disclosure here.
image used from Circut.com

If you need some more reasons to pick up the Cricut Explore (or the Cricut Explore Air) besides the fact that they are on sale right now keep on reading:

Easy to use
Above all the Cricut Explore and the Cricut Design Space are both easy to use.  You can pick up on how to use and design with Design Space extremely easily.  If you've even used another one of my favorite tools PicMonkey, you'll be able to catch on super quick.  The features are easy to use, you have access to all your downloaded fonts, you're able to change colors quickly, and you can use your own clipart to design.  Creating your own shapes - like planner dividers - is super easy with the weld button.  

Apps + Bluetooth
If you have the Cricut Explore you can purchase a bluetooth adapter to communicate with either your computer or your iPad.  How cool is that?  If you're using this post to convince you that you should buy this thing, if you pick up the Explore Air you get the bluetooth feature included!  Download the app for your iPhone or iPad and design on the go.  You know, after you've eaten all your Thanksgiving turkey you can curl up on the couch and design some Christmas presents before you slip in to a post-feast coma.

Like a Million Cartridges
If you're familiar with the word clip art let me introduce you to the cartridge.  The clip art used in design space corresponds with the cartridges offered by the company.  Think of the cartridge as clipart.  Now that we've got that out of the way - there like a bagillion cartridges.  Each set has corresponding elements to create cohesive designs.  There are even some cartridges with corresponding fonts.  Create to your hearts content.

Smart Set Dial
Not only is there a dial on the side of the machine to take the guess work out of blade depth, but under the custom settings there are so much more!  You can even manage your custom materials to set names for common depths you use for your own materials.  Not to mention you can cut things like leather and balsa wood and then easily set the dial to delicately kiss cut vinyl.

Cut, Write, and Score
Not only is this machine like a one stop cutting shop - but it also writes and scores!  The Cricut Explore (and the Cricut Explore Air) have two different heads - one for the blade and one that you can interchange with either a writing tool or a score tool.  All in one awesomeness!  Write, cut, score, fold, bam you're DONE!

If you're down for a new crafty gadget to add to your creative arsenal, I've got some great news!  Currently the Cricut Explore Air and various Cricut Explore Air Bundles/Starter Kits are on sale through the Cricut website!  Hooray!!!!  Or you could alway suggest the sale price to Santa, I'm sure he'd hear you loud an clear. 

You can also get FREE shipping on your orders using the code FREESHIPNOV (I'm not sure how long the code is good for...so go use it!)

Is there one crafty gadget you are excited about?  Do you have any crafty gadgets on your Christmas lists?

xoxo, Moe

6.04.2015

Tips for Cricut Explore Print then Cut // Making Stickers

After much debate and the fact that Menards, of all places, had a pretty neat deal going on, I finally purchased a Cricut Explore.  That's right, I now own an electronic die cutting machine.  I've been wanting one for a while to experiment with making stickers....buying a machine like this for just one purpose was crazy, I know.  But, I have come to see that it has so much more potential - that I need to explore.
this post contains affiliate links, please read my full disclosure here

(side note: word of the year here! Explore.  Oh my goodness!)

But today I wanted to offer up to you some tips I've learned for designing for the Print then Cut specifically for making planner stickers....because you know I'm obsessed.  In fact you can find a whole bunch of FREE stickers designed right for the Cricut Explore by clicking here I couldn't find any info with tips for the Cricut Explore, it seems this is a Silhouette dominated world! So I hope this post is helpful.

Design a .PNG 'sticker sheet' in another program first

This is something I didn't do at first but Design Space kept crashing on me.  Design Space is an online design platform that uses flash.  So if you're familiar with using PicMonkey to design things you may have run into Flash or ShockWave crashes due to the way you're trying to push the program.  When I tried to use one little icon and populate the mat by selecting how many projects I was doing, ShockWave would crash.  Each. And. Every. Time.  So, instead of trying to create a 'sticker sheet' in the Cricut program I'd turn to a third party program to create my sheet.  (come to find out it was due to Chrome's Shock Wave and an independent Shock Wave plug-in, thats fixed now...but I do run into crazy problems more often than not.....) 

What I mean by sticker sheet is creating a .png image with a transparent background about 4x6 or 5x7 size filled with my icons.  This way the online design program doesn't have to work too hard to populate your stickers in the printable area.  Uploading this single, larger, image is easier for the mat part of the program to process.  The 5x7 size is the perfect size to fit on your mat as the Cricut can only cut an 8.5x11 piece of paper.

Why a .png?  Because the background is transparent you don't have to go through the step of removing the areas you want to cut.  A transparent background usually shows up as white and grey checkerboard in your design program.  It should automatically see the background is transparent and then make the cut lines around your icons.  I also put a slightly bigger white border behind my icons in the same shape because I don't quite think I have the calibration of my machine down.  You can use a design program or photo editing program like Photoshop Elements (what I used for the image above), InkScape, or PicMonkey to create your sticker sheetsIf you want to learn to design your own sticker sheets, check out my complete tutorial series here on YouTube. 

PicMonkey Photo editing made of win

Or Design in Design Space

After working with design space for a while I find it super easy to use.  The only downside is that you do have to be online to use the Circut Design Space but I found I could use the images/clipart/cartridges (??) like I use the overlays in PicMonkey.  I change all the images to print, instead of cut then design with them like they are clipart.  I found that using the attach option attaches any layers you may be using together so you can move them around your canvas.  In order to design a sticker sheet, I use the flatten button to create one grouped image after I've created a bunch of attached images.  This lets you populate the canvas with the sticker sheet you've designed in Design Space instead of having Design Space organize the images you made on the mat for print then cut.

Honestly, if you can get Design Space to work and you have a reliable connection the online editor does fine - much like working in PicMonkey.  However, your limited in making images to share.  You can publicly share the link to a saved project but if you ever stop using your Cricut or delete your account you may run into problems.  I like to have my freebies stay around long after I've forgotten about them (wink).  It's easier to host a PNG file and link to that.

Print then cut in the dark (or as close to it)

I bought a little rolling TV stand to hold some of my creative little things - like my printer, my laminator, and my Cinch.  The whole stand rolls in and out from under my desk and while the idea was to create extra space for myself by rolling the cart out from under my desk and then putting it away under the desk when I was done.  I am slowly having less and less space!  But my idea sort of failed because the Cricut really needs to be in the darkest space possible to get the light to read the registration marks.  I was having so many problems with the cut feature because the machine couldn't or wouldn't read the registration marks!  But putting it in the dark has helped and I rarely have problems now.  I recommend a shelf under your desk or somewhere that doesn't get direct light.  I find that even under my desk I have to turn off the ceiling light and just use the lights directly above my desk.  There is very little light leak now.

Cut using the  Washi Tape - 0.06m setting (if you don't have Cricut Sticker paper)

One of the biggest frustrations for me was cutting through my label and sticker paper that I got at Office Max.  I. Was. So. Pissed!  The Cricut Sticker paper setting is way too deep...it cut right into the mat!  But then I realized the custom settings are so varied that you can totally find the thickness that you need...with some experimentation.  I've used Avery Sticker paper and on the Office Max brand full sheet adhesive labels and that Washi Tape setting works wonderfully.  My current favorite sticker paper is this one from Amazon!!   The Cricut Sticker Paper setting is way too deep for label paper.  I bought some sticker paper and it is thick like scrapbook paper, for me that's too thick for stickers!

Find Your Printer's Ultimate Best, Most Best, Highest DPI, Most Bestest Print Setting, Ever

For the longest time I thought I was printing at the highest quality by selecting photo paper but I  still had prints that looked like they were printed at the fast print setting!  Eventually by poking around I found another setting that uses Maximum DPI.  I suggest googling your printer and finding the maximum DPI or best print setting for your specific printer.  This has made me soooo much happier!  The printer I use is like 8 years old!  It got a Happy Planner disc stuck in it too and STILL works!  Here is a newer version.

60off Happy Planners

Bleed for Print then Cut

I have a love-hate relationship with this feature.  It doesn't work well with the PNGs you design - I think it's because it can accurately create the bleed because the image isn't a part of the Cricut database.  So when you print it...it does weird stuff.  It works better with images already a part of Cricut.  Also, sometimes on a white background Circut will add a bleed of the center color of the sticker.....it's weird.  I have not tips for this function besides that you will probably want to do your own tests to see what prints better and how.

I hope these little tips are helpful.  I wanted to share what I learned from my first few uses of my Cricut Explore!  Like I said earlier, I couldn't find much on how to use your Cricut Explore for planner peeps!  I am planing on doing a few screen cast videos for planning as well - how to use PicMonkey to create icons for stickers, creating notes pages, etc.  Hopefully I can get my shiz together to get this done!

If you'd like to join in on more tips, be sure to join the Cricut Ready Stickers group on Facebook here.  Check out the Cricut sticker templates in the shop and the other stickers designed to print & cut with your Cricut here.

What tips and tricks have you figured out with your die cutting machine?

xoxo, Moe

6.19.2017

Make it Monday // Mini Happy Planner Cover with Cricut Explore

Summer is nearly here!! Who's excited for the Summer solstice?  This girl is! I seriously can not wait to spend more mornings, days, & evenings on my porch.  Plus I can't wait for cool dips in the water & delicious summer time drinks.  (Lemonade is my favorite so you know I've got two of my favorite recipes here.)
DIY Mini Happy Planner Cover
this post contains affiliate links, please see my full disclosure here.

If you're a creative planner girl, I'm sure you love to style your planners for different seasons, holidays, and themes.  Styling my planner as my mood or as the seasons change is a relaxing an creative process for me.  Gathering up some of my die cuts, scrapbook paper, paper clips, and Project Life supplies and creating a cohesive vignette is a simple way to burn some creative energy!  Until now, I've only had the Mini Happy Planner covers that are already in existence.  But using InkScape and my Cricut Explore I've now got 3 summer themed planner covers - and I want to share them with you!

Shop Supplies on Amazon!


This is a print then cut project so you'll need to upload the cover of your choice to Cricut Design Space and size the height to 7.5 inches.  Select Go, and print the cover on to your chosen printer paper.  I use 32lb paper because it's a little bit sturdier but not as thick as cardstock.
Cricut Explore Mini Happy Planner Cover
Open the corresponding back file on your computer and print this image on the back of the cover page.  Be sure you're using the highest print quality for a vibrant print!  If you're unsure how to print back to front on your printer, you may want to do a google search for your specific printer.  For my printer, I place the printed page face up and the second image is printed on the reverse side.
Mini Happy Planner Cover DIY
Next, laminate the printed page similarly to this tutorial, lining up and cutting out notches so that the registration marks aren't covered by the lamination.  I've found that cutting far, far, far from the registration marks gives the most success!
Mini Happy Planner Cricut Explore Project
Place the laminated page onto the Cricut mat.  Set the dial to Poster Board + then cut the project following the prompts on your computer screen.  You may find that one pass under this setting is not enough, simply press the flashing Cricut button again after the first cut is completed.  This will run the mat through the cutting process again to ensure the cover is completely cut from the page.  I've found that 3 passes is just right.  You can create a custom material setting - but I'm lazy!
DIY Dashboard with Cricut Explore
The best part about having the corresponding back pattern is that the cover looks great from both angles!  And you can use it as a dashboard for sticky notes or just look at how professional your creation is!

DOWNLOAD MINI HAPPY PLANNER COVER FILES HERE


Remember, all files downloaded from the blog are for personal use only.  Do not distribute the files or the finished product.  Do not claim any part of this file as your own.  Do not print and disseminate in mass quantities.  If you'd like to share this project with others, please link to or Pin this post.  As always, thank you for playing nice.
DIY Mini Happy Planner Cvoer
Now pop your cover onto your Mini Happy Planner!  I love the variety of Deluxe Covers for the Mini Happy Planners (there is a HOLOGRAPHIC! one for the classic size, did you know?!?!?!?!) and have found that the personal size Disc Agenda Covers from Love Doki fit the Mini Happy Planner perfectly!  My favorite is the constellations one!
Mini Happy Planner Cover Printable
When you make this project please, please tag me in your photos on Instagram.  You can also join my Cricut Ready Stickers group on Facebook for printable stickers and project shares!

Do you change your planner accessories seasonally?  What do you use to style your planners?

xoxo, Moe

12.27.2016

Five Little Known (but helpful) Cricut Hacks

If you haven't been following a long on the YouTube channel you may have missed that I've started a group on Facebook exclusively for Cricut Explore users wanting to learn more, share more, and do more when it comes to making stickers for Cricut Explore!  Click here and request to be added - I'd love to have you!  In this group I am constantly inspired to share tips and figure out things I didn't really think of before.  So I thought I'd share with you 5 little known hacks for your Cricut Explore
this post contains affiliate links, please read my full disclosure here.

Custom Material Settings
Did you know that not only can you choose from a variety of settings from the custom menu on the Load Mat screen, you can actually add your own custom settings?  This is great if you work with a material that isn't listed on the drop down menu or you want to duplicate a setting but change the name.  I've found that the Washi Sheets setting is perfect for cutting stickers so I could copy the same settings but change the name to Sticker Paper as an example.  Or I could make a setting that cuts deeper than the settings available or adds the multi cut feature.  I have a post on adding Custom Material Settings here

Bluetooth Adapter + Dongle
When I switched from my MacBook to my Dell laptop I lost the ability to connect to my Cricut Explore through the Bluetooth adapter I'd purchased.  If you have a Cricut Explore Air or the new Cricut Explore Air 2 then you don't need the Bluetooth adapter sold.  If your computer doesn't have a Bluetooth option you can purchase something called a Bluetooth dongle (lol dongle) to plug into a USB port in your computer.  I love this because I have my Cricut Explore on the side of my desk on a rolling cart. (See my current office tour here.)  The cord is too awkward to plug into my computer and it's too short to leave it there always.  So a Bluetooth dongle is very, very helpful!

You Don't have to Unload the Mat to Cut again
Sometimes when cutting through thicker materials I find that the blade hasn't passed all the way through.  If I'm doing a one off project or don't want to add a new custom material, I'll just cut the project again.  Simply leave the mat in the machine and press the flashing Cricut button to recut the project.  This ensures that the mat is aligned in the same way so it won't create a funny cut around your project.  This helps me when I'm making dividers but my blade may be old.

Use other Software
You know that I love to use other software with the Cricut Explore and Design Space. I do this because I like to have a copy of the project that can be opened in a different software in case I ever get a different cutting machine.  If you design everything in Design Space you won't have your projects or files if you ever decide to change machines.  Inkscape is one of my favorite programs because it is an easy way to create SVG files but it is an great program to create PNG files for print then cut as well.  Another free software I love is Pixlr.  This software is online - visit pixlr.com and click on Pixlr Editor - and very easy to use.  It performs a lot like Photoshop, just a light version.

I hope these 5 hacks have helped you discover that there is more to the Cricut Explore than meets the eye.  This is one of the most flexible cutting machines and I love this for paper crafting and making stickers.  Do pop over to the group and hang out!  Plus you can find some free stickers there too!

xoxo, Moe

1.23.2017

Make it Monday // Your Handwriting as a Cricut Cut File

When I first purchased my Cricut Explore it came with a few projects to complete.  I immediately tossed those aside and worked on figuring out Print then Cut.  Since then, I've been super satisfied with this machine!  I figured it was high time to work with vinyl - one of the big reasons to pick up a Cricut Explore!  Have you seen all the amazing things people create with vinyl???
(this post contains affiliate links, please read my full disclosure here.)

Last week I showed you how to digitize your handwriting for use as an overlay over your photos.  Handwriting and hand lettering is all the rage now.  What if I told you that you can digitize your handwriting and use it as a cut file with your Cricut Explore?  What if I told you that you didn't need crazy software - just your phone?  Here's how to do it :

supplies // iron on vinyl, Cricut Explore die cutting machine & mat, digital image of your handwriting (follow this tutorial), small pouch (similar here), iron, weeding tool (optional, you can use something like a tooth pick instead)
Start off by following this tutorial to create a digital image of your handwriting.  Stop once you have an image where the text is black and the background is white.  Once you have the black and white image saved, email it to yourself - or use an app/service like DropBox or Google Drive - and then save it to your computer. Then move on to the steps below.

From a computer, navigate to Cricut Design Space and open a new canvas.  From the left hand menu choose Upload Image, click on Browse and locate where you've saved the black and white image, and select open.  Choose Complex Image, then click Continue.
From the clean up screen, use the magic eraser tool to clean up all white areas.  Zoom in if needed to clean up all white in between letters.  Use the Preview button at the bottom if needed.  Once the image is cleaned up, click continue.
On this final screen, choose Save as Cut Image.  It may take a moment for this all to load, so be patient!  This will turn the image into a cut file allowing you to cut the words from a material like vinyl.  Save the file & add the saved file to the new canvas.
Size the image on the canvas properly, then select Go.  Prepare the vinyl and the mat.  From the Go screen select Mirror for Iron on.  On the Cricut Explore machine set the dial to iron on.  Load the mat & cut the phrase.
The Cricut Explore is such a versatile machine.  I love that I don't have to do any guesswork when it comes to what depth to set the blade, etc.  The Smart Touch Dial is super easy to read and super easy to use.  At first I thought  the blade didn't cut through at all....but I was so happy to know it did!
Once the phrase is cut, remove the negative image of the phrase and then weed out any vinyl between the letters.  Next, iron on the vinyl according to the directions - I used the Cricut vinyl and the instructions were super easy to follow!  I was so impressed that I was able to do this!
The best part about this little pouch is that it will fit smaller planners.  It fit my personal size Filofax Originals, a small fauxdori, and my Medium Lilac Kikki.  But you can totally use this to tote around supplies (or even make one as a gift perfect for a make up bag!)

Find more Cricut Explore posts & projects here.

What would you make with vinyl?  What have you made with vinyl?

xoxo, Moe

7.29.2016

Free Planner Stickers // Cricut Ready Coffee Cups

Hello everyone!! I've been feeling a bit blah lately when it comes to blogging.  Part of it is because I've been busy in my life outside of blogging and YouTube (but you can always keep up with me on Instagram).  In fact, this coming Monday I have a root canal appointment.  Yikes!!! And to tell you the truth I'm a lot bit nervous!  I've only had one cavity filled before when I was younger....but somehow my tooth got angry at me.  I also think I'm developing another cavity.  I know that is so gross.....and I don't understand because I brush religiously and I even floss!! So I don't know what is going on....
this post contains affiliate links, please read my full disclosure here.

But that isn't what this post is about.  This post is about how I'm going to start making Cricut friendly planner stickers.  I love my Cricut Explore for paper crafting but it isn't my favorite for sticker making.  In Cricut Design Space you can't create an offset, the print area is very small (from a PC), and you can't control the bleed.  This has led me to use another program called Inkscape to design stickers to cut with my Cricut Explore and now I can use my machine to is max for planner accessories!  I've finally become a little bit more proficient in this program so I'm going to start offering some free printable stickers designed exclusively for the Cricut Explore.  These will be PNG files that require little clean up in Cricut Design Space.

DOWNLOAD COFFEE CUPS HERE


I've added a line of branding text that you can erase for easy cutting with your Cricut Explore, but remember that all of the printables here on the blog are for personal use only.  If you're down for a free download, click the link above.  If you have a Silhouette and would like to use these stickers you totally can - you'll just need to use the trace feature to add cut lines.  I have a video tutorial on using a PNG with you Silhouette software here - just follow the part after creating the image in Inkscape, and you'll be good.

**I've updated the download to have a PDF file included as well**

If you want some more Cricut Explore tips check out my channel playlist here and more posts on the blog here.

This is the first post of many, but if you're looking for more Cricut friendly stickers, click here.

Happy Friday!!

xoxo, Moe

5.16.2016

Make it Monday // DIY Washi Bobbins

Some planner girls are obsessed with washi.  Some planner girls aren't.  I fall in the first category and I think I may need a program to stop purchasing it.  I have about 3,000 rolls of washi (that is an exaggeration, probably) so I've reverted to buying washi samples because I can't tell you if I've ever used a full roll of washi.  I also think making washi samples to swap is really cool - it gets rid of your collection, while also adding to it.  So that is a win, win right?

this post contains affiliate links, please read my full disclosure here.

I'm not a huge fan of the white thread bobbins that a lot of the washi samples are sold on, they are just not that pretty to me.....but I will still buy them!  I was at a planner meet up last week where we talked about doing a washi swap and I thought about how I could make some thing for us to wrap our washi on that wasn't too plain...insert my Cricut Explore + some laminated scrapbook paper.  And the washi bobbin was born!

supplies // Cricut Explore die cutting machine, Cricut Design Space, Cricut Light Hold mat, 3 mil laminating pouches, laminator, scrapbook paper, binder rings, PNG below or create your own design.

Create the Bobbin Shape
To create this bobbin shape, I used nothing but the free shapes as a part of the Cricut Design space platform.  I didn't use any cartridges or any clip art, just simple squares and circles!  Add to the canvas one square and a few circles.  Create an oval buy unlocking the size in the edit pane on the right and flattening the circle.  Duplicate this circle.  Unlock the size of the square and drag the green arrows to create a rectangular shape. 
Move both of the ovals over to the rectangle.  Place an oval on the top and the bottom of the rectangle.   Play around with the visual ratio of each of the elements until it resembles a bobbin.  Click and drag the cursor over the three shapes to select them all.  Under the align tab, center the three shapes horizontally.  Then click the align tab again and select distribute vertically.  Right click and group these three shapes.
From three of the left over circles, create a decorative scallop shape with a larger circle and two smaller circles.  Click and drag the cursor over the three circles and use the same align tab to align these vertically (along the vertical axis) and distribute horizontally to create an evenly spaced design.   Right click the three selected shapes and group these together.  Move this to the top of the bobbin shape.  Select all shapes involved in with the bobbin and from the align tab select center horizontally.
From the pane on the right, select layers, then (with all shapes still selected) click weld.  This will create a single shape from the shapes used to create the bobbin on the canvas.  Now there is a whole new, unique shape on the canvas.  Once the shape is welded you will be unable to ungroup or resize each shape individually, so make sure you are satisfied with this shape before continuing.  If you are unsatisfied, simply click the undo arrow, resize, arrange, etc and weld again.
To create the hole in the top of the bobbin, move the final circle over to the top of the bobbin shape leaving a little bit around the top of the bobbin shape.  Click and drag the cursor over all shapes to select them all.  From the pane on the right, select slice.  Click only on the bobbin shape and move it away from the smaller circle.  You should see that you now have a hole in the top of the bobbin shape.  Delete all excess circles.
Resize this bobbin shape - I found that about 1.5 inches wide is a good size for storing washi on a little binder ring.

Cut out the bobbin shape
Trim the scrapbook paper if needed and run it through the laminator, in the laminating pouches, a few times to create a good seal.  This is how I make my dividers - a single piece of scrapbook paper laminated then cut with my Cricut (I have a DIY divider how to here).  A great thing about the Cricut Explore is the variety of materials it will cut through - even with out the deep cut blade!  The Cricut Explore has a fool proof way of allowing you to set the pressure with the click of a button or the turn of a dial - no removing the blade and adjusting the depth.  This is my favorite part of the Cricut Explore - I can easily see where the setting is on the machine and the Go screen shows the cut depth as well.  If I need something different, I simply turn the knob!
For this project, set the knob to Poster Board (if you find that your Cricut Explore isn't cutting through the material, you may need to create a custom setting - learn more about that in this post).  The Poster Board setting does a double cut to ensure that the bobbin shape is cut completely from the thick, laminated scrapbook paper.
From the preview screen select how many copies of the bobbin shape to be cut.  For this project set the material size to 8.5 x 11 inches - unless your laminating pouches were bigger - to be sure the Cricut Explore will cut the proper amount on the proper size page.  Click Go.
Place the laminated scrapbook paper on the light hold mat and load into your machine (be sure the machine is on and plugged into your computer or connected via Bluetooth), set the dial to Poster Board, and push the flashing Go button.
Once the bobbin shapes are all cut out, wrap your washi around the middle and store on a binder ring!  If you'd like to be precise about the length of washi on the bobbins, measure the middle of the bobbin to figure out how much washi one 'turn' of the bobbin would use.  So if the middle of the bobbin is 1 inch wide, 1 turn of the bobbin is 1 inch.  18 turns of the bobbin would give you 18 inches of washi.

If you do not want to create your own bobbin shape, I've created a PNG image here for you to upload and use.  Simply use the upload images feature in Cricut Design Space, upload the PNG, and save it as a cut file instead of print then cut file.  Size this PNG to 1.5 inches wide before you cut - this will give you a 1 inch space in the middle of the bobbin to make measuring easy.  Also, if you have Silhouette you can use the PNG in the same way.  I'm not sure on the blade depth or how damaging cutting laminated paper would be on the Silhouette blade.  
Remember, like with all freebies on my blog, this PNG is to be used for personal use only.  If you would like to use this type of thing in your business or product packaging - use the tips above to make a unique design (who likes copying things anyway?).  Please direct any friends to this blog post and pin only images from the blog post so that others can find the instructions.  Do not link directly to the PNG image in any social sharing.  Thank you for playing nice!

So, if you have some washi you'd like to giveaway  (I'm always for making a simple thing a little more jazzy) or you have a shop that sells lengths of washi - this will spice it up!  Great product packaging idea!  You can also check out other washi storage ideas here & here.  Check out all the Cricut Explore related DIY blog posts here.  It is seriously my favorite machine for paper crafting!

How do you store your washi tape?  Are you a buyer of full rolls or do you buy samples?

xoxo, Moe

8.01.2016

Make It Monday // DIY Sushi Bookmarks with the Cricut Explore

If there is one food I'm very fond of...it is Sushi.  There is one grocery store down from where I work that offers a little grab-n-go type situation of sushi and I love to stop in every now and then.  I haven't found a Sushi restaurant near me...but there's not much near me but chain restaurants.
This post contains affiliate links, please read my full disclosure here.
When I found these little sushi images on FreePik.com I knew they would make the perfect fun little bookmark!  I've been trying for ages to come up with a way to share how to make a magnetic bookmark using the Cricut Explore.  The main thing I was struggling with was how to make it durable.  Today I'm pleased to say I've come up with a solution.  I do hope that you try this tutorial out and let me know how your bookmarks come out!

Supplies :: magnetic tape, printer paper, 3mil laminating sheets, scissors, laminating machine, Cricut Explore (or Cricut Explore Air, Cricut Explore One) + cutting mat, sushi PNG image (at the end of the post) 

Shop the Supplies on Amazon Below!

Upload the sushi PNG image to Cricut Design space.  I always select Complex Image when I upload an image because I think it preserves the best quality.  This PNG will only need a little clean up to remove the branding and licensing information.  Add it to a new canvas and size it to be 8 inches tall.  (Keep the proportions locked, the width will adjust automatically.)  Select the Go button at the top and print your image on regular, thin printer paper.
Once the image is printed on regular printer paper - you may need to select the best print quality your printer has to get a crisp image - slip it into the 3mil laminating sleeve and trim the sleeve around the registration marks.  This will allow the Cricut's sensors to read the marks more easily.  Run the pouch through the laminating machine per the machine/pouch's direction.
Now that the full page is laminated, set the dial of the Cricut Explore to Poster Board, load the mat, and click the flashing Cricut Button.  This will cut out the shape of the bookmark.  You'll find that the Cricut reads the registration marks normally as long as you've trimmed enough of the laminating pouch away from them.
Carefully fold each bookmark in half making sure to match up the ends.  Using the edge of the scissors handle, create a crisp fold.  To make the magnetic tape a bit stronger, cut two lengths of tape about .5" long then stack them on top of each other so that one side is still sticky then stick that side down to one side of the inside of the bookmark.  (Hold one .5" piece of tape with the sticky side down.  Place the second .5" piece of tape sticky side down on the top, non sticky, side of the first piece)
Repeat the same process - double up the magnetic tape so that only one side is still sticky.  Flip this piece over so that the sticky side faces up.  Place the smooth magnetic side against the smooth magnetic side of the previous piece.  They may not line up, but that is fine.  As long as the sticky side is up.  Then press the top piece of the bookmark to the sticky side of the magnet facing up.  You should end up with a the magnetic pieces sandwiched between the two sushi images.  This should open and close easily.  Repeat this process for the two other bookmarks.
These bookmarks make great gifts for your planner friends or friends who love to read!  How cute would these be for back to school?  I plan on giving these as a gift and keeping a set for myself!

The best part of this is that the laminating isn't too thick so that the magnets won't stick.  Doubling up the tape makes it a bit stronger.  The printer paper also helps to keep the thickness down so the magnets will stick to each other.  I also plan on having a few other free bookmark templates available in the future so you can repeat this DIY for varying seasons and themes!  Love it!


If you've been thinking 'Well I'd love to do this with my Silhouette.' or if you've been thinking 'I'd love to just cut these out by hand,' I've got you covered.  Click the link above to find the PNG, PDF, and Silhouette file.  I can't make any claims on how the the blade of your Silhouette will cut through laminate..nor do I know if you'll need a deep cut blade.  That is why I love my Cricut....it really is the best for paper crafting because I know it can cut through thick(ish) materials.  I make dividers like this all the time!  Remember, all printables on the blog are for personal use only.  Do not sell the design as is or the end product.  Do not distribute this in mass quantities either.  If you would like to share this post, please pin or share the blog post only and not the linked files.  As always, thank you for playing nice!

Hope you enjoy!

xoxo, Moe
If you like the content you see here on the blog, please consider becoming a patron!  Joining the Patreon Family as a financial contributor means you get access to exclusive content only for you!