After much debate and the fact that Menards, of all places, had a pretty neat deal going on, I finally purchased a Cricut Explore. That's right, I now own an electronic die cutting machine. I've been wanting one for a while to experiment with making stickers....buying a machine like this for just one purpose was crazy, I know. But, I have come to see that it has so much more potential - that I need to explore.

this post contains affiliate links, please read my full disclosure here
(side note: word of the year here! Explore. Oh my goodness!)
But today I wanted to offer up to you some tips I've learned for designing for the Print then Cut specifically for making planner stickers....because you know I'm obsessed. In fact you can find a whole bunch of FREE stickers designed right for the Cricut Explore by clicking here! I couldn't find any info with tips for the Cricut Explore, it seems this is a Silhouette dominated world! So I hope this post is helpful.
Design a .PNG 'sticker sheet' in another program first
This is something I didn't do at first but Design Space kept crashing on me. Design Space is an online design platform that uses flash. So if you're familiar with using PicMonkey to design things you may have run into Flash or ShockWave crashes due to the way you're trying to push the program. When I tried to use one little icon and populate the mat by selecting how many projects I was doing, ShockWave would crash. Each. And. Every. Time. So, instead of trying to create a 'sticker sheet' in the Cricut program I'd turn to a third party program to create my sheet. (come to find out it was due to Chrome's Shock Wave and an independent Shock Wave plug-in, thats fixed now...but I do run into crazy problems more often than not.....)
What I mean by sticker sheet is creating a .png image with a transparent background about 4x6 or 5x7 size filled with my icons. This way the online design program doesn't have to work too hard to populate your stickers in the printable area. Uploading this single, larger, image is easier for the mat part of the program to process. The 5x7 size is the perfect size to fit on your mat as the Cricut can only cut an 8.5x11 piece of paper.
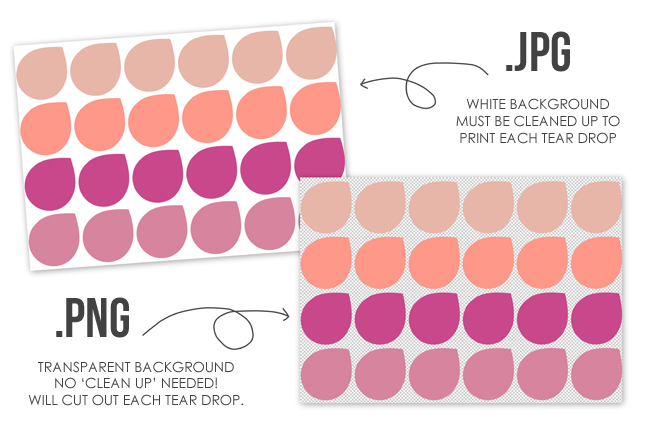
Why a .png? Because the background is transparent you don't have to go through the step of removing the areas you want to cut. A transparent background usually shows up as white and grey checkerboard in your design program. It should automatically see the background is transparent and then make the cut lines around your icons. I also put a slightly bigger white border behind my icons in the same shape because I don't quite think I have the calibration of my machine down. You can use a design program or photo editing program like Photoshop Elements (what I used for the image above), InkScape, or PicMonkey to create your sticker sheets. If you want to learn to design your own sticker sheets, check out my complete tutorial series here on YouTube.

Or Design in Design Space
After working with design space for a while I find it super easy to use. The only downside is that you do have to be online to use the Circut Design Space but I found I could use the images/clipart/cartridges (??) like I use the overlays in PicMonkey. I change all the images to print, instead of cut then design with them like they are clipart. I found that using the attach option attaches any layers you may be using together so you can move them around your canvas. In order to design a sticker sheet, I use the flatten button to create one grouped image after I've created a bunch of attached images. This lets you populate the canvas with the sticker sheet you've designed in Design Space instead of having Design Space organize the images you made on the mat for print then cut.Honestly, if you can get Design Space to work and you have a reliable connection the online editor does fine - much like working in PicMonkey. However, your limited in making images to share. You can publicly share the link to a saved project but if you ever stop using your Cricut or delete your account you may run into problems. I like to have my freebies stay around long after I've forgotten about them (wink). It's easier to host a PNG file and link to that.
Print then cut in the dark (or as close to it)
I bought a little rolling TV stand to hold some of my creative little things - like my printer, my laminator, and my Cinch. The whole stand rolls in and out from under my desk and while the idea was to create extra space for myself by rolling the cart out from under my desk and then putting it away under the desk when I was done. I am slowly having less and less space! But my idea sort of failed because the Cricut really needs to be in the darkest space possible to get the light to read the registration marks. I was having so many problems with the cut feature because the machine couldn't or wouldn't read the registration marks! But putting it in the dark has helped and I rarely have problems now. I recommend a shelf under your desk or somewhere that doesn't get direct light. I find that even under my desk I have to turn off the ceiling light and just use the lights directly above my desk. There is very little light leak now.
Cut using the Washi Tape - 0.06m setting (if you don't have Cricut Sticker paper)
One of the biggest frustrations for me was cutting through my label and sticker paper that I got at Office Max. I. Was. So. Pissed! The Cricut Sticker paper setting is way too deep...it cut right into the mat! But then I realized the custom settings are so varied that you can totally find the thickness that you need...with some experimentation. I've used Avery Sticker paper and on the Office Max brand full sheet adhesive labels and that Washi Tape setting works wonderfully. My current favorite sticker paper is this one from Amazon!! The Cricut Sticker Paper setting is way too deep for label paper. I bought some sticker paper and it is thick like scrapbook paper, for me that's too thick for stickers!


Find Your Printer's Ultimate Best, Most Best, Highest DPI, Most Bestest Print Setting, Ever
For the longest time I thought I was printing at the highest quality by selecting photo paper but I still had prints that looked like they were printed at the fast print setting! Eventually by poking around I found another setting that uses Maximum DPI. I suggest googling your printer and finding the maximum DPI or best print setting for your specific printer. This has made me soooo much happier! The printer I use is like 8 years old! It got a Happy Planner disc stuck in it too and STILL works! Here is a newer version.
Bleed for Print then Cut
I have a love-hate relationship with this feature. It doesn't work well with the PNGs you design - I think it's because it can accurately create the bleed because the image isn't a part of the Cricut database. So when you print it...it does weird stuff. It works better with images already a part of Cricut. Also, sometimes on a white background Circut will add a bleed of the center color of the sticker.....it's weird. I have not tips for this function besides that you will probably want to do your own tests to see what prints better and how.
I hope these little tips are helpful. I wanted to share what I learned from my first few uses of my Cricut Explore! Like I said earlier, I couldn't find much on how to use your Cricut Explore for planner peeps! I am planing on doing a few screen cast videos for planning as well - how to use PicMonkey to create icons for stickers, creating notes pages, etc. Hopefully I can get my shiz together to get this done!
If you'd like to join in on more tips, be sure to join the Cricut Ready Stickers group on Facebook here. Check out the Cricut sticker templates in the shop and the other stickers designed to print & cut with your Cricut here.
If you'd like to join in on more tips, be sure to join the Cricut Ready Stickers group on Facebook here. Check out the Cricut sticker templates in the shop and the other stickers designed to print & cut with your Cricut here.
What tips and tricks have you figured out with your die cutting machine?
xoxo, Moe
You have no idea how happy I was to see this post! Can't wait to try your tips on my Cricut Explore.
ReplyDeleteThank you for this! I've been trying to figure out the easiest way to do this for like a week!
ReplyDeleteWhat kind of sticker paper did you use like the photo shown? Great tips!!!
ReplyDeleteThank you! I've have a cricut explorer air! and i love it but i have been debating getting a silhouette because of everyone using it for stickers lol.
ReplyDeleteThis comment has been removed by the author.
ReplyDeleteHello, thanks for your post! I just got a Cricut Explore One and want to use the print and cut feature as described in your post. However, when I try to print, my epson 1430 printer shrinks the images to about a quarter of the cricut print size, and prints the tiny image centered on the page. It will do this with both my custom images as well as cricut images. Have you encountered your cricut sending incorrect printing info to your printer? Or do you think it's the printer? Any help would be appreciated!
ReplyDeleteI feel as though this may be a printer issue. Check your settings and make sure it's 'actual size'. not fit to page or tiled, that may affect it.
DeleteHow do I print my name or shop's name on the sticker sheet without having the circuit cut it out?
ReplyDeleteI would love to know the answer to this too..
DeleteI would love to know the answer to this too..
DeleteI too am trying to figure this one out.
DeleteI have a video on this on my youtube channel - https://www.youtube.com/watch?v=tLeMZ4qqRFU&list=PLHw6-KlyViwAfbL6d0Fztmz8STH0ao2wA&index=21 Hope that helps.
DeleteThank you for this! I use Avery sticker paper for now because I have some left over from other projects. Finding a thickness that cuts through the adhesive but not through the back has been difficult. I think if I switch to the full page shipping labels, the paper is thinner so I can use the washi tape setting.
ReplyDeleteHave you run across a problem with the cricut cuts being off even after calibrating it? It'll work perfectly fine for two or three sheets, then it's off shortly after! It's frustrating since I feel like I am wasting paper and ink, neither being inexpensive.
I'm having the same problem with my cuts being off after calibration. It's very frustrating! Have you found a solution yet? I really don't want to use the bleed line because it looks pretty tacky. I'm going to get in touch with tech support, but I'm already considering returning the machine and trying a Silhouette, instead. I've only had my Cricut for 3 weeks and am not too impressed with their software.
DeleteI did not really find a solution. I rarely cut stickers, so I know to calibrate the first time I use it in a while. Also the tip of cutting in the dark helped a lot! It's my roommates Cricut so I am happy to just be able to use something.
DeleteFor this, you would import your image and then a shape to go behind it (like a square or oval or more fancy if you want to draw it in another program). Then you arrange them in design space thaw way you want, select both at the same time, then click the flatten icon. This will combine the two layers into a print then cut file. Only the outer shape will cut.
ReplyDeleteThis was a response to Gabrielle above.
ReplyDeleteThis was super helpful! I just got a Cricut explore as an early Christmas present (from me, to me...but that's not important) and I've been trying to figure out how to make stickers for my Erin Condren Planner!!
ReplyDeleteThanks so much! I just printed my first sheet of custom stickers today and was getting frustrating that most of the tips are for printing images from Cricut's library.
ReplyDeleteThank you so much for sharing this! I love making stickers!
ReplyDeleteI find that my cricut cant print sharp images from the online app. even if I select complex image. I'm trying to print small stickers of little characters. All of my prints come out pixelated and not sharp. Do you know if there is a way to print perfect images? This is killing me. any advice would be appreciated.
ReplyDeleteThanks :)
I find that my cricut cant print sharp images from the online app. even if I select complex image. I'm trying to print small stickers of little characters. All of my prints come out pixelated and not sharp. Do you know if there is a way to print perfect images? This is killing me. any advice would be appreciated.
ReplyDeleteThanks :)
Have you had issues with the Avery sticker paper curling when you take it off the cutting mat, or stickers popping off because it's curled?
ReplyDeleteWhen you pull off your paper put it "face down" on the table and peel the mat back as you slide your hand over the paper to get it off the mat. It won't peel hardly at all this way!
DeleteThank you this saved my sanity this morning! I could not for the life of me get my printer to print on Cricut's sticker paper but I did have some Avery labels lying around and the washi tape setting worked perfectly!
ReplyDeleteWay over my head......lol I will come back here and try again when I have a clue what you are saying and brave enough to try it.....:)
ReplyDeleteThanks for posting this! I am printing/cutting custom stickers (nametags in the shape of rockets) and the sticker setting wasn't working for me, going to try Washi tape now thanks to you! How do you get to adjust your printer settings to get the best quality? I don't see that option within Cricut Design Space.
ReplyDeleteTHIS is an amazing post! You answered so many issues I had when I attempted to make stickers (I had given up, truly). I will be 1, darkening where my cricut is, changing my printer settings, and using the Washi setting! You are appreciated!
ReplyDeleteA lot of etsy accounts have printable stickers that are set up for 8.5x21. Any suggestions for how to get them to print correctly and full size to fit the planner?
ReplyDeleteI don't know what is meant by Cricut sticker setting? If I create something in Adobe Photoshop, how do I make cricut cut those shapes out? Is there a special way to save the file?
ReplyDeleteI don't know what is meant by Cricut sticker setting? If I create something in Adobe Photoshop, how do I make cricut cut those shapes out? Is there a special way to save the file?
ReplyDeleteThis was so very helpful!!! I've been searching for tips and this is exactly what I needed. Thanks!!!
ReplyDeleteDoes anyone know how to print then cut just a word without a box around it?? I'd like the whole word as a sticker, without it being a box and without cricut cutting each individual letter.
ReplyDeleteI tried your trick about putting the circuit in the dark and still doesn't read the registration marks it kinda looks like the the ink is starting to get low (im just doing a test run so i didnt care much) but could the black registration marks not be dark enough?
ReplyDeleteIf you have an HP Printer you will have to lengthen the registration marks if they are not the same length as they are wide. This has helped me. Just use a marker type pen like a sharpie pen.
DeleteWe are trying to print out stickers using Cricut sticker paper. When we insert the sticker paper into the printer to print, the registration marks don't print properly. Normally there is a small space between the top of the registration mark and the top of the paper. This is not happening for us and thus not allowing the cricut to find the registration marks. If we try it on regular paper then the registration marks print perfectly. Just not with the Cricut sticker paper. What are we missing? Please help us newbies!! Thank you
ReplyDeleteI had the same problem. I used paper on my dies. I just buy the whole sheet label paper from Walmart.
DeleteDoes anyone have any suggestions on what printers work best with a cricut air? I am in the market for a new printers and am new to the cricut world.
ReplyDeleteGREAT JOB! Thanks.
ReplyDeleteThank you so much for this!! I used the washi tape setting and it worked perfectly!!!!!
ReplyDeleteI am SOOO happy I found this!! I have been ordering stickers for my shop and finally, after having my Cricut over a year, I put two and two together.... Now making my own.
ReplyDeleteThank you!!!
I have the Cricut Explore Air 2 and I use Avery full sheet sticker sheets. I use the custom setting "sticker sheet" and I have never had the blade cut through the sticker sheet. I'm sure it's because the newer machines have been adjusted well as the new Design Space.
ReplyDeleteI just purchased a Cricut Explore Air 2. While I haven’t been using it but a couple months I have figured out the work around to such a limit amount of images available WITHOUT the need to purchase anything. Inkscape is a free program you can download on your computer to turn jpeg images into cut files. You can take layers away, add layers, manipulate the images a bit, etc. Thanks for making this post. The warning about registration marks is going to come in handy!
ReplyDeleteThank you so much for the washi tape tip! I tried different set ups for sticker papers, and this one worked perfectly!
ReplyDelete