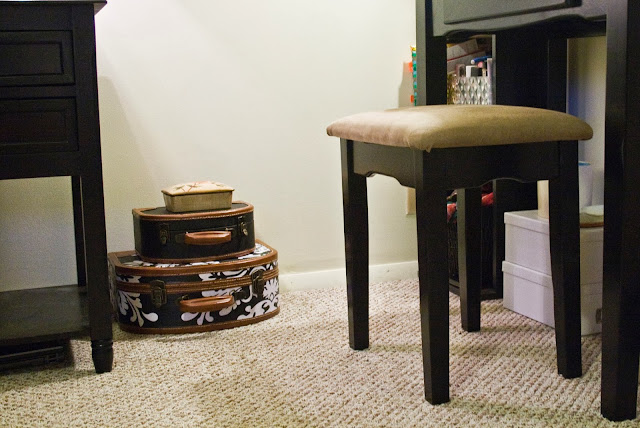
A long while ago - like even before we moved into the house - Zach bought me a set of two cute little storage boxes that were shaped like suitcases. I'm pretty sure he got them from a garage sale. I loved them (still love them) but they were a brown color & covered with like faux newspaper clippings to make it look a bit vintage. I liked them the way they were but the didn't really fit into anything we had in the house. A few weekends ago I sat down to do something with them. My first thought was to get some fabric & cover them - but I scratched that not wanting to spend any money on fabric. Fast forward a bit & we needed a new (bigger) bedspread. A queen on a queen size bed is just not big enough for two blanket hogs. I'd kept an eye on the bigger size of a similar style of our old bedspread, waiting for it to go on sale. When it did, I snatched it up. It came in the mail and I put in on the bed, discarding the king sized pillow shams I knew we wouldn't use. Then it hit me - I now had fabric to cover the boxes & it would totally match our room! I had already painted the small one black but was all over covering the bigger one in this fabric. So, if you're interested in seeing what I did then stick around!


Supplies :: box you want to cover, pencil, paper to make your template, ruler/yard stick/straight edge, scissors (for fabric & for paper), mod podge for fabric, sponge brush, screw driver if your box has any hardware you have to remove, straight pins, fabric (vintage fabric would be beautiful) or old pillow case (one half of a king size pillow case covered all of this!) , old credit card or plastic card to smooth out your fabric


First, remove all the hardware from your box with a screwdriver. If your box has little feet on it, they probably will screw off....just give it a little try & use pliers if you need to. Now you can move on to the fun part.

If you have a funky style box like I did, you'll need to create a pattern so that the fabric sits in the place you want. I taped two pages of used printer paper together & used a pencil to trace around the inset to create a pattern. I cut it out a bit bigger then trimmed away making sure it fit. You'll want to mark the top side of your pattern so you know how to place it on the fabric & how it will fit on the top of your box.


Pin your template to your fabric. Make sure to cut out two of these patterns so you have one to cover the lid & one to cover the bottom of the base. Remember to cut bigger than you think, then trim. You can always trim but you can't put it back!

Next I used a little ruler thing (it's for sewing, if you know the name let me know!) to measure out how much fabric to cut for to wrap around the perimeter of the box. Here is where I should have measured better or made another template - the measurements were not the same all the way around so there's some gaps between where the fabric meets the stitching on the sides! So measure everything! Then I just transferred the measurements to a straight edge of my fabric by marking every few inches or so & used a straight edge/ruler to create a rectangle long enough to fit around the box - you should have one long fat rectangle & one long skinny rectangle. Then I repeated the measurements to cover the back of the box where the hinges are - this creates another fat & skinny rectangle.
Here are the pieces you should have:

Now using the mod podge, apply a thin layer with your sponge brush. You may have to work in sections - I found I had to so I didn't get glue bits or sticky fingers on my fresh fabric. Place the fabric on the box smoothing it out as you go. Use the credit card to smooth out any bumps if you need to. Per the instructions on my mod podge, I let the whole thing dry for two hours before applying a sealing coat. Don't mind my messy desk - but I didn't think using mod podge on the carpet was a good idea.


Once you've applied your sealing coat let it dry for a good while - I let mine dry over night. Then screw all your hardware back on & smile because you are awesome! You now have a beautiful box that if you wanted could match any decor you desire. I wish we used all my vintage sheets because I'd have covered this in pretty floral fabric & would have just melted. But this damask pattern is just fine. If you have a matching box you can paint it like I did using two coats of acrylic paint. I like that these don't have the same coverings, the look more collected that way.

Hope you enjoyed this Make it Monday! This is one of the first posts in a new little series this month for Homevember - something I really wanted to do right after we moved in last year, but it was so impossible to do. So there will be a few posts on home decor, home improvement, etc this month to share with you our year old little home! Of course there's a lot that isn't finished but such is life.
xoxo, Moe
I just love these! =D
ReplyDeleteReally, these storage boxes are so cute and looking like suitcase. You know recently I have cleaned my home and made my self-storage plan and thus for storing items, I also use storage boxes but my boxes are simple. I liked your collection and I want to buy some pieces for me too.
ReplyDeleteI'm happy with my choice, and strongly recommend them to anyone who is looking for one. This storage place rocks! I only rented for a month and they were totally professional and accommodating.
ReplyDeleteSelf storage management software
The storage boxes really almost look like they're suitcases. Really makes me want to start packing and get myself out of the Gold Coast for the weekend or something!
ReplyDelete