My best friend (& room mate) is a really cool artist. Currently she works as a Marketing Rep during the day but on Tuesday nights & Sunday afternoons she's a potter. She's also a part time leather crafter, crocheter, & all around creative person. So, while I am away from blogging this week, Katie is going to share an awesome post about transferring an image to leather. She'll also share a bit about leather crafting & the tools used in the process.
So it seems there is a lost art. The art of leather crafting. Well, maybe I should say lost trade. I picked it up a few years ago, and have gotten addicted to it. It's calming, rhythmic at times, and it can annoy some one in the room with the pound of a hammer! Ting! Ting! Ting! Ting!
Before you do leather crafting, you need to know that yes, it is SKIN. I get my leather through Tandy Leather, who takes the hides from animals used in their entirety. Also the stains and paints I use are Eco-friendly and 100% biodegradable.
There are two different kinds of leather. Veg-tan and Chrome-tan. The difference is in the tanning process.
Veg-tanned leather, in short, is tanned with vegetable extracts and is the kind of leather that is easily altered, moldable and stampable. It's the more decorative leather you might see in belts, saddles, boots, etc. Any mark made on it is permanent. Even pencil marks.
Chrome-tanned leather is tanned with chromium salts. It's what is used more typically in clothes. It is very easy to cut, and you can use a lace-maker on it quite easily.
These guidelines are going to be for working with Veg-tanned leather. You can buy it in all kinds of sizes and thicknesses. Just think about what you want to make, and the make the judgement.
The supplies:
Marble slab- you need a very very hard surface to hammer on, and one that doesn't bounce. I got mine through Tandy.
Marble slab- you need a very very hard surface to hammer on, and one that doesn't bounce. I got mine through Tandy.
Mallet- you can get these in plastic or leather. I went with plastic. Just don't do rubber.
Stamps- designs, letters, backgrounds, whatever your heart desires.
Spray bottle filled with good ole H2O
Leather- make sure it's veg-tan
Tracing paper
Mechanical Pencil or Stylus
Swivel Knife
Good lighting & creativity!
Let's get started:

And there you have it...a small introduction to leather crafting!
Stamps- designs, letters, backgrounds, whatever your heart desires.
Spray bottle filled with good ole H2O
Leather- make sure it's veg-tan
Tracing paper
Mechanical Pencil or Stylus
Swivel Knife
Good lighting & creativity!
Let's get started:
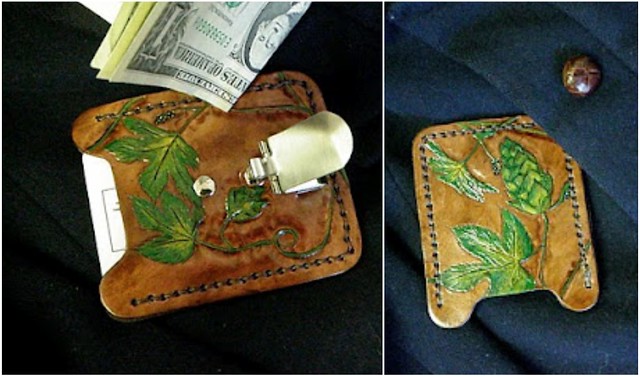
Your leather can be cut into whatever shape you want with scissors or an exacto knife. I would suggest practicing before you do anything on your primary piece of leather.Find your image, in this case I used an image of a hops cone. This particular project was for a friend who is a home brewer & beer enthusiast. I borrowed images from online, created a mash up of sorts, & put together my image.
To begin, wet the leather with the spray bottle. Now it's not alive anymore, so it's not thirsty. Don't drench the piece, just make sure that you get the surface wet enough so the water will absorb into the leather.
To begin, wet the leather with the spray bottle. Now it's not alive anymore, so it's not thirsty. Don't drench the piece, just make sure that you get the surface wet enough so the water will absorb into the leather.
I traced the hops cone and leaves using tracing paper, and transferred it to the leather. Instead of a stylus, I used a mechanical pencil with no lead sticking out. I then used a swivel knife to cut around each line- including the veins of the leaves. For the primary and most bold of the veins, I cut fairly deep. The rest of the veins simply branch off of that.
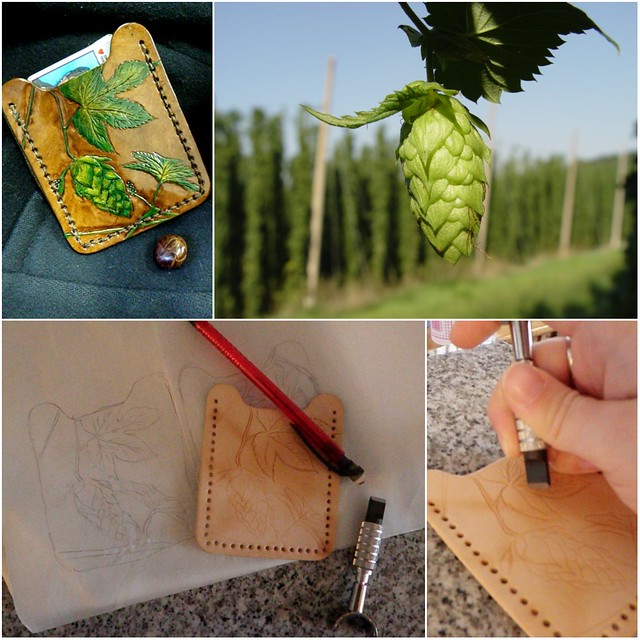
As far as tooling goes, all I did was use an angled beveler around each layer of the hop cone and then under the smooth part of the leaves.
If you want to add stamping (like letters or other designs) I suggest doing it after you've created your traced design. Hold your stamp straight up and down, touching the leather, and hammer. If you hammer too hard, you will puncture the leather. If you go to lightly, you won't make a mark.
Next came the painting, staining, and assembly. The painting & staining adds color to the design. I use acrylic paints & stain with an all natural stain. I'll spray mine with a water resistant seal to give it longevity.
You can find Katie either in the pottery studio or on her website & etsy shop Muddy Pup Pottery. I hope you enjoyed learning a bit about working with leather & how it all goes down. I bet you'll appreciate the work that goes into the tooling on your leather bag even more!
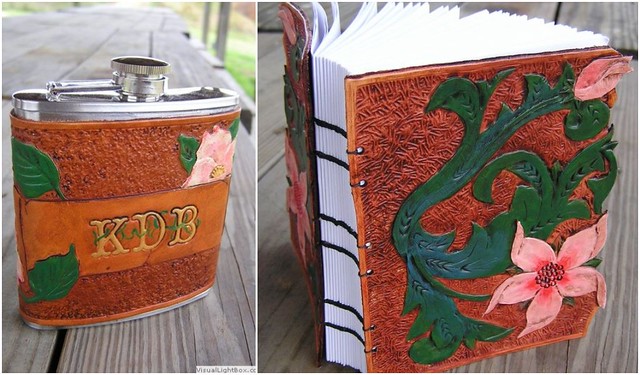
this is a really amazing tutorial... that leather-bound book is awesome!!
ReplyDelete