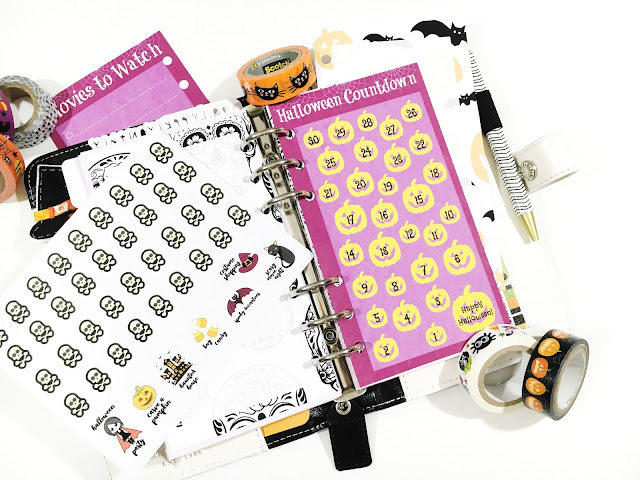
Last year around Christmas time I shared a little DIY Christmas Countdown insert for your personal planner. Today I want to share with you a similar DIY but to countdown to Halloween instead! On Friday I will have some countdown stickers - but they may be too big for personal size planners.....so I knew I had to keep everyone covered for this countdown! We'll be doing something similar in this tutorial as with every tutorial where I use PicMonkey to make planner inserts - like here, here, here, and here. The biggest thing I want to feature in this tutorial is something new with PicMonkey - Hub. Hub is an exlusive for Roayle members and a great way to store projects your working on, make copies, and create templates. This is perfect if you'd like to create a new or different planner insert because you don't have to start from scratch every single time! Let's get started
(this post contains affiliate links, please read my full disclosure here.)
From the home screen, open a blank 8 x 10 canvas. Use the crop feature to size the image to a proportion that will work with your personal planner - iPhone 6 is a good choice, it is not exact but the proportions come out pretty close. Deselect Scale photo to give you the best quality to work with. Click Apply. Choose a canvas color, I chose a purple color.
From the Overlays tab (the one that has a butterfly icon) overlay a Halloween border and a rectangular box. Be sure to move the box so that it is resting on the right side of the page leaving room on the left side for the hole punches. Make your best judgement with alignment since there are no grid lines.
Adjust the transparency of the rectangle and the Halloween border. Add 31 pumpkin overlays - or any other item you'd like (bats, candy corn, ghosts). Once you are satisfied with the arrangement flatten all layers together using the Combine all image elements button in the lower middle menu bar. This will flatted all elements together so that you don't move them while continuing to add to the design.
Add the text you would like - I used the font Coolock Black to add the label Halloween Countdown at the top and the font Flavors to add the numbers over the pumpkins. The 31st day on this countdown is Halloween so start with the number 30 then count backwards. Coolock Block is a Royale font and I highly encourage you to upgrade from the free subscription to a paid one. The Royale subscription gives you access to a ton more fonts and overlays and most importantly, the new Hub feature. Did I mention hub lets you go from desktop to mobile? Storing your creations for you to use again and again? For only $4.99/mo or $39.99/year, the subscription is sooo worth it. Find out more here. Save this to the Hub by clicking the Add to Hub button in the top menu. Name your creation, and save.
Using the undo button in the bottom menu, undo everything you just did (yikes!) to get back to the base layer. Move the rectangle over to the other side leaving room for punching this insert on the right hand side now. You can use this to make anything you'd like - I made a movies to watch list.
Once your satisfied, click on Update in Hub in the top menu. You should see a pop up that asks if you want to Update (overwrite the original design) or Make a copy (save your new design as a copy). Chose Make a copy and you'll see the copy show up in your Hub. Use the tail end of this tutorial to create a document using your new inserts for printing.
Now you have a fun printable countdown (and one for a friend since printing this guy back to front will yield you two inserts!). I've also created some stickers for you to place over each day as you count down. And if you'd like to skip the tutorial all together, download the countdown inserts below as well.
This download includes the PDF inserts, a PNG file for cutting the stickers with your Cricut Explore (size the width to 5.5 inches, keep the proportions locked), a Silhouette Studio file for cutting the stickers with your Silhouette, and a PDF for cutting the stickers by hand or using a gyro tool as found here.
As with all printables on the blog these are for personal use only. You can not sell the digital image or the final product. You can not distribute these in mass quantities. Do not claim this project, design, or file as you own. If you would like to share this project on you Pinterest or social media, please share the link to the post, do not Pin the file download only. As always, thank you for playing nice.
And if you'd like some more Halloween inspired notes pages to print out - the sugar skulls and pumpkins & bats - find that post here.
And if you'd like some more Halloween inspired notes pages to print out - the sugar skulls and pumpkins & bats - find that post here.
Have fun counting down!
xoxo, Moe


No comments:
Post a Comment
Hi there, thanks so much for taking the time to comment. I love &value each & every one! If you have a question, I will respond as soon as I can. Don't be afraid to shoot me an email! If you have a blog, I will pop on by :)