Showing posts with label listing journal. Show all posts

9.21.2016

Inside My Listing Journal // Free Printable Ephemera Pieces

If you watched my Listing Journal flip through & tool box video then you'll know that currently I'm obsessed with ephemera.  These little packs of die cuts and cute things can become expensive...but for the most part they are worth it!
this post contains affiliate links, please read my full disclosure here.
I've been loving these little guys to add a bit of flair and add to the story of the page I'm working on in my Listing Journal.  I haven't been sticking to one collection of ephemera, I've been loving mixing and matching the different sets I have to create a unique look.  But, gathering up a bunch of sets can get expensive (like I mentioned above!) so I decided to make some of my own...and share them with you today!
I used some images from FreePik.com, imported them into my current favorite design software, Inkscape, and created an offset around each image for easier cutting using my Cricut Explore.  I love my Cricut Explore for paper crafting and this project is perfect!  

DOWNLOAD DIGITAL EPHEMERA PACK HERE


I've created a set for you to download from the link above that includes two PNG files, a PDF file and a Silhouette file.  If you have a Cricut Explore (or Cricut Explore One or Cricut Explore Air) one of the PNG files has a 'key' with all the images included in the ephemera pack so you can store your ephemera together and still know whats in the little pack.  I store mine in those little plastic zipper bags you can find in the jewelry section of the craft store and these little 'keys' (often found on the back of the packaging of commercial ephemera packs) help me know exactly what is in the little baggy.  To cut with your Cricut Explore, simply size the width to 5.5 inches.  To cut with your Silhouette open the Studio file and adjust your cut settings to be at a depth for cutting card stock.
Remember, all printable files on the blog are for personal use only.  You many not sell the final product or the design.  You may not print and distribute these in mass.  If you would like to share this file with others, please link or pin this post and not the digital files.  As always, thanks for playing nice.
I used some of this ephemera pack in my lists about my favorite movies and my favorite stories.  I think this pack goes together well and I especially love the vintage radios.  (That is a nod to Zach who loves vintage radios - we have approximately a zillion of them in our home!)

I'll be sharing my lists over the next few days (when I remember) over on my Instagram.  So go follow me there.

Have you started a listing project?  What are some of your favorite ephemera packs?

xoxo, Moe 

8.29.2016

Make it Monday // DIY Mini Journal using the Cinch

Guys - I'm participating in 30 Lists.  You may remember that I've tried this like two times in the past and failed horribly at it.  I've been working on my own listing journal and that has taught me a lot about this process - intention and priority are two of the words that journal has taught me - and I plan on finishing my 516 listing journal this coming weekend since it will be a 3 day weekend!
Mini Journal DIY with the Cinch
this post contains affiliate links, please read my full disclosure here.

But today's DIY is about creating a small journal using the Cinch tool.  This tool is one of my favorite high end craft tools and it gets very little use in all honestly.  So I thought I'd break it out for this little listing journal since I needed to whip one up in a hurry.  Let's get into it.

supplies :: Cinch tool, pliers, cinch 1" binding, at least 30 4x6 grid journal cards, 2 4x6 journal cards for cover, laminating sheets, laminator, scissors, assorted 3x4 decorative journal cards, assorted 6x6 paper pads, corner rounder, assorted washi tape, paper trimmer, library pockets (optional)
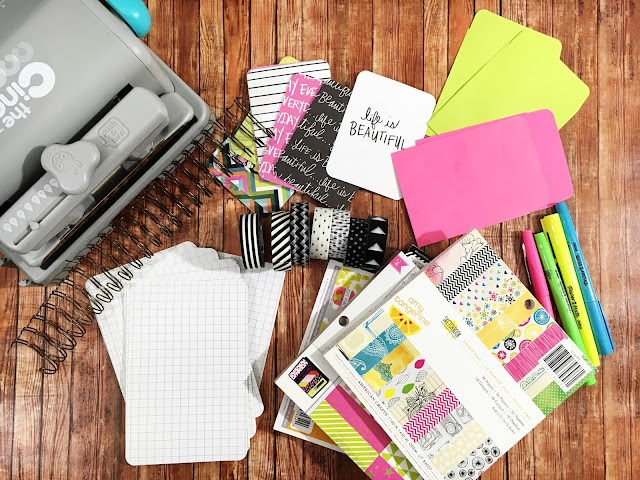
First, choose the 6x6 papers to use for this project.  I chose about 20 patterns to use from quite a few paper packs.  My inspiration for this journal came from two bright neon library pocket envelopes I had in my stash.  I'm pretty sure they came from the Dollar Tree in the teacher section at one time, but I'm not 100% sure.  The bright neon pink and electric green inspired the colors I chose from various paper packs.  The paper packs I used for this project are Amy Tangerine Sketchbook, Heidi Swapp Favorite Things, an American Crafts paper pad, and Pink Paislee Citrus Bliss.  Next, choose the coordinating 3x4 cards you'd like to use - the kits I used that went well with my color scheme were the Heidi Swapp Favorite Things and the Project Life Sunshine Edition packs.  
DIY Journal
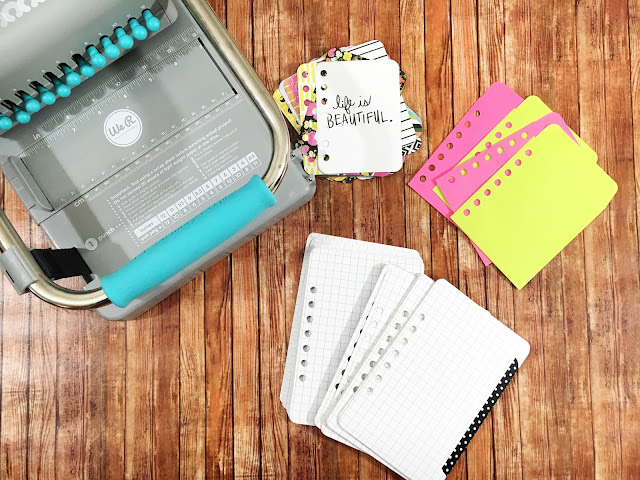
Using the paper timmer, trim the 6x6 papers down to 4x6 size. Round the corners with the corner rounder.  This is one of my favorite punches because it has multiple options depending on the corner radius you need for a project.  The sharpest radius is the one that matches the Project Life radius the closest.
Project Life DIY
Because these paper pads aren't double sided, the washi tape will create a 'double sided' look to the journal pages.  Place the tape along the side of the 4x6 grid card (it is easier to make a straight line this way), align the two journal cards wrong sides together, fold the washi tape over on to the patterned paper.  Repeat for as many 4x6 patterned papers you have.  You don't have to have 30 of them, it is better if you have just slightly fewer.  20 - 25 patterned papers should be good.
Using your Cinch tool punch the pages in the alignment you'd like.  I use the info printed on the Cinch as guidelines (kinda like how pirates use rules....just as guidelines) for punching holes.  But I also just make it up as I go.  To repeat the spacing I did - pull out the first two knobs as well as 10 - 12.  Leave the guide pushed all the way in & punch all the 4x6 cards excluding the front covers.  Once the front covers are laminated, pull out the guide just a tad (one click) and punch the two covers.  To punch the 3x4 cards push in all knobs 1 - 7, and pull out all knobs 8-12.  Bring the guide back to its original position and punch all 3x4 cards.
Assemble the cards on the coil, back and front covers right sides together (back cover on the coil first) then add your inserts the way you'd like.  Use the back end of the Cinch to close the coil.  You can see detailed instructions in this post.
And now you're done!  I love this little guy - a great way to use up scraps and create a cohesive look.  I've found the way to create something I really like is to form it around an inspiration piece and come at the project with intention.  Some projects can be created all willy nilly but some projects need to be planned.  I really wanted this project to be super simple so the only other elements I'll add into this listing book are the scraps from this project, a black pen, and highlighters.  I do plan on stamping the list numbers - I'm not going by date because I know I won't finish it like that! - using some ink and stamps I have already.  If all the work is done, all I have to do is write.  And I wanted all elements to fit in a small pencil bag!

Do you do any journaling?  Have you tried any list challenges?

xoxo, Moe

7.31.2016

Starting a Listing Journal

One thing I've really, really wanted to start and complete is a creative journal.  I've tried to create art journals in the past and I've also participated in the 30 Days of Lists challenges...but I've never committed and completed a project like this.  I never felt I was able to and recently I think I've figured out why - I didn't start out with intention.  Prior to now, I've sort of just said 'I want to do this' and I've done it.  But for some projects....this isn't the best approach.
this post contains affiliate links, please read my full disclosure here. 

A creative journal filled with ephemera, decor, and just a place to paste things I like would seem like a project where when the inspiration takes you..you go with it.  But for me it never worked out.  Finally I had the idea that I need to plan out what I was going to do.  To give myself resources to pull from, and to have an intention when it came to working on this project.
So I put together some ephemera, some journaling cards, and some paper scraps into on of my vintage train cases so that I would have everything I would need in one spot.  This has helped so much with my planning - having one thing with all the things so I  know where the things are - so I thought it would translate well into this project.  I love that I can just crack open my case and play, then pack it all away.
Eventually I will do a video about the supplies in my train case but for now the images above sort of sum it it.  A little bit of this and a little bit of that.  It has been fun to work on this project and I can't wait to share with you some of my lists and pages on Instagram!  I am journaling in a mini notebook I made using the MAMBI Happy Planner Punch and I've slipped the back cover into a Traveler's Notebook from Webster's Pages.  I love this set up because I don't have to commit to a bound notebook but I can have the feel of a Traveler's Notebook. 


If you would like to follow along as well (or you're just looking for fun listing prompts) I've put together a PDF and a Silhouette file so that you can list along with me.  Download them both at the link above.  Remember, all printables on the blog are for personal use only.  Please do not sell the design or the printed images, or distribute them in mass quantities.  If you would like to share this with your friends or pin to a Pinterest board, please pin this blog post and not the digital file.  Thanks for playing nice!


Hope you'll follow along!

xoxo, Moe