Showing posts with label Printable. Show all posts

12.15.2017

Free Sticker Friday // Birthday Week Planner Stickers

So this week (today actually) I turn the big 3 - 0.  That's right...I am 30.  Over the past few years I've had to change my bios on various websites like Twitter, Pinterest, and even this blog.  What started out as 'a post grad southern girl' changed to 'twenty-something Indiana transplant'.  But as I've moved through my late twenties, I changed most of my bios to say something like : 'I'm Moe, a 9-5er, Southern at Heart, Indiana transplant & sweet tea enthusiast'.  So no longer am I post grad or twenty something...I'm 30!! 
this post contains affiliate links, please read my full disclosure here.

One of the the biggest things I've learned in my 30 years is to make sure I'm doing what makes me happy.  Over Thanksgiving when I was at my parent's house, I was sitting on the couch putting stickers in my memory planner & my everyday planner.  I thought to myself 'You know, some may think this is pretty childish.....playing with stickers.  But it makes me feel creative and expressive, and it relaxes me.  So I'm going to keep doing it even though I'm 30.'  Life is too short not to do the things that make you happy.  Life is also too short to keep doing things that make you annoyed, sad, frustrated, etc.  So I need everyone to resolve with me to continue to do the things we love...no matter what it is.
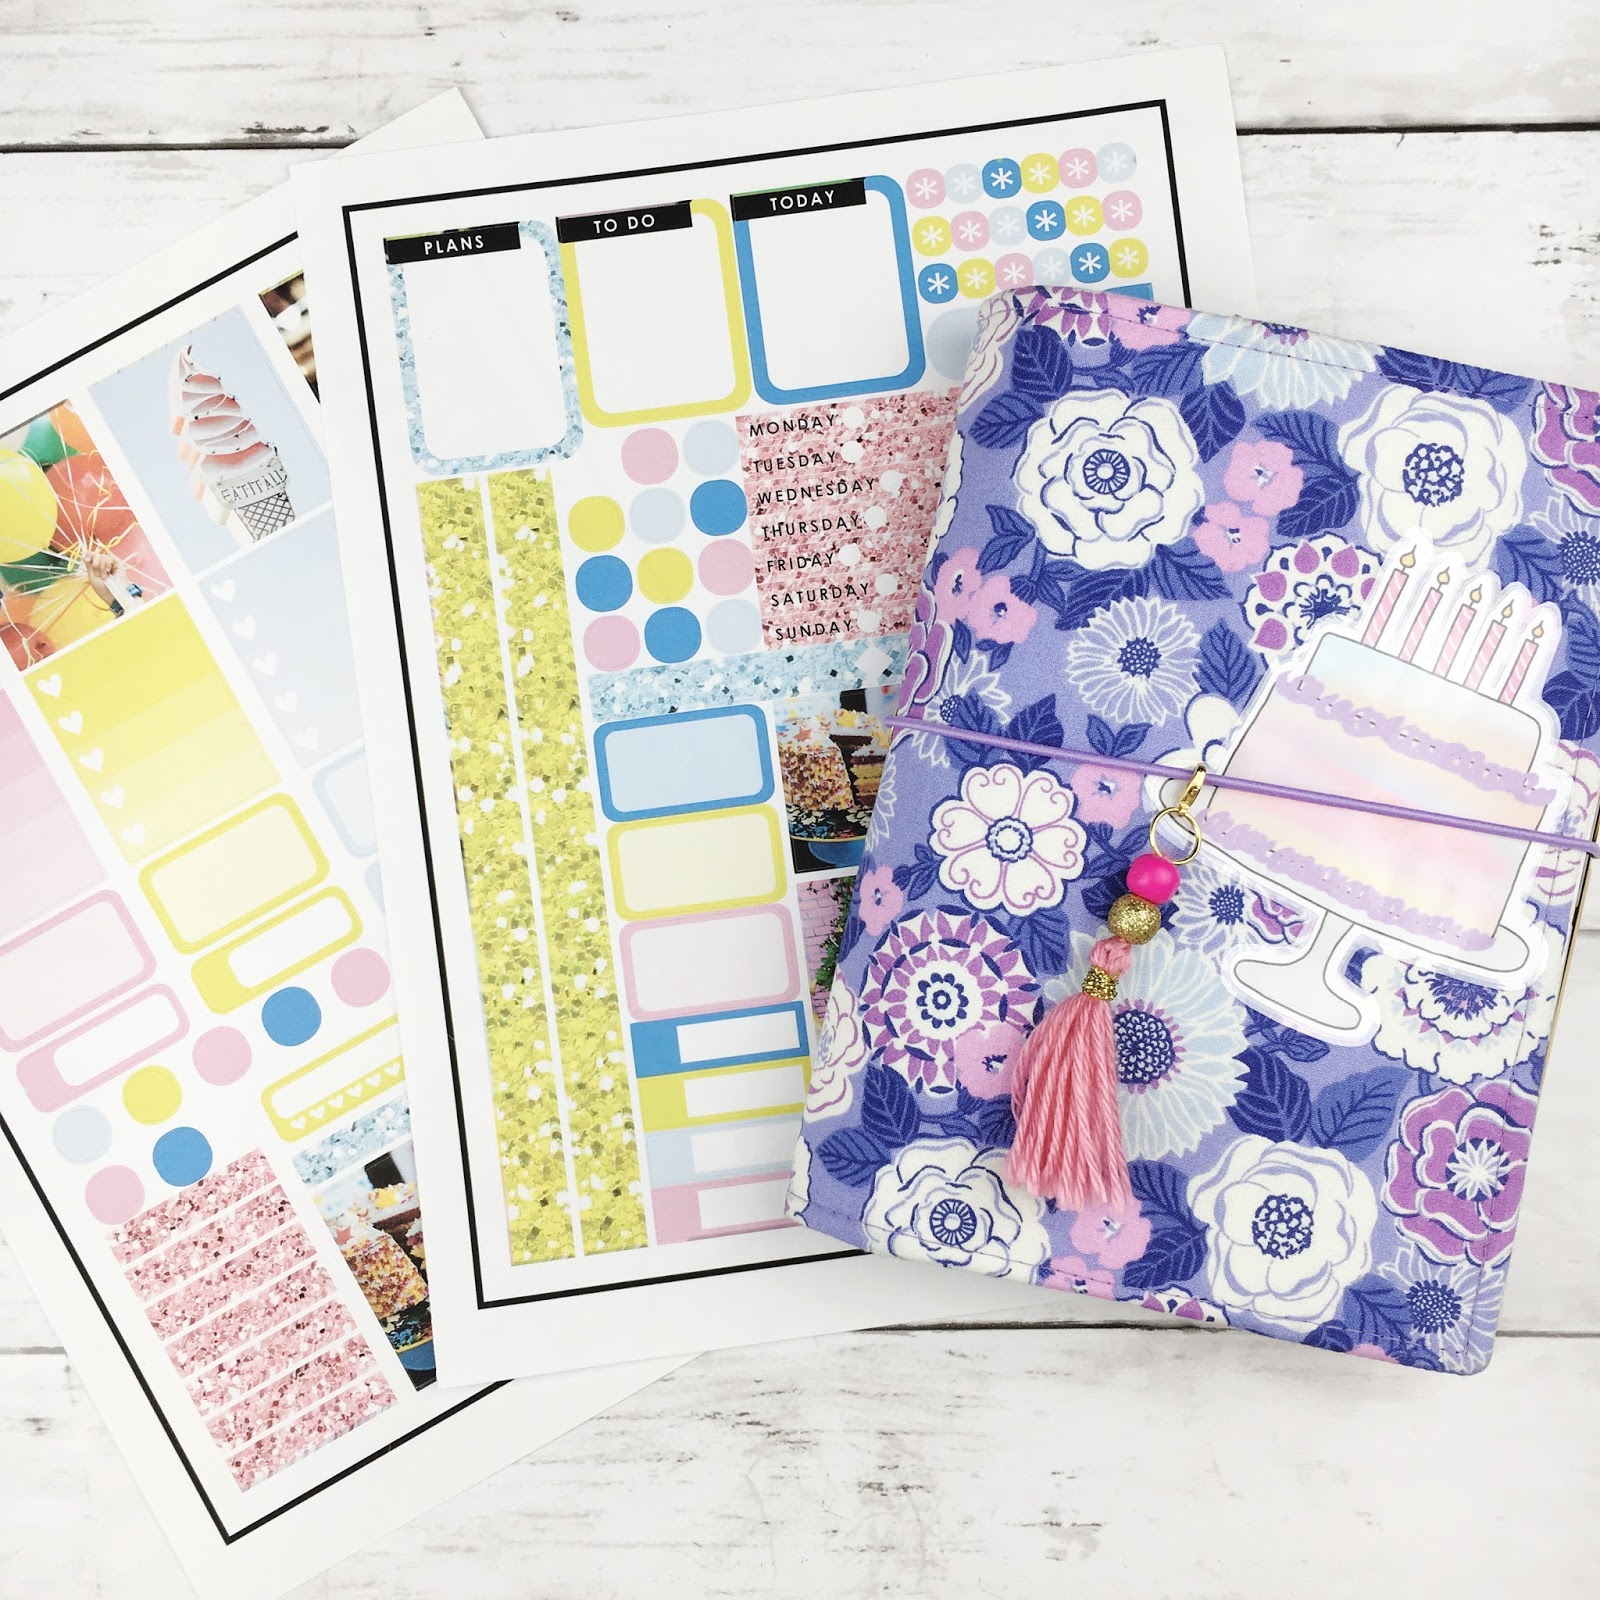
So, in honor of my birthday - and for the fact that I figured out the sizing for the Mini Happy Planner - here is a free printable you can use during your birthday week.  This week I left the icon circles blank because I really loved using my planner stamps for the icons.  Leaving these blank means that you can customize them with planner stamps or digital icons of your own!  How many times have you purchased a weekly kit only to find that you  don't use all of the icons or don't even need some of them?  This way you can create the ones you need.  And hey, bust out those planner stamps if you haven't been using them.  Learn more about how I use planner stamps here.


Remember, all printables on the blog are for personal use only.  Do not sell the printed or digital design, do not claim any of these as your own, do not print an disseminate in mass quantities.  As always, thank you for playing nice.  The glitter textures are from EyeInspire and all photos are from Unsplash.
Included in the download are the files for both the Erin Condren sized & Mini Happy Planner sized stickers in the following formats - PDF for printing & cutting by hand, PNG for uploading to Cricut Design Space, and Silhouette Studio file to cut with your Silhouette.  Be sure to size the PNG to 6.75 x 9.25 inches when you upload it to Design Space.


If you're interested in the birthday cake die cut, you can join the Printable of the Month Club over on my Patreon page!  For $3 a month you'll get access to an every growing library of printables totally unique to that subscription.  That means the printables you find over there will not be replicated in the shop or on the blog....they are exclusive for my Patreon family.  Check it out & subscribe here.

What is something that makes you happy?  What is something you want to start doing?

xoxo, Moe

ps. my planner cover is from Sew What Else is New on Etsy.  I love it, I have 2, and I need more.  Check out the shop for amazing planner covers & traveler's notebooks!  Don't forget to use Ebates when shopping on Etsy for the holidays (and any time really) to get cash back on your purchases!  Sign up here.

12.01.2017

Freebie Friday // Printable Buffalo Plaid Mini Happy Planner Cover

Oh my goodness you guys...the holiday season is heeerrrreee! Who has their tree up?  Who has lights up?  Who is wearing holiday leggings?  I am only doing the last one because I am waiting for Zach to come home to start decking the halls!  However, as soon as set down my last piece of pumpkin pie I started to deck my planner!
this post contains affiliate links, please read my full disclosure here.

I have for you today a free printable Mini Happy Planner cover!  This guy is in a PNG format so you know what that means....it is ready to print then cut with your Cricut Explore!  Don't have a Cricut Explore yet? Better get to asking Santa! (Oh! There is a new Cricut Machine that does print & cut AND so much more.  It is the Cricut Maker!)  This cover is perfect for the current season.  I mean buffalo plaid is all the rage.
On the week of Thanksgiving, I posted in the Cricut Ready Stickers Group on Facebook how to make your own buffalo plaid prints using an oldie-but-a-goodie website/tool : a tartan maker.  I've been using this site for ages (I even mentioned it in this post!) and love to go back to it when I need simple tartan/plaid pattern.  So easy!  And you can import these patterns right into Cricut Design Space too.  Learn how to do that in this video over on the YouTube channel.

DOWNLOAD THE BUFFALO PLAID PLANNER COVER HERE

As with all the free downloads on the blog, these are free for personal use.  Do not sell the final product or the file.  Do not distribute in mass quantities, and do not claim any part of this as your own.  If you want to share or Pin this project, please pin the blog post and not the file itself.  I appreciate everyone playing nice!


When you download this guy, be sure to size it to be 7.5 inches tall.  Keep the proportions locked and the width should auto populate.  To fit this guy on my happy planner in my Recollections binder that I deconstructed I did have to trim a bit off of the right side.  Then I rounded the corners with my corner chomper.  So if you're using approved Happy Planner deluxe covers (the little binder style guys) you won't have to trim this.  Additionally, you can see this post for how I laminate & then cut the planner covers with the Cricut Explore.

Happy Holidays & Happy Planning!

6.02.2017

Free Sticker Friday // Tropical Getaway Mini Kit

This past weekend officially ushered in Summer, right?  We had barbeques, we remembered those who served, and we jumped in a body of water to kick of the warm weather!  Up here in Indiana warm weather is a big deal to me.  It is always cold up here.  You've got Fall, then Winter, then more Winter, then when it hits March you have Winter, then when it hits April you have rain, then you hit May and its still cold.  Finally, at the end of May we reach the warm radiating sunshine.
Free Cricut Explore Planner Stickers
this post contains affiliate links, please read my full disclosure here.
Today I have for you this tropical getaway kit.  I love these patterns - found them on FreePik by the way - and I can't wait for full blown beach time, picnics, and sunshine.  I have given up on my memory planning so far this year but this would work perfect for your vacation week.  There are also some Vacation Countdown Stickers on the blog here.

DOWNLOAD TROPICAL GETAWAY MINI KIT HERE


In this download there are three files - a PNG to cut with your Cricut Explore, a PDF to cut by hand (though I hear this tool works great), and a studio file to cut with your Silhouette Cameo or Portrait.  If you use the Cricut Explore be sure to size this kit to be 5.5 x 8 inches.  You can watch a video here on how to cut the PNG printables from the Cricut Ready Facebook Group but it is pretty much the same for these guys.
Free Printable Planner stickers
Remember, all printables on the blog are for personal use only.  Please don't claim the digital or printable image as your own.  Do not sell the digital or printed versions of this file.  Do not print and disseminate in mass quantities.  If you'd like to share this with friends, please share or Pin this post and not the file itself.  You can find more Cricut Ready Sticker here.

I don't have another vacation planned for this summer, earlier this year we went to Florida so we are all vacationed out for right now.  I am excited to go to the beach, go to my in-law's, and just enjoy the warm weather from my porch. 

Shop Related Products on Amazon!

OH! If you want to make your own planner stencil as pictured in the images above, check out the DIY on my channel here.

How will you be enjoying the warm weather?  Any fun vacations planned?

xoxo, Moe

1.20.2017

Free Sticker Friday // Junk Food Stickers

It is time for another Free Sticker Friday post!  I've been having a blast making these fun stickers for you all to use.  If you haven't already checked out my YouTube channel, please pop on by to learn how to design your own stickers!  This past weekend I reimaged my old MacBook in the hopes of offering some tutorials on programs that are offered on that OS.  I think that InkScape is a little finicy on Mac OS so we shall see.
(this post contains affiliate links, please read my full disclosure here.)

These cute little hand drawn fast food icons are great for marking cheat days, office donut days, ice cream dates, or cook outs when the weather is warmer.  Oh and pizza parties.  Are you really ever too old for a pizza party?


As always, this file includes a PDF to cut by hand (though I hear good things about this tool!), a studio file to cut with your Silhouette, and a PNG to cut with your Cricut Explore!  Please remember that these files are for personal use only.  Do not sell the image, file, or printed product.  Do not claim this design as you own and do not disseminate in mass quantities.  Please link or pin this post and not the file download.  Thank you for playing nice.
If you haven't joined the Cricut Ready Stickers Group on facebook, head over and request a join.  There are a ton of free stickers posted there too - mainly multicolor options for icons and headers!

Find more Free Sticker Friday posts here.  Find all Cricut Ready Stickers here.

11.04.2016

Free Sticker Friday // Hand Drawn Planner Doodles

A little bit (well, a lot bit) late on the free sticker train this week.....but none the less here they are!  These are some fun little planner doodles I doodled up for you all!  I have a bunch of planner related doodle stickers I want to share here on the blog, so this is just the start.
(this post contains affiliate links, please read my full disclosure here.)

There are some spiral bound planners, fauxdori style planners, and binder style planners (like Filofax or Webster's Pages) featured on this sticker set.  I love the hand drawn look of these and the fauxdori has to be my favorite.

Included in the file is a PNG to cut with your Cricut Explore, a Studio file for use with you Silhouette, and a PDF file if you've just got your good ol scissors.  If you're looking for a way to kiss cut your stickers by hand, I hear great things about this tool.
Additionally - if you haven't heard I've created a Facebook group just for Cricut Ready printable stickers!  Go ahead and join up right here!  If you have any questions about cutting these files with your Cricut Explore, I've made a video right here for some tips!  Be sure to size the PNG to 5.5 inches wide once you've uploaded it to Design Space

DOWNLOAD PLANNER DOODLES HERE


Also, have you seen the new version of the Cricut Explore -  the Cricut Explore Air 2?  They now come in 3 super cute colors!  Any 'ol Cricut Explore will work with this tutorial but the three new colors really make me want one just because!

As always, these stickers are for personal use only.  Please to not claim the design as your own.  Do not print and disseminate the stickers in mass quantities.  Do not sell the file, design, or end product.  If you'd like to share these stickers with others, please link or Pin this blog post - not the download.  If you have any questions please let me know.  And thank you for playing nice!

If you'd like to find more Cricut Ready stickers on the blog click here.  Find all Free Sticker Friday Posts here.

xoxo, Moe

9.21.2016

Inside My Listing Journal // Free Printable Ephemera Pieces

If you watched my Listing Journal flip through & tool box video then you'll know that currently I'm obsessed with ephemera.  These little packs of die cuts and cute things can become expensive...but for the most part they are worth it!
this post contains affiliate links, please read my full disclosure here.
I've been loving these little guys to add a bit of flair and add to the story of the page I'm working on in my Listing Journal.  I haven't been sticking to one collection of ephemera, I've been loving mixing and matching the different sets I have to create a unique look.  But, gathering up a bunch of sets can get expensive (like I mentioned above!) so I decided to make some of my own...and share them with you today!
I used some images from FreePik.com, imported them into my current favorite design software, Inkscape, and created an offset around each image for easier cutting using my Cricut Explore.  I love my Cricut Explore for paper crafting and this project is perfect!  

DOWNLOAD DIGITAL EPHEMERA PACK HERE


I've created a set for you to download from the link above that includes two PNG files, a PDF file and a Silhouette file.  If you have a Cricut Explore (or Cricut Explore One or Cricut Explore Air) one of the PNG files has a 'key' with all the images included in the ephemera pack so you can store your ephemera together and still know whats in the little pack.  I store mine in those little plastic zipper bags you can find in the jewelry section of the craft store and these little 'keys' (often found on the back of the packaging of commercial ephemera packs) help me know exactly what is in the little baggy.  To cut with your Cricut Explore, simply size the width to 5.5 inches.  To cut with your Silhouette open the Studio file and adjust your cut settings to be at a depth for cutting card stock.
Remember, all printable files on the blog are for personal use only.  You many not sell the final product or the design.  You may not print and distribute these in mass.  If you would like to share this file with others, please link or pin this post and not the digital files.  As always, thanks for playing nice.
I used some of this ephemera pack in my lists about my favorite movies and my favorite stories.  I think this pack goes together well and I especially love the vintage radios.  (That is a nod to Zach who loves vintage radios - we have approximately a zillion of them in our home!)

I'll be sharing my lists over the next few days (when I remember) over on my Instagram.  So go follow me there.

Have you started a listing project?  What are some of your favorite ephemera packs?

xoxo, Moe 

8.26.2016

Free Sticker Friday // Cricut Ready Happy Mail Stickers

Time for another edition of Free Sticker Friday - this time I've got some Cricut Ready stickers for you!  I've been loving making these stickers for you all each week. I have especially been having fun making them for the Cricut Explore!  The Cricut Explore isn't the most popular machine for cutting stickers in the planner community but it is definitely possible.
this post contains affiliate links, please read my full disclosure here.

These little neon envelopes are great to mark happy mail days, snail mail going out, or even (the dreaded) bills.  To use these simply save the PNG file, upload to Cricut Design Space, add to your canvas, and size the width to 5.5 inches.  (Keep the proportions locked so that the height automatically resizes.)  Then click on go!  I use the vinyl setting on my Cricut Explore to kiss cut these, but you may also try using the Washi Tape setting.
If you'd like to find some more Cricut Ready stickers, click here.  You can also find some Cricut Explore tutorials on my YouTube channel, here.  One more link - find Cricut Explore DIY's on the blog here!


As with all printables on my blog, this is for personal use only.  Please do not sell the design as is or use the design to make anything to sell. Do not sell the printed stickers made with this design.  Do not disseminate these in mass quantities or share this file.  If you would like to share this link with friends, please link or Pin this blog post and not the file.  Thank you for playing nice!

**Updated with a PDF file included in the download!**

Enjoy!

xoxo, Moe 

6.10.2016

Free Planner Stickers // Vacation Countdown!

Anyone love free, printable stickers?  I know I do! I have a family reunion that I'm going to in July and that is counting as a little mini vacation for me so I decided to whip up some vacation countdown stickers for myself!
Every year since I was little my family has gone to Lake Gaston just of the border of Virginia and North Carolina.  This year will be the first year in a long, long time that I've actually been able to go.  So I thought I'd make some fun countdown stickers.  These little palm trees are awesome + there are some little deco stickers at the bottom for your vacation week!


There are 3 files included in the download - 1 Silhouette Studio file, 1 JPG with gray cut lines to upload to Cricut Design space (watch how to cut PDF printable using your Cricut Explore here), 1 PDF to print & cut by hand if you don't have a cutting machine.  

After you convert the PDF with the gray outlines to a JPG, it will require you to clean it up after uploading to Design Space - simply use the magic eraser to erase the entire background, then use the precision eraser to erase the text.  After you add the image to your canvas, size the width to 5.5 or 6 inches and it will still fit in the 6 x 8 inch print area.
And remember - these printables are for personal use only.  Do not print these in mass, give away the physical or digital file, claim these as your own, sell the physical or digital file, etc.  Play nice, these are for personal use only.  If you'd like to share this with your friends or add this to a Pinterest board, please pin the blog post and not the file itself.  Thanks!

Are you looking forward to a vacation this summer?  

xoxo, Moe

5.20.2016

Free Printable Weekly Mini Kit Planner Stickers - Bright Summer

I am so, so, so happy warm weather is finally here!  You know what I hate though?  Yard work.  It's not my jam, so everyone just has to deal with the fact that my flower beds are pitiful.....it seems no matter how hard I work, its not ever done.  So, just nope.

I'd rather be crafting anyway.
(this post contains affiliate links, please see my full disclosure here.)

Today I have for you a free printable sticker kit designed for these week on one page vertical inserts in the shop.  These are the inserts I've been using lately in my planner and I have to say I really do like them.  I used to be a no-white-space planner in my week on four page vertical inserts but these week on one page really lend to some white space (at least for me).  Of course, you can use these in any style planner - just have at it!

There are  two styles of these stickers - one where the patterned full boxes have a faded white box in the middle to write on, and one that doesn't have this.  There are also two file types - a Studio file to use with your Silhouette and a PDF.  But guess what?  If you follow the steps in this video tutorial you can totally use the Print then Cut feature of your Cricut Explore to cut these as well!  Both files feature an image area of 5.5 x 8 inches - the maximum Print then Cut area that the Cricut Explore can handle (I based it off the measurements for the Chrome browser so the image would work for those you may use Design Space in Chrome - that is my browser of choice).

If you have a Silhouette, simply open the Studio files and find that the cut lines already exist.  You may have to do some fancy pants stuff with your blade depth and registration marks since all Silhouettes are different.  If you don't want to waste space, use the knife tool to chop up the image and move it (with the cut lines) around. Duplicate parts that you want, etc, to fill up the print area of the Silhouette.
If you have a Cricut Explore, simply use a PDF to JPG converter (like this one) to make the PDF into a JPG to upload to design space.  Following this tutorial, you can erase the white of the jpg and have perfect cut lines for this sheet!  Once you add the image to your canvas, be sure to size the width to 5.5 inches (the height should automatically change to 8) and hit the Go button.  It is the perfect size for the Print then Cut area of Design Space.  If you get an error that the the image is too big, be sure you've sized it properly.

If you don't have either of these machines - you seriously should consider getting one!  The Silhouette is a bit more advanced that the Cricut Explore, but they both are worth it (I have both and use both for different things!)  Check out my video tutorials here and my Cricut projects on the blog here.  But, if you still want to cut by hand - simply download the PDF and get to snipping.

The headers in this printable have been left blank so that you can customize them and print as many as you'd need.  The printable features a limited amount of each element so printing at least 2 of these will get you most of what you need - so make seven To Do headers then sevn Today headers, etc in your design program and print. This can be done in both Silhouette Studio and Cricut Explore (both programs can be used for free!)  However, if you have access to neither you can use an online PDF editor like PDFescape to overlay text.  I like this one because you can rotate the PDF to overlay the text properly.  Then save to your computer and print!  Easy peasy.


I hope you enjoy this printable, please remember that this is for Personal Use only.  Do not claim this as your own, do not give this freely to others (printed or through file sharing), do not sell this printable in any form,  do not link to the file itself please link to the blog post.  Please play nice - that is just the right thing to do.  The patterns used in this kit are from the Pixeled Paper Blog.  

Let me know if you've used them, I'd love to see your layout on Instagram!  Share it with me by tagging @fivesixteenths because I'm a sucker for planner layouts!!

xoxo, Moe

4.21.2016

Free Printable Sick Day Stickers

A few weeks ago I was sick as a dog and really wanted a way to mark the fact that I felt like death in my planner.  I didn't take any days off from work so consequently the guy I sit next to got sick (sorry dude) but I did come directly home and sleep.  Sweetie was not very happy with that as she really wanted to play and cuddle and play and cuddle.  I created this little graphic using the app Phonto - which is such a fun and quick text app (I use it to create all my blog cover photos and YouTube thumbnails - it is the best) then imported it into my Silhouette software and used the Draw a Curved Shape tool to trace a cut line around each little image.
this post contains affiliate links, please read my full disclosure here.

So I have a PDF, a Studio file, AND a PNG file for you all today - so if you have a cutting machine like the Silhouette you can cut the Studio file or like the Cricut Explore you can cut the PNG File (check out this video on how to cut PDF & PNG files with your Cricut!), and if you're old school you can trim these with scissors.

**If you do cut this with the Cricut Explore, make sure when you upload the image you erase the text at the bottom of the image (that is the only cleaning up you'll need to do) and then size the WIDTH ONLY to 5.5 inches.  You may find the image to pixelate a little bit - so you might need to size it smaller :( this graphic was created at 300dpi so I'm not sure why it's pixelated!**

If you haven't considered picking up a digital die cutting machine I highly recommend you consider picking one up!  The Cricut Explore is my favorite for paper crafting and the Silhouette is my favorite for sticker making but you can totally do both with each machine.  I am very happy I have both though!
As a reminder, all the files in this blog post are for personal use only.  If you'd like to share with others please link or pin this post and do not share the file.  Do not print and distribute in mass and do not sell this printable as is, modified, or printed.  Do not claim this file as your own.  All in all, please play nice.

Hope you enjoy, and I hope you don't have to use these often!!!

xoxo, Moe

3.07.2016

Make it Monday // DIY Glitter Text using PicMonkey

Holy cow, Batman!  Another PicMonkey tutorial!  Last week I shared a post on how to offer free printables on your blog and today I want to follow up with some inspiration to create a free printable (plus offer one to you!)  It's like free printable-ception - a printable with in a printable....but let's get back on track.
If you've been under a rock for the past few years you may not have seen that glitter is the new Gaga - glitter is everywhere!  And I don't mean that glitter has exploded all over your craft room, I mean glitter has exploded all over design!  So today we're going to use PicMonkey - the simplest, yet most amazing online design tool - to create a super cute glitter text graphic for your wall!
First, start off with a blank canvas by hovering over the design tab and clicking on 8x10.  Make sure the canvas color is set to white if it isn't already.
Navigate to the text pane and add your quote.  One of the greatest things about PicMonkey is that you can use your own fonts, for free, straight from the website.  If you don't have any cool fonts installed, don't fret - PicMonkey offers an array of fonts for free.  But there are even more fonts, overlays, and effects if you sign up for the Royale feature ($4.99/month or $33/year).  It is totally worth it!

I used the fonts Coffee Break (a royale font) and Geo Sans Light to create the quote on the canvas.  You could also add any overlays or dingbat fonts (see this tutorial here) to your design.  Be sure all text and other design elements are set to black.
Once the design is finished, navigate to the Overlays pane (the one shaped like a butterfly) and select Choose Your Own from the top.  I downloaded this gold glitter image from Designs by Miss Mandee for this project so feel free to pop over there and download it for yourself.  From the Your Own menu, choose My Computer and locate where the glitter image was saved.  Select the glitter image you will use and click open.
The glitter image will appear smaller on the canvas but simply drag the circles one either corner to expand the image so that the glitter covers the entire design on the canvas.  Rotating and scaling can be done in a following step, right now just be sure the glitter image covers the entire black design on the canvas.
Next, from the overlays window that pops up once the overlay is selected find the Blend Modes drop down menu and choose Lighten.  This is where the magic happens - immediately you'll see that your text is now glitter!  Now you can rotate and scale the glitter image to your liking.  
I move the glitter image up a little bit so that I could grab part of the design (the attribution of the quote) and bring it to the top.  The smaller stroke text doesn't really work well with the glitter texture so bringing it to the top and leaving it black adds to the design.

You don't have to do this with a glitter texture image - you can use any photo you'd like.

Now save your image.  You can crop if you wish to create different sized images (great for journaling cards or planner dashboards - remember the iPhone 6s crop size is the perfect size for a personal sized dashboard)
I've made two free 8.5 x 11 printable images for you using this method - both inspired by my word of the year Forward (read more about my word here).  One is an Edna Mode quote (I love The Incredibles!) and the second is inspired by my favorite movie The Wizard of Oz.  For the Wizard of Oz image, I found the red glitter here.

Download them both here.

Feel free to print these and hang these up as inspiration, but do not resell (printed or digital) as your own, do not redistribute for free on any websites.  Please play nice, these are for personal use only.  If you'd like to share these please link to the blog post so others can learn how to create some really graphics!

xoxo, Moe

2.29.2016

Make it Monday // How to Fake a Repeating Pattern in PicMonkey

Here we go again!! Another fun PicMonkey tutorial.  If you read last week's post about using my blog to teach you'll know that one of my favorite things to teach are PicMonkey tutorials.  I have many different softwares I can use to digitally design things but if ever I want to get it done - good and quick - I choose PicMonkey.  The online program is very easy to use and honestly I haven't ever edited a photo in the program because I use it as a design tool every time I open it!  Today I want to share with you how to fake a repeating pattern (think digital scrapbook papers) in PicMonkey.
this post contains affiliate links, please read my full disclosure here

There is no option in PicMonkey to fill a shape with a pattern.  You can use some of the predesigned patterns under the collage tool or upload your own digital papers to use in the collage feature but there is no way to create your own.  Most of the time I want to create a pattern on a small scale - like for journaling cards - and I've found a little hack to create this look!

Pattern One - Using a DingBat Font
First open a 4x6 canvas from the home page.  I chose to design with the canvas vertical, but feel free to rotate it horizontal if that works better for you.  A while ago I shared this tutorial on using dingbat fonts in PicMonkey.  Today we're going to do a similar thing - download a dingbat font that you like (I used WM St Paddy's from DaFont) and choose a letter to be the base of your pattern.
Add a text box and fill the box with the chosen letter.  Create a line of text that is slightly winder than the canvas.  Keep repeating this line of a single letter until a box of text is created that is slightly larger than the canvas.  Using the rotate tool (the little knob at the top of the text box) to rotate the text you've created will give an even more impressive look.  Situate the text box so that the entire canvas is filled with the pattern.
To add dimension to the pattern, add a text box with only that single letter and change the color.  Position a few of these text boxes over your pattern.  Be sure to space them out so that they are visually equal all over the page.
Once you are satisfied with the pattern you've created, change it up a bit to get the look you'd like.  I inserted a larger rectangle, changed the color, and used the right click menu to send the rectangle to the back.  this put the rectangle under the layers of text boxes.  Then change your text boxes to the colors you'd prefer.  Working from a color palette is best for this (I suggest finding one you love on ColourLovers.com) so you can create a cohesive look.
Use as is (4x6) or crop down to 3x4 and add some text to create a journaling card.

Pattern Two - Using an Existing Overlay
Start the same way as pattern one - open a 4x6 canvas from the homepage of PicMonkey.  From the Overlays tab (the tab shaped like a butterfly) chose an overlay.  Position the overlay on the canvas, and make any changes - change the color, rotation etc.
Right click the overlay and from that menu select Duplicate Overlay.  Begin to fill the canvas with duplicates of the overlay.  Be sure to hang some of the overlays off the side of the canvas.  This gives the illusion of a repeating pattern.
Duplicate the overlay as many times to fill the canvas.  Then duplicate the overlay again (or add a new overlay) and make a change to it - size, color, rotation, etc - and use that as a new element to the pattern.  Duplicate this new overlay and fill the canvas with this new overlay.  Make sure to have some of the overlays hang off the edge as well.
Save this image as is to use later or crop to 3x4 to create a smaller patterned journaling card.  Add text and another overlay to add interest.
And there you are!! Some great ways to create patterns for journaling cards.  You can also totally create a pattern over a photo too.  (Sort of like a watermark - so check out this tutorial here.)  Additionally if you'd like this set of 3 journaling cards I've created a PDF for you to download!  Just click here.
Remember that the free downloads offered on the blog are for Personal Use Only!  Do not sell these, claim them as your own, etc.  Please play nice and direct others to this blog post and not just to the direct download link.  If you'd like to pin them, Pin this blog post and not the direct download.  

Check out more PicMonkey tutorials here.

xoxo, Moe

2.04.2016

Free Circle Date Stickers for your Planner

If there is one thing I need most in my sticker stash, it is number stickers.  I use the undated inserts that I sell in my shop - both the undated monthly and the undated vertical week on 4 pages - so instead of handwriting in the dates I love using stickers.
Today I have for you a free Silhouette file + a PDF with assorted colors of number stickers!  These colors match the rainbow color scheme I have in the shop but will look create with an assortment of any other stickers you may have!
The Silhouette file already has cut lines so you can just print and go.  If you have the Cricut, I'm thinking you might be able to use an online program to change the PDF to a PNG and upload it to the Cricut Design Space.  You'll have to clean up the image and the print area will be too big, but you should be able to crop the image down when you upload it to Design Space.  I'm going to try this and share with you here if it is possible!

Download the files here.
Please remember that these files are for personal use only.  Do not claim these as your own, sell them or redistribute the file.  If you'd like to share this file with someone, please link back to this blog post.  

Hope you enjoy!

xoxo, Moe