Showing posts with label bathroom decor. Show all posts

5.21.2014

Wednesday Decor // Nail Polish Collection & Storage

Hooray for another peak into our home!  I think I'm giving you these peaks right now knowing that in a few months we may be doing renovations on the upstairs.  Hopefully we'll be adding another bedroom with a walk in closet & a cool little laundry room expansion type of deal.  I know I said a while ago I was going to do a little laundry room make over - well I sorta did it then I put off the rest.  If it's going to change I didn't want to spend time & money on it to have to redo it later!
A while ago I posted the above photos on Instagram (follow me @fivesixteenths!) and today I wanted to share with you what I actually did with all my polishes!  I first posted about my nail polish display/collection here way back in January of 2012!  Since then I've moved & changed it a little bit.....and now I changed it a little bit again.  This post today is going to be a bit similar to this post I did previously about the perfect manicure kit in the sense that I still store my nail polish in baskets.  But I've stepped up my game a little bit & made it a bit fancy.  Peek below to see!
If you don't like seeing bathrooms - avert your eyes, especially because there's a toilet brush in there!  But I store my nail polish collection in the bottom of these three baskets in a skinny 3-section bookshelf.  This little shelf is from Target, it's about $14 and you can find these all over the place especially around move in time for college.  If you're curious - feminine products are in the middle shelf & extra TP is in the top shelf.  Just keeping it real here.  These baskets are from Target & currently on Clearance in the store as well - I can't find them online so I hope they are still in store!  I bought the bottom two full price then found the 3rd one on clearance later.
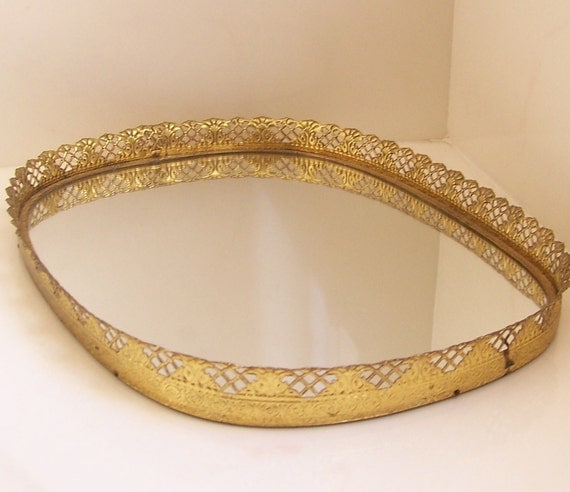
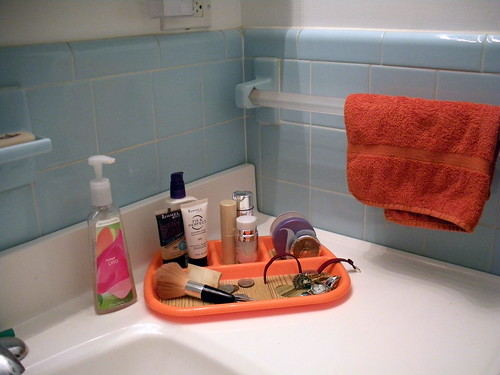
I love these baskets because the style came in different sizes & this smaller tray.  (This could totally be DIYed with a smaller tray/basket & two leather straps attached.)  This tray stacks neatly on the top of the basket and it still fits in the shelf.
In the tray I keep all the things I would need to do a manicure so I can fill the tray & take it with me.  It acts as a carry all & catch all and as a hard surface, if I need one, when I do my nails.  I wish I could link for you this little pink tray (behind the pink & black heart pouch) that is awesome for setting between your legs & using as a little table to paint your nails on....but sadly it was a gift ages ago & I can't find one.  It't pretty cool because it fans out & holds three polishes....just in case you're painting your nails on the couch or in bed.  In the pink & black hear pouch is also something I can't link because Icing discontinued their Base & Top Coat that I looooove.  I have like 5 back up bottles!  In that pouch are some of those Icing top coats & various other drug store top coats.  I like to keep those separate so I don't lose them in my polish collection.  Then I have some of my favorite polishes, nail clippers, files, lotion, & my nail brush.  I can pick all this up & take it to where I plan on doing my manicure then wrangle it all back together to put away.
Then in the big basket I store all my polishes, extra files, my nail file/drill thing (scary!), a tub to soak my hand, and nail polish remover.  As you can see from the images at the top of the post I threw out a lot of my old polishes.  I haven't bought a new one in a loooooong time!  But most of my collection is from Claire's & Icing's because I love the formula.  There's some Zoya & Nailtini from Ipsy bags, some Sally Hansen, Revlon, & L'Oreal.

It all fits so nicely in this little set up that I'm super satisfied!  Hopefully you can find these at Target now but if not, the tray is very DIY-able.

How do you store your nail polish?

xoxo, Moe

Connect on Twitter // Follow on Pinterest

11.14.2012

Wednesday Decor // Bathroom Realness

I may or may not be watching RuPaul's Drag Race reruns a long with the All Stars season as I try to organize the house.  There's a lot of Netflix marathons going on in this house as laundry is done, clothes are unpacked, & for plain ol background noise while I work.  Really & truly - I need a desk!  But the downstairs ins't even close to being desk ready so for now I'll work from the bed & the dinning room table.....hooray for posture right?

Anyway, there are very few rooms in the house we can actually have a little bit of control over: the bedroom & the upstairs bathroom.  I recently ordered new sheets in deep purple for us on super dooper sale from Amazon & am working on making or finding the perfect duvet cover.  But this post is dedicated to the bathroom.  We've pretty much got it the way it needs to be minus the shower curtain which I don't think has made it here yet.  But we bought baskets for the back of the toilet & for a little shelf for the linens (which don't match right now) so it's coming together, slowly but surely.

You may remember that Zach & I used Pinterest a lot to talk about the house while we were apart.  You also may remember that we don't agree on anything when it comes to decorating a house so it's important we always keep each other in mind.  He's got a few bathroom decor pin boards so I'm gonna run the following mood board past him & see what he thinks:


Zach has some really cool historical & nature inspired bathroom ideas that I love!  He came up with an idea for a fossil like bathroom.  Since we both love that kinda of stuff (remember the trilobites & fossils in DC?) I thought I'd use that idea for this bathroom.  Since we don't have any real fossils I thought a bathroom inspired by this idea would be really neat.  My favorite part is including the wood & stone accents along with greenery.  I also ended up finding these cool fern imprinted, almost fossil like containers & a stone soap dispenser from Uncommon Goods.

I'm not quite sure if the wooden bathmat is going to go over well, personally I'm afraid it will slip around or create quite a puddle under it.  I hate stepping on a wet bathmat so this one may prevent that! This bathroom, I think, is going to be a good blend of brown & black - totally wrong, I know!  We do already have a black bathmat & I do like the black towels so I think the dark color of the baskets is going to be a way to tie the two colors together.

The baskets we already have are from Hobby Lobby & sit on the back of the toilet and a long white shelf by the sink since with the towels since we have no linen closet!  Our sink has a cabinet & 2 drawers.  The cabinet will probably hold all the cleaning stuff - I'm a stickler for cleaning supplies especially when it comes to kitchen & bathroom cleaning (can't keep anything else clean but counters & tubs apparently!) - and the drawers have my make up & curling iron/straightener, etc.  I don't know about you, but I have a lot of lotions & body sprays....all those Bath & Bodyworks gift cards!  Oh, and nail polishes!  So the tall shelf up there will sit beside the toilet & house things that may not get used often.

So, I hope this is a good blend of the ideas we've come up with for the bathroom.  It's fun having someone to decorate with even if we don't agree sometimes.  Next, I hope to be able to give you a better idea of our bedroom!  I just got my nightstand & I need to add some silver accents so it will match the furniture we already have.  Luckily we found his exact couch & recliner set so we could order another recliner.  That's a relief!

Do you decorate your bathroom?  It is as serious as I've made it?


Connect on Twitter // Follow on Pinterest // Peep me at Hello Cotton

5.23.2011

Make it Monday: Doodle Decor

I am always on the look out for things to make my home look like it's filled to the brim with unique artwork.  I love when I don't have to spend a dime either.

You may remember my inspiration journal project that was full of doodles & drawings.
Some of them I turned into prints & others I just re doodled & framed.


This great DIY shows you how to take patterned scrapbook paper & create a framed letter


I have an alternative idea, why not take plain colored or lightly patterned scrapbook paper & draw your own pattern on top of it?
Create your own doodled monogram!
Now you have really cool doodle paper to use in other decor projects.

Slap it on your inspiration board, hang in a wall collage, bind it in a book.
The lists goes on.


How will you use your envelope & telephone book doodles?
PS. Don't forget to check out the link parties in the Side Bar or click here!

2.16.2011

Dorm Dec Wednesdays: DIY Bath Poof

I've realized I haven't yet posted or created anything handmade for the bathroom.  I guess I never really thought of it as a place to decorate besides storage.  (I guess I did post that vanity tray, but I really think that has been the only thing)

I really like bathroom decor. It can make even the smallest & not so cute bathroom an oasis to get away in.  Light some candles & draw a bubble bath when you are surrounded by things you find pretty & I am sure any one can relax the stress away.  In fact scented soap & bubble bath are my favorite. I recently bought this soap from Spotted Moth:

Blood Orange and Bergamot Organic Soap


I think Valentine's Day made me buy it
look at that red!
I also liked the name & imagined it would smell delicious!

While on Stumble today, I came across this great idea to turn old towels into bath poofs that look like roses!  Here's the finished product:

the front

the back

in process

These are perfect in expensive gifts & a great way to reuse towels! Pop over to Ruffles & Stuff for the complete sewing tutorial.  I'd say that even if you didn't have a sewing machine, you could hand sew these as well.

Happy Wednesday everyone.  Do you craft up things for your bathroom/guest bathroom?

PS. Don't forget to check out the link parties in the Side Bar or click here!

1.12.2011

Dorm Dec Wednesdays: Tin Can Organization

I love the idea of stacking to take up less space.  In a small apartment, things need to go as high as they can.  I found this cute idea for a craft room, but it would be perfect for any other room in the house:


I'd make a dozen & here's how I'll use them:

  • In the Kitchen - organize your tall & short spice containers.  Put fruits & nuts in it as well.  We always have nuts like walnuts around in the winter time.  Even granola bars & wrapped pastries would look much better here than in their boxes.
  • In the Bathroom - put your make up in different tiers according to what they are, put wash clothes & soaps with in easy reach for guests, add in your toothbrush too!
  • In the Bedroom - make a two tiered one for your glasses, change & random jewelry on your nightstand.  Create one for your beau for his watch, lose change & other pocket what-nots.  It would be great for ties if he doesn't have a lot!
  • In the Studio - Store bits & bobs like shown in the picture.
  • In the Office - store paper clips, pens, note pads, etc. Since its magnetic you can post notes to it for reminders.
  • In the Living Room - use it to display decorative accents like the yarn in the picture or store small games like cards or Bananagrams!
These are just someways to translate this craft room decor to every day decor.

Visit the original post here on Better Homes & Gardens.  It calls for a jigsaw & pipes, etc but I think you could do it the same way you would make a cake stand.  Grab some candle sticks while you pick up your tins from the thrift store & some E6000 from the craft store.  Center & glue.   


PS. Don't forget to check out the link parties in the Side Bar or click here!

1.10.2011

Make It Mondays: DIY Faux Woodgrain #2 - Vanity Tray

I am still totally in love with my woodgrain contact paper.  I was over at a friends house the other night & not only did I find a needle point portrait of a man with a mustache & a kitty but I found a really cute vanity tray.  It was gold with a mirror in the bottom.  It looked kinda like this:


I knew I needed one! But let me tell you, I don't need anything else in my bathroom in my apartment so I couldn't see going out & searching thrift stores for one.  It stuck it the back of my head for a while but then I realized I had some divided lunch trays & some of the wood grain contact paper.  I got these trays my freshman year of college when I worked at a party supply store.  I thought they'd be cute to use in my little dorm room as dishes!  I bought them in three colors: orange, lime green, & blue.  After moving into an apartment, I stored them away at my parents house & really haven't thought twice about what to do with them.  I loved them so much & I am so glad I could give them new life!


What you need:
Contact paper, tray, paper to make a template, pencil, scissors

start off by making paper templates for the divided parts in the tray.  I cut a piece of paper big enough to press down in the divided parts.  I ran my fingernail around the edge to push it down into the part to make it fit.  Then I just cut around the indentation.  The hardest one was the long one.  Make sure that your paper fits back in the way you want so the contact paper with fit that way too.


Trace your templates on the back of the contact paper.  Make sure you flip the template over when you trace it so it fits in the right spot.  I used the corner piece twice since they are just mirror images of each other.  Take the cut contact paper & make sure it fits how you want it.


Remove the backing & press the contact paper down on the tray.  This is the hardest & tedious part!  The good thing is you can remove & reposition it a bit because the tray is plastic.


I cut out a little heart of a contrasting contact paper because I thought it was adorable!

Then stick it in your bathroom or vanity! We have a huge side counter part in the bathroom at my parent's house so thats where I staged it.  I think it would also look great on the back of your toilet for candles & lotions.  You could even use one of the sections to put your rings/bracelets if you forget to take them off when you get in the shower.  Just don't knock the tray in the toilet!!


PS. Don't forget to check out the link parties in the Side Bar or click here!