Showing posts with label cheap decor. Show all posts

9.11.2018

How to Create a Personal Altar in Shared Spaces

Sometimes our spiritual practices might weird people out.  Why do you have all those rocks? people ask.  What's all this stuff on this table? they'll say.  Often as their picking items up and turning them over in their hands.  Keeping a discreet altar - whether in your home, office, or dorm room - can have an array of benefits with out having to explain things to curious folks.  Though, I am always down for it personally...it can be kind of distracting.
this post contains affiliate links, please read my fulls disclosure here.

Creating an altar in your personal space is important.  Whether it is for ritualistic practices or a place for peace and meditation, we often don't want to have our personal spaces invaded or feel odd for having them in the first place.  Keeping a discreet altar space can be perfect for those still in the broom closet or those who share a common space - like a shared apartment or dorm room, or for a more intimate office setting.  Personally, I have a big ol altar at home in my spare room that I don't care if anyone sees but when it comes to keeping somethings on my office desk - for personal power, calming vibes, and just all around comfort - I choose to do something discreetly that doesn't even seem like an altar at all!

Items to Include on your Altar

While everyone has different things on their altars here are a few key pieces to keep in mind:

The Elements 

You can represent the elements - fire, air, earth, water - in various ways.  Add plants for earth, an essential oil diffuser for air & water, etc.  You can also charge these things with your intentions as you set up your work space.  The great thing about a diffuser is that you can choose certain oils with certain correspondences but you can also charge the water with your intentions as you fill your diffuser for the day.

Deity Correspondences 

Different knick knacks on your desk can have different associations to certain deities if that is a part of your practice.  You don't need to have an all out dedicated statue that may seem out of place (we're attempting to be discreet here) but just a little tchotchke with your personal deities will add just a touch of reverence to your space.

Current/Relevant Spellwork

This may be something that might only apply if you're currently doing any spellwork around your place of business - maybe keeping a money spell present, etc.  Not something totally necessary but you may find a place for it.

Personal Power Objects

While a little woo woo for my office, I used to keep the current crystals I was working with on my desk.  These were visual reminders for me throughout the day for certain energies and emotions I was attempting to usher into my life.  Same with the essential oils I'd use.  You can also choose other tchotchke like items that have a certain personal power significance to you but that aren't necessarily woo woo.

Creating Your Altar, Discreetly

Like I mentioned, at home I go all out with what I've got on my altar - crystals, boxes, oils, incense, animal totems, sabbat decorations, I mean it's endless (and often a mess!).  But in smaller or more public spaces, we can be more choosy or specific.

 Work Space Altar

Shop this Look

Depending on where you work, your personal space may have very different types of decor.  The example above has a sleek look and features a lot of light.  This is a great little space to feel inspired!  I imagine the person in this office getting so much stuff done!

My personal desk space at work isn't as elegant as this so I choose to express my quirky fun side with some plant Shopkins (yes, I'm a 30 year old woman who thinks shopkins are the cutest), my diffuser, and other objects that remind me to lighten up.  My job can be kind of intense with a lot of frantic energy so fun little objects that lighten the mood and cheerful essential oils keep me in the good vibes category!
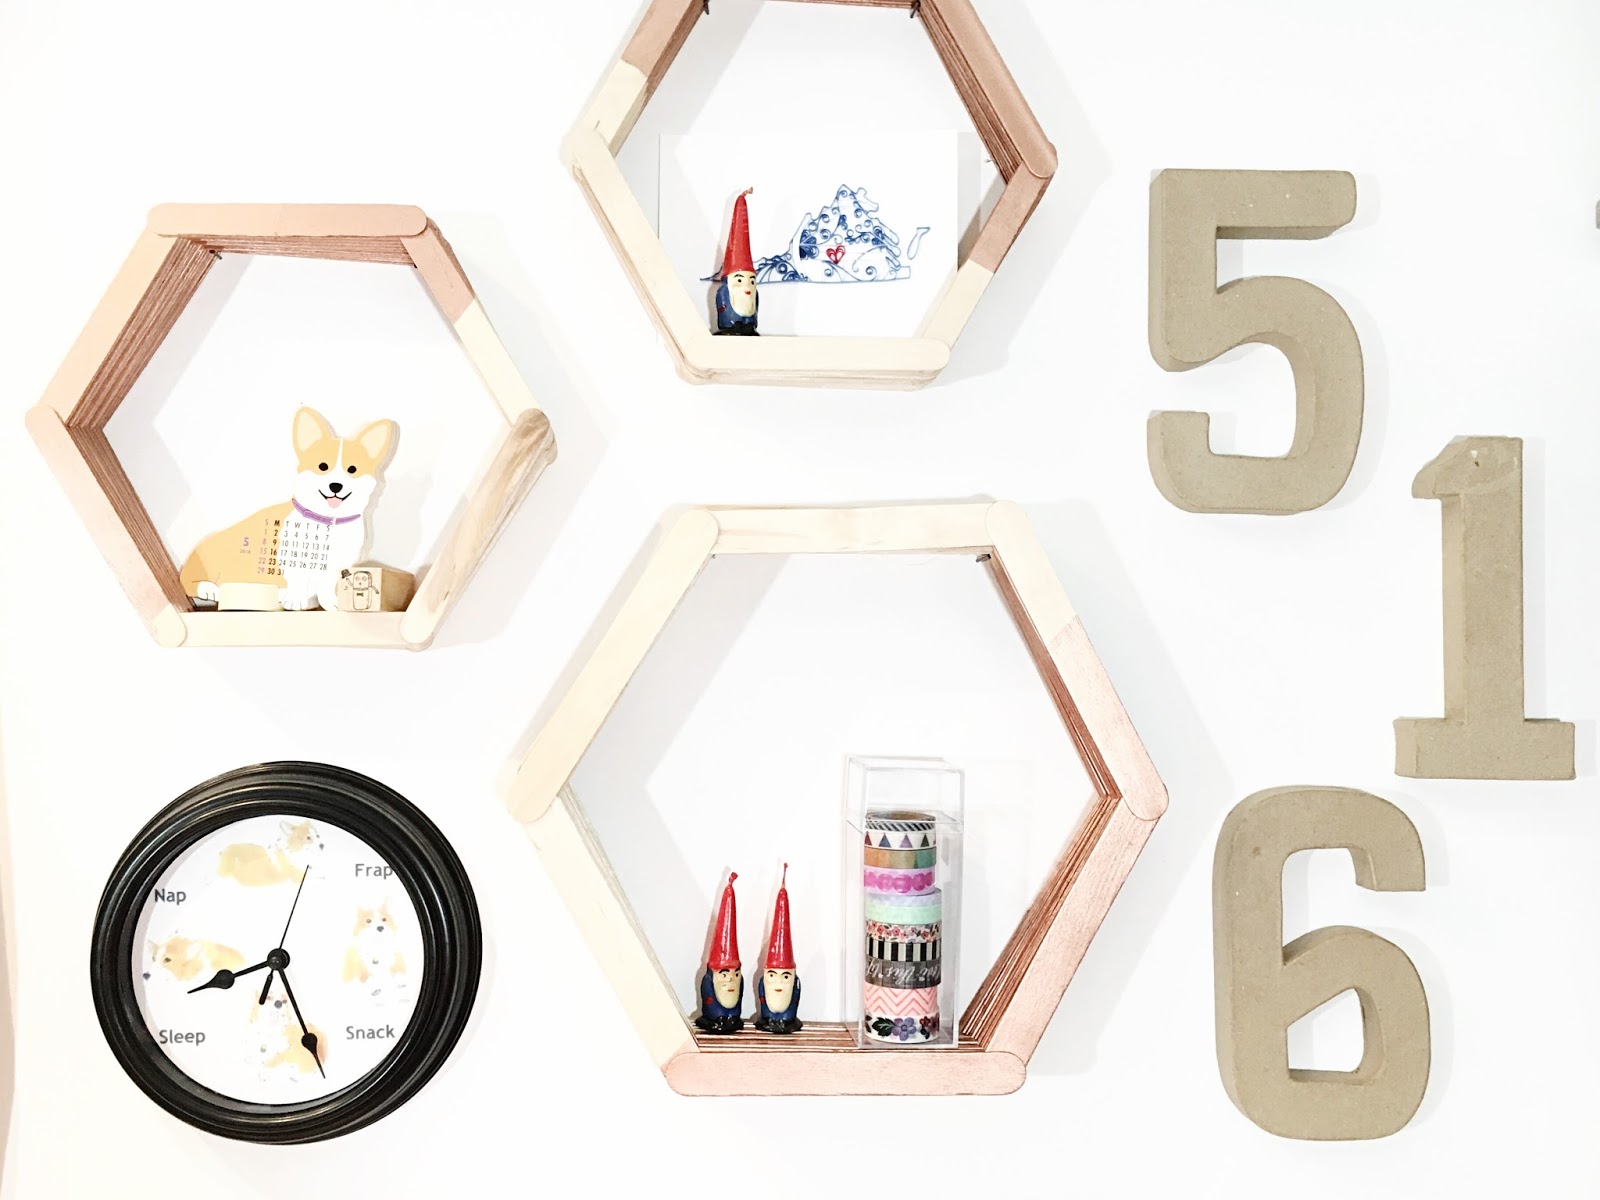
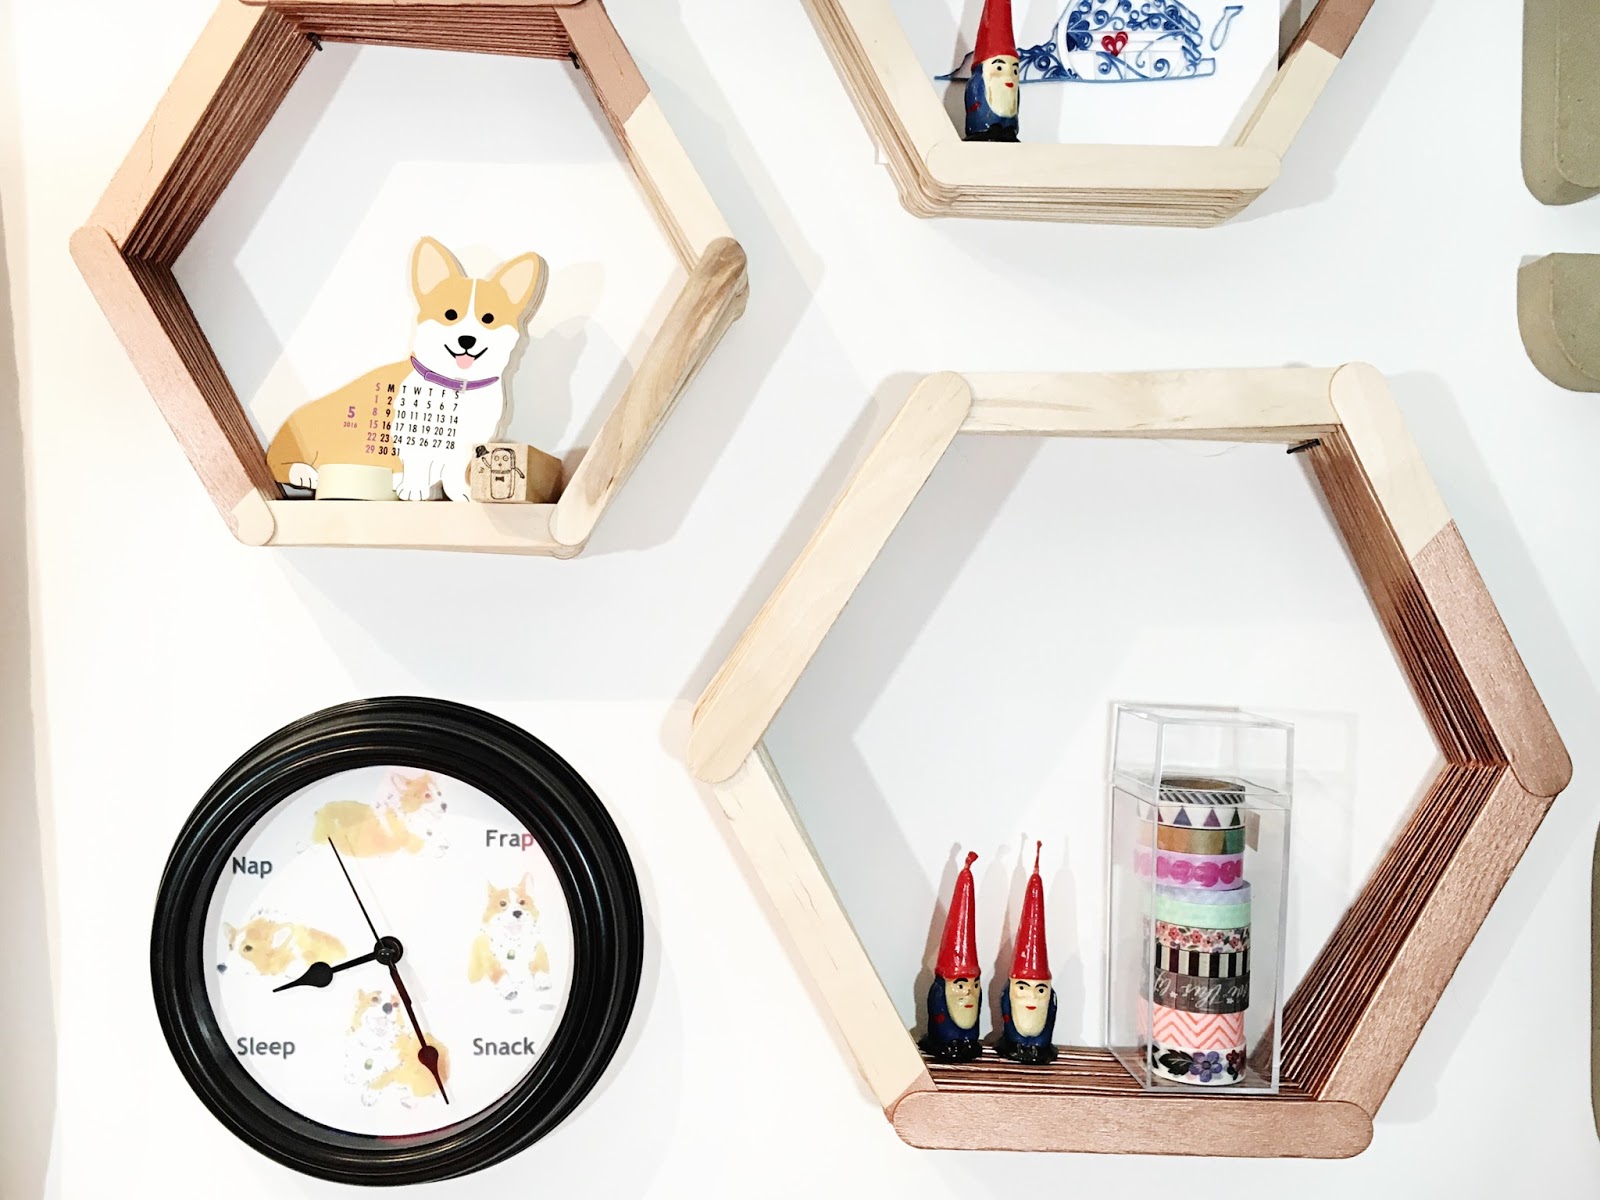
Dorm Room Altar

Shop this Look

I think most of the time in a dorm room or shared apartment we're among like minded people so it might not be too weird to have some of these things around your space. But we still might not be ready for a ton of questions.  Creating a small altar space on your desk, night stand, or little shelf in your room can make our shared spaces seem a little more sacred.

When I was in college I loved to have small collections of inspiring nick knacks.  These little collections of things really made me fill at home and gave me a space to feel inspired.

Creating these personal altars bring a feeling of safety to our spaces.  We feel at home and we feel like we can still work on our personal goals.  Sometimes we are asked to be different people in different spaces - at work I'm not going to blabber on about chakras (unless someone asks) - so bringing elements of ourselves into these spaces can give us a sense of purpose.

If you'd like to learn more about crystals, essential oils, chakras, etc head on over to join the Live & Create Facebook group where we talk about mindful & creative living through productivity, planning, and personal growth!

Do you personalize your spaces?  Do you have a personal altar at work?

xoxo, Moe

2.26.2018

Make it Monday // DIY Dollar Tree Ostara Altar Decor

Spring is almost here!  I am so excited for warmer weather and longer days.  At the beginning of February we celebrated Imbolc which is about the first inklings of spring shinging through - more active animals, longer days, maybe a hint of green here & there.  

I was compensated for this post. This post also contains affiliate links and I will be compensated if you make a purchase after clicking on my links.  Please read my full disclosure here.
Today's DIY is focused on creating budget friendly Ostara decor from supplies found at the Dollar Tree!  There are a ton of pretty spring things out right now.  My favorite find was the springs of lavender which is perfect for this project.  Purple is such a spring color.  And I found these amazing speckled eggs that look like they came from a high end decor shop.  Dollar Tree for the win - 6 pastel speckled eggs in a little egg container for only $1!  I couldn't link these for you below, but I've linked what I can.  Even the bunnies came from the Dollar Tree.  Assorted Spring decor for $1 each!
supplies : mini wreath, lavender sprigs, speckled eggs, moss, hot glue gun & glue sticks, wire cutters/snippers

Start by snipping buds from the flower bunches.  Don't snip too close to the base of the flower, you want to make sure there is enough stem left to push into the wreath.  Organize the flower sprigs on the wreath form the way you'd like.  Using the glue gun place a line of hot glue on the stem & push it into the wreath.
Pull some of the leaves from the stems & add those in to your floral mix.  This creates a little bit of depth to the arrangement.  The arrangement is going to be on the side of the wreathe, so press these leaves into the arrangement upright.
Next it is time to add the speckled eggs.  We're mainly working with a lot of visual balance in this project.  The floral arrangement is on the right side of the wreathe and the egg & moss grouping is going to ground back down the overall design.
Attach the moss to the wreathe by putting glue on the wreathe first then pressing on the moss.  The moss sticks together, but small pieces will fall off.  It was a mess.  Pressing the moss on to the glue allows you more control over it.
Keep it balanced by creating a cluster of three eggs in the moss.  I chose pink, yellow, and blue for the eggs to compliment the purple lavender sprigs.  Adding two egg in the front & one egg in the back makes a lovely little scene.

Now for some facts:

What is Ostara?

The Vernal or Spring Equinox falls on March 20th.  Also known as Ostara, the Spring Equinox celebrates the balance of light and dark with light beginning to increase until we get to the longest day of the year the Summer Solstice.  It is one of the eight holidays or sabbats on the pagan Wheel of the Year.

This Pagan holiday celebrates the maiden goddess that overseas the budding of plants and the idea of fertility as she begins to interact with the horned sun god.  The maiden goddess transforms over the year from maiden, to mother, to crone.  She is fertile now, just as the earth is, ready to conceive.  So now is the time to celebrate planting & new life to harvest later in the year (at celebrations like Litha & Mabon).  We can also celebrate a goddess like Persephone who has emerged from her stay in the underworld.  I personally think Ostara celebrates newness & new life.

Easter, the Christian holiday celebrating Christ's resurrection, is most closely related to Ostara as it celebrates rebirth & shares similar symbols.  However, Ostara & Easter don't really have any close linguistic relations (from what I've read when trying to find a definitive answer on this).  These two holidays seem to just fall closely & share symbolism.

Symbols of Ostara

Around this time we start to see a lot of bunnies & eggs pop up in our stores seasonal aisles.  Eggs have always been a symbol of 'seed'.  Eggs are a symbol of opportunity & growth as the hold the entirety of potential inside of them.  Think of an bird's egg - a self contained unit that nourishes & protects the bird while it grows.  Decorated eggs are fun & a great way to spend time with a symbol you'd like to work with - so coloring eggs with your family using a PAHS dye set isn't necessarily a pagan (or Christian) thing but it is still an important part of spending time with family & carefully prepping for the coming holiday.

When it comes to hares or bunnies, this animal has been associated with fertility for a long while.  Apparently a rabbit can conceive another litter, while she is still pregnant!  And we all know how rabbits seem to multiply exponentially.  So that symbol comes with a little bit of science.  We're also seeing animals stirring during the spring time and that can lead to an association between the bunny & Easter/Ostara/the Spring Equinox.
I can't wait to sit with these symbols at my altar while I celebrate the longer days and the development of ideas.  I've spoken before about how Mabon, or the Atumn Equinox, is like the Full Moon for me, well the Spring Equinox is like the New Moon.  It is a time to set & refine intentions for the year (even though you may have done this in January).  You can also work with the New Moon in Aries energy that falls in April this year to set goals & intentions.  Spring is a great time to see new growth & new opportunity in your life, especially after the reflection & release that was the Winter Solstice.

Use this time to celebrate the longer days, the warmth coming, and the seeds you can plant towards becoming your best self.  If you haven't started a new habit, try one out!  If you've got a new idea, refine it a little then offer it up to be nurtured by your hard work.

How do you celebrate spring?  What do you do to celebrate the spring time?

xoxo, Moe

6.12.2017

Make it Monday // Easy DIY Meditation Bolster Sewing Project

I'm in the middle of redoing the spare room downstairs with some bohemian inspired bedding I got for a super great deal from our local Meijer.  One of the key parts of the spare room downstairs is my sacred space!  This is where I go to meditate, journal, and all around connect with myself.  I love that this space of mine is separate from my actual bedroom because that means it is a place I can go to.  It is a place I can show up to when I need to. 
Easy DIY Meditation Bolsterthis post contains affiliate links, please read my full disclosure here.

Today I want to share with you how to make a comfortable meditation bolster.  This project was easy...yet annoying.  You'll totally love the results...but you may not ever want to make a pillow again.  Before I made this guy, I was using a small pillow.  Once I realized that pillow wasn't high enough and just wasn't supportive enough I went on to use one of the chairs from my craft table.  In the end, neither of these options had the right height or support for my booty.  So I thought to myself 'hey, you can make a bolster!'  and that's what I did.
How to Sew an Easy pillow
Shop Supplies on Amazon!

supplies // fabric (I used an extra sheet set to match the new bedding), sewing machine, matching thread, ruler/measuring tape, pins, bean bag chair beans, 1.5 inch button cover kit, doll needle

I started with 6 fabric peices - 2 14 x 20 inch pieces, 2 14 x 9 inch pieces, and 2 20 x 9 inch pieces.  This pillow will be stored in the bottom shelf of my meditation altar so I took these measurements to ensure it fits.  Feel free to make your pillow a different size, but this guy is the perfect height to elevate your bum enough so your legs don't fall asleep during mediation!

Pin the right sides of the 4 squat pieces together and sew up the short sides to create a long strip of fabric.  The seam allowance here is set to be .5 inches.  In hindsight, I would have used just a long, single piece of fabric as the sides of the bolster rather than sewing these 4 pieces together.  I also suggest using a zig zag stitch for strength.  I'm using some cheapo fabric so the zig zag stitch gives the seams a little more substance.  Leave an opening to add the beans
Turn Corner on Sewing a Pillow
Pin the top and bottom pieces (the 20 x 15 pieces) to the top and bottom of the tube you've created - make sure you're pinning everything right sides together.  This is the tricky part & where the single long strip might have been better.  As you're sewing around and reach the corners be sure to pull the extra fabric out so that you're not sewing over the corners too much.

Turn the pillow inside out so the right side is now facing outward & fill it with beans.  This is going to be the messy & most annoying part.  The end result is so worth it though.  I used a paper funnel and measuring cup to funnel the beans into the pillow.  Once you get the pillow good and full, test it out.  If it feels overstuffed just shake out a nice chunk of the beans.  Hand or machine stitch the little opening closed.How to Make a Covered ButtonTo finish the bolster, add a coordinating covered button.  You can pick up these covered button kits at your local sewing shop so this isn't something special you'll have to seek out.  Simply follow the directions on the back of the package.  Cut a circle to the required shape, place it over the form, push the button into the form.  Fold the extra fabric over, place the button backing on top, and push it down to secure.  Bam! Button.Add a Button to a BolsterDIY Mediation Pillow
Using the long doll needle and doubled over thread - you can even use two strands, doubled, for extra strength - attach the buttons to both sides.  Poke the needle through the center of once side to the center of the other side of the bolster.  This may take a few tries. Once you reach the other side, slip a button through then pass the needle back through to the first side.  Add the second button, pull taught, and secure with a few knots.

And you're done!  See, easy peasy. Though slightly annoying.

Using this bolster now relieves the pain on my hips, allows the blood to circulate, and gives me the right height to see my altar.  It also fits perfectly into the space under my altar table.  The altar table itself is a TV stand from either Walmart or Meijer, I can't remember. (Oh! Walmart is also a part of ebates!  Be sure to sign up here if you haven't started to use ebates yet!).  It has shelving space plus a little door with some shelve too - perfect for hiding away journals, etc.
Sacred Mediation SpaceSacred Meditation Space
I am in love with this little space.  Be sure to check back soon to see the whole room put together + some other decor DIY's!  If you'd like to check out some of the other rooms in my house I've got a living room tour + a craft room tour over on my YouTube channel.  You can check out the bedroom tour here on the blog.  Need more DIY decor inspiration? Click here!

Do you have a sacred space?  Where do you go to connect with yourself?

9.13.2016

Trend Tuesday // Dollar Tree Home Essentials

Saving money is an important thing to me.  I like to spend money but I like to spend it wisely!  The Dollar Tree has become essential store for me & my budget.  Finding affordable solutions for various areas of the home is sometimes hard to do.  I know the Dollar Tree hasn't always been my first choice for anything but recently I've found affordable and attractive decor & storage solutions as well as quality everyday essentials.  Not to mention you find something new nearly every time you walk in!  Here are my home essentials from the Dollar Tree.
(this post contains affiliate links, please read my full disclosure here.)

Kitchen Utensils
I break a lot of things in the kitchen.  I can't tell you how many times I've broken a glass just by looking at it.  So I buy a lot of my kitchen essentials from the Dollar Tree.  The main thing I purchase from the Dollar Tree are wooden spoons and various other serving style utensils.  Wooden spoons aren't supposed to go in the dishwasher (this is why I try not to have wooden handled knives as well).  I was everything in the dishwasher.  If it isn't dishwasher safe, I don't buy it.  So I purchase a lot of my serving utensils from the Dollar Tree because I'm only out a few bucks when they eventually crap out on me, I break the, or they just don't make it through the dishwasher one last time.  The Dollar Tree has a great array of kitchen utensils to choose from (some even name brand like Betty Crocker!)

In this post about creating various cleaning caddies with Dollar Tree products, I used some super cute plastic bins.  I also mention how those caddies help me with the 3 Waves Cleaning Method here.I love the Dollar Tree for the various storage solutions they offer.  If you want the best selection of storage containers in store, I've found the best time to go is at the beginning of the year.   If you're looking for a specific color I'd suggest looking during a holiday that color would be more common.  For example - pastel durring Spring/Easter, brown during Fall/Thanksgiving, purple during Halloween, red during Christmas, etc. They do offer an array of colors in general but shopping for storage solutions seasonally will give you the best chance to match any existing colors you my already have going on in the space you need storage for.

Fall is nearly here and Halloween will be around the corner.  Dollar Tree is my favorite place to go for some essential crafting supplies.  While sometimes the supplies may not be as full - like a bundle of flowers, for example - I love picking up smaller filler pieces and wreath bases.  These more affordable starting points and accents are great to add more to a project you may have started from the craft store.  I love to purchase things like wreaths to use as a base to make a fuller wreathe because I'm paying $1 for a base rather than upwards of $3-$5 to start my project.  Their Fall selection of decor is warm & inviting while the Halloween offerings are creatively frightening.  If you haven't checked out the Dollar Tree blog for creative inspiration you should check that out as well.  They've got quite a few fund projects to try using their seasonal products!

The bulk buying option also means you'll always have what you need on hand.  While that may not be the best for kitchen utensils, it is great for gifts & decor as you get more bang for your buck!

Do you frequent the Dollar Tree?  What are your money saving must haves?

xoxo, Moe

5.09.2016

Make it Monday // DIY Hexagon Popsicle Stick Shelves

I am willing to bet you at least $5 that the first craft you ever made was using Popsicle sticks.  Today I want to share with you a really cool upgrade to popsicle stick crafts - one that I think is resourceful and also great for a crafty room.  It pays homage to our paper and paste days of crafting.  When we were young, free, and glued colored macaroni to various object.  This project upgrades the traditional popsicle stick to something a bit more classy.
(this post contains affiliate links, please read my full disclosure here.)

I present to you the popsicle stick hexagon shelf project!  I had a blast making this and it whipped up super quick.  This is perfect decor for a craft room - in my opinion!

supplies :: various popsicle sticks - I used 90 (3 total packs) of Super Jumbo Popsicle Sticks for the larger hexagon & 75 - 150 (1-2 packs) Jumbo Popsicle Sticks for each of the smaller hexagons, adhesive - E6000 is stronger but hot glue is faster (I used hot glue for this), painter's tape, spray paint of your choice (I used a rose gold paint), optional hexagon template, nails & hammer

To easily make an even hexagon I suggest starting off with a template.  I used my Cricut Explore to cut out an 11 inch wide hexagon from some unused scrapbook paper.  I love my Cricut Explore for paper crafting - I love that if I have an idea I can whip it up in a matter of seconds.  This is a simple shape for the Cricut but it would take me forever to come up with the correct shape.  (If you haven't thought about a digital die cutting machine - I suggest the Cricut for all your paper crafting needs).
Lay out your popsicle sticks along the edges of the hexagon template.  Adhere them together - in this case with hot glue - so that you are able to stack them against each other in a Licoln Log style.  You should have three popsicle sticks on the 'bottom' and the other three layered on the the 'top'.  This way you can alternate where the sticks are placed to get a 'woven' type of pattern.  So in the picture above the last popsicle stick is glued right on top of the the ends of the two beside it.  Continue gluing the sticks in this manner until you get the depth you'd like.  Repeat for as many little shelves as you like - odd numbers always look best, so I went with 3.
Using painter's tape, mask off where you want to paint your mini shelves.  It may help to arrange them on a table in the manner they will be on the wall to visualize where to paint.  Be sure to tape the inside as well so that you don't get spray paint in places you don't want it.
I also found it helpful to use a pencil to mark the up position so I'd know how I was hanging these once they were dry.  When they are dry, remove the painters tape and hang with two nails on either side of one side of the hexagon.
These shelves aren't going to be the strongest things in the world, but for little knick knacks I think these shelves are perfect.  Every time I look at them I have a little chuckle - I think they look super neat, but they are totally made out of a kids craft supply!!

Do you have any memories of crafting as a kid?  What is your earliest one?

xoxo, Moe

8.18.2014

Make it Monday // Five Back to Campus DIY Projects

I am 3 years out of undergrad.  I haven't been back to school in 3 years.  But that doesn't mean I can't get in on the back to school spirit.  Is it weird that a 26 year old loves back to school time?  I hope not!  I loved getting back into my campus during college & finding new ways to decorate my dorm or my apartment.  Since things changed every year I could really switch it up often.  Man I miss those days!

Here are 5 ways to spruce up your dorm life & campus wear for the 2014-2015 school year:
Add a pencil case to your small, three ring binder or planner using this tutorial.  You'll need a plastic pencil case, sewing machine, and hole punch.  
Make a simple, 10 minute abstract painting with this tutorial.  You'll need paint, these squeegees or an old credit card, and a hair dryer.
Knit two simple hats to spice up your campus wardrobe with this tutorial - no circular needles required!  You'll need large needles, chunky yarn, scissors, and a little bit of time.
Revamp a thrift store tray with paint & stencils using this tutorial.  A great way to spruce up your dorm or college apartment.  You'll need a thrifted tray, these Handemade Charlotte stencils, paint, and brushes.  
Create a key catch all with this tutorial to add to your decorated tray.  You need a small wooden bowl from the thrift store, chalkboard paint, sand paper, and a brush.

Just for fun, here is 2012's Back to School DIY round up.  Why didn't I do one in 2013???

Happy back to school time!

xoxo, Moe

10.07.2013

Make it Monday // Dorm Decor - A Website to Make Posters

If you're still looking for something to put on your drab dorm room walls - I mean it's October, you've got to be nearly done decorating right?  Well, if you're not I've got a really cool site to share with you today called recitethis.com.  If you're not too design proficient to used a free site like PicMonkey to make some art for your walls (like this tutorial), this site has already done it for you.  Here's how:
Visit Recite This & type in a quote you like - there are thousands out there & zillions on Pinterest!  Don't have one in mind or can't find on there? Click on find a quote and explore.  I pin my quotes to a board called Hello Monday so I can have a pick me up at the beginning of the week.  Heck, you could even make a whole quote wall in your dorm room or apartment.
You can then choose from quite a few different poster styles.  Once you've found the one you like click it to be directed to the screen to download.  Don't want to download? Share it on your social media sites!  You can even go back if you've decided you don't quite like the poster style you've selected.
Once you've downloaded your image print it on a standard sheet of paper.  You can do this at home, at the library, or take it to a print shop - just print it out.  Then either frame it like I've done or use decorative washi tape on the corners to stick it to your wall.  If ever you're feeling down you'll have something to pick you up.

xoxo, Moe

Connect on Twitter // Follow on Pinterest // Peep me at Hello Cotton

12.14.2011

Dorm Dec Wednesdays // Great & Real House Tour

I am always inspired by people who live in eclectic & totally DIYed/thrifted homes.  It's hard living in a place with other people especially when we each have different views on home decor.  I may have mentioned it before, but my room mate & I are oh-so-totally different when it comes to home decor.  I am totally kitsch/glam/knick-knack/tacky/vintage & she is miss match-the-curtains-to-the-couch-and-the-pillows-too let's-not-have-too-many-colors-going-on-here.  My boyfriend is also this way.  If we ever end up in a house together (waayyy down the line, I might add) I don't know what I am going to do.

In college, my room mate's loved my eclectic boho-chic kitschy style.  I've seen that growing up & moving out doesn't really jive with my home decor choices.  My room is a burst of crazy (yet perfectly cohesive & oh-so moe-licious) while in the common rooms of the house I have to sneak in some toned down pieces of mine.  Little do they know that the brushed gold 12" gnome I just bought will be gracing the living room's presence shortly!

Also, I think I've made up too many words.

While perusing the oh so lovely YouTube, I came upon this great house tour by Mr. Kate.  Not only is she a DIY diva, she just happens to have a totally chic & affordable home.  Hell, she has a totally chic & affordable lifestyle!

Peep the video to see how cool she is:


I love how she mentions that she loves cheap clothes because I live off of Thrift stores, Clearance, Forever21, etc.  Your life can be so sweet even on the cheap!

What are your fave parts of your home? Do you have trouble decorating your home?

P.S. It's also my mother's birthday today!  And mine is tomorrow! I'll be 24.

7.06.2011

Dorm Dec Wednesday: Thrift Store Paintings

I love having artwork in my home.  The work I wish I had more of is paintings.
Those old paintings that look like they've been around for ages are the ones I love.
The ones that slightly remind me of Degas - they are sort of impressionistic & sort of paint by number.

My gramma has a painting of  a little girl in a bright pink dress & hat on a green background.
It is so cute but it used to scare the crap out of me when I was little.

I'd like to hang that on my wall one day


Make your own silhouette from a picture & thrift store painting


PS. Don't forget to check out the link parties in the Side Bar or click here!

6.23.2011

Things to add to my Thrift List


So, we've finally settled on a place to live, I have the prospect of a new job,
 & I can't wait for things to just smooth out
(please send positive job thoughts my way today!)

I've been thinking of some new things to add to my thrift list since we might go out thrifting today:

- large mirror

I really want a big one to lean to the wall on top of my dresser.

- alarm clock


- rake head


Isn't this the greatest?? I know a junk shop back at school that had everything related to old tools like this. I really hope I can find an awesome little shop in my new town!
I still haven't found a great thrift shop yet....but it's my quest!

- storage baskets


You know, cuz you can never store enough things!

- assorted tins


I really want a little place on my dresser with a tray & some candles, right in front of the mirror.
It will look so cute, right? 


I just can't wait to be settled.
What are you looking to thrift?
PS. Don't forget to check out the link parties in the Side Bar or click here!