Showing posts with label homevember. Show all posts

11.20.2013

Wednesday Decor // Virtual Living Room Tour

I'm retro posting this post because I realized I never got it up for Homevember! What was my problem?  Well here it is now & as a video none the less!  Stick around for a little bit of a blog make over here soon adding my YouTube channel & a little refocusing of the online shops.  Anyway, here's the video:

Read about the before & after here.  Hope you enjoy!

xoxo, Moe


Connect on Twitter // Follow on Pinterest // Peep me at Hello Cotton

11.13.2013

Wednesday Decor // Our Total Basement Redo

You probably know if you've been reading this blog for a while that we undertook a total basement redo when we moved into the house.  I've shared it here before, but for Homevember I thought I would corral all the pictures into one big post for posterity.  When we moved in, the first floor of our house - sort of like a basement if you will, was a two bay garage with a bedroom.  Now we have a smaller garage & great big living room/office area!
Here's what our idea was when we first started talking about it.  It's changes a whole lot!  For reference, the long part in the front with the lving room & work area was the first long bay of the garage.  The dotted line at the top of the living room area was open - no wall - and went into the second smaller bay of the garage.  I don't think I have pictures of this part but we tore out a huge closet that was to the left of the stairs where that door is crossed out there by the desk.  Here's what the downstairs looks like now:
As you can see a lot has changed!  We put up 5 walls - one to divide the garage from the living area, one to replace the garage door at the end of the living area, moved the one in the spare room to make the bathroom, utility closet, & closet bigger, and walls to separate those!  Here are some in progress photos:
I don't think I have the original image before I added the text for this post
So here's what separated the bays of the garage.  We put the wall there.
Above is the wall that had a closet on it.  We ripped out the closet to give more space & we ripped out another doorway by the closet into the garage so the space would be open.
Below starts a peak at the spare bedroom & the bathroom/closet/utility room.  We split up the long bathroom into utility room that was there before in order to give the bedroom a closet.  I believe in order to be considered a bedroom it had to have a closet - so we made the tiniest closet on the face of the earth!
Those are all the in progress pictures of the spare bedroom! We're still not totally done with the spare bedroom so no photos this Homevember go round - but keep a look out next year as we keep on updating!

Also, next week will be pictures of out Living Room & how it's styled etc.  Then the week after will be pictures of the office area.  It's not totally done yet either - we've got some adding & styling to do but you can get a peak at it!

This basement redo was exhausting & fun and I'm so glad we have more room in the house now.  I would have felt like I was living in an apartment if we'd just kept the upstairs.

xoxo, Moe 

Connect on Twitter // Follow on Pinterest // Peep me at Hello Cotton


11.06.2013

Wednesday Decor // Our Bedroom & My Vanity

There are two rooms I'm very proud of in our house, whoops there are three - our bedroom, the living room, & our office.  These are the three main rooms I'm going to highlight this Homevember with bits from other rooms thrown in.  The first room is our bedroom! I really like our room - at first it was very hard to decide on how to decorate since we both have very, very different tastes, styles, ideas, etc.  But I think we did a good compromise - I hope Zach thinks so too, even though a lot of my things seem to spill onto is night stand - but the Make it Monday from this week is supposed to fix that!  On to the pictures of our bedroom & my vanity!
 View from standing in the doorway facing into the room
 View from the left corner of the room, the door is to the right
 DIY from Monday, check it out here
 Bird's eye view from the left corner
 Bird's eye view from the door way
View from standing by my vanity

Our room, if you can't tell, is very tiny.  And actually when I'm not lazy the bedroom often looks like this though I have been lazy lately.  Often the overflow of make up ends up on Zach's night stand - but those new decor boxes are supposed to prevent that!  We haven't added any artwork yet and I'd like to add mirrored doors to the closet, but I'd say it's pretty nice.  Here's where everything is from:

Bedspread - Walmart.com // Sheets - Amazon.com // Standing mirror - yard sale, painted // Dressers - mattress place Virginia // Nightstands - Big Lot's (I almost missed out on a matching one for Zach, phew!) // Vanity (comes with the mirror propped up on the tall dresser) - Amazon.com // Mirror over vanity - Big Lot's // Lamps - brought from our own places before we met

Connect on Twitter // Follow on Pinterest

11.04.2013

Make it Monday // Fabric Covered Storage Boxes - 1st Homevemeber Post!

A long while ago - like even before we moved into the house - Zach bought me a set of two cute little storage boxes that were shaped like suitcases.  I'm pretty sure he got them from a garage sale.  I loved them (still love them) but they were a brown color & covered with like faux newspaper clippings to make it look a bit vintage.  I liked them the way they were but the didn't really fit into anything we had in the house.  A few weekends ago I sat down to do something with them.  My first thought was to get some fabric & cover them - but I scratched that not wanting to spend any money on fabric.  Fast forward a bit & we needed a new (bigger) bedspread.  A queen on a queen size bed is just not big enough for two blanket hogs.  I'd kept an eye on the bigger size of a similar style of our old bedspread, waiting for it to go on sale.  When it did, I snatched it up.  It came in the mail and I put in on the bed, discarding the king sized pillow shams I knew we wouldn't use.  Then it hit me - I now had fabric to cover the boxes & it would totally match our room!  I had already painted the small one black but was all over covering the bigger one in this fabric.  So, if you're interested in seeing what I did then stick around!
Supplies  :: box you want to cover, pencil, paper to make your template, ruler/yard stick/straight edge, scissors (for fabric & for paper), mod podge for fabric, sponge brush, screw driver if your box has any hardware you have to remove, straight pins, fabric (vintage fabric would be beautiful) or old pillow case (one half of a king size pillow case covered all of this!) , old credit card or plastic card to smooth out your  fabric
First, remove all the hardware from your box with a screwdriver.  If your box has little feet on it, they probably will screw off....just give it a little try & use pliers if you need to.  Now you can move on to the fun part.
If you have a funky style box like I did, you'll need to create a pattern so that the fabric sits in the place you want.  I taped two pages of used printer paper together & used a pencil to trace around the inset to create a pattern.  I cut it out a bit bigger then trimmed away making sure it fit.  You'll want to mark the top side of your pattern so you know how to place it on the fabric & how it will fit on the top of your box.
Pin your template to your fabric.  Make sure to cut out two of these patterns so you have one to cover the lid & one to cover the bottom of the base.  Remember to cut bigger than you think, then trim.  You can always trim but you can't put it back!
Next I used a little ruler thing (it's for sewing, if you know the name let me know!) to measure out how much fabric to cut for to wrap around the perimeter of the box.  Here is where I should have measured better or made another template - the measurements were not the same all the way around so there's some gaps between where the fabric meets the stitching on the sides!  So measure everything!  Then I just transferred the measurements to a straight edge of my fabric by marking every few inches or so & used a straight edge/ruler to create a rectangle long enough to fit around the box - you should have one long fat rectangle & one long skinny rectangle.  Then I repeated the measurements to cover the back of the box where the hinges are - this creates another fat & skinny rectangle.

Here are the pieces you should have:
Now using the mod podge, apply a thin layer with your sponge brush.  You may have to work in sections - I found I had to so I didn't get glue bits or sticky fingers on my fresh fabric.  Place the fabric on the box smoothing it out as you go.  Use the credit card to smooth out any bumps if you need to.  Per the instructions on my mod podge, I let the whole thing dry for two hours before applying a sealing coat.  Don't mind my messy desk - but I didn't think using mod podge on the carpet was a good idea.
Once you've applied your sealing coat let it dry for a good while - I let mine dry over night.  Then screw all your hardware back on & smile because you are awesome!  You now have a beautiful box that if you wanted could match any decor you desire.  I wish we used all my vintage sheets because I'd have covered this in pretty floral fabric & would have just melted.  But this damask pattern is just fine.  If you have a matching box you can paint it like I did using two coats of acrylic paint.  I like that these don't have the same coverings, the look more collected that way.

Hope you enjoyed this Make it Monday!  This is one of the first posts in a new little series this month for Homevember - something I really wanted to do right after we moved in last year, but it was so impossible to do.  So there will be a few posts on home decor, home improvement, etc this month to share with you our year old little home!  Of course there's a lot that isn't finished but such is life.

xoxo, Moe

Connect on Twitter // Follow on Pinterest

4.03.2013

Wednesday Decor // Style an Eclectic, Old World Bookshelf

If you've been following a along with our home renovation, you may have noticed that we got this awesome bookshelf custom made for our house to act as a room divider between our living room & office space.  Here's an idea of it in action:

This is the long room that used to be a long garage bay - can you believe it? All this used to be concrete & a garage door!  We also put up the wall with the fire door, we're pretty bad ass.  The carpeted area is now the living room & the hardwood is our office area - which is still kind of a mess! Slowly but surely guys, slowly but surely!
This is from when we first got the bookcase & stuff just got piled on it.  Now the side facing the living room (the side with the carpet) looks almost all put together!  Today I want to share with you our collection of books & knick knacks we've used to create an eclectic, old-world library feel.  I love adding bits of collections to this bookcase it's becoming a pretty cool piece of art in itself.
This is what the living room side of the shelf looks like.  I'm loving the old-world feeling the living room is taking on.  Part museum, part library, part entertainment center.  This decor really brings out my love of charm, if that makes sense.  Our collaborative style is very different from our individual  styles.  It's been really interesting working together to create our house.  The next step for this room, I think, is deciding on what goes on the walls!  We've already agreed on an awesome clock and next is going to be the art & wall hangings.

Zach has always been a collector of books - a lot of books on many different subjects.  Its something that I really love about him.  We styled this books shelf with the idea of a library/museum in mind.  To showcase some collections from our travels & to add a bit of old world charm.  The most important thing we kept in mind while styling these shelves was to tell a story.
I love when items tell a story.  It just makes a place cozier.  That's one reason why we curate the vintage shop the way we do!  All these books tell a story of who we are, of our interests.  We share similar interests in history & art so I'm glad I came into such a wonderful collection.  Mixed into Zach's books are my books & tells a story of us coming together.  My art books, French language books, & favorite novels now mingle with his & suddenly I have new books to flip through!

For me the colors are a sort of inspiration for me like a giant living of abstract art.  The books have patterns - both on their covers & on some end papers - that make me feel inspired.  It's like touring the Library of Congress everyday!
Our bookshelf is also filled with little curiosities that make everything a little more interesting.  Like Pear Brandy with a pear in the jar, an assortment of pewter mugs, a few old medical boxes with empty jars, a Ball jar featuring my collection of rocks from my first trip to Lake Michigan, Crystal Head Vodka (looks really cool!), & a pretty cool purple glass bottle (my fave color) on the bottom.

This collection of pretty bound books & things that just say us make me happy.  I'm loving the old world charm coming out in our decor & I can't wait to see it all come together.  We are moving right a long!

How do you style your shelves? Did you have to come together on design with your significant other?

xoxo, Moe

Connect on Twitter // Follow on Pinterest // Peep me at Hello Cotton

3.25.2013

Make it Monday // The $65 Crochet Blanket

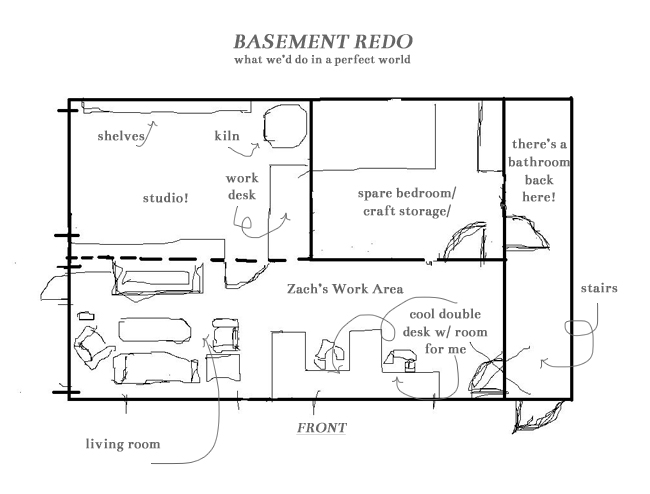
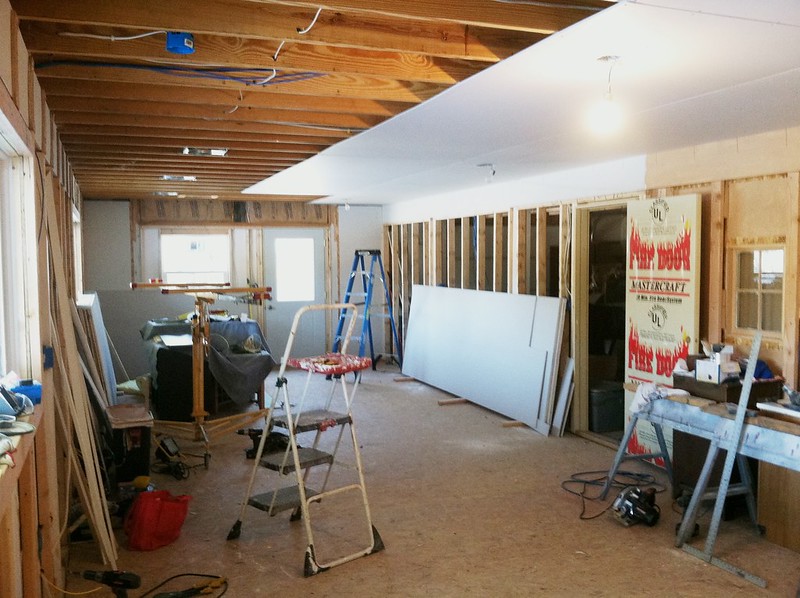
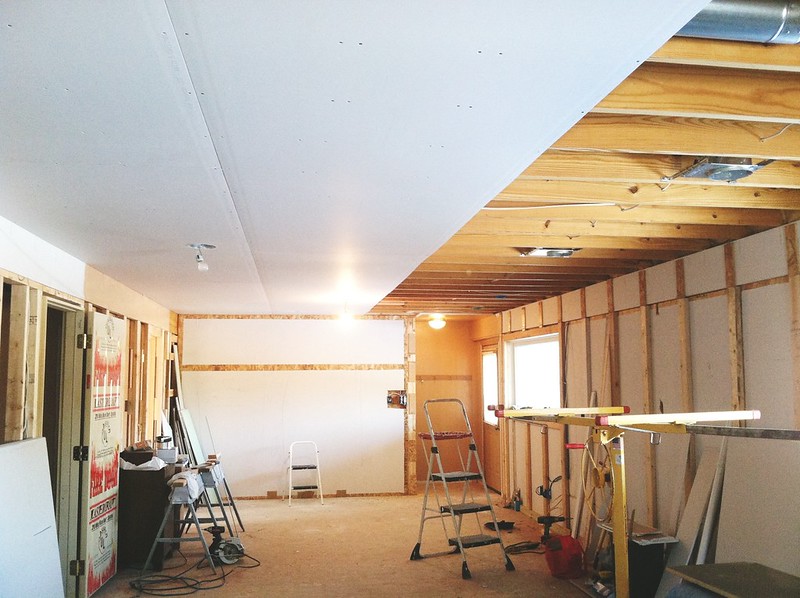
You guys, we're nearly done with the living room!  I'm excited!  We're now down to a room by room finishing stage.  There is still a lot to do but there's a lot that has been done.  I seriously can't believe how this house used to look & as I sit on our couch down here where a garage bay used to be, I am so proud of us.  Sheesh, we did a lot!  Since we're on our way to finishing the living room - nearly everything is done...we just have to agree on art for the walls, finish filling the shelves in the movie/game space, organize the living room side of our huge bookshelf, & pick out some side tables.  It's like so close!!

The most recent addition to the room, besides the catch all planter box tray from last week, is this blanket I finished crocheting this past weekend.  I say finished last weekend because It's usable...but I think I want to add a fringe!

Zach requested a huge blanket that we could both snuggle under when we start watching our next tv series.  Since the blanket in our bedroom is made from regular acrylic yarn I thought I'd try something more luxurious for the living room since it would be on show more.  I love really fuzzy, really warm, boutique-y blankets that look crazy expensive & often are.  I decided to work with Lion Brand Homespun in Spice, Meadow, & Pearls.  These three colors are the main colors in our living room, along with dark browns in the couch & the furniture.

I picked up a few skeins of these Lion Brand colors at JoAnnes when they had a sale going on, I believe they were $4.70-ish down from $6-ish.  I got through them & needed more.  I popped by the yarn section of Meijer & found that they were only $4.99 - but Meijer didn't have the sage green color.  All in all this blanket took 13 skeins of yarn - making this blanket cost me $65.  I don't think I would have found a blanket this big for that price.  I mean this thing is huge! But still, $65 is a lot for a blanket!  Especially one made by hand!
The weight of this blanket is great too, it's wonderful to snuggle under.  I used a J hook & a modified V-stitch through out the entire blanket.  I make a lot of my blankets with this modified V-stich because it's quick...and I have no attention span!  Here's the basic pattern:

Chain an odd number in the length you'd like, including a ch 3 at the end for turning.  

1 dc in fifth chain from hook, ch 1, 

(here's the modified part) *yo, insert hook into same ch, yo, draw yarn through loop, yo, draw yarn through first 2 loops on hook, yo, skip one ch, insert hook into next ch, yo, draw yarn through loop, yo, draw through first 2 loops on hook, yo, draw through all three loops on hook. ch 1*

Repeat from * to * until last ch 1, double crochet in same stitch as last modified decrease, skip one ch, dc in last ch.

ch 3, turn.

Now you'll do this stitch pattern in the ch 1 spaces of the modified V's below:

dc in first ch 1 space, ch 1.

*yo, insert hook into same ch 1 space, yo, draw yarn through loop, yo, draw yarn through first 2 loops on hook, yo, insert hook into next ch 1 space, yo, draw yarn through loop, yo, draw through first 2 loops on hook, yo, draw through all three loops on hook. ch 1*

Repeat from * to * until you do the last ch 1 on the current row, double crochet in same ch 1 space as last modified decrease, dc in the top of the ch 3 from previous row.

Repeat this way until you've reached the length you want.

here's an example of decreasing & here's an example of a v stitch pattern.  And below is an example of a modified V-stich symbol I came up with based off of the symbols for double crochet & chain as seen in crochet diagrams:
I hope that makes sense! But this type of stitch works up really, really fast.  It creates a cool texture in any sort of fabric you create.  A lot of my scarves are made with this stitch too.  It's super versatile!  I'm not sure if this stitch has been done before or has been better explained but I hope that the explanation above makes a little bit of sense!
We've been loving using this blanket as winter is still hanging on.  It looks lovely on display when it's not in use too!!

I can't wait to show you more of our house as it comes together! We've got so many projects in the works.  In fact, shortly after taking these photos we picked up prettier floor lamps!

Have you ever taken on a project that ended up costing your more than you'd hoped?  Did it still turn out lovely in the end?


xoxo, Moe

Connect on Twitter // Follow on Pinterest // Peep me at Hello Cotton

12.12.2012

Wednesday Decor // A Sneak Peek into our Home

So FINALLY our house is getting put together.  Are you kidding? It's taken this long to get drywall up? Yes, yes it has.  After finding contractors that were willing to do the work & not ask us why it's so important to get this done we're on our way!  I'm here today to just give you some sneak peeks into what's going on in our downstairs area.

The Living & Office Area
Right now, as we speak (er, type?), there are two lovely gentlemen installing more drywall! The ceiling is completely done & the wall with the windows is being covered!  There are holes for plugs & light switches.  Ceiling light boxes have been installed & it all looks just amazing.  Finally!! FINALLY! 

This picture was before we installed the subfloor & before we mapped out the lights & plugs.  In front of you, there used to be a giant (and ugly) closet with sliding doors.  We ripped that mess out, no question!  Now, the long bowling alley room will be divided into a living area & office.  The above picture has you looking at where Zach's desk will be.  Mine will be to the right, off center from the window.  To the left is the spare bedroom & behind that wall is the utility room under the stairs.  We've taken down the florescent lights & now have track lighting to mount above the desk area and a light with ceiling fan to light the center of the office.  Laminate hard wood flooring will be laid down (and I hope I can convince Zach to agree on a rug!) in the office & then giant bookshelves will separate the living & office area.  The living area will be carpeted & lit by five can lights.  We'll also have tall lamps with reading lights.

The Spare Bedroom & Wall of Doors

These aren't the most up to date pictures.  I tried to snap some earlier but the floor is filled with spare tools & drywall stuff.  But currently the subfloor is in both the bedroom & the closet and drywall is hung in the bathroom, closet, & bedroom.  When we bought this house, this was considered the second bedroom.  However, to be considered a bedroom, this room needed to have a closet off of it so we had to add one.  Unfortunately, the only place to add one was on the wall adjacent to the stairs.  I don't have a before picture, but imagine the wall above with one door.  This door opened to a sink, then on the  right was the water heater, furnace & water softener and to the left a shower stall & toilet.  Not only did that room creep me out but it was also cramped as heck!
We moved the wall about about two feet & added three doors!  The pinkish one opens to a bigger bathroom with a vanity opposite the toilet.  The small, middle door, opens to an itsy bitsy closet (but it's still a closet!).  The next door opens to the utility room under the stairs & it's pretty big! Wish we could store things in there!  The final door is the door to the office area & living area.  The plan for this room is just to be a spare bedroom to house my bed & dresser.  I hope to turn part of it into a place to take product photos!  There is a corner that is just perfect!

I'm not sure if this would be a great bedroom for a child....too many doors monsters could be behind.  Both Zach & I are soooooo damn happy this is progressing.  I'm thinking of making the guys we have working on the house some cookies or something.  Seriously, this is like..... unbelievably awesome!  So awesome we've begun to talk about flooring, carpet & curtain colors!  I'm rooting for teal curtains.........keep your fingers crossed for me!

So there's a little catch up on our situation.  I can't wait to show you more!


Connect on Twitter // Follow on Pinterest // Peep me at Hello Cotton

11.28.2012

Wednesday Decor // Peaks Around Our Home

Well, it's after Thanksgiving & we're slowly but surely still coming along with the house.  We'd hoped we'd have a few more things done before the holidays, but we are where we are.  Here are some peaks into what's been going on.

The very first things we did were to paint all the colored rooms - the upstairs bathroom & the master bedroom - a lovely shade of white.  I am not a fan of colored walls.....I guess it's because I can't decide. I am super jealous of my old roommate Katie who seems to have a great love & wonderful execution of colored walls.  I am just too afraid I'll hate it & after trying to cover up the horrid colors in our house, I am over painting.  We may end up choosing colors for the downstairs since the white color that's through the whole upstairs sorta makes me see a bit of yellow.

The subfloor is also all down in the large room downstairs.  This room will be divided by a bookshelf into a living space & an office space.  We also put up a wall dividing the garage space & then put a wall with a window & a door where a grage door used to be.  The door got painted green, trim got put on the window there too, & the outside wall was painted.  All the studs are up on the walls to apply drywall (looooong story!).  We're just waiting on the wires to be run for electricity into the living area & office.  Then we'll drywall, then it's painting, & then it's flooring, & then hopefully it's done.  The extra bedroom needs a new wall to give it a closet, access to the downstairs bathroom, & a utility closet.  Then it's drywall, painting, & flooring in there.

So far it's only been the little things that we can get organized & put away.  We got new sheets & comforter from Amazon & two new nightstands from Big Lots.  I don't think Zach knew about the glories of places like Big Lots & Amazon for cheaper things...when you shop right, you can find good stuff.  Sometimes it's not really a deal....but sometimes it is.  I'm also in the process of dying lampshades to be the perfect shade of plum.  They need to be dyed again & for longer...pretty much I don't know what I'm doing so I'm experimenting.

One half of the kitchen is set up including canisters that have since been labeled & filled.  The wine rack is filled, too.  I never thought I liked that wine rack of his....but I really like it over there, it just fits.  We've also got a few other canisters that need pasta in them.  Then on Monday at like 6pm, there was a knock on the door.  Whenever people knock & it's dark out I instantly think the worst & almost never answer.  Never.  But I peaked outside & saw that there was a box & not a murderer (there still could have been, I guess).  The box had our matching, black towels!  Finally no more random towels.  There are two reds, a maroon, guacamole green, tan, black, green, & three brown towels in this assortment.  Every time I see them in the bathroom I want to throw them out the window!  But the matching ones are here now so no more worries.  Now all we need is the shower curtain which we believe is still packed in the apartment at his parents house.

I'm just glad we're getting better at agreeing on things decor wise.  Surprisingly I've made a few decor decisions that Zach agrees with - the crochet blanket in our room, the night stands, & the shelf with baskets in the bathroom.  Hooray!!  Maybe we can think a like!


Connect on Twitter // Follow on Pinterest // Peep me at Hello Cotton