Showing posts with label DIY inspiration. Show all posts

9.04.2018

Beginners Guide to Blending Essential Oils

Creating your own essential oil blends can be a great way to develop your intuition and improve your emotional (and physical) wellness.  Blending essential oils can seem to be an intimidating task!  Perhaps you've gotten yourself a starter kit or you've collected essential oils that you feel drawn too, but you're not sure how to blend them to get the best emotional and/or physical benefits.  Well....let's get you on your blending way.
this post contains affiliate links, please read my full disclosure here.

I've share quite a few seasonally specific blending guides as well as an in depth look at traveling with essential oils but this post is all about helping you create your own blends for your own needs.  Below is the exact way I started to learn about blending essential oils and I can't wait to share it with you.  You can also find some information on using essential oils topically here.  Check out all the essential oils posts on the blog here.  Let's get started.

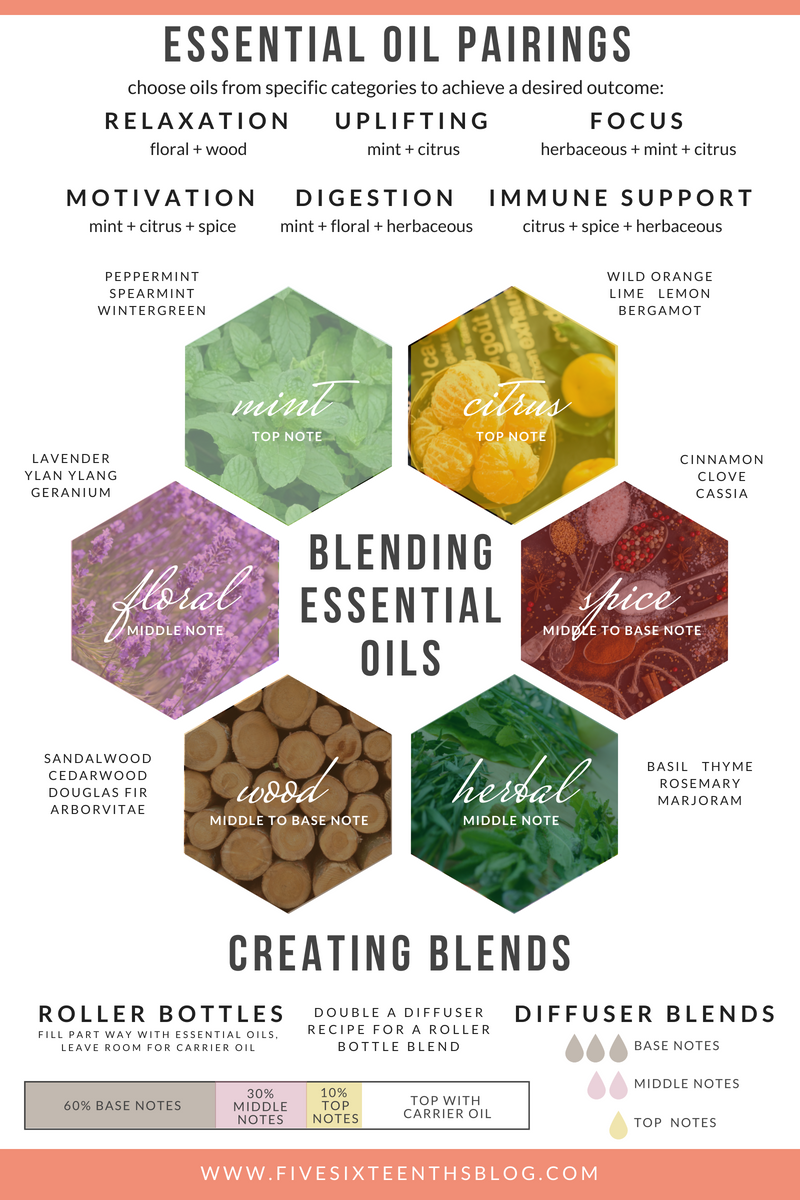
Essential Oil Categories

Citrus

Wild Orange, Lemon, Bergamot, Lime - these oils are fruity, fresh, & clean.  Most often citrus oils are top notes.  Citrus oils are great for adding a fresh kick to your blend and can help to remove odors & purify the air.

Spice

Cinnamon Bark, Cardamom, Black Pepper, Cassia - these oils are warm & deep.  Some oils in this category can often have a resinous scent - slightly sweet or with a vanilla like tone - to them.  This attribute is called 'balsamic'.  Oils in the category are often middle to base notes that add an interesting layer to a blend.

Herbal

Thyme, Basil, Rosemary, Marjoram - these oils are herbaceous.  They smell green, herby, and grassy.  Oils in this category are fresh & sharp and often are middle notes.  They can add a spring time vibe to your blends.

Mint

Spearmint, Wintergreen, Peppermint - these oils have a minty fresh kick.  Sometimes falling in the herbaceous category (Rosemary & Peppermint are related to each other!) but they have a distinct pep when added to your blends.  Most often these are top notes.

Wood

Arborvitae, Cedarwood, Sandalwood - these are all wood oils with a grounding scent.  These oils evoke a sense of stability.  The scent is rich & woody.  These fragrances are middle to base notes and can round off a relaxing blend.

Floral

Lavender, Geranium, Ylang Ylang - these floral oils smell soft, feminine, and powdery.  Floral oils are mostly middle notes.  These scents can be relaxing & supportive.


Getting Started

First off, determine the goal of the blend.  Are you looking for immune support?  Are you feeling nauseous?  Are you looking to relax?  Are you looking to focus?  Determine what the purpose or end goal of the diffuser blend is.  This will help you decide which oils to use.

Then, begin to gather a group of oils that fit the purpose or goal your going for.  If you'd like focus choose oils from the herbaceous, citrus, and mint categories.  If you'd like to feel relaxed choose wood & floral oils.  If you'd like to feel motivated choose citrus, minty, & spicy oils.  If you're looking for an immune supporting blend choose citrus, spice, and herbaceous.  Need digestive relief? Choose a mint, floral, and herbaceous oil.

Once you've chosen a few oils from each category designed to target your end goal, you can begin to pair them together.  There's no rule saying you can't have two of the same category oil in your blend so you can start by pairing together two citrus oils, two herbaceous oils, and so on.  Once  you get a little bit brave you can start to bring in other oils in the categories you've chosen to create blends you love.

More Blending Tips

Keep a Journal

Writing down your blends - including how many drops you used - will help you decide what you personally like & what you personally find effective.  For me I know that adding in too much Peppermint to any blend will be too overpowering for me. I've translated this into how I approach other minty oils like Spearmint, Wintergreen, and the Breathe blend.  Your journal doesn't have to be super fancy, you can even just make notes in your phone!

Get Creative

When you get brave enough just grab a base note, middle note, & top note OR an oil from a few of the categories above and just see what happens!  You may find an interesting combo you never would have tried before!  You can pick a few oil bottles, uncap them, and then hold the group of caps under your nose to see if their scents work nicely together.  Sub out different oils until you find a blend you like.  This is where cap labels can come in handy!  You don't want to mix up your tops or you'll have a hard time doing this creative experiment again.


Store your Blends

Before you make a giant 5ml bottle of a blend you think you'll use all the time make a smaller batch in a 5/8 dram bottleI phase through blends I make very quickly especially when I'm inspired.  When I first started making blends I'd want to make a bottle to keep and use later....but then I'd get bored!  So these smaller bottles are prefect to create a smaller blended batch & not waste the essential oils.  And you can travel with these better too!  You can also get smaller roller bottles in order to test out any topical blends.

Choose High Quality Oils

Essential oils are a popular thing right now leading a ton of companies to want to get in on the boom.  This creates a situation where in order for companies to make the most buck, they cut corners.  As there is little regulation on what can be labeled a 100% pure essential oil, bottles found in the grocery store, home good stores, and even health food stores may not be the best quality.  They may be cut with synthetic fragrance oils or other carrier oils that dilute the purity & efficacy of the oil itself.  I choose to use doTERRA Certified Pure Therapeutic Grade Oils for a myriad of reasons - one of the most important being quality.  DoTERRA tests each & every batch of oils prior to bottling to ensure quality, purity, & efficacy.  They also source high quality plant matter and process the raw materials near where they are grown.

Using high quality oils not only ensures that nothing unnecessary will enter your body if you're using these blends topically but it also ensure the fragrant profile of the essential oil is preserved.  Working with a low quality lavender oil may not yield the same effects as working with a higher quality oil.  Any synthetic fragrances may cause headaches or other adverse health effects....when the whole point is to help yourself out!


Grab the Free Ebook!

* indicates required


Creating your own essential oil blends is a great way to connect to your oils and get used to their physical & emotional applicationsDoTERRA offers a chemistry handbook with more information on the chemical make up of oils and which oils blend together well based on their chemistry.  This can add another level to your blending and works great to create things like cleaning solutions & skin care serums.  

The proprietary blends offered by doTERRA can add another layer to your blending creativity as well. One of my favorite books regarding the emotional associations for essential oils is Emotions & Essential Oils.  This book elaborates on the emotional balancing properties of both the single oils & proprietary blends.  You can cross reference an emotion your feeling or an emotion you'd like to feel with oils that can help with that situation.  The book also offers an emotional wheel that outlines which oils are great for different emotions.

I hope you found this post helpful and feel inspired to get started creating your own personal diffuser & roller bottle blends.  It is a great exercise in both creativity & intuition! If you'd like to learn more about working with essential oils everyday join the Live & Create Facebook group!

Do you create your own blends? What is your favorite essential oil blend?

xoxo, Moe

Disclaimer :: These statements have not been evaluated by the Food and Drug Administration.  This article is not intended to diagnose, treat, cure, or prevent any disease.

10.24.2016

Make it Monday // Crafts I'm Currently Obsessed With

Way back when I first started the Make it Monday series on this blog it was a post about the things I would try to make that week.  It has since evolved into a post featuring my own DIY work and creations.  Today is a little bit of a throw back but it is 100% still in the holiday spirit - we are in the final stretch reaching up until Halloween!

I started work on my October Daily challenge which led me into a whole new world of crafting.  Since starting that (and admittedly slacking on it...whoops) I've fallen in love with some not so holiday specific crafts juiced up 100% for the holiday!

(Bettlejuice! Bettlejuice! Bettlejuice!)
The first are mini albums.  My own mini album is above but if you search the #OctoberDailyChallenge hash tag on Instagram you'll find a ton of these bad boys.  This little journal/mini album is perfect for my documenting needs right now - especially for a little challenge.  You can find the tutorial I did on a small journal like this using the Cinch here.
The second thing I am 100% dying over are bag flips.  How stinking awesome are these!  This is something I am very new to hearing of...but wouldn't these make the greatest planner swap bags at meetups?? Or even something cut just to send to a friend!  I am trying to figure out a way to incorporate these into a make & take for a December planner meet up (spoilers!).  The tutorial I love is from Serena Bee (ps follow her instagram if you want to be overloaded with inspiration.  But the bagflip above is from Lorrie of Lorrie's Story blog.  These are mad with lunch bags - or any sort of bag, you can even use a die cut to make one - where the end is flipped up to make a second pocket.  I really need to jump on makings some of these.  You can find inspiration for these on Instagram by searching for #bagflip though some entries are people misspelling 'back flip'.

I just can't get enough of all the crafty inspiration behind October Daily.  I admit that I've been slacking but the ideas are so creative.  The bag flip thing really has me thinking about making planner pockets!

Its the final countdown guys, are you ready?

12.07.2012

Fan Friday #82

Hello Friday! First, I am so happy that we've had workers here for the past week installing drywall & running electricity.  We got rid of the first guy who thought it wasn't that important to get this stuff done in a timely manner.  I am now happy to say we have a drywalled bathroom, a drywalled closet, almost a finished floor in the spare bedroom, & almost a drywalled spare bedroom.  Finally! Progress on the house! I rrrreeeeaaaalllllyyyy hope we get this done here shortly...hopefully just into the new year.  Then, we can unpack & store all the things!!!!! That's all I want!!!

Anyway, on to other things:

These paper diamonds that would look great as tree ornaments!  A really cool looking cut, fold & glue project.  You can also find more paper gem patterns here.

This giant wall of yarn.  I can not wait to have our spare room done! My desk & hopefully a little bit of the shelving unit on my side of the office will hold a whole array of crafting supplies.  I just want to buy yarn if only to put it in a display like this one.  Look at those colors!!!  Yarn just makes me so happy.  I can't even tell you.

These pretty felt ornaments.  Great to use up some scraps.  I am in love with non-traditional holiday colors.  My favorites are chartreuse & light blue, it just looks so wintery.

Link Love
++ Alycia of The Curious Pug is starting a blog newsletter so I think you should subscribe....cuz I know it will be awesome! ++

++ Just Lovely Things has a wonderful collection of Fancy hair accessories just perfect for your holiday wardrobe! I can't pass up something sparkly & these headbands are my favorite! ++

++ You can find some lovely wintery DIY's over on Dream A Little Bigger here.  My fave is the neon ornament DIY ++

++ If you're dying for a cool art print, you can get FREE SHIPPING on select items in my Society6 shop! ++

Happy Friday! Have a great weekend!


Connect on Twitter // Follow on Pinterest // Peep me at Hello Cotton

8.03.2012

Fan Friday #67 // More DIY Inspiration

Well y'all I've been in Michigan for nearly a week.  Zach has gotten up and gone to work everyday & I've gotten up and worked on scarves, business card designs, blog designs, hats, the eBook, the newsletter....it's been awesome!!  But I do have one favor to ask...will you be my first sale in August?  Making this dream a reality means having the means to back it up & it sure would make my day to pack up a lovely item for you & ship it your way!  (It would also give me an excuse to go get a coffee!)

Anyway, here are some lovely DIY's I've found this week that I just couldn't wait to share with you:

This awesomely adorable bag made by Lindsay over at Hello Hydrangea.  She did this DIY in two parts (one & two).  What a great way to show some suspense!  Having cool things in two parts is great to give readers a reason to come on back!

This sweet way of dressing up store bought mail holders & office accessories.  What a way to add some vintage flair from Camille Styles.

This way from Lucky Mag to make your jewelry/vanity look gorgeous!  Now to convince Zach that I need to do this! Our little room at our new house is waaaayyyyy tiny..but hopefully we can come to an agreement on a few things :)  Lucky Mag suggests cake stands & candy dishes that are a bit out of my price range...you could totally diy some with thrift store plates, candle holders, & E6000 or even check the Dollar Stores!

And I am gearing up for the September Edition of 30 Days of Lists*! Can you believe it? I totally bombed on the go round in March :( But am so excited to be a part of 30 Lists this September.  So to gear up, I am toying with ideas for my own list notebook.  If you're into using your sewing machine in unconventional ways & wanna use up some stuff you have around your house give this DIY a try from Lux Per Diem.

Links Loved
++This super easy light box DIY that I might be using here soon to take pictures of the new hats for the shop.  I can't wait to get 'em in there!++

++This Vintage Wood Stain DIY that sadly doesn't lead back to the original website...from Pinterest++

++This blog is just all around lovely.  Sometimes I think I want Five Sixteenths to go in a more desinger-y blog direction but then I realize it's just not me.  I am not clean & simple & minimal in real life.  You should see the yarn pile next to me (I am not ashamed!)++

I hope your week has gone by well enough!  If you are interested & want to do a cool little project either personally or for your blog, consider joining 30 Days of Lists.  Just click* to register!

What will you do this weekend?


*as a sponsor of 30 Days of Lists I have signed up for their affiliate program.  By clicking any 30 Days of Lists button/link on Five Sixteenths & registering, I will get a percentage of the revenue generated. 30 Days of Lists is a fun & community engaging project that I can't wait to be a part of!
Connect on Twitter // Follow on Pinterest // Peep me at Hello Cotton

8.02.2012

Feature Sponsor Guest Post // Katie & Her New House

If you didn't know, Katie (last month's feature sponsor) & I used to be room mates.  Since we both just made big ol moves, I thought I'd give her some time to come up with her sponsor spot guest post.  Since moving is stressful enough, why would you want to be stressed about writing for someone else's blog??  So here she is to share a bit about what she's done in her new house.

Lately my husband and I decided to buy a house.  We found the perfect place for the two of us and our pup, put an offer and now its ours.  Funny how life can find a way to make things challenging: my husband got called for a temporary deployment the day after we signed all the papers.  It's been an interesting process, but so far it's been fun.  For me, the theme for August is "making a house our home"
After the hubs and I picked some paint colors for the bedroom (Gypsy Rouge and Smoked Oyster) I felt like the room needed something else.  Of course I haven't gotten around to unpacking the wall hangings, but I needed an easy accent to compliment my fine paint job.  (Well, I probably shouldn't quit my day job, but its a good enough paint job for me!)

I noticed all of the wall plugs and light switch covers were dingy and old.  Rather than spending $5 each to replace them all, I got a $4 can of hammered bronze spray paint, and went to town.  


So far, it's been a nice little touch.  I'm just about set up in the bedroom other than wall hangings.  Next stop, painting the bathroom and setting up the kitchen.  

You can connect with Katie on her blog or on twitter.  Her whole house is coming together rather nicely.  Look at little Cody there...so adorable!

7.23.2012

Make it Monday // DIY Vacation Poster

Guess what....there are only like 4 days left until I load alllll of my stuff in to a Uhaul & drive up to Michigan.  Can you believe it? I thought this day would NEVER come :)

While packing I found a few intagram prints from postalpix or our Michigan trip.  More specifically of our trip to Lake Michigan.  I was thinking about ways to use them in our new home & what more I could maybe do with them & this collage idea came to my mind.


Today I want to share with you how to make a cool poster style picture using Pixlr-o-matic, Picasa, & Picmonkey.  I've found that Picmonkey is a great go-to, cheap & fast if you will, photo editor.  All in all, you'll need 9 vacation pictures.  I used some pictures I took with my DSLR & some pictures I took with my iPhone.  If you need some good tips to remember when using your iPhone, check out some iPhonography posts.  Sometimes its the only camera you have with you, so make sure your pictures count!

You can add a bit aging or different colors to your photos with a great online resource, app on your phone, or even download it to your desktop: Pixlr-o-matic.  I have the desktop version & the app on my phone its a pretty cool appl & I played a lot with it on our Michigan trip!

Once you've gathered your 9 photos you can start.  This is my favorit photo of my bunch because it is the moment that I came upon Lake Michigan...right before I realized it was huge! I love this photo because I captured my own surprise:

Open it in Picasa & crop it square.  You don't have to do it square but doing so will allow you to make the image into circles when you edit it in Picmonkey.
Open Pixlr-o-matic either on your desktop or on the website.  I first found this really cool retro photo editor for my iPhone.  It has tons of filters & effects to make your photos super vintage.  I love the filters because it colors the photos nicely.  Some are better than others.  You'll need about 9 different colored photos in all but play around with some choices...it won't hurt!

Here are some of my favorites: Aladdin, Anne, Bob, Greg, Harry, Josh, Julia, Soloman, Tom, Sana, Kevin, & Sun.  You may have to click the more option to add the rest of the filters to your set.  Just choose filters you think are really super awesome & apply them.

Next, go to picmonkey & chose the collage option. Upload your photos & fill them into a square collage template:


Adjust the spacing to 0 & change the corners to 100% round.  Then save the image.  You can use Picasa to add text.  Add a quote or something that reminds you of your trip.

I chose You're never too far from home because I feel that this picture represents a lot about Zach & I: He's never too far from home because we will be close to Lake Michigan, the lake he's known the best while living in Michigan, & I'm never too far from home because I love the water & couldn't imagine living in a place with out it.  (If we moved to like Arizona...I'd just be so sad all the time!)  So both of us know that there is a little part of home involved in that lake.  I plan on matting & framing this for our new home!

So there you have it! You can use a different picture for each square if you'd like but I like the repetition.  I'd love to make more of these from each year OR maybe even make a big one from 9 years of going to the lake...thats a lot of years!

Well, I am off to pack more things.  Wish me luck!


Connect on Twitter // Follow on Pinterest // Peep me at Hello Cotton

7.06.2012

Fan Friday #65

Well  it's the end of the week here & it's been a weird one.  Having a holiday mid week like that is not my favorite thing.  Thursday felt like Monday...it was awful.  I did however have a fun time at the 4th of July cook out thing hosted by a few friends.  Usually, we try for a bi-weekly meeting of this thing called Kitchen Band & this time it was just amazing.  Sometimes we have as few as 5 people but this time we had nearly 20.  We sounded pretty good for a bunch of people who half know how to play & half only know 3 chords (I'm in the second half!).

First, before I share exactly what I love this week let me share this: I love HelloCotton even though I struggle with it.  I posted yesterday about how I don't think I'm doing it right sine I usually follow the blogs through GFC & not through HelloCotton.  But HelloCotton is my favorite resource to find new blogs.  I know it's a collection of bloggers sharing their stuff but sometimes I don't find anything super inspiring at all (sorry) & other times its like a huge resource for DIYs, fashion, blogging, inspiration, etc.  A lot of the things I found this week came from HelloCotton's assortment of awesome bloggers!

Here's what I'm loving this week:
This incredibly awesome DIY from Peep My Style.  I think this is the same sort of paper I used in college for my print making class.  I really want to try it out.  I also really want to get back into making prints...it was such a fun class!
Katie from Muddy Pup Pottery shares her love of new at home Gel Manicures. She also shares something I would have never thought about: using an LED light instead of a UV light to avoid unnecessary UV exposure.  Some good pros & cons to the new trend.
My favorite way to style dresses is with ankle socks & loafers, it dresses down a cute dress but still makes you look sophisticated. Becky from Life. Style. Flash. does a wonderful job styling these elements. That dress pattern is just awesome.


Last month's feature sponsor Jen from Motu Viget shared these radioactive pots made for an MFA exhibition from contaminated soil near Fukushima.  Read the full article here.  This goes way beyond anything I would do for the sake of art but speaks volumes to what this artist will do.


Link Love
++ This new blog design over on Five 30 Three.  Her new design shows how even a good blog design can be better.  I've been working on the design portion of the Blogging 101 eBook for August & I am finding I have too much to say but no way to say it.  Her post is what I am trying to get at! ++


++ This post questioning whether we can create the life we want.  Just a little post in passing to think about as I go into self-employment near the end of the summer ++


++ The design of this blog & most recently a collection of jean cut off shorts.  I love the simplicity of the design.  I swear I can't get into minimalism on my own but I love it. ++


++ 10 Blog Layout Tips from Katrina of Pugly Pixel over on A Beautiful Mess.  It's just so fun to learn. :) ++

I am currently (if I haven't already arrived) on my way back down to the lake this weekend to bask in some summer sun.  I hope you have a lovely weekend!


Connect on Twitter // Follow on Pinterest // Peep me at Hello Cotton

5.29.2012

Trend Tuesday // Three Stripes You're Out

So, I think it was last Tuesday where I mentioned I was going rename the Tempted Tuesday feature here on the blog.  At first I thought I'd just leave it nameless but still post trends I am loving.  Then Trend Tuesday hit me.  Same great stuff, new name.

I can't believe how sick I was last week.  I am still getting over it & in fact don't really know what went on at work the other day because I was so out of it! Missing two days is really going to put a damper on this paycheck but hopefully I'll be able to still save up to move with Zach here in the coming months.  If anyone has any cross country moving calculation tips, I would totally appreciate them!! (But if you wanna help out, please consider shopping at the Five Sixteenths Shop or checking out my Online Yard Sale.  I'd appreciate it!)

Anyway, this Trend Tuesday I am totally loving stripes.  Stripes aren't the best choice for my body shape, especially horizontal ones, but I still dig them just the same.  A great way I am going to incorporate stripes into my wardrobe is with nail art & accessories.  I do have one horizontal striped dress that I totally love, but all the other stripes will probably be on a slant.  One of my fave slant striped dresses is from Target.  I need to get back into taking outfit shots.  It's much easier when Zach is around!


3 Stripes & You're Out


I am loving all of the striped accessories.  Like I said, that is the simplest way to work a trend into your outfits especially if you don't have a lot to spend.  I would totally even DIY some of these with paint & masking tape:

Straw Hat // Have a hat from last year that needs a bit of a pick me up? if it's in a solid color, consider taping off strips & hand or spray painting a new pattern.  Pick a bold color for a statement or a neutral to go with everything!

Beach Bag //  You can pick up a plain canvas tote from the craft store or repurpose an old one for this.  Again tape off stripes & paint.  If you have a tote that has text or a print on it, water down your paints or spray one even coat of a light colored paint to let the text show through.  Place a piece of cardboard in your tote so the paint doesn't bleed through

Striped Flats // Old canvas flats take on new life with a few taped off stripes.  Do it only on the toe for added interest.

Spruced up Sunnies // I have an old pair of sunnies that need a make over!  Take paint pens or your good ol trusty spray paint & masking tape combo & have at it.  Paint stripes only on the frames or only on the arms to spice it up.

Striped Tee //  Spice up your plain old white tee (or pink or green or yellow) with a fresh set of stripes by taping off large stripes in a horizontal, vertical, or slant pattern.  Place a piece of card board in the shirt to stretch the canvas & prevent bleed throughs.  Stand a good bit away (probably 3 or 4 feet) & spray a light misting of a neon color spray paint.  Let the droplets fall for a cool paint splatter effect.

Beach Bangles // Have an old wooden bangle? Found a cool plastic bangle at a thrift store? (Or did you pick one up from the Online Yard Sale?) Then tape that sucker off & give it a good coat of spray paint.  Hand paint different colored stripes in acrylic paints then give it a good seal with a spray sealant.

How about that? 6 ways to Stripe Out your wardrobe.

Do you like that pun? See what I did there?

What trends are you loving this summer? How do you incorporate it into your wardrobe?


Trend Tuesdays is a reoccurring post featuring awesome trends to inspire your wardrobe.  For more Trend Tuesday posts, click here!
Connect on Twitter // Follow on Pinterest // Peep me at Hello Cotton

5.21.2012

Make it Monday // Makeshift Light Studio

A few weeks ago, before Zach left in fact, I set up a little make shift light box/light studio area in his kitchen.  He had the perfect dining room table, wall space, & lighting to make a great space to photograph in.  So I set to work finding things around his house that would add to the lighting, give a good backdrop, & prop up my pieces.  Here's how the photos came out:

Here's what you need: Table big enough for your piece, clear wall space big enough to push the table back to, an over head light -preferably track lighting, but use bright white bulbs, freezer paper (or wax paper but freezer paper is better) that is pretty wide, a few standing lamps with a reading light attached (those cheapo ones from Target/Wal-Mart are fine), tape, camera.

The Setup: Pull out a long enough piece of freezer/wax paper to be taped onto the wall & then draped down onto the table.  Use your masking tape (I used electrical tape) to fasten the paper to the wall and to the table.  Make sure there isn't an abrupt crease where the paper goes from the wall to the table.  You want a wide U shape.  Place your object in the middle & begin photographing.

The reason why freezer paper would have worked better is because it is white where as wax paper is grayish.  I liked the effect, but suggest using freezer paper unless you have something tiny.  The width I would have liked to have had my wax paper be is about 18.5 inches so I could photograph the objects horizontally.  So take these things into consideration when you are getting ready to set this up.  I was so excited to have found these things around the house though to do a quick photo shoot & list things on etsy (which have sold now!)

This is the most successful lighting I've ever had for my photos.  I am so bummed that Zach is gone from that house! We are looking at places to live when I move & studio with a lot of light is something I am dying for. And, in case you missed it, I mentioned yesterday why Zach is the best boyfriend in the world.  

Have you ever set up something makeshift like this? Give me your photography tips, I desperately need them for photographing products!


Make it Monday is a weekly feature on Five Sixteenths dedicated to showcasing some DIY fun & inspiration.  If you'd like to see more DIY posts, click here!
Connect on Twitter // Follow on Pinterest // Peep me at Hello Cotton

3.30.2012

Fan Fridays // Thrifty Finds

Since Zach & I got back from Michigan I've been dying to take pictures of my fave finds yet!  Unfortunately with my 9-5 office job moving offices, I've been so tired every night this week to even think about photographs!

I am so glad I found a man that love thrifting & antiquing.  The only problem? Zach likes 20's-40's and I like 50's-70's.  In order to see what our future house may look like, we often go through furniture aisles while antiquing (& in general) and ask each other what we like.  When we find something we agree on, we make a note because 9 out of 10 times we won't agree! I've found myself taking pictures of things in stores that I like that I think he may like....so far no luck!

Some fave thrift finds from around the web this week:

This cute little doggy holder thing that miss Kaylah found at an Estate Sale! I need one of these for my office! Gah, I can not stand the cuteness.  Peep the whole post to find the rest of the awesomeness!

These awesome salt & pepper shakers on My Paper Crane.  My room mate in college used to collect S&P shakers.  Every time I see a pair I think of her.  (Hello Nance-pants!)

This super rad DIY by mr. Kate on Hello Giggles.  Totally take some thrift store bags & spruce 'em up.  Did you know the secret is acetone?? I totally have some bags that I need to do this too.  If I only had the time :(

In other news (news I am not a fan of) I got ripped off getting my car inspected the other day.  My lovely boyfriend was so kind enough to take my car while I was at work.  He told me when I got home it was $72 bucks!  They said I had lights out & things here & there they needed to replace.......needless to say, I don't really believe them! Oh well, it's all done now...

I'd like to know what states in the US have a state inspection required each year.  Virginia is the only one I've heard of!

What are you loving this Friday? 

2.24.2012

Fan Fridays // Keep on Keeping on

Friday is for favorites & this Friday I am sharing a few new things (like my new endeavor), but mainly some things I've loved for quite some time (Hippos mostly, but also Rocky Horror!)

There are plenty of things I am loving this week, mainly the things I love are the new lovely ladies I've met through helping them install their customized pre-made themes they picked out from the shop!  I am so excited to have learned so much from them as well as help them spiffy up their blogs.

The first was City Dwellin' & she chose the Layer Me Softly Template:


And the second was Midwesternita who chose to upgrade her color palette for the Melon Baller Theme:

It was so much fun to work with each of them as we back & forthed through email.  I learned a lot working with them & I hope they learned a bit too!  I have one more blog in the works that hopefully will be fully launched here oh so soon!

Other things I am loving this week:

This way too cool linocut planner DIY from Two Happy Hearts
I am so in love with linocuts.  I need to break out the linoleum blocks!


This shop The Good Machinery has some great painted animals!
Last Friday I posted for the first time about cool little animals.
You know I need the hippo one...


Here's another Hippo print I found three seconds ago from Wild Life Prints.
I really do love hippos


This ring...my love for geodes & geode looking things continues

And this cool iPhone case
this is one of those times that I don't have the original source :(

I seriously can't believe it's Friday.  This week seemed to fly by! Even though I've been in pain this whole week (still in pain right now) I've been very productive. 

On Sunday, Zach & I are going to see my Alma Matter's production of The Rocky Horror Picture Show & I can not wait!!  I remember being in high school & going to see it with my friend at midnight down town.  When I asked my parents if I could go (it was on a Thursday) they immediately said no.  On of my friends sat down & wrote a persuasive letter to my parents, came over to my house, & handed it to them.  The were both shocked at her determination to have me go.  It was like a sitcom: My parents were both reading the letter at the same time.  When they finished, they looked up at each other & then up at us.  Sara stood there confidently & I was like 'Oh no, here comes the embarrassment!"  To my excitement & horror they said yes.  It was one of the best freaking nights of my life.  So much fun!  This will be the first time in ages that I've seen it live.  I can not wait!

I am also excited to send out my first Newsletter (!!!) at the end of this week.  Hooray!!  If you'd like a little slice of Five Sixteenths (with some special offers!) click here to sign up!

Are you loving any old faves this week?