Showing posts with label crafting. Show all posts

5.09.2016

Make it Monday // DIY Hexagon Popsicle Stick Shelves

I am willing to bet you at least $5 that the first craft you ever made was using Popsicle sticks.  Today I want to share with you a really cool upgrade to popsicle stick crafts - one that I think is resourceful and also great for a crafty room.  It pays homage to our paper and paste days of crafting.  When we were young, free, and glued colored macaroni to various object.  This project upgrades the traditional popsicle stick to something a bit more classy.
(this post contains affiliate links, please read my full disclosure here.)

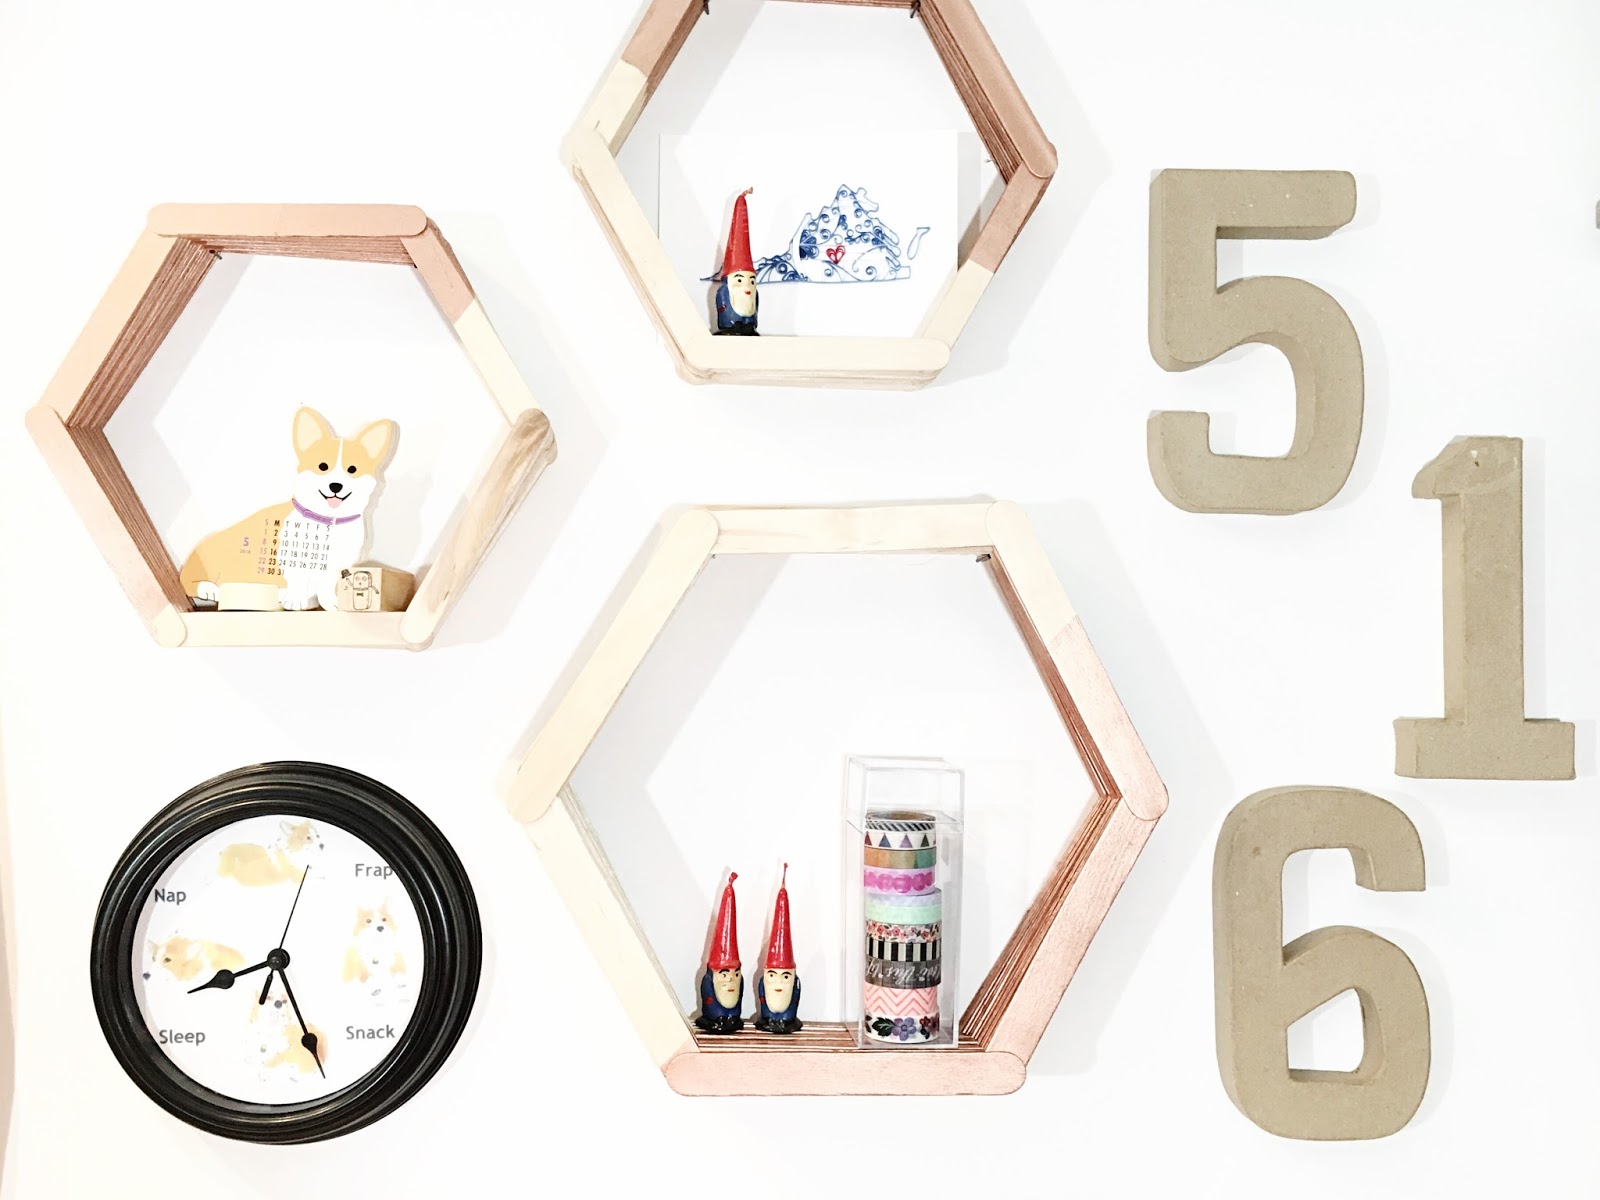
I present to you the popsicle stick hexagon shelf project!  I had a blast making this and it whipped up super quick.  This is perfect decor for a craft room - in my opinion!

supplies :: various popsicle sticks - I used 90 (3 total packs) of Super Jumbo Popsicle Sticks for the larger hexagon & 75 - 150 (1-2 packs) Jumbo Popsicle Sticks for each of the smaller hexagons, adhesive - E6000 is stronger but hot glue is faster (I used hot glue for this), painter's tape, spray paint of your choice (I used a rose gold paint), optional hexagon template, nails & hammer

To easily make an even hexagon I suggest starting off with a template.  I used my Cricut Explore to cut out an 11 inch wide hexagon from some unused scrapbook paper.  I love my Cricut Explore for paper crafting - I love that if I have an idea I can whip it up in a matter of seconds.  This is a simple shape for the Cricut but it would take me forever to come up with the correct shape.  (If you haven't thought about a digital die cutting machine - I suggest the Cricut for all your paper crafting needs).
Lay out your popsicle sticks along the edges of the hexagon template.  Adhere them together - in this case with hot glue - so that you are able to stack them against each other in a Licoln Log style.  You should have three popsicle sticks on the 'bottom' and the other three layered on the the 'top'.  This way you can alternate where the sticks are placed to get a 'woven' type of pattern.  So in the picture above the last popsicle stick is glued right on top of the the ends of the two beside it.  Continue gluing the sticks in this manner until you get the depth you'd like.  Repeat for as many little shelves as you like - odd numbers always look best, so I went with 3.
Using painter's tape, mask off where you want to paint your mini shelves.  It may help to arrange them on a table in the manner they will be on the wall to visualize where to paint.  Be sure to tape the inside as well so that you don't get spray paint in places you don't want it.
I also found it helpful to use a pencil to mark the up position so I'd know how I was hanging these once they were dry.  When they are dry, remove the painters tape and hang with two nails on either side of one side of the hexagon.
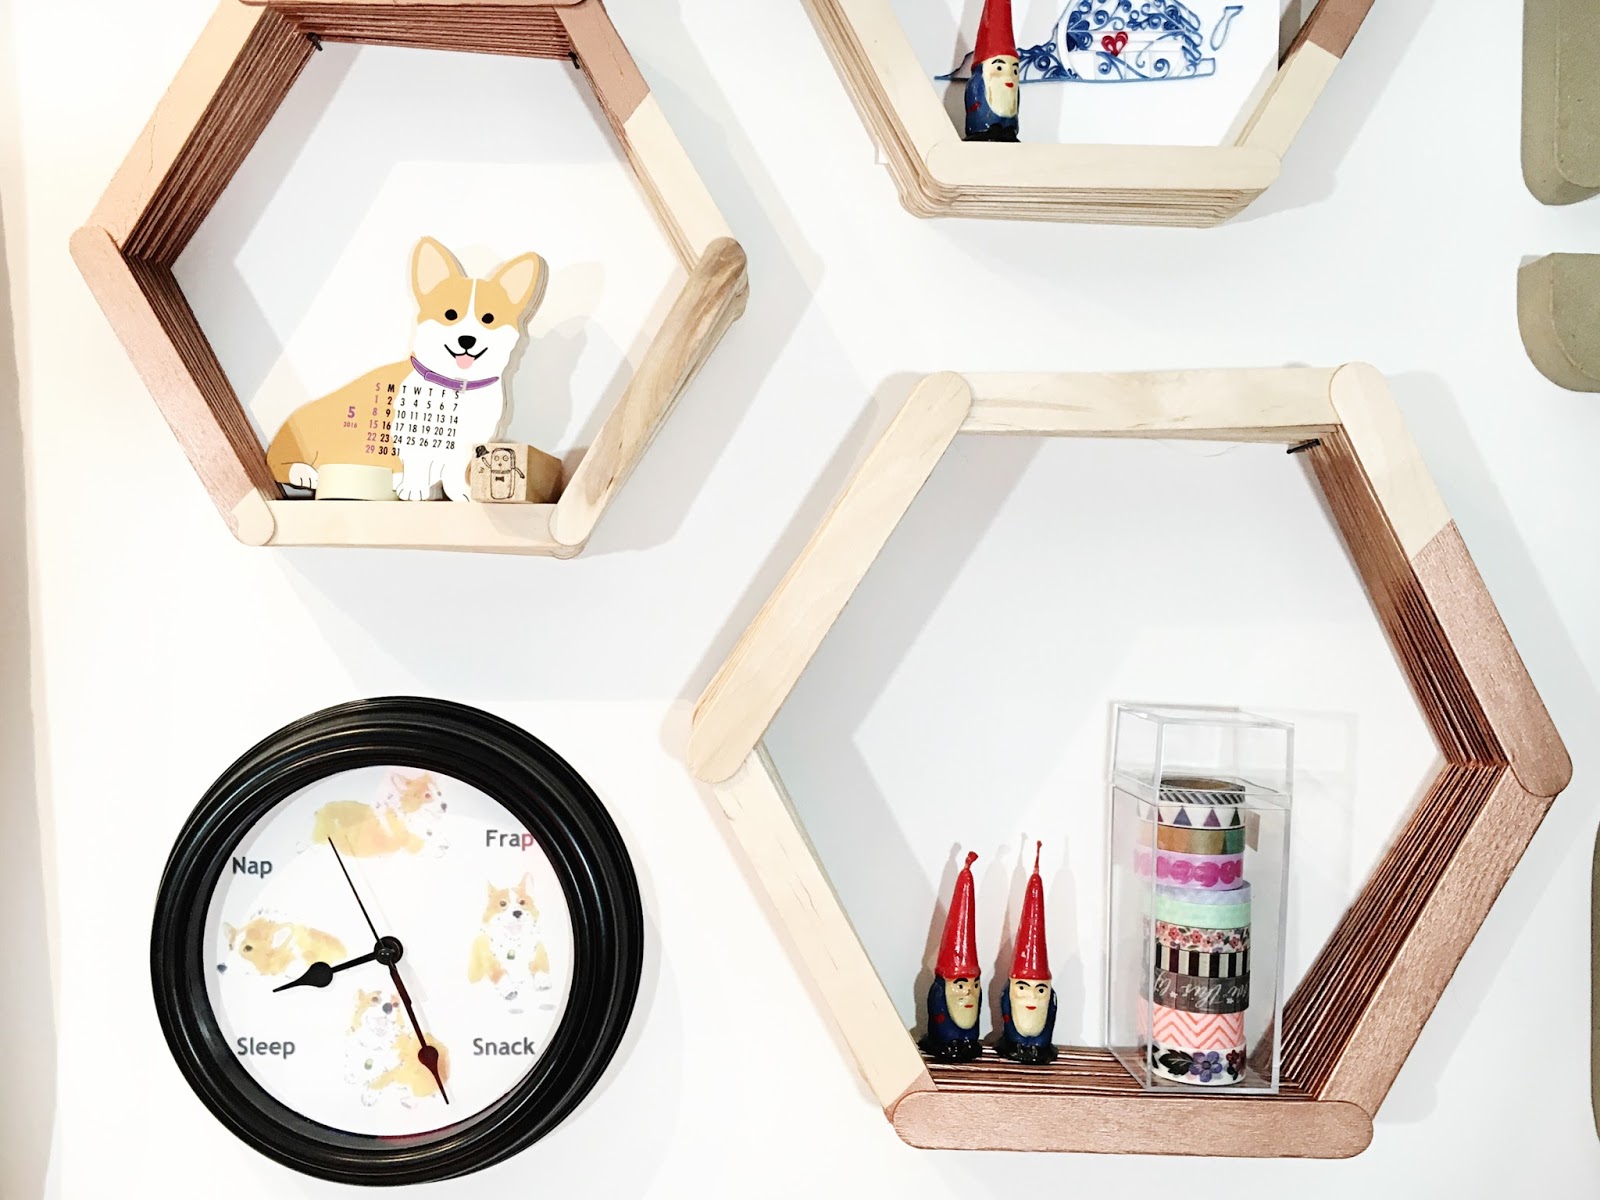
These shelves aren't going to be the strongest things in the world, but for little knick knacks I think these shelves are perfect.  Every time I look at them I have a little chuckle - I think they look super neat, but they are totally made out of a kids craft supply!!

Do you have any memories of crafting as a kid?  What is your earliest one?

xoxo, Moe

11.05.2015

Five Crafty Things For the Planner Girl

I think I have so much fun planning because I'm a crafty girl at heart.  I have found a way to be creative everyday - I used to want to scrapbook and even got into 30 Lists for a while, but it just didn't really suit me.  I couldn't keep up with 30 Lists and I was too non-committal with traditional scrapbooking (which is why I love Project Life....but haven't finish an album in ages.)  So transitioning from crafty girl to planner girl wasn't really a hard transition.  I mean I already had a but load of scrapbooking paper just sitting around being pretty.......

Here are 5 crafty things for the planner girl:
this post contains affiliate links, please read my full disclosure here
Xyron Sticker Maker
This has a specific use and you may not have purchased one before getting into planning but you definitely need one now.  I have a Cricut (and my new Shillouette!) so making kiss cut stickers is something I can do anytime I want.....but a $10 sticker maker like the Xyron is AMAZING.  When I don't feel like messing around with my Cricut or Sil, I bust out the good 'ol scissors and get to work with my Xyron.  There are tons of free printables out there and if you have yourself a good pair of smaller scissors (check the clearance often of your craft stores!) you can be super precise.  I've uploaded some functional printable stickers in my shop here. A paper trimmer can help too.  The Xyron comes in a variety of sizes but the small one fits your DIY stickers up to the width of an Erin Condren Life Planner box - 1.5 inches wide.  How convenient is that?
Rule Your Rulers (and your washi)
I found these guys the other day in Hobby Lobby and knew exactly what they could be used for.  The literal name of this is Rule Your Rulers.  I'm pretty sure they are about $4-$6 depending where you grab them from.  You don't have to keep the little hook on it but it's pretty utilitarian if you have a place to hang them up.  Organize your washi by color, by holiday, by theme, etc.  Pretty handy.
Hexagonal Punch
Not only are hexagons all the rage right now but the angles of the sides of the hexagons make perfect little tails to page flags.  This might be a preference thing but I like my page flags to look a certain way (I also like my tear drop stickers to have a certain shape!).  Trimming scrapbook paper down and then using the angled edge of the hexagon punch makes the tail the right angle.
Felt Appliques
I shared before how to make easy paper clips with pre assembled felt appliques.  Those little crafty goodies are great if you are unable to die cut shapes or unwilling to assemble them all into cute little things!  You can find them all the time around the holidays.  Its great to have an assortment of clips at your disposal.
Scrapbooking Embellishments
Those little card stock cut outs are amazing too.  Laminating them and then attaching a paper clip makes a little less bulky paper clip.  The best place to find these little guys in super unique collections are places like TJ Maxx, Tuesday Morning, and Marshall's!  Using a thicker lamination - like 5 mil - will make it stand up to being used but not too thick like a felt applique can be.

This whole planner thing has been a really creative journey for me.  I've gone from just plan to how many stickers do I really need?  Hope you found something in this list that can make your planning easier.

xoxo, Moe

9.30.2015

Current Favorite Higher End Crafty Gadgets

If there is one thing I've loved longer than makeup and planners it is craft supplies.  One of my favorite traits about myself is my creativity.  I love that if I have an idea I can execute it - for the most part.  Being able to create anything under the sun means having an amazingly stocked craft room/area.  Honestly, I feel so thankful to be able to have the fun gadgets I have to make nearly anything possible.  I've shared my favorite paper crafting supplies in this post, and I've also shared my favorite craft supplies in this post, but now I want to share my current favorite higher end crafty gadgets.  Some of these could be considered middle end (which makes no sense, I know) rather than high end but if you're an average crafter I feel like these are things you save up for or ask Santa for and don't really pop into a Hobby Lobby and throw money everywhere.

I've been in love with these gadgets since I got them and find them so, so helpful for many different things!
I found my Explore on sale at Menard's (a hardware store) of all places.  It was severely discounted and I just snatched it up.  Since owning it I've used it to make stickers, planner dividers, & scrapbooking embellishments.  I'm looking forward to trying to make some vinyl decals and seeing what I can cut with it.  There are tons of free shapes and cartridges to create super simple projects.   There is even a monthly or yearly subscription service so you don't have to buy a zillion cartridges all at once. The Design Space is easy to learn (reminds me of using PicMonkey) and the creation process is really simple.  The Cricut software also has a print then cut feature as well.  I would have never been able to create kiss cut stickers if it weren't for this machine.  I also wouldn't have been able to create small embellishments in various shapes with out a million punches if it wasn't for my Cricut.  The precision cutting is amazing as well - no more uneven planner dividers!
I recently created my own planner using the Cinch and my Cricut Explore.  I never would have been able to bind a little journal like that with out this little contraption.  I was super intimidated by this little machine and just stared at it for a long while.  Turns out it is super easy.  If you're looking to create any sort of memory book or notebook.  It is perfect if you need to make a little notebook in a pinch - like for a gift or something.  But you can also take your time and make a super detailed scrapbook.  It can also double as an A5 size hole punch to punch pages for your planners!  I like it because I can make notebooks super fast.  I'm going to try to make some little notebooks out of Project Life cards as little gifts this year for Xmas.  You can also create a junk journal of sorts and punch in your pictures to create a flip book.

Sewing Machine
I. Love. My. Sewing. Machine.  I don't even do a 10th of the things it is capable of but it is so inspiring to just feel like creating something out of fabric and then being able to.  If I want to sit down and sew something I can...and fast.  Hand sewing would make me get super bored of the project I was working on.  I find that I get bored with a project if I can't see it develop quickly enough.  I've loved using my sewing machine to make a few aprons, my fauxdori, some garb for the SCA, and just general sewing two pieces of fabric together.
This is one of those things where you can justify not picking it up every time you see it in the craft store.  I finally picked one up to set eyelets and punch holes in my fauxdori.  I now think it will be super handy when I want to set eyelets in other crafts - maybe scrapbooking? Who knows?  I haven't really found assorted uses for it yet, but I'm sure I will!

These are my 4 current favorite higher end crafty tools.  Now I can make all the things!

What are your favorite crafty gadgets?  Anything I should try out?

xoxo, Moe

1.16.2015

2015 Creative Goals

I've been feeling like I've been putting crafting and creativity on the back burner for a while now but with my new love of my Filofax, I have a way to track everything I think of!  So I thought I'd make some crafty goals for this year to keep my creative juices flowing:

Try 4 New Crafts
This was one of my four simple goals one month last year and the craft that I chose - loom knitting - was not my favorite so I never talked about it.  But this year I want to try - or continue with - some new to me crafty things.  The first is weaving.  I've been inspired by Rachel of Smile and Wave and by Alicia of Habitual Homebody and want to try my own take on some weaving projects.  I have some circular weaving ideas in mind as well as some more complex god's eyes.  I want to stretch the idea of weaving just a little bit.  The second is to continue with sewing.  I want to make a few shirts, a few maxi dresses/skirts, and just some other simple stuff so i get the hang of my sewing machine.  I'm not sure what the other two might be - maybe some polymer clay stuff, maybe I'll do more spinning of yarn, maybe I'll do some print making..who knows.  I just want to make, make, make.

Project Life 2015
First, I want to finish off my 2014 albums - still have to do September, October, November, and December (I am sooooo behind!).  The last trimester (?) of the year...thats what I call it...still needs to be completed.  I want to continue with my current breakdown - 4 months per 6x8 SNAP album - but instead of doing the 6x8 instagram collage at the front of the album I think I want to do a full 6x8 page of a word or saying that speaks to me that month.  I want to try to put a little bit more design into it.  I also want to include Zach in the album more.  It is so hard when it's just the two of you.  So far those are my only real Project Life goals this year.

Continue to Design Pocket Cards each month
I've loved doing free cards last year - find them all here - and really can't wait to continue to do it into 2015.  I plan on offering 12 sets of cards this year, one for each month.  I think I started with September last year and want to keep on going.  I also want to offer some fun free sets like I did for our anniversary in 2014.

Set up the garage, for real this time
Every time we clean out the garage to set up the studio (that has been a goal, for what like 3 years now?) more crap gets moved in there and we don't get it done.  We need to clean out the garage and make room for the studio.  We need to get rid of a lot of crap we do not need and get the garage set up for its intended purpose.  This is one of the goals that is stressing me out because we try every year and every year it doesn't go through.  Maybe one day it will fall in place.

What are your creative goals this year?  Anything you're gunning for?


xoxo, Moe

3.12.2014

My Four Favorite Craft Supplies

The other day while sitting down to create my planner & again while working on my new art journal I realized that there are some craft supplies that are just awesome to have.  Sometimes you just need something to make & when you have these four supplies your options are endless.  Some of these supplies might be somethings you don't have or they might be things you hoard.  For me these supplies are essential to being free to create - especially since I've been doing a lot paper crafting lately:

I put off for a long time picking up a corner rounder.  In fact I'm pretty sure I picked mine up on clearance because paper punches like this can be really expensive.  This is great if your making a book or just want nice rounded corners on a project.  I've used this to create ATCs, to round the corners on my planner dividers, and to add accents to pages in other projects.  This gives you the freedom to create uniform pages & is much simpler than using your scissors to round corners.

This is a craft supply I hoard like no other.  I love washi tape because it's just so colorful & often really affordable.  When you feel inspired but aren't sure what to make, you can always cover things in washi tape!  I've recently been breaking into my collection to get creative all over everything, like my quote art journal from Monday.

Another supply I hoard!  I don't scrapbook but I can't pass up a nice pad of pretty paper.  Again, if you feel creative yet uninspired bust out the scrapbook paper.  Cut it up, paste it together, create a fun piece of art for your wall or make a little book with your feelings right now.  Sometimes even flipping through the patterns inspire me to be creative.

I have two paper slicers actually!  This is great to quickly & evenly trim down paper for books or other projects.  Perfect for when you're busting out the washi tape & scrapbook paper.  This tool makes creating so much easier because you can measure and cut in one step.

Each of these supplies makes creating a bit easier.  These are great to have on hand because you can get creative with them but also because you'll never know when you might need them!  Since I've been in a creative rut lately (I think I'm finally breaking it!) these simple supplies have helped me keep my hands busy while I sort out exactly how I want to be creative.

What are your favorite, go-to craft supplies?  Do you hoard things for no reason only to drag them all out later?

xoxo, Moe

Connect on Twitter // Follow on Pinterest

8.29.2010

Sum Up Sundays: Paper & Printmaking

The first week of classes is over! I can't believe it! I can't believe this weekend went by so fast either.  I was a bit of a slacker this week because it's just so hard getting back into the swing of things. Its also been HOT & I don't want to walk from my apartment to campus even though its just right across the street.

Here's whats been done this week:


  1. First I've decorated my notebooks like I said I would! I've discovered a need for notebooks this year to organize a lot of my things.  I am a list maker & I really need a place to write down what I need to do & when I am going to do it.  Luckily I have a to do list on my Ipod Touch which will save me from losing the paper I write the lists on! So far the app is working :)
  2. This is a template I've made for my bookplate.  I collect scrapbook paper & used a design from it to make my bookplate.  I love patterns & pattern papers.  I like to have a collection of them to use for digital & paper art.
  3. Ex Libris: I decided to use my own hand writing for my bookplate.  I liked type but I thought it'd be more personal with my own writing. I am going to scan it in & break it apart because my name is too close to the other text.
Have you finished anything cool this week? Also, do you use bookplates? I don't know how common they are now but I like them!

Have a great week!

p.s. Its Sunday night and being the slacker I am, I am heading over to the art building as soon as I finish posting this.

Check out the parties in the side bar or click here!

8.24.2010

Make It Mondays: Paper & Printing

I know I've been gone for a while, but I am back for now & will continue to post as much as I can.  I've decided to incorporate some of my art assignments into Make It Mondays.  So each week I will feature one art project & one or two craft/side projects.

Here are this weeks projects:


  1. First, in my Printmaking class we are creating book plates.  Now book plates can range from this simple & more everyday one from janeray.com to the more traditional & intricate one in 2.  Go here to get 4 printable bookplates to keep up with your library of books.
  2. This bookplate is of Rudyard Kipling (of course!).  This is an example of the bookplate reflecting its owner.  Designed by his father, the scene reflects adventure.  Go here to read the full caption & check out the book The Art of The Bookplate by Kames P. Keenan
  3. Finally I am going to decorate my notebooks for the year with scrapbook paper.
I am also going to be blogging more about style.  So look for that soon. 

Have a great week :)

8.16.2010

Make It Mondays: Free Printables

This week is filled with packing, moving & unpacking as both my sister & I are going to college!  So, because of that, I will most likely be unable to complete anything from Make it Mondays but here are some things for you to try (for kids & adults) :


  1. First is a really cool organizational tool from Living Locurto.  It's a blog weekly calendar! Ins't that the greatest? I need some of those.
  2. This 3D Fawn & Gnome Dolls printable from Fantastic Toys on Etsy.  These are so cute! They would look adorable displayed on a shelf in a kids room.
  3. These gnomes better watch out! This gnome bowling set is free (along with some other cute printables included) from Fantastic Toys blog.
  4. And finally here is a cute bunny stationary set from Paper Glitter.  Go grab the PDF & print & send your love :)
I am in love with gnomes & cuckoo clocks right now.  Is there a certain character you are in love with now?

8.15.2010

Sum Up Sundays: Part One

Unnnnfortunately, I haven't photographed everything from the week because of a busy packing spirit & seeing some friends over the weekend.  So here is part one:


I had to take this picture with flash to get all the detail.  Its an old glass milk bottle I've had forever (I think someone in my family got it for Xmas with hot chocolate in it & I took it when they were done!) & some light blue paint I've had for probably the same amount of time.  It was super hard to decorate the inside, I had to shake it & slap it against my hand to get it to spread around.  I had a sore, sore hand.

I like how it looks & I want to do this to loads of bottles now!  Check out last weeks Make It Monday for the link & keep on the look out for part two of Sum Up Sunday!

Check out these link parties for this week.  Some awesome stuff!