Showing posts with label dorm decor. Show all posts

9.11.2018

How to Create a Personal Altar in Shared Spaces

Sometimes our spiritual practices might weird people out.  Why do you have all those rocks? people ask.  What's all this stuff on this table? they'll say.  Often as their picking items up and turning them over in their hands.  Keeping a discreet altar - whether in your home, office, or dorm room - can have an array of benefits with out having to explain things to curious folks.  Though, I am always down for it personally...it can be kind of distracting.
this post contains affiliate links, please read my fulls disclosure here.

Creating an altar in your personal space is important.  Whether it is for ritualistic practices or a place for peace and meditation, we often don't want to have our personal spaces invaded or feel odd for having them in the first place.  Keeping a discreet altar space can be perfect for those still in the broom closet or those who share a common space - like a shared apartment or dorm room, or for a more intimate office setting.  Personally, I have a big ol altar at home in my spare room that I don't care if anyone sees but when it comes to keeping somethings on my office desk - for personal power, calming vibes, and just all around comfort - I choose to do something discreetly that doesn't even seem like an altar at all!

Items to Include on your Altar

While everyone has different things on their altars here are a few key pieces to keep in mind:

The Elements 

You can represent the elements - fire, air, earth, water - in various ways.  Add plants for earth, an essential oil diffuser for air & water, etc.  You can also charge these things with your intentions as you set up your work space.  The great thing about a diffuser is that you can choose certain oils with certain correspondences but you can also charge the water with your intentions as you fill your diffuser for the day.

Deity Correspondences 

Different knick knacks on your desk can have different associations to certain deities if that is a part of your practice.  You don't need to have an all out dedicated statue that may seem out of place (we're attempting to be discreet here) but just a little tchotchke with your personal deities will add just a touch of reverence to your space.

Current/Relevant Spellwork

This may be something that might only apply if you're currently doing any spellwork around your place of business - maybe keeping a money spell present, etc.  Not something totally necessary but you may find a place for it.

Personal Power Objects

While a little woo woo for my office, I used to keep the current crystals I was working with on my desk.  These were visual reminders for me throughout the day for certain energies and emotions I was attempting to usher into my life.  Same with the essential oils I'd use.  You can also choose other tchotchke like items that have a certain personal power significance to you but that aren't necessarily woo woo.

Creating Your Altar, Discreetly

Like I mentioned, at home I go all out with what I've got on my altar - crystals, boxes, oils, incense, animal totems, sabbat decorations, I mean it's endless (and often a mess!).  But in smaller or more public spaces, we can be more choosy or specific.

 Work Space Altar

Shop this Look

Depending on where you work, your personal space may have very different types of decor.  The example above has a sleek look and features a lot of light.  This is a great little space to feel inspired!  I imagine the person in this office getting so much stuff done!

My personal desk space at work isn't as elegant as this so I choose to express my quirky fun side with some plant Shopkins (yes, I'm a 30 year old woman who thinks shopkins are the cutest), my diffuser, and other objects that remind me to lighten up.  My job can be kind of intense with a lot of frantic energy so fun little objects that lighten the mood and cheerful essential oils keep me in the good vibes category!

Dorm Room Altar

Shop this Look

I think most of the time in a dorm room or shared apartment we're among like minded people so it might not be too weird to have some of these things around your space. But we still might not be ready for a ton of questions.  Creating a small altar space on your desk, night stand, or little shelf in your room can make our shared spaces seem a little more sacred.

When I was in college I loved to have small collections of inspiring nick knacks.  These little collections of things really made me fill at home and gave me a space to feel inspired.

Creating these personal altars bring a feeling of safety to our spaces.  We feel at home and we feel like we can still work on our personal goals.  Sometimes we are asked to be different people in different spaces - at work I'm not going to blabber on about chakras (unless someone asks) - so bringing elements of ourselves into these spaces can give us a sense of purpose.

If you'd like to learn more about crystals, essential oils, chakras, etc head on over to join the Live & Create Facebook group where we talk about mindful & creative living through productivity, planning, and personal growth!

Do you personalize your spaces?  Do you have a personal altar at work?

xoxo, Moe

6.12.2017

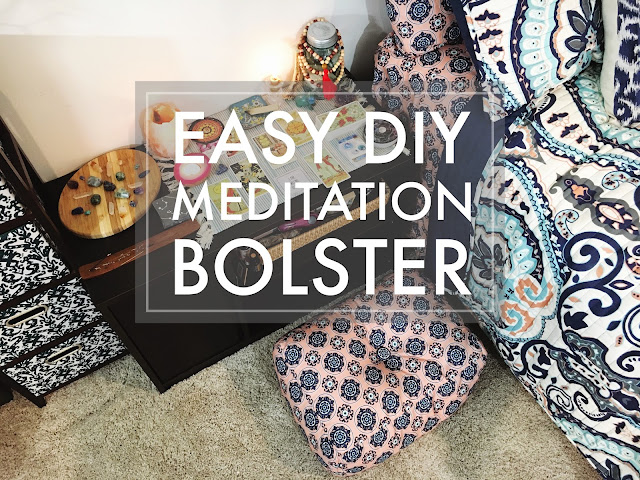
Make it Monday // Easy DIY Meditation Bolster Sewing Project

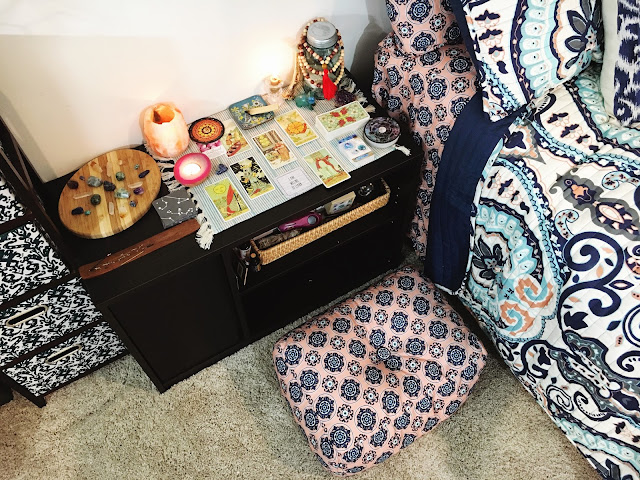
I'm in the middle of redoing the spare room downstairs with some bohemian inspired bedding I got for a super great deal from our local Meijer.  One of the key parts of the spare room downstairs is my sacred space!  This is where I go to meditate, journal, and all around connect with myself.  I love that this space of mine is separate from my actual bedroom because that means it is a place I can go to.  It is a place I can show up to when I need to. 
Easy DIY Meditation Bolsterthis post contains affiliate links, please read my full disclosure here.

Today I want to share with you how to make a comfortable meditation bolster.  This project was easy...yet annoying.  You'll totally love the results...but you may not ever want to make a pillow again.  Before I made this guy, I was using a small pillow.  Once I realized that pillow wasn't high enough and just wasn't supportive enough I went on to use one of the chairs from my craft table.  In the end, neither of these options had the right height or support for my booty.  So I thought to myself 'hey, you can make a bolster!'  and that's what I did.
How to Sew an Easy pillow
Shop Supplies on Amazon!

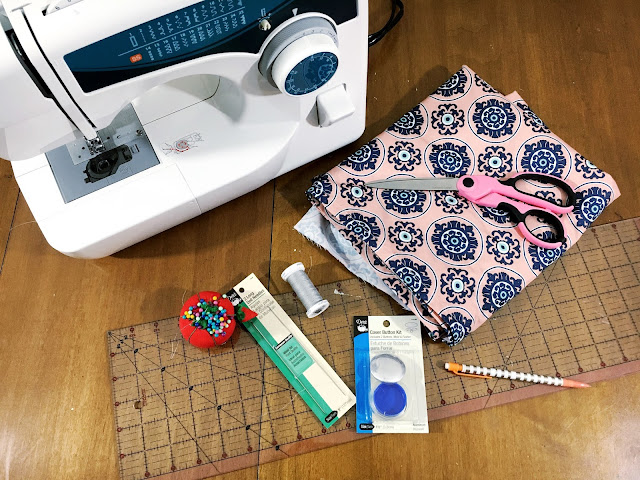
supplies // fabric (I used an extra sheet set to match the new bedding), sewing machine, matching thread, ruler/measuring tape, pins, bean bag chair beans, 1.5 inch button cover kit, doll needle

I started with 6 fabric peices - 2 14 x 20 inch pieces, 2 14 x 9 inch pieces, and 2 20 x 9 inch pieces.  This pillow will be stored in the bottom shelf of my meditation altar so I took these measurements to ensure it fits.  Feel free to make your pillow a different size, but this guy is the perfect height to elevate your bum enough so your legs don't fall asleep during mediation!

Pin the right sides of the 4 squat pieces together and sew up the short sides to create a long strip of fabric.  The seam allowance here is set to be .5 inches.  In hindsight, I would have used just a long, single piece of fabric as the sides of the bolster rather than sewing these 4 pieces together.  I also suggest using a zig zag stitch for strength.  I'm using some cheapo fabric so the zig zag stitch gives the seams a little more substance.  Leave an opening to add the beans
Turn Corner on Sewing a Pillow
Pin the top and bottom pieces (the 20 x 15 pieces) to the top and bottom of the tube you've created - make sure you're pinning everything right sides together.  This is the tricky part & where the single long strip might have been better.  As you're sewing around and reach the corners be sure to pull the extra fabric out so that you're not sewing over the corners too much.

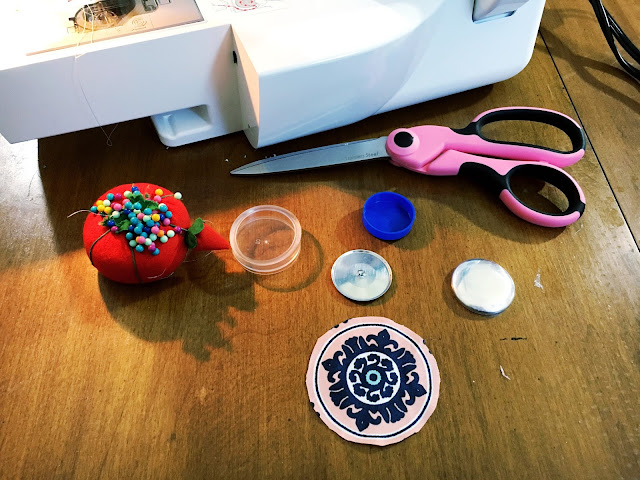
Turn the pillow inside out so the right side is now facing outward & fill it with beans.  This is going to be the messy & most annoying part.  The end result is so worth it though.  I used a paper funnel and measuring cup to funnel the beans into the pillow.  Once you get the pillow good and full, test it out.  If it feels overstuffed just shake out a nice chunk of the beans.  Hand or machine stitch the little opening closed.How to Make a Covered ButtonTo finish the bolster, add a coordinating covered button.  You can pick up these covered button kits at your local sewing shop so this isn't something special you'll have to seek out.  Simply follow the directions on the back of the package.  Cut a circle to the required shape, place it over the form, push the button into the form.  Fold the extra fabric over, place the button backing on top, and push it down to secure.  Bam! Button.Add a Button to a BolsterDIY Mediation Pillow
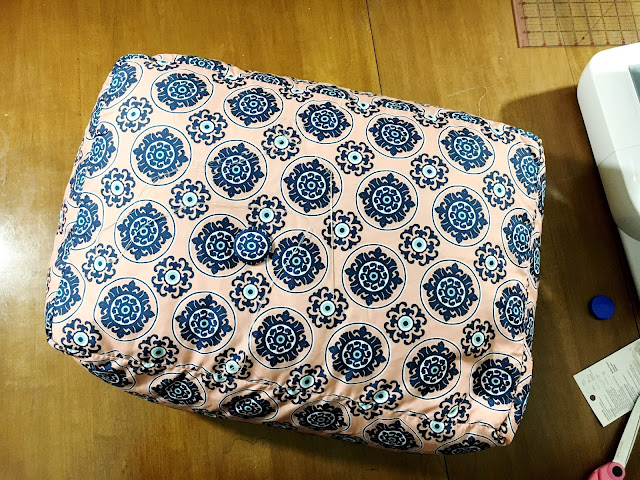
Using the long doll needle and doubled over thread - you can even use two strands, doubled, for extra strength - attach the buttons to both sides.  Poke the needle through the center of once side to the center of the other side of the bolster.  This may take a few tries. Once you reach the other side, slip a button through then pass the needle back through to the first side.  Add the second button, pull taught, and secure with a few knots.

And you're done!  See, easy peasy. Though slightly annoying.

Using this bolster now relieves the pain on my hips, allows the blood to circulate, and gives me the right height to see my altar.  It also fits perfectly into the space under my altar table.  The altar table itself is a TV stand from either Walmart or Meijer, I can't remember. (Oh! Walmart is also a part of ebates!  Be sure to sign up here if you haven't started to use ebates yet!).  It has shelving space plus a little door with some shelve too - perfect for hiding away journals, etc.
Sacred Mediation SpaceSacred Meditation Space
I am in love with this little space.  Be sure to check back soon to see the whole room put together + some other decor DIY's!  If you'd like to check out some of the other rooms in my house I've got a living room tour + a craft room tour over on my YouTube channel.  You can check out the bedroom tour here on the blog.  Need more DIY decor inspiration? Click here!

Do you have a sacred space?  Where do you go to connect with yourself?

8.28.2013

Wednesday Decor // Dorm Edition - East Meets Mod

These two styles - Asian inspired & Mod - don't really have much in common but it's fun to blend two things to see what you can come up with.  If you missed last week's Dorm Edition it was Eclectic meets Shabby Chic, read it here.  This week is East meets Mod.  Angular shapes & mod elements meet more rustic asian inspired accents.  My favorite part is is the pairing of the mod art with the more asian inspired (yet totally reflecting angular elements) mirror.

East Meets Mod


1. Bold Angular Lighting - You can choose one bold color to be the theme throughout this look.  In this example, I chose orange.  Colors that work well with bright orange are yellows, creams, & navy blues.  This shape is reminiscent of huge decorative jars I've seen in Asiatic pottery so it really complements the other shapes.

2. Collect Angular Storage  - Shop thrift stores for the perfect angular containers.  Then grab a can of spray pain & have at it.  Paint these into the complimentary colors in your theme to have an East meets Mod look.

3. Bold Throw Pillows - Pair complementary patterned pillows for a fun look.  Keep your color choice in mind when looking for complimentary pillows.  These two patterns go well together because of the colors & the pair of bold and soft. 

4. Complementary Art & Wall Decor - This Mod print in a navy blue goes great with the asian inspired mirror.  The mirror complements the mod design with the graphic style and angles.  Add in something super rustic like these candle holders to give they style a grounded feel.

5. Bold Mod Alarm Clock - Because, why not.  You've got to wake up for class & you also probably have some spray paint left over.  Give a thrifted find new life to match your decor.

6. Collected Trinkets - Keep things grounded with a dark stone feel to some of your trinkets but don't be afraid to throw in something fun.  Add texture with different figurines & add color with spray paint matching your theme.

Stay tuned for the final style pairing next week!

How do you use color in your decor?  What styles have you paired together in your decor?

xoxo, Moe

Connect on Twitter // Follow on Pinterest

8.21.2013

Wednesday Decor // Dorm Edition - Eclectic Meets Shabby Chic

I know a lot of people are already back to school! I also know a lot of people are heading back with cars full this coming weekend!  So I'm a bit late on doing this series but you can definitely add a touch of each of these (there will be three) styles to your current dorm/apartment decor.  The first one is Eclectic meets Shabby Chic.  I feel like I am always between two styles.  This one is my favorite and I've always been drawn to Shabby Chic but it's a bit too girly.  You can totally grunge it up with an eclectic vibe by brining in deeper tones & old world accents.

Eclectic Meets Shabby Chic


1. Collected Containers - A great way to store your little doodads (pencils, mascaras, etc, etc) is in small containers.  Consider popping by the thrift stores in your area to see if you can collect a few that compliment each other.  To keep it Shabby Chic consider buying milk glass, mercury glass, or glass with etched designs.  Keep it eclectic by finding glass in jewel tones or metallic containers.  Vary the widths & heights.  Don't go over board - two or three look the best paired together.

2. Display your Perfume Collection - Consider a more modern tray to bring down the overly shabby look of your perfume collection.  A tray in a contrasting style of your perfume bottles adds a bit of depth & compliments the marriage of these two styles.

3. Flameless Pillar Candles - These are great since you can't have burning candles in school housing.  Pillar candles look worldly but are also classy so they are a mix of both of these styles.  Ones that are remote operated or with a timer are very low maintenance.  They come on when you want & you don't have to switch on a bunch of candles.

4. Blend Floral & Bold Patterns - Using throw pillows & bedding you can blend these two styles.  Key elements are florals & bold patterns.  Don't over do it though - chose complimentary colors in your florals & then black and white for your bold patterns (or do it opposite, how chic!).

5. Fluffy Warm Blankets - These blankets in a neutral colors & not patterns bring a bit of warmth into your room.  They also add texture to your bedding.  Consider a white or cream colored comforter so there's not a lot of pattern clashing going on.

6. Fun Lighting - I threw this guy in here because I have him & I think he's adorable.  He's great to add a little light to your room.  Turn him on with all of your flameless candles & bask in the relaxing glow.

7. Collected Dishware - Dishware is another collection you can build by blending these two styles.  Choose tradition style cutlery with a fun twist.  Then add different textures with handmade ceramics & other rustic elements.

Stay tuned for the next two installments!

What styles do you blend in your own decor?

xoxo, Moe

Connect on Twitter // Follow on Pinterest 

7.29.2013

Make it Monday // DIY Framed Dry Erase Calendar from Instagram Pics

Happy Monday! Can you believe Summer is nearly over? It's nearly August!  Meijer already has back to school stuff out & Hobby Lobby is putting up Christmas stuff.  ARE. YOU. KIDDING?  I can't believe it!  So this DIY is perfect for going back to school - dorm decor & what not - or if you just feel like you need a calendar by the door!
I used a photo from the beginning of Summer for this.  If you're making this maybe for your dorm, you can use 12 photos you love from home or from summer or make a new one each month from college photos.  The best part about this is it's a marker board so you can circle important dates, come up with your own color coordinated code, or write notes to your room mate or in my case - to myself.  Since Zach & I leave through different doors in the morning I put this near my door!

So start off with a picture you want to use.  I pulled one off of instagram from the beginning of Summer that I then edited through PicFrame for the circle shape.  PicFrame has a few different shapes you can use but I chose a simple circle.  
I created a calendar template (download instructions are at the end of the post!) that you can change for each month using a font that should be available on your computer - Century Gothic.  When you open the document in Word, make sure to highlight the text that says highlight & insert picture here. to make sure the picture fits correctly, us a square image no bigger than 612 px (you can use a photo editing program to crop it down to size.)
I just made one month template, so if you ever find a month that needs more rows for days, you can decrease the font in that box & do a / between each number or play around until your satisfied with the look (for example, March of next year I think has another row on a calendar).  Here's what your finished calendar should look like:
There is also plenty of space around the calendar to write notes & reminders.  I picked up a frame from the dollar store, trimmed the 8.5x11 paper to fit 8x10, framed my calendar, & placed it right by the door!  I can't wait to remember all the things I keep forgetting.

Download Instructions
I created a template for you, find it here.  To download it, click the link where you'll be redirected to a Google Drive page.  In the top left corner under File there is a little arrow, click that to download.  Once it downloads to your computer you should be able to open & edit it in word.  I hope it works for you! This is the first time I've done anything downloadable with the intention of editing it afterwords!  Remember, this is free for personal use.  Share it with friends, print for yourself, or make a gift!

Have a great week!

xoxo, Moe

Connect on Twitter // Follow on Pinterest