Showing posts with label crochet. Show all posts

1.20.2020

Make it Monday // Easy Crochet Pen Case

I've been a crafty lady for as long as I remember.  I'd used to sit at my grandma's house cutting up her McCall's magazines.  I'd color anything that sat still.  I just loved to make stuff!  I've been a crafty person longer than I've been a planner person and my favorite thing is when two of my hobbies collide - crochet & planning.
this post contains affiliate links, please read my full disclosure here.

I remember when I learned to crochet just a simple chain.  I think I learned when I was in elementary school and I felt pretty cool.  The first hat I made was bright yellow.  I'd crochet a row and then ask my grandma what to do next.  She'd tell me 'do two double crochets in every third stitch' and I'd do that around, then she'd tell me the next step.  Eventually I ended up with a bright yellow beanie!  That was in maybe middle school or my freshman year of high school.  My French class went to Canada my freshman year and I wore that hat!

A few years ago I crocheted a blanket in 10 days for one of Zach's siblings.  When I was unemployed in 2012 up here in Michigan I crocheted a butt ton of granny square blankets.  I crocheted this blanket for our first house (and we still have it!).  
I've been a planner lady for quite a while too - ever since we got a planner in high school to use!  I would decorate that little thing with magazine clippings, highlighters....you name it!  I think this post is really the first post I shared about a planner on the blog.  That post didn't even begin to match where I am now in planning.  Hell, you can even watch this video where I outright say 'I don't understand why people use stickers in their planners.'  And boy, look at me now!


Recently I've been seeing these cute little crocheted planner and pen cases!  I can't stand how adorable they are.  I definitely never thought I'd crochet anything for my planner but here we are.  Now that I have a Hobonichi Weeks I plan to crochet a pouch for it as well.  Man the possibilities have become endless!

So I'm here today to share with you the quick and dirty pen case crochet pattern - if you can even call it that!  Seriously this is super easy and it will work through your yarn stash!
supplies // scrap yarn, size I crochet hook

Are you ready for this? 
Chain 8, sc in second chain from hook and all the way across, 2 sc in last chain, do not turn.
Begin to work in the round by sc in back loop of chain across.  Do not join.
Sc in the first sc from the first row and begin to work in the round.
Sc in each sc until pouch measures 5.5 inches, end on the side of the pouch with a slip stitch, weave in ends.
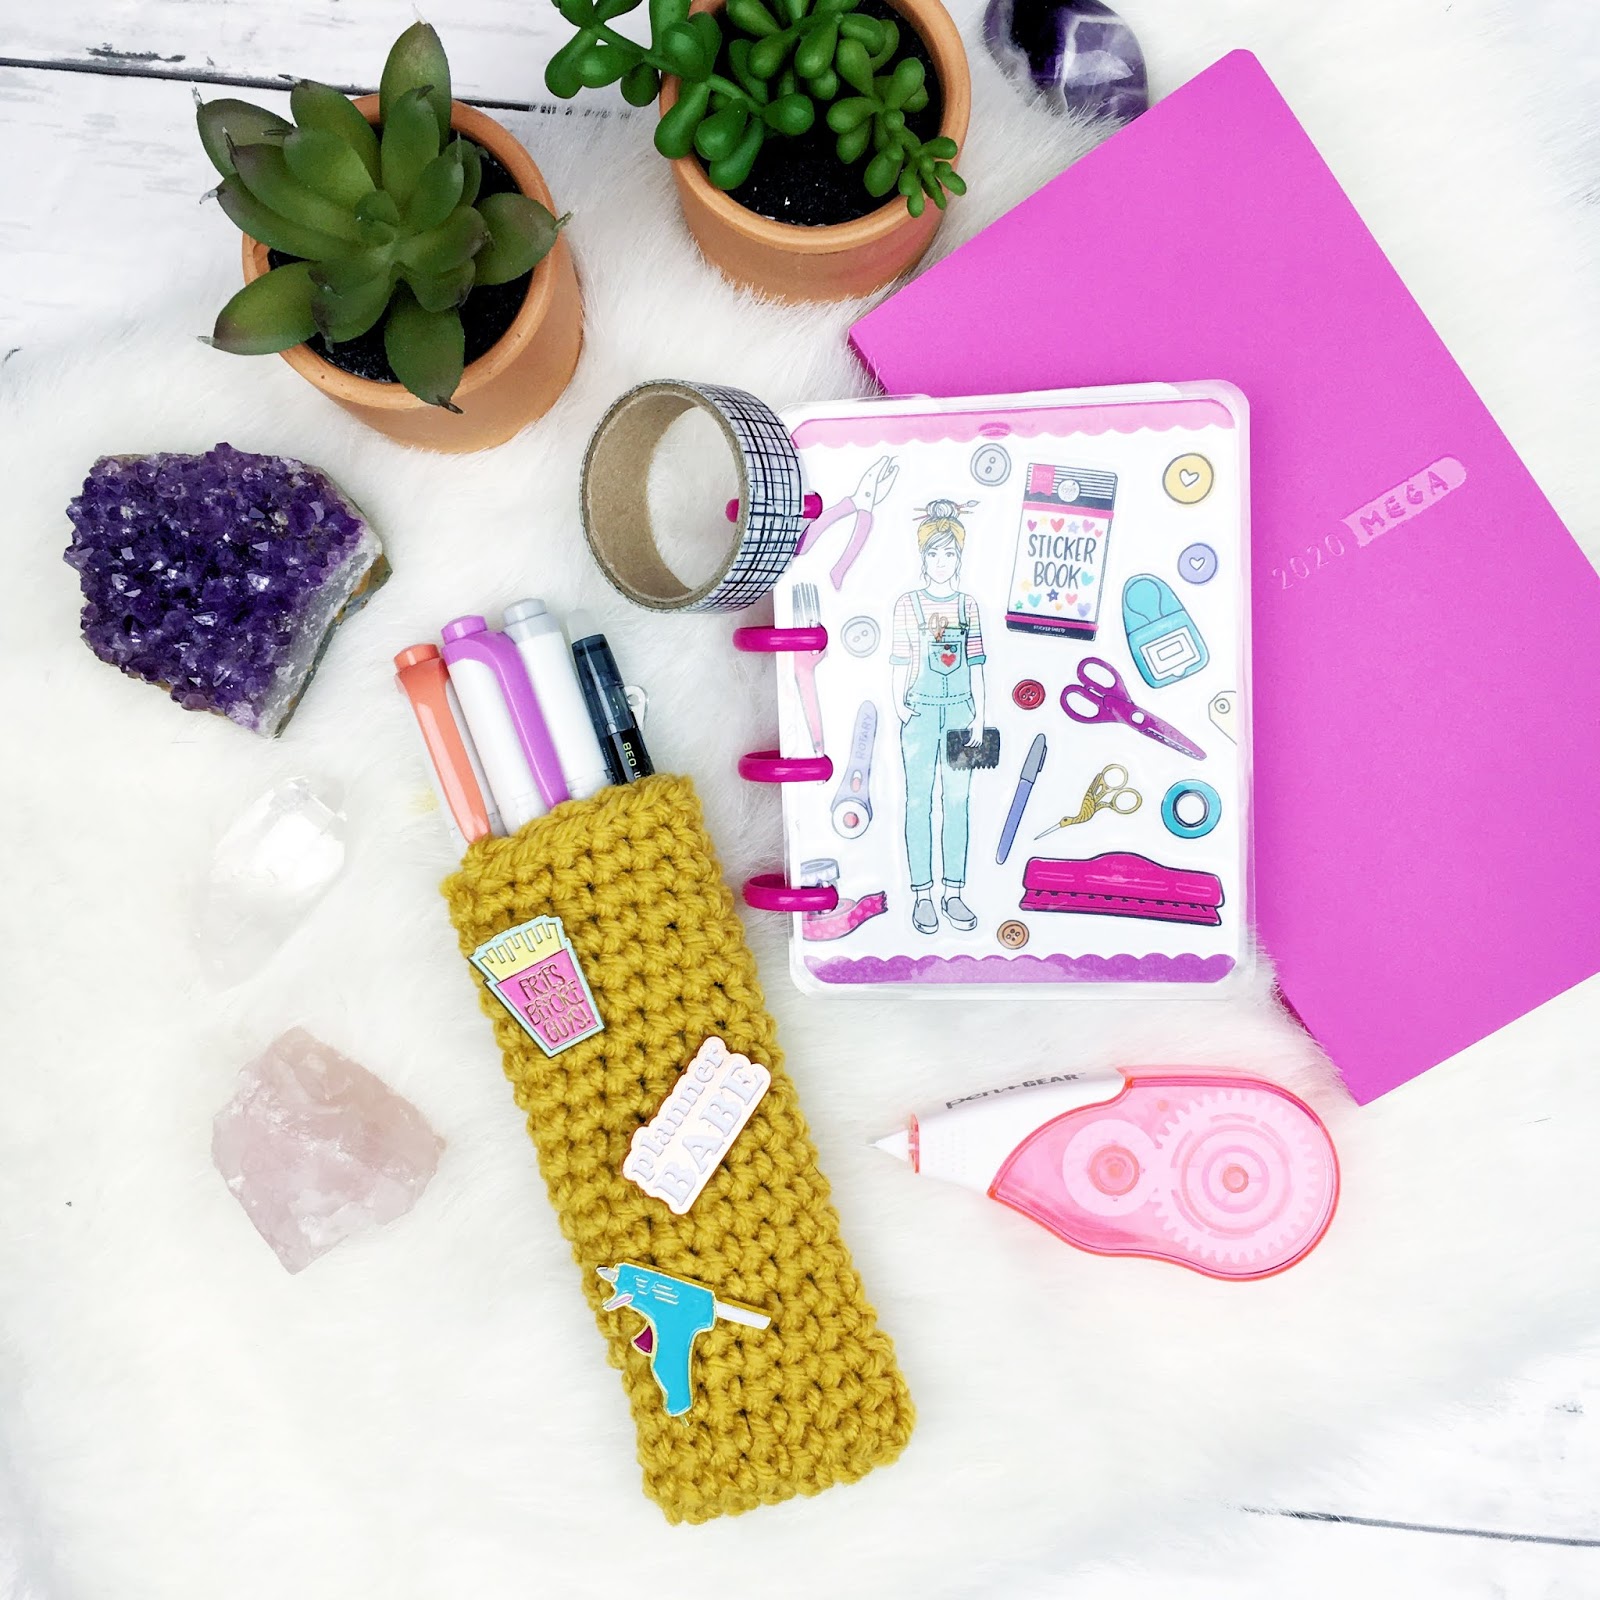
This pattern is so simple I don't know if you'd even call it a pattern!  You can seriously bust your stash and gift a ton of your planner friends with little pen pouches!  Store your pens, tweezers, mildliners, highlighters...you name it.  And maybe even throw a crochet hook or two in there.

I'm just gonna whip a few of these guys up with my yarn stash!

What two hobbies of yours do you wish would collide?

xoxo, Moe

8.08.2016

Make it Monday // Apple Crochet Cozie

I hear we are nearing back to school time....and I have to say I am excited!  I am not going back to school, nor is anyone I know, but I can't help but get excited about it.  So in honor of back to school time I wanted to share with you some project inspiration.  A back to school inspired, Apple Applique crochet cozie for your coffee cup!
I'm no good at writing patterns but I did loosely follow this coaster pattern and then I crocheted in the round until I had a tube that would fit around the cup and fit the applique.
I hope this inspires you to make some crochet cozies of your own.  If you want some more themed cozie inspiration, click here, here, and here.

xoxo, Moe

4.25.2016

Make it Monday // Fruit Slices Cup Cozie

It is finally getting to be the time of year where I can switch my parka for a tank top and my winter boots for bare feet.  This winter wasn't as bad as it has been in the past but it still was cold, it still was long, it still was winter.  Even last week we had a day in the 40's after a week of 60's-70's.  I was like WTF is going on here.
I decided to welcome the warm weather with a crochet project! Super weird, right?  But it isn't something you wear it is something for your cup to wear.  I've posted previous cup cozie projects before (here & here) and they are all themed for the season.  This is the second crochet applique cup cozie I've made and I have to say it is pretty fun to figure out how to make little shapes using various stitches.  I tried to make charts for the orange slices but just couldn't figure out how to properly convey the shape.  Hopefully you can go off of these charts for reference.  I did use a combination of single crochet and double crochet to get the look.

The half size slice has a row of double crochet in light orange, and then two rows of single crochet in light orange, increasing a bit each time.  The final row is single crochet in the darker orange.
The full circle slice is crocheted in the round with out turning and has a row of double crochet in the light orange followed by a row of single crochet in light orange, then a third row of double crochet in light orange.  The last row is single crochet in the dark orange.  Each row has an increase to help keep the shape.  Both appliques were made with a size G crochet hook.

I then used some white yarn to weave from center to outer edge to create some 'slices'.  I didn't do this equally around the slices though, to add some contrast.  Then I attached the appliques to the cozie with a needle and the corresponding yarn, tucking all loose ends inside.
The cozie was made by crocheting in the round 17 rows of 35 single crochet stitches using an H hook.  Because the appliques were so huge, the cozie had to be big enough to accommodate them.  Using thinner weight yarn and a smaller, corresponding hook will make the appliques smaller.  But this size works great for a cold beverage insulated cup.

I can't wait to sip something delicious on the porch out of this fun mug.  Or even throw a frozen lemonade or smoothie in it to go.

Was winter harsh were you were?  Are you excited for warm weather?

xoxo, Moe

12.07.2015

Make it Monday // Crochet Wine Cozie, Again

In December of 2012 I shared this DIY Wine Bottle Cozie.  This December I want to step it up a notch and do it a little better.  It's still crocheted, and it's still a wine cozie, but it is a little more festive!

I followed the same pattern and took my own advice about making the cozie a bit taller.  I used some left over yarn as a closure.  And since I'm obsessed with those little felt appliques I added a few here too.  How. Stinking. Cute!
Picking up my crochet hook again is so fun!  Especially working on something so repetitive and simple - great for watching TV.  These would be great to knock out for a few neighbor gifts or for some coworkers.  Love it.

Hope you're nearly gift giving ready!

xoxo, Moe

11.16.2015

Make it Monday // Thanksgiving Coffee Cozie

Remember when I shared this crochet coffee cozie for Halloween?  Well now I'm addicted to making themed coffee cozies!!  They are super simple to whip up and great creative practice if you're a beginner crocheter because not only are your practicing crocheting in the round, you can also practice different stitches!
this post contains affiliate links, pleas read my full disclosure here.

For this cozie, I used a single crochet in the back loop only of each round.  This project is a great stash buster!  You could work through about a dozen in an afternoon - talk about instant gifts for the holidays.
Pattern
Using worsted weight yarn in two colors and a size H hook
ch 30, slp st in first chain to join, sc in each ch around.  Be careful not to twist your work, join with slp st by picking up second color, ch 1, do not turn.
Using second color, sc in back loop only of each st around.  Join with slp st by picking up first color, ch1, do not turn.
Alternate colors for every row, 11 rows in total. 
Bind off and weave in ends.
To add an embellishment, I used a little bit of E6000 and the stickiness on the back of a premade felt applique in the shape of a Turkey to add to the front of the cozy.  Now is the time to find Thanksgiving stuff at the craft store for like 40% off!  I used these same little appliques to make these paperclips, too!
If you're thinking about getting into the craft of crochet (do it! do it!) I'd suggest this Crochet Basics & Beyond class from Craftsy to get you started!

Are you ready for Turkey day?  I looooovvvee Thanksgiving!

xoxo, Moe

9.28.2015

Make it Monday // Crochet Halloween Coffee Cup Cozie

In between my planner obsession I've picked back up a little bit of crochet.  Over the long weekend when I made these face scrubbies, I also made a few Halloween inspired coffee cup cozies!  I even went out and bought another travel mug to go with the cozies I made.  You always need a new mug right?  Right.
this post contains affiliate links, please read my full disclosure here.
When it comes to crocheting 9 times out of 10 I'm like 'I want to make something....but...... I...don't....know.....what......'  That is when Pinterest comes to the rescue.  I think I was looking for patterns for face scrubbies when I stumbled upon a pin, that led me to another pin.  None the less I settled on this coffee cozie pattern.

While I'd say I'm pretty good at making up projects on my own, this couldn't have been more perfect.  This is actually one of my favorite stitches and back when I tried to sell some of my crocheted hats this was the stitch I used to make a lot of them.  It looks sort of like you're knitting in the round like you would with crochet.  Instead of going in the top loops of the row, you slip your hook in the loop behind the top two loops.  You're going into the back of the yarn over part you did to create the stalk (if you will) of the half double crochet.  Once you get this down the stitch is beautiful.  And if you're like 'man, I had crocheting in the back loop only...takes FOR.EV.ER!'  I promise you this stitch totally doesn't.
You do need to use a stitch marker - a proper one or a safety pin or a little piece of yarn (or you can be a rebel and not use one, I don't) - because you won't be joining and turning between rounds.  You'll keep going and going until you're satisfied.  The pattern I used called for a button, but I had bigger plans.

I searched, and searched for a tiny scull applique pattern and tried a few out but they all came out too big.  I finally found this one and did a slight modification.  The chart really helps you see where you need to be placing your stitches and what stitches will become what part of the scull.  When I reached the last row of the pattern I continued on with a slip stitch in a few points around the mouth part of the scull.  I did two slip stitches in the corners of the mouth to give it a little bit of a square shape and just even off the finished edge.  Then I joined with a slip stitch to the final row just at the middle of the scull, right above the mouth piece.  Leaving a tail, I used that to sew the scull onto the coffee cozy.
You could leave it as it is, or you could crochet yourself a little bow, a video how to is above.  Using a bright, neon yellow yarn I started with a ch of 4, then 2 double crochets in the 4th ch from the hook, 3 ch and joined with a slp st.  Then I ch 3, 2 dc in the stitch I just joined in, ch 3 and slp st back into the stitch I worked the dc in.  This creates two little flower petals that are perfect for a tiny bow.  Leaving a tail again, I used that to sew the bow to the cozy by wrapping the yarn around the center of the bow then into the cozy and back out again, wrap around, repeat.  much like you would sew through a button hole.

If you find other small applique patterns, you can have endless amounts of coffee cozies for the fall!!  Yay!!!
Hope you enjoyed this fun little project to work up in an afternoon!!!  If you're looking for a beginner class (or just looking to brush up) be sure to check out Crochet: Basics & Beyond class here on Craftsy.  You can also purchase some amazing supplies on the Craftsy site I love their variety of yarn!

xoxo, Moe

9.07.2015

Make it Monday // Crochet Face Scrubbie

I haven't crocheted in a long, long time.  One of my favorite things about being me is that I am so creative.  (Vain much?) But really, I'm too creative for my own good and I end up changing my interests quite often.  I love getting really into a new hobby/craft and often I ignore other things I once was passionate about.  Crochet was definitely one of those things.  I can't remember the last time I crocheted for more than one second.
this post contains affiliate links, please see my full disclosure here.
Because this weekend was a long weekend I found myself with extra time....who would have known?? I just wanted to make something small so I pulled out some cotton yarn from my stash that I found on sale a little bit ago and got to work.  I totally pulled out my project about 1000 times, but I finally settled on a little face scrubbie.
I based my little scrubbies on a pattern like this one (which is actually for a potholder!) and used super bright, fun colored yarn.  This is the first I've seen of bright cotton yarn, usually when looking for cotton yarn all I find is white, pale yellow, baby pink, multi colored pastel....so blah.  Fun, bright colors - that's where it's at.  I can't believe I found these Lion Brand Kitchen Cotton Yarn on clearance at our Meijer.  It seems like my Meijer's craft section rotates through craft supplies pretty frequently, I never know what I'll find in their clearance.  (Sidenote - my Joanne's rotates through stuff quickly also - ours is small and it moves stuff to clearance that I still see on the shelves at the bigger one about 30 min away!)

Each scrubbie worked up very fast, about 2 in 45 minutes and I could get 2 (maybe three) out of a single skein of yarn.  Can we talk about an early start on Holiday gifts?  I used an H hook, chained 20 + 3 for a turn, and got to work in double crochet.  If you'd like a more rigid cloth single crochet would be better as you'll get a tighter weave.  I've just been needing a light bit of exfoliation and these are easy to reach for when I need a quick face wash.  I've been relying on makeup removing wipes and my skin is paying for it!
Anyway, this super bright cotton yarn was just sitting in my yarn basket for ages but you can still totally grab some fun colored cotton yarn from Lion Brand during the Back to School Sale going on on Craftsy through 9/9 - each skein is $1.65 (45% off!) and there are 14 colors to choose from.  Of course you can browse all their cotton yarn selections, I'm just partial to these!

During their back to school sale you can also score some discounted lessons in crochet.  This project is very simple, with some basic stitches down you'll be able to whip these up in no time - but if you're looking for more techniques and patterns check out their online classes and even the kits (they have one for knitting and crochet!)  No time like a long weekend to get started with a new hobby, or pick up an old one!  Seriously, if you're going back to campus, these kits send you everything you need to make a project and the crochet ones look so fun to work up!

Hope your Monday is productive - but if you just lay in your jammies watching Netflix and crocheting, I won't judge.  I might end up just looking at all the crocheted items on my inspiration board and not work through any of them.

xoxo, Moe

3.23.2015

Make it Monday // Easy Stash Busting Crochet Coasters

I am pretty confident that Spring has sprung here in North West Indiana.  I went outside on my day off a few weeks ago and it was like suddenly the world was in color!!  What the actual heck...its like my world has been covered in snow for the past 3 months....oh, wait, it was.
(this post contains affiliate links, please read my disclosure here.)

Earlier in the year I realized I hadn't picked up a crochet hook in ages.  In fact I couldn't remember the last thing I crocheted. (Funny enough the last thing that I knitted was using up the alpaca fiber I spun!)  Does anyone else go through phases of crafting?  Or phases of interests rather?  I'm all about the planners now, I guess.  But I do have a left over yarn stash that is just begging to be used up - and this Craftsy class looks really good to finish off some skeins by making some embesliments.  I thought some quick stash busting projects that would be great for a weekend afternoon but then I saw this class on Craftsy to improve your crochet techniques and I think some left over yarn could go towards that project!  I feel like there is always something new to learn even if you're seasoned in your hobby.

Anyway, here is my little stash busting project created in an afternoon.  These are super fast to work up and you can make quite a few for a gift or for every end table in your house!
Supplies : size I & size L crochet hooks, two colors of worsted weight yarn from your stash

Pattern

work this pattern in the round (and it's the simplest thing you could ever do)

row 1 : With the two yarns held together, ch2, sc 8 times in the the second ch from the hook, join with slp st in the top of the first sc, ch 1.

row 2 : 2 sc in each sc around, join with slp st in the top of the first sc, ch 1.

row 3 : 2 sc in first sc, 1 sc in next sc, * 2 sc in next sc, 1 sc in next sc*, repeat from * to * around, join with slip st in the first sc, ch 1.

row 4 : 2 sc in first sc, 1 sc in the next 2 sc, *2 sc in next sc, 1 sc in the next 2 sc*, repeat from * to * around.  Once you reach the first sc, using the size I hook join round with slp st in top of first sc - be sure to only yo and draw through the color of yarn you plan to use for the outer border.

row 5 : Using the size I hook, 2 sc in first sc, 1 sc in next sc, *2 sc in next sc, 1 sc in next sc*, repeat from * to * around.  Join with slp st in the top of the first sc.  Trim and weave in ends.

Repeat for desired number of coasters.
I used a bright yellow and a natural beige color and I they remind me of warm, warm weather.  Even though I'm not looking to add to my stash (yet!) I'm loving all the yarn options on Craftsy!  I love trying new yarn textures...but I feel like I always buy one skein and then I don't know what to do with it....hence why my stash is super huge.

I am hoping to get cracking sometime this year on my crafty goals this year, too.  Boy I'm slacking!

xoxo, Moe

4.28.2014

Make It Monday // Boho Crochet Summer Bag

I've finally picked up my crochet hook again!  Sometimes I am just so uninspired to create things that I don't even try.  Lately I've been looking up crochet bags on Pinterest & pinning a lot for inspiration.  I want to crochet more in the coming months & have challenged myself to make 7 bags before the end of the summer.  I don't know if I'll use them but they are fun & quick to make.  If you're a pretty fast/experienced crocheter you can make this bag in about 3-4 hours!  On Saturday I posted a picture on instagram that I finished the cream colored bag in this post - then on Sunday I got up around 7:30am and finished a second one by 11am.  The second one has bright, beachy colors that remind me of summer!  This bag is super easy - here's how I made it.
Supplies: worsted weight yarn (like Red Heart), size J hook, granny square pattern of your choice.  This project is great to do with scrap yarn - the cream one I used a 1 lb skein that they sell at Joanne's (but you might be able to use one regular Red Heart skein) and the more colorful one was a bunch of scrap yarn I had on hand.  It doesn't take too much yarn to make.

Firs I made up a granny square pattern as I went but you can use a pattern you might love or one you want to try out.  Pinterest has loads of patterns & you probably have a granny square pattern book lying around.  You don't want the pattern too have too many open parts but it should have an interesting enough pattern to look fun in a solid color.  After I crocheted my granny square I added 4 rounds of single crochet to the outer edge making sure I still made crisp corners by doing a sc-ch1-sc combo once I reached the corners.  This will give the bag more solid parts as well as make it sturdy & hold it's shape.  If there are too many holes not only with your stuff fall through but you may end up making a floppy bag.
Next, fold your granny squares in half to make three triangles like in the photo above.  Sew the triangles together.  It might help to lay out your work as your sewing to make sure you're sewing the right pieces together.  The shape of this bag can make it confusing.  I also made sure to put all my tails at the back of the bag so the stitches in the front would match up better & you wouldn't see where each round was joined.
For the cream bag, I braided 30 strands of yarn together to make a thicker strap with some fluffy tassels.  When it came to the strap for the multi color bag, I crocheted a chain with two strands of my yarn held together.  You want to make a sturdy/thick chain because it will stretch once the bag is filled with stuff.  I always try to use a little less than I think I need so it doesn't stretch too much, making the bag unwearable.  For these, I made them cross body bags but you could make a shorter strap.
I left mine unlined because I plan on using these for beach outings or little trips...not as my everyday purse!  But you could hand sew a lining into this purse if you want.

I looovvveee the multi colored one!  So fun for summer!  To me it's a little patriotic looking - so perfect for the 4th of July I guess.  But both of these would be great for any little warm weather outing your planning.  These stretch as well so if you were going to a farmer's market or outdoor fair you can stuff these full of fun goodies.

xoxo, Moe

Connect on Twitter // Follow on Pinterest

1.20.2014

Make it Monday // Easy Crochet Fold over Bag

I've been on a crochet kick lately but usually it involves making half a project then ripping it apart.  I'm so indecisive.  I decided to whip up something quick in front of the TV this past weekend & came up with this little fold over bag.  It's perfect as a little make up bag for your purse or to hold anything you want, really.  It stands up on it's own as well.  I think it's a pretty cool piece & it's quite easy to make.
Supplies:  worsted weight yarn, size j hook, fabric button maker, spare/coordinating fabric, needle, thread.
Pattern:
This pattern is not worked in the traditional round way.  I created a tube of crochet then sewed one end shut.  If you're comfortable crocheting down one side of your foundation chain, then crocheting down the back of the chain - go for it.  But I thought a tube would be easier if you were a beginner.  Also, you could crochet a flat piece of fabric then sew down the side & across the bottom to create your bag.  You'll only need to know the chain stitch & the half double crochet for this project.  But get fancy if you want!

For the tube method, chain 50, join the first & last ch together, ch 1, do not turn (don't turn after each row for the entire project.

row 1: hdc in each ch until end, slp st to first hdc, ch 1.
row 2: hdc in joining st, hdc around, slp st to first hdc, ch1.
repeat for as many rows as you wish.  For a medium sized bag crochet 24 rows.
on your last row, estimate the middle of the back side of the bag.  Hdc until that point, ch 7 (or enough to fit around your button, hdc around, slp st to first hdc, bind off.
This bag measures ________
Create your button by following the instructions on the back of the button maker.  Sew it on near the bottom of your bag to create the slouchy fold over look.  Now fill with all your goodies!
I love that it stands up on it's own so if you are tucking it in your purse or bag for make up you can set it up on the counter - though it is just cloth so be careful, no spills!  You could also use this to store bits & bobs you may need to have handy.  The self standing feature lends this to be great for anything that needs quick access but also needs to be tucked away.

xoxo, Moe

Connect on Twitter // Follow on Pinterest

1.02.2014

Resources to Learn to Sew, Knit, or Crochet

If there's one thing I'm passionate about it's making things.  Sewing, knitting, & crocheting are right there at the top.  I'd say I'm a pretty advanced crocheter but when it comes to knitting & sewing I'm pretty much a beginner.  The great thing about being a beginner is that you have so far to grow - you can learn to do just about anything.  But there are also a bunch of beginner resources out there that will have you making amazing, yet super simple projects in no time.  So if your goal is to get creative in the new year here are some of my favorite crafty resources:

Craftsy offers classes in nearly anything you can think of.  You get great, high quality videos & access to a virtual class room where you can find answers to your creative questions.  Some classes even come with downloadable patterns.  If you want something more in depth than a short YouTube video & something more hands on than a craft book, these virtual classes are a great option.  Here's the link for sewing, knitting, & crocheting.

YouTube
If you're pretty good at picking things up, you can search for YouTube videos that can show you the basics.  I even searched for how to use my brand of sewing machine - a Brother - and found some tutorials on using all the stitches available, different techniques, etc.  You can find some great, in depth tutorials for different crochet & knit stitches as well as some creative inspiration.  If you're ever stuck in your project YouTube is a great place to learn how to solve your problem.

Habitual Homebody Crochet Videos & Crochet Along
Find the above project instructions here
A wonderful blogger Alycia from Habitual Homebody has shared her own crochet tutorials & projects and has started a monthly crochet along.  Joining in on these crochet alongs is a fun way to meet other crocheters & crochet bloggers as well as connect with others who might be learning as well.  She also has a huge list of Crochet Resources on her blog featuring her own videos.  She's such a nifty crocheter!

Craft Books
Images from the book 1, 2, 3, Sew
Of course, the stand by resource are crochet books.  You can browse the bookstore, Amazon, or even your local library to find some easy instructions.  Books to look for if you're a beginner may feature words like beginner, or Sewing 101 type of things.  I also love books featuring one yard projects or one skein projects because let's be real I have the attention span of a goldfish!  These types of books are sure to give you a quick fix & teach you something new.  Here's a list of beginner sewing books, knitting books, & crochet books.  And if you're browsing on Amazon, a lot of books are available for Kindle!  So download those guys on your phone, ipad, or kindle & get to creating!

Actual In Person Classes
Many craft stores offer in-person classes in the evenings & on the weekends.  These are fun to meet new people, to get out of the house!  Oh, and you can learn a new craft.  Craft stores offer many different levels of classes so you can learn the basics or learn something specific.  A room mate of mine in college took a fun class on making a tee shirt quilt - it was simple enough to learn the basics but she also came out with an awesome product at the end.  If you have a museum or gallery near you, see if they offer specialty programs like making an art quilt or learning to work with different fibers.  Maybe there's even something like a mixed media class focused on fiber arts.  You can really get your creative side going with something like that!

What are you going to create this year?

xoxo, Moe

Connect on Twitter // Follow on Pinterest

8.01.2013

3 Creative Crochet Tips // Pick Up that Project Again & Keep Going

I love to always be doing something with my hands.  I have to always be occupied whether it's in front of the TV, in bed, or waiting - somethings gotta be getting made.  But since I have the attention span of like a flea, I pick up & put down projects quite frequently, rip projects a part, & just plain forget about them.  Over the years I've developed a few things to keep forgotten projects easy to pick up & started projects easier to finish.

Remind yourself about the project - I write down either the idea or even just simply the yarn & the hook size on a piece of paper & pin it to my project after I've worked a few rows.  I do this so when I pick up the blanket I've set aside 3 months ago I'll remember what I'm supposed to be doing with it! Sometimes I'll throw in the colors I wanted to add to it - because if I've set it down I've probably used the other colors for some other project!  Most of my projects aren't based on patterns & are very loose so the key part is writing down the hook size so I don't have to try this one or that one or hope that it's right!

Use a bigger hook & a faster stitch - Ever since last summer when I sat down & made more blankets in a few months that I had in my entire life, I fell in love with a really fast stitch I came up with (at least I think I came up with it!) when making a scarf. This stitch works great in any type of yarn - the blankets in the shop are acrylic yarn & this blanket for out house is made from really fluffy yarn.  Learn the stitch I'm talking about in this post.  A bigger hook makes projects go by faster as well and I'm all about that!  My favorite size hook for blankets is an L and for hats & scarves its a J or K.  Bigger hooks also make smaller stitches go by faster.  I'm in love with the way single crochet looks done with a K size hook!

Bobby pins, hair clips, bits of yarn, paper clips, etc are great stitch markers - I've never had a set of proper stitch markers because there are a zillion things around the house that can be used to mark your place.  Even just little bits of extra yarn can act as a stitch marker.  I've used bits of yarn, bobby pins, paper clips, & hair clips to mark my place.  I'm not ashamed!


Connect on Twitter // Follow on Pinterest // Peep me at Hello Cotton

3.25.2013

Make it Monday // The $65 Crochet Blanket

You guys, we're nearly done with the living room!  I'm excited!  We're now down to a room by room finishing stage.  There is still a lot to do but there's a lot that has been done.  I seriously can't believe how this house used to look & as I sit on our couch down here where a garage bay used to be, I am so proud of us.  Sheesh, we did a lot!  Since we're on our way to finishing the living room - nearly everything is done...we just have to agree on art for the walls, finish filling the shelves in the movie/game space, organize the living room side of our huge bookshelf, & pick out some side tables.  It's like so close!!

The most recent addition to the room, besides the catch all planter box tray from last week, is this blanket I finished crocheting this past weekend.  I say finished last weekend because It's usable...but I think I want to add a fringe!

Zach requested a huge blanket that we could both snuggle under when we start watching our next tv series.  Since the blanket in our bedroom is made from regular acrylic yarn I thought I'd try something more luxurious for the living room since it would be on show more.  I love really fuzzy, really warm, boutique-y blankets that look crazy expensive & often are.  I decided to work with Lion Brand Homespun in Spice, Meadow, & Pearls.  These three colors are the main colors in our living room, along with dark browns in the couch & the furniture.

I picked up a few skeins of these Lion Brand colors at JoAnnes when they had a sale going on, I believe they were $4.70-ish down from $6-ish.  I got through them & needed more.  I popped by the yarn section of Meijer & found that they were only $4.99 - but Meijer didn't have the sage green color.  All in all this blanket took 13 skeins of yarn - making this blanket cost me $65.  I don't think I would have found a blanket this big for that price.  I mean this thing is huge! But still, $65 is a lot for a blanket!  Especially one made by hand!
The weight of this blanket is great too, it's wonderful to snuggle under.  I used a J hook & a modified V-stitch through out the entire blanket.  I make a lot of my blankets with this modified V-stich because it's quick...and I have no attention span!  Here's the basic pattern:

Chain an odd number in the length you'd like, including a ch 3 at the end for turning.  

1 dc in fifth chain from hook, ch 1, 

(here's the modified part) *yo, insert hook into same ch, yo, draw yarn through loop, yo, draw yarn through first 2 loops on hook, yo, skip one ch, insert hook into next ch, yo, draw yarn through loop, yo, draw through first 2 loops on hook, yo, draw through all three loops on hook. ch 1*

Repeat from * to * until last ch 1, double crochet in same stitch as last modified decrease, skip one ch, dc in last ch.

ch 3, turn.

Now you'll do this stitch pattern in the ch 1 spaces of the modified V's below:

dc in first ch 1 space, ch 1.

*yo, insert hook into same ch 1 space, yo, draw yarn through loop, yo, draw yarn through first 2 loops on hook, yo, insert hook into next ch 1 space, yo, draw yarn through loop, yo, draw through first 2 loops on hook, yo, draw through all three loops on hook. ch 1*

Repeat from * to * until you do the last ch 1 on the current row, double crochet in same ch 1 space as last modified decrease, dc in the top of the ch 3 from previous row.

Repeat this way until you've reached the length you want.

here's an example of decreasing & here's an example of a v stitch pattern.  And below is an example of a modified V-stich symbol I came up with based off of the symbols for double crochet & chain as seen in crochet diagrams:
I hope that makes sense! But this type of stitch works up really, really fast.  It creates a cool texture in any sort of fabric you create.  A lot of my scarves are made with this stitch too.  It's super versatile!  I'm not sure if this stitch has been done before or has been better explained but I hope that the explanation above makes a little bit of sense!
We've been loving using this blanket as winter is still hanging on.  It looks lovely on display when it's not in use too!!

I can't wait to show you more of our house as it comes together! We've got so many projects in the works.  In fact, shortly after taking these photos we picked up prettier floor lamps!

Have you ever taken on a project that ended up costing your more than you'd hoped?  Did it still turn out lovely in the end?


xoxo, Moe

Connect on Twitter // Follow on Pinterest // Peep me at Hello Cotton

11.19.2012

Make it Monday // Crocheted Pom Hat

I can't remember where I saw the inspiration for this hat, but as soon as I saw it I needed to make it.  It's a really simple combo of a beanie + crocheted mesh (like a market bag).  I sort of just made this on the fly so I don't have a pattern written down, but I'll give you some resources & a blend of two patterns.


Skill level: Intermediate
Supplies: beanie pattern that works up in double crochets (this one is great), size h crochet hook, skein of medium worsted weight #4, square of cardboard or another way to make a pom pom
Stitches: double crochet, single crochet, chain, front post double crochet


When I was little, the first thing my gramma taught me to make was a beanie, a yellow beanie in fact.  Now I pretty much have beanie making skills where I don't need a pattern so I don't write them down.  The pattern mentioned above is pretty much how I make mine so you should be golden.  Start working the beanie pattern up,  I made my beaning a bit bigger because it's gonna be cold & I wanted the warmth to swirl around my head :).

Before you finish your beanie you'll want to make a brim with a few rows of the rib stitch - or Front Post Double Crochet.  This will create a sort of cabled brim around your hat.  This is a great tutorial & when you hover over the images, you'll see the view for a left hander.  Pretty neat!  I did three rows of this rib stitch, doing a front post double crochet on top of each front post double crochet.

Now onto the mesh part: I also used to make mesh hats during the summer, so I kinda have this to memory too. But this pattern is pretty close, use the same size hook you did for your beanie to complete it.  You'll want to work the mesh hat down until it fits over your beanie just above the brim.  You may have to repeat the last few rows of the mesh hat pattern until it fits.  Then you'll begin to join it together.


Pick a spot to start joining your mesh hat to your beanie just above the ribbed brim part after you've finished the last row of your mesh hat.  Put your hook under a double crochet from the beanie - like when you were working the front post double crochets - and slip stitch.  You've started joining the two hats together.  This may take a few tries, but mine ended up needing 3 chain stitches between each join.  So, chain 3, slip your hook under a chain loop & then under another double crochet from the beanie (count three over from your last join) & slip stitch.  Repeat this around until your mesh hat is joined to your beanie just above the ribbed brim.

Now make your pom pom.  This needs to be a big 'ol pom pom! So if you've got your preferred method....go ahead & do that.  I wrapped the yarn a bazillion times around a square of cardboard that was about 4 inches square.  Once I thought I'd wrapped enough, I wrapped a bunch more.  Then I slid it off, tied a string around the center - tight, & cut the loops.  Then shape it into a circular pom pom.  Tie your pom pom to the top of both hats - through the mesh one & into the beanie.

Now, you have a cool vintage inspired hat.  More or less.  I hope this pattern made sense & I'm sorry I don't have more of a precise method.  I tend to crochet organically & hardly ever write patterns down.


Connect on Twitter // Follow on Pinterest // Peep me at Hello Cotton

8.24.2012

Fan Friday #69 // In a Crochet Daze

First I wanna say that I was caught red handed yesterday trying to suggest a neutral color palette in our bedroom to Zach.  As soon as I started saying something about it he said 'why, so you can put pink everywhere?'  Immediately I knew he'd read yesterday's post.  Can't get anything past that guy!! :)

If there is one thing I've learned about myself after being alive 24 years, its that I can't sit still.  I always have to be making something.  Since I've been back in Michigan, I've been crocheting away like the good old days.  Keeping my hands busy is something I have to do.  Ever since I was little I always had to be making something...it just kept my mind & my hands occupied.  I can't just sit & watch TV, I can hardly sit still enough to read a book, I have to be making.  So now that I have my hook in hand again I've been thinking about tackling some bigger projects: blankets & throws.  Not only do I want some nifty ones for our new home (back to the bedroom color palette!) but I also want to make some for the shop.  I've been loving just making & making & making....

one two three four

modern patchwork - Making a zillion tiny granny squares is something I like to do to use up scrap yarn.  Since I also get bored if I use one color for too long, switching it up always helps me finish a project.  This modern, cross like patchwork blanket is super great.  I love the color palette & it can really spice up a room.

apartment living - Speaking of spicing up a room, if you live in an apartment (like I've been accustomed to) adding a colorful crochet throw can bring color into your room.  You can't paint the walls & you can't put holes in 'em either so bringing color into your apartment this way ensures you'll get your deposit back.  It's also great for dorms, you're supplied furniture but the way you dress it can give you a personal look!

modern granny - This is what I am working on now.  I fell in love with that picture & the blue colored yarn.  Not only does the blue accent go well over that bright orange but the open weave gives you a more modern, casual look.  I am hoping that I can convince Zach to do a neutral bedding & then add a pop of color with the throw.  Since he likes dark colors I am thinking about a gray bedspread, white/lighter grey sheets, black accent pillow cases, black crochet throw, & then a pop of color.  We'll see!

combining stitches - Not only is this granny square blanket joined together seemingly seamlessly, it looks as if the first few rows are double crochet & the last row is a treble crochet.  This creates a great visual texture & that mustard color gets me every time! Once the individual squares area ll together adding a blanket stitch instead of a crocheted edging finishes it off in a unique way!

Link Love
++ this tutorial for making a crocheted basket it super awesome.  I never would have thought to make a basket that way.  I was thinking about using macrame cord to make a crocheted table runner or placemats.  What do you think?++

++You should definitely check out that patchwork pattern up close to see the edging detail!++

++This blanket is knit but I love the joining idea: two large halves joined by a stitch.  I'd make that stitch like a neon color!++

Happy Friday y'all! What do you have planned for this weekend?


Connect on Twitter // Follow on Pinterest // Peep me at Hello Cotton

9.13.2011

Tempted Tuesdays // Let's Talk Fall - Hats Off

While it isn't quite cold enough for hats here just yet I am starting to think of all the wonderful ones I can either make or that I own.  I love that fall brings the opportunity to wear layers!  Blogger Amy of est. 1839 did a great post about some great products at target & one was a great hat!

I love being able to keep all cozy warm with a handmade or store bought hat.  But I tell you there is one thing about crocheting/knitting something that just keeps me extra warm.  So this Tuesday, these hats are all hats that I'd like to try to make!

mad hatter

mad hatter by fivesixteenthsblog featuring a beret hat

I've always wanted to try a turban style hat.  I have no idea how to even begin.  All the ones I've tried come out looking insane!  Perhaps I will be able to get the hang of it eventually!

What are you wanting to make this fall?
Have you found any mainstream inspiration?