Showing posts with label bracelet. Show all posts

10.26.2015

Make it Monday // Inspirational Charm Bracelet

When fall rolls around not only do I bust out the knitting needles and crochet hooks, I suddenly become an arm candy queen.  I don't know why - maybe it's the boots and the scarves - but I will stack up the bracelets like to tomorrow.  My favorite are charm bracelets with lots of dangly things.  I found some cool little charms in my stash and at the craft store the other day, so I knew I needed another 
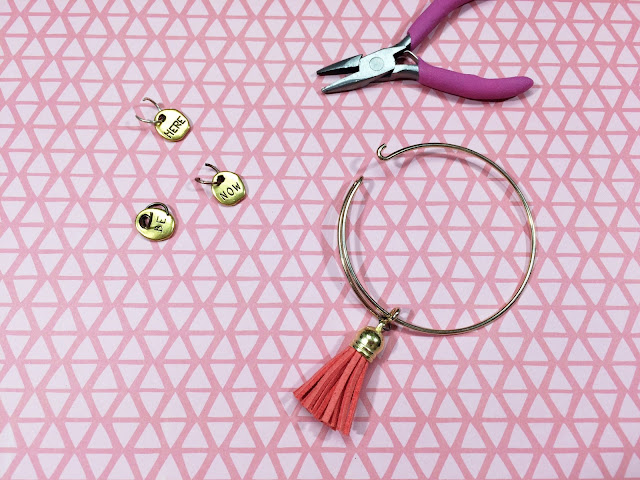
Supplies :: charm bracelet base (like these, found mine in the Joanne's clearance section), tassel charms, inspirational charms, pilers, assorted jump rings.

If you're unsure of where to find inspirational charms, check all your craft stores in the jewelry aisles.  I found these a bit ago and find any excused to use them.  This DIY is also about how to properly open a jump ring.  If I have one creative pet peeve it is the improper opening of a jump ring.  Instead of pulling the two edges apart, twist the jump ring apart.
Using the pliers in one and and your thumb and forefinger (or second pair of pliers) center the opening between the two.  The edge in the pliers twist toward you and the edge between your two fingers twist away from you.  You don't want to stretch the ring out as you want it to be able to go back to it's original shape.  Twisting it like this should do the trick.
Attach the charms to the loop on the bracelet so that the charms don't fall off.  You could also use a bracelet that is in a continuous circle for this DIY as well.
I love the sentiment of these charms - Be Here Now - is something that I'm really trying to work on.  When Zach is here I try to take the time to enjoy us together.  But of course I get wrapped up everyday things.  I need to try to enjoy the time we have more.

How do you remind yourself to enjoy the moment?

xoxo, Moe

5.10.2011

Tempted Tuesday: Bands for Arms

Being from a military home town I hold our country's service men & women near to my heart.
Many of my friends have joined the military & many have married those in the service.
My mother showed me a really neat website where old
service uniforms are turned into bracelets for both men & women.

Started by one man, this company donates much of it's proceeds to programs such as Toys for Tots & other programs that help our country's military men & women.

Not only do these bracelets help out causes but they look good too

all images from bandsforarms.com
the Boatswain's Mate Bracelet

the Pearl Harbor bracelet made from WWII sailor's uniforms

My mother & I recently made a purchase of some of these bracelets.
In honor of the recent events in Japan I purchased the Humanitarian Relief Bracelet


My mother & I both got the Turcotte

So these bracelets aren't just fashionable they do some good.


have you found a product you really love that loves others? what is it? 
I'd love to know!
PS. Don't forget to check out the link parties in the Side Bar or click here!

5.09.2011

Make it Monday: Another New Twist

I love DIY's like these:


Make some pretty cool bracelets from twine/rope/cord & some S hooks:


full tutorial here from Honestly...WTF


PS. Don't forget to check out the link parties in the Side Bar or click here!

12.05.2010

Sum Up Sundays: Bracelet Tutorial

So on Monday I posted about my love for some beaded bracelets I saw over on Free People.  I decided to tackle trying to make a few.


Here are the supplies:

- Needle nose pliers
- Beads
- Memory Bracelet wire (you can find this at any craft store & even Wal-Mart)


step one:
cut off enough of the memory wire to wrap around your wrist a few times.
bend a little loop at one end to keep the beads on the wire.

step two: 
string the beads onto the wire.
fill the whole length of the wire with beads.

step three:
leave a little "tail" once you've strung on all of your beads.

step four:
use that tail to make a little loop like you did in step one
to secure the beads on the wire.

this is what you get


add some charms if you want
(I know that silver & gold aren't supposed to go together)
(sue me lol)


For the single bangle:
cut a length of straight wire 
(non-memory, I don't remember what gauge. But your seed beads need to fit on it...so not too big)
repeat steps 1 - 4
to finish, bend around soda can/bottle to create shape. 
open one loop & hook it through the other loop.
close opened loop
now you have a bangle!

Here they are styled together with some bracelets I have.


 PS. Don't forget to check out the link parties in the Side Bar or click here!

11.29.2010

Make It Mondays: DIY Bangles

I have posted so much about bangles on this blog.  This week I am going to tackle making a few bangles from beads, string, wire, & crochet.

Here is some more bangle inspiration from three of my fave stores:

this one from Anthropologie would be fun to make on memory wire.
It would be easy to stack a few up your arm, they'll never lose shape! I think it would look great either solid or with multi colored beads.

This from Free People is stretchy.
I love the look of multiple bracelets, can you tell?

And this Best Friends Since ID bracelet from Urban screams gift to me.  
I need one for the first friend I ever met in college & another for a very dear friend I met shortly after.
I love them both to death!

I swear, if I don't buy it from Urban now I will definitely get this down the line from another engraving place.

PS. Don't forget to check out the link parties in the Side Bar or click here!