Showing posts with label jewelry. Show all posts

6.26.2017

Make it Monday // DIY Howlite & Lava Stone Diffuser Bracelet

Howlite is a great stone for calming anger, anxiety, & the overactive mind.  It is a stone that seems to aid in balancing many emotions, which makes it perfect for a diffuser bracelet.  In addition to the Howlite stones being calming, Lava stones are also grounding and balancing.  These porous stones work perfectly with Essential oils.
DIY Essential Oil Diffuser Bracelet
this post contains affiliate links, please read my full disclosure here
.
Today I want to share another diffuser jewelry DIY with you - check out the first necklace DIY here.  I love bringing my oils with me everywhere - and jewelry is the best way to do it!  You can breathe in the calming (or invigorating) scent all day.  This diffuser bracelet is very hip but very bohemian and the pop of rose gold metal is very trendy!

Shop Supplies on Amazon!


supplies :: howlite beads, lava stone beads, elastic, super glue, charms (optional)
how to make a beaded bracelet
Cut a length of elastic and thread half of the howlite beads onto the strand.  Add a bead cap, then thread on the 3 lava stone beads.  Finish with another bead cap and the rest of your howlite beads.  The amount of howlite beads may vary depending on your wrist size.

Once the bracelet is big enough to fit around your wrist, tie a knot in the elastic and drop a dot of super glue to keep the knot in place.  This elastic can be kind of slippery so the knots don't hold well by themselves.
If you'd like to add some charms to your bracelet or a tassel, add a jump ring and attach it

Add a few drops of your favorite single essential oils or essential oil blends to the lave stone beads & calm your mind while you work or play!  You may want to make a few bracelets so that your oils don't mix and create unpleasant scents.
Essential Oil Diffuser Bracelet
I keep a bottle of the Balance essential oil blend on my desk at work.  Half the time I've already run out of the house with out my diffuser jewelry so this little stash is perfect.  Uncapping the bottle and breathing in the scent allows me to calm an center myself in just a few breaths.  Scent is a powerful way to make connections - so when you use Balance to consistently calm & center yourself, it becomes easier to do so as you associate that scent with that feeling.
Nurturing Essential Oil
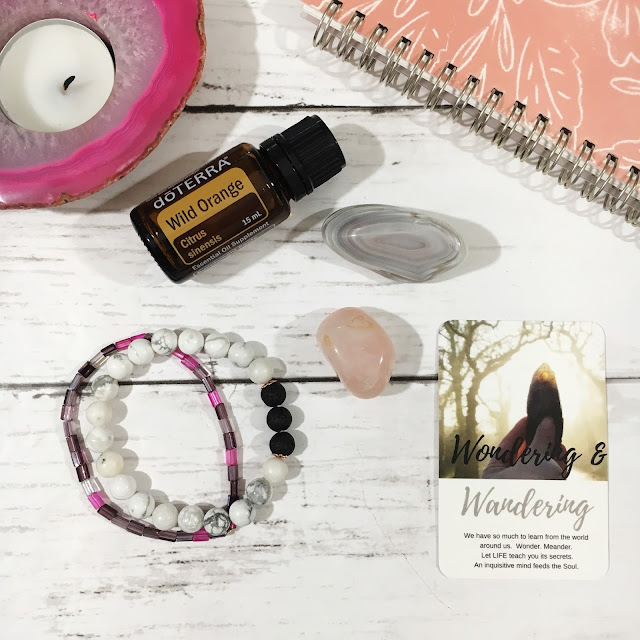
For this lunar cycle, I'm personally focusing on nurture & structure - so the Wild Orange scent is very nurturing and supportive.  I'm also working with Botswana Agate (for security) & Rose quartz (for love).  All of these work beautifully together!
Diffusing Essential Oils with Jewelry
This is currently my favorite nurturing blend - Wild Orange is very uplifting and nurturing, Bergamot is citrusy & bright, while Myrrh balances out the brightness of both citrus oils.  You can find a few more of my favorite blends in this post, too.  I purchase all of my essential oils through Doterra, let me know if you'd like to learn more about the oils!  Find the specific oil blend recipe in the NEW Five Sixteenths Facebook group!  Click here to join!

Essential oils have become a huge part of my spirituality and everyday wellness!  I can't wait to share more with you!

 Do you use essential oils?  Any tips you have for using them daily?

xoxo, Moe

*any advice given in this post is not intended to diagnose or treat any ailment.  Please consult a licensed practitioner for advice.  All information on essential oils is taken from the Doterra website & my personal research.

Ready to get started on your Essential Oil Journey?  Click here to learn more about doTERRA!

5.15.2017

Make it Monday // DIY Faux Enamel Pins

I am in love with enamel pins.  They are super popular right now and I even featured my jean jacked covered with them in this video on my YouTube channel.  I've searched Pinterest and Amazon and have been drooling over way too many of the cute designs.  Since I can't afford every single pin out there and I'm 100% into DIYing anything I can, I'm excited to share with you a fun and easy way to make cute pins at home!
this post contains affiliate links, please read my full disclosure here.

If you're into adult coloring you'll have a fun time coloring in these pop/retro inspired designs.
supplies // this digital download, black or metallic gold permanent marker, assortment of colored permanent markers (my favorite Sharpie collection) or colored pencils, ShrinkyDinks shrik plastic, scissors, pin backs (I used these but these work too), E6000 adhesive, oven, printer, optional: ModPodge Dimensional Magic

First, print the digital download on to printer paper.  You can do this at home or take the file to a local printing place.  If you're really ballsy and don't have a printer but you have an iPad or the like you can try to gently trace the image on to the shrink film from the screen.  These images are around 3 inches wide/tall because the shrink plastic will shrink to about a third of its size so we need to make sure we don't end up with baby tiny pins!  They should shrink to around an inch.
Using the black permanent marker trace the outline of the shape onto the rough side of the shrink plastic.  When using permanent markers, it is best to trace just the outline first, color the shapes, then trace the details - like the lines in the palm of the hand and the seeds on the watermelon or prickles on the cacti - so as not to start blending the back marker with the main color of the shape.  You can also use a metallic gold permanent marker to outline if you'd like that traditional enamel pin look.
Color the shapes in using either permanent marker or colored pencils.  Using colored pencils will allow you to have more control over blending but permanent markers will give you a bolder color.  Once finished coloring, use the black or metallic gold permanent marker to add in the details.
Cut out the shapes close to the edge of the design.  Do not leave a boarder of shrink film as this will not achieve the enameled pin look.  Bake them in the oven according to the shrink plastic instructions.  Be sure to let the shapes cool once they have been removed from the oven.  They can not be pliable for the next step.
Optional - add ModPodge Dimensional Magic to the matte surface for a glossy look or spray with a clear sealant.  If you use the ModPodge Dimensional Magic..don't use too much!  You'll end up with crazy globs everywhere.  Also, work slowly to avoid any bubbles.  Let them dry for 24 hours.  Yo don't have to add this glossy top coat to the pins, the flip side off the pin is rather vibrant and glossy.  I've included two downloads since some of the words or signs would need to be flipped if you aren't using the Dimensional Magic.

Because the shapes are still a little bit see-through, you can paint the backs either black or white so that the pin back doesn't show through.  Let dry before attaching pin backs. Adhere the pin backs to the back of the cut out with E600 adhesive.  If you did not use Dimensional magic, adhere the pin back to the matte side of the pin for better stick.  Let dry for 24 hours.
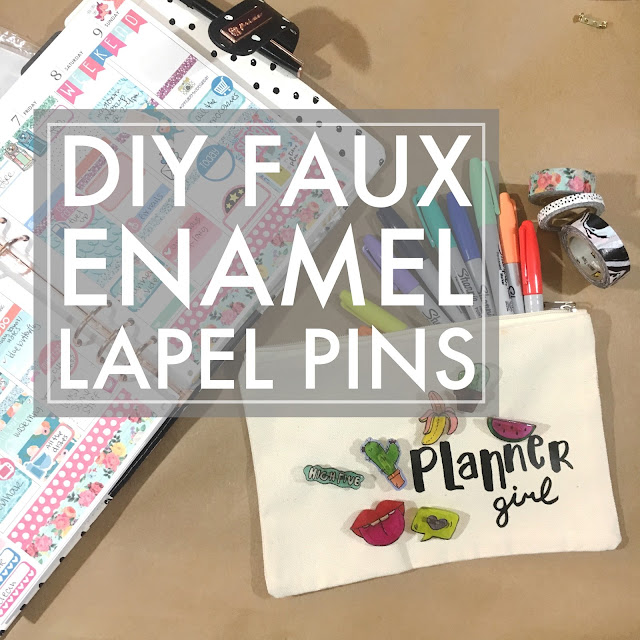
Now rock your pins!  I love this because now I can own all the pins with out breaking the bank.  Pins can go on a ton of things - my personal favorite is the jean jacket..but I also love decorating little pouches.  Learn how to digitize your handwriting and use it to make a personalized pouch here!
Stay tuned for another DIY using your inkjet printer + your Cricut to create even more awesome pins.  If you want to learn how to make this Planner Girl pencil pouch, check out this post!

Are you loving the enamel pin trend?  What pins would you make?

xoxo, Moe

5.08.2017

Make it Monday // DIY Diffuser Necklace + Inspirational Blends

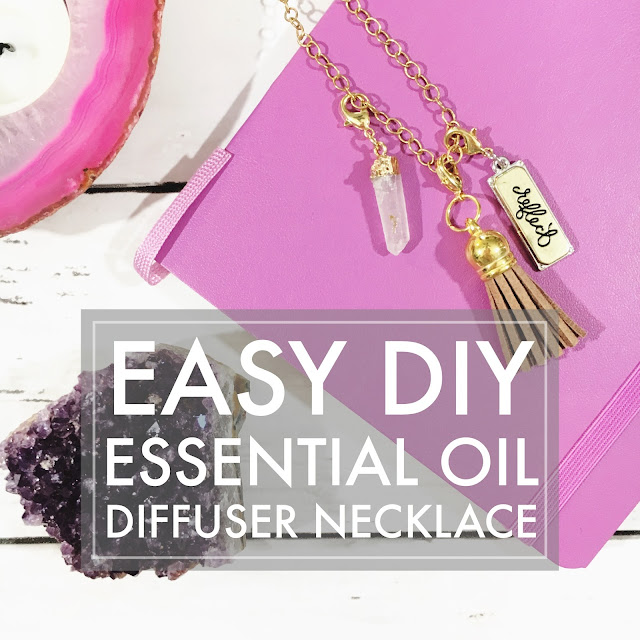
A long while ago I shared this DIY on how to make an inspirational charm bracelet.  I came up on some of the supplies again and thought about another jewelry DIY that these tassels would be good for.  A DIY essential oil diffuser necklace (or bracelet!).
Easy DIY Essential Oil Diffuser Necklace
this post contains affiliate links, please read my full disclosure here.
Essential oils have become a key part of my daily life.  I use them to ground myself & to open myself during meditation.....and, more practically, to clear my sinuses and open my chest when I'm sick.  You may think they are little bit out there, especially if you see some of your friends trying to peddle the oils to you, but believe me if they give you nothing but a nice aroma its worth it.  I use my Origami Owl diffuser necklace nearly everyday.  But I know that sometimes DIY is life so here's an easy way to bring essential oils with you day to day.
DIY Diffuser Necklace Supplies
Shop Supplies on Amazon!


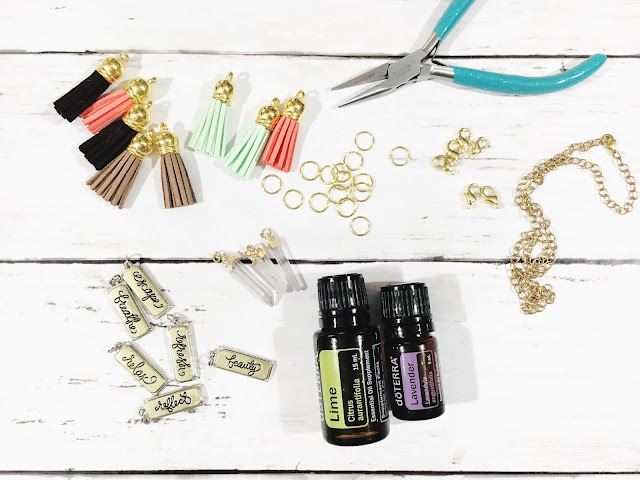
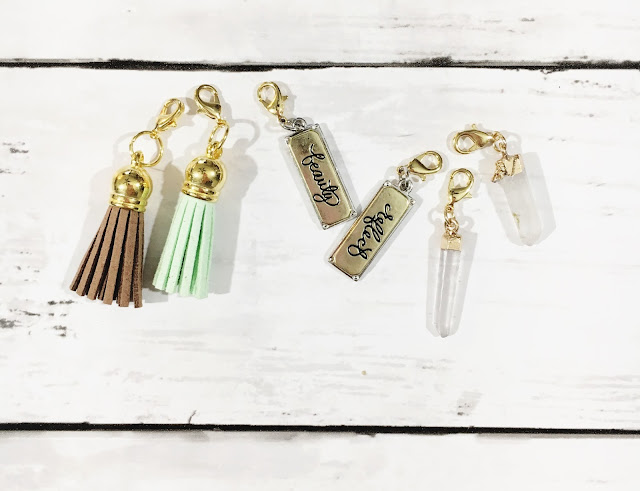
supplies :: small craft tassels (here or here), necklace chain, pliers, inspirational jewelry tags/findings (similar), quartz charms (similar), lobster clasps, o-rings, essential oil, optional - small storage bags + sharpie
Properly Open a Jump Ring Jewelry Making
Start by opening an o-ring (another demo in this tutorial) and adding a lobster clasp & a craft tassel on to it. Close the o-ring.  Repeat for all the colors of the craft tassels you'd like to use.  It is important to use one tassel per type of essential oil so that you get the most pure scent.  You can create oil blends, of course, but mixing too many oils on one tassel may not give the desired aromatic effect.
DIY Diffuser Necklace Charms
Next, create the inspirational charms by opening an o-ring and adding a lobster clasp and charm.  If you have a few tags/sayings make a few charms.  You can use these as mantras when wearing your diffuser jewelry to further enhance your relationship with the scents you're using.  Adding the clips makes it easier to change out the tassels and mantras daily.
Add Essential Oils to Diffuser Necklace
To wear your necklace - add a few drops of your favorite oils or oil blends to the tassels.  The oil will make the tassel a little bit darker, some blends may discolor the tassel as well.  To attempt to avoid this, spread the tassel open and add a few drops to the inner area.  Let dry for a few minutes then choose a mantra and clip to your necklace chain.  Letting the oils dry on the tassel will ensure that there's not transfer to clothes.  If you have extremely sensitive skin, please be careful - either test the oil to see if you will have a reaction or wear the necklace so that there is a layer of clothing between your skin and the tassel.
DIY Diffuser Necklace
Working with essential oils has really made my days so much better.  I usually wear the Balance blend from Doterra everyday because that is what I meditate with usually (because it is very grounding and I don't have to make decisions!).  But different scents can give you different effects.  There are some standard ideas on what various oils & oil blends do - like lavender is relaxing - but I think it's important to try different blends to see what you resonate with.  Maybe lavender doesn't really relax you...and that's OK!  There are different blends for everyone.  I save a ton of blends I want to try to my Essential Oils Pinterest board.
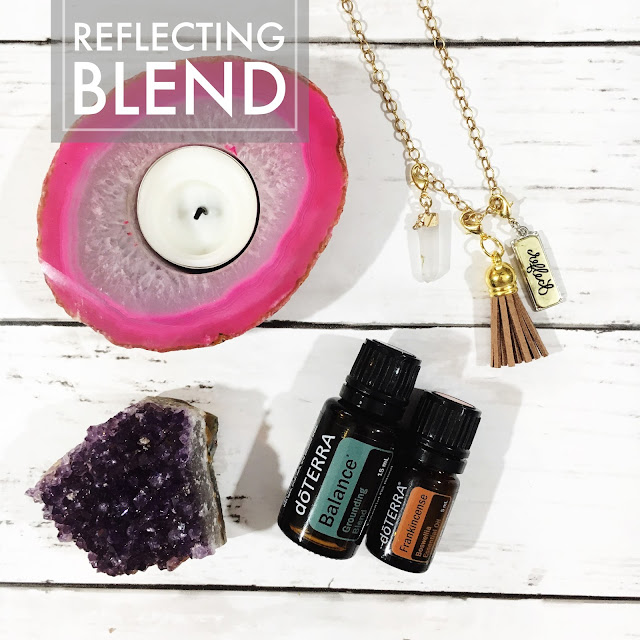
Essential Oil Reflecting Blend

Reflecting Blend

Doterra Balance & Frankincense
mantra: The quieter I become, the more I hear.  Everything I need is within me.
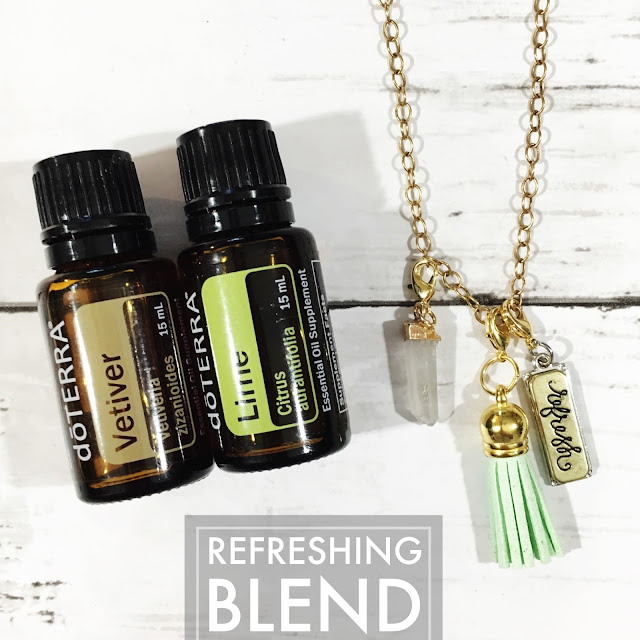
Essential Oil Refreshing Blend

Refreshing Blend

Doterra Vetiver & Lime
mantra: I am thriving.  I am growing. I am brand new.
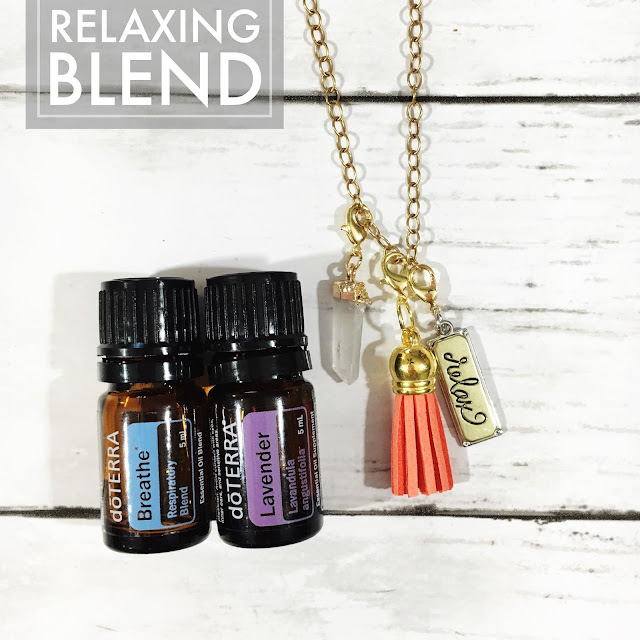
Essential Oil Relaxing Blend

Relaxing Blend

Doterra Breathe & Lavender
mantra: I release anxiety. I feel peace in this moment.

Be sure to designate one tassel to each blend or scent.  Though the scent will fade, to get the best results only use one oil or oil blend per tassel.  To sort and store the used tassels (and to differentiate the used from the unused tassels) place them in small plastic storage baggies.  Use a permanent marker to write the name of the scent on the baggie, then store them with your other jewelry.
Essential Oil Necklace
Being able to diffuse essential oils with you wherever you go will increase your connection to the feeling you get when using them. Since scent is a powerful sense and we associate memories with scent, being able to smell the same scent that made you feel relaxed, refreshed, or grounded will enhance that effect.  If you'd like to know more about Dottera essential oils, let me know!

How do you use essential oils in your everyday life?

xoxo, Moe

Ready to get started on your Essential Oil Journey?  Click here to learn more about doTERRA!

11.22.2016

Trend Tuesday // Give the Gift of Origami Owl

I made the announcement a little bit ago - and even unboxed my starter kit on my YouTube channel - but I'm now an Origami Owl Designer!  I am so excited to share this with you.

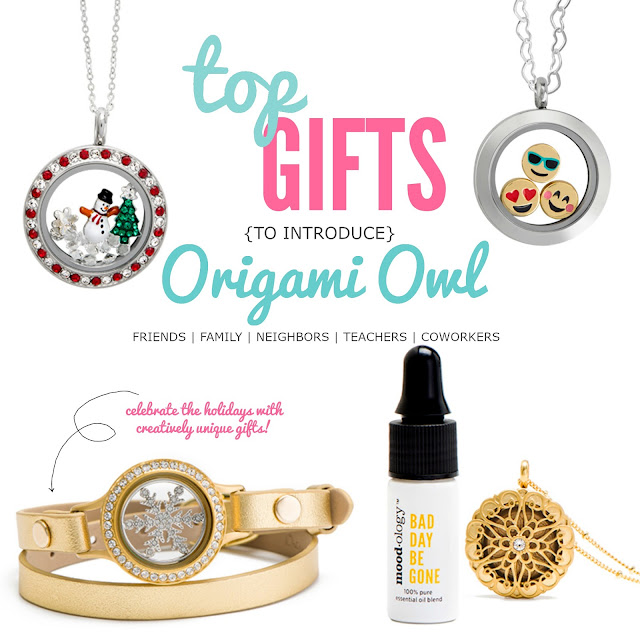
If you're unsure about Origami Owl, it is a jewelry line featuring the Living Locket that allows you to create a custom piece with charms, plates, dangles, and more.  Create a custom look to tell your story.  One of the things I've noticed is that if you're new to O2 you may be a bit overwhelmed with all the options.  Whether you're looking for a gift for yourself (who isn't) or you want to introduce someone to Origami Owl there is a gift set to start out on the right foot.  Here are some of my favorites from the Holiday Gift guide.  Shop any of the links below for these uniqu gifts!
Happy Holidays Gift Set - Perfect for the friend or coworker who just loves Christmas!  Do they sing Christmas carols all year long?  Do they decorate their desk for the holidays?  If the answer is yes to either of these questions, they will love this traditional yet whimsical holiday look.  Features the Seasonal Exclusive Candy Cane Twist Living Locket as well as a few of the exclusive charms on a 16-18" silver cable chain. 

A Charmoji'ed Life Set - This set is my personal favorite because I am all about the emojis.  If you have a sister or girlfriend who speak emoji fluently, this gift will suit them wonderfully.  Featuring the three charmoji charms (plus they are reversible - so its really like six charms!) in a medium brushed silver Living Locket on a 16-18" heart link chain, she'll get a kick out of wearing her emotions in a trendy way.

Gold Wrap Snowflake Gift Set - This classic yet unique look is perfect for a chic friend or neighbor who loves adding something trendy to her outfits.  It captures the essence of the season with the Seasonal Exclusive Medium Silver Snowflake Window in a stunning locket on a Gold Wrap bracelet.  This will look super classy for any Christmas party or event.

Bad Day Be Gone Gold Necklace Gift Set - The Moodology line is another one of my favorites from Origami Owl.  This gift set is perfect for someone who needs to keep their mind even during and after the holidays.  Featuring a medium locket with a gold filigree design, the mood disk will diffuse a lovely scent from a 100% pure essential oil throughout the day.  The vintage design is a beautiful addition to any jewelry collection.

Black Friday Deals - This is where you don't want to miss ANYTHING!  Select styles & pieces are $10 and under.  Create super affordable looks & great gifts to introduce friends, family, and coworkers to Origami Owl.  Mix with some current locket bases and charms too to create a unique look.  The Black Friday stock is limited - so hurry, hurry, hurry!  Here are some looks to check out.


The best part of these gift sets is that each of these looks can also be customized with a dangle, engraved plate, or additional charms.  You can even change the chain or add or remove charms, etc once any of these looks is in your cart!  These are one click looks to give you a start, then let your creativity take over from there!

And, if you's like to get the inside scoop on the Origami Owl Black Friday exclusives, please join my VIP group to find out more.  You won't want to miss this...really!!

What are your favorite gifts from the gift guide?  Are you making your own wishlist now?

xoxo, Moe

11.08.2016

Trend Tuesday // How to Build a Living Locket with Origami Owl

The newest adventure I've embarked upon is launching my own Origami Owl business!  Origami Owl is a jewelry brand that helps you tell your story through the Living Locket.  I've loved O2 for a while now and can't wait to share the creative brand with you.
The reason I decided to join the Origami Owl family is that I saw how creative the brand is.  Create and tell your story, a story personal to you, but curating charms into a perfectly sized vessel (the Living Locket) to create a keepsake that is special to you or to a loved one.  Curate hundreds of looks with just a few key pieces and be a fashionable memory keeper in the process!  If you'd like to learn more about the company, check out Bella's story here.

Today I want to share with you how to create a Living Locket.  I glazed over the process in this post but I wanted to go more in depth with the process to show you how personalized this process can be.
First, pick your charms.  Browse the charms on the website here or flip through your Take out Menu.  Think about the hobbies that move you, the sports teams you root for, the causes your fight for, the colors you love, and the person you are.  Pick charms that move you or have special meaning.  If you're browsing online, add the charms that move you to your cart.  This will help you to see all the charms you love in one place in order to better form your story.  If you're browsing the TOM, circle the charms you love in order to form your story.
Second, pick your Living Locket.  This is the vessel and the unique keepsake to hold your story.  There are a ton of faces, bases, and styles to choose from.  The large Living Locket is about the size of a quarter and will hold 7-10 charms.  The Medium Living Locket - available for the leather wrap bracelet too - is the size about a nickel and holds 4-6 charms.  The Mini Living Locket is about the size of a dime & holds about 1-2 charms depending on size.  Depending on the story you'd like to tell you may need to decide on the locket size you'd like.  There are even different shapes - round, heritage, teardrop, and heart shaped.  And there are different styles - faces with Swarovski crystals, filigre on the Sentiments collection, or even just brushed metal.  Choose between a variety of metals colors - silver, black, gold, and rose gold - as well.
Third, chose the chain to compliment your locket.  Again there are a variety of metal colors to choose from, but this time you should also think of the length you'd like to wear your locket.  The larger faces look great on the longer chain lengths.  My current favorite length is the ______ inch chain and my current favorite chain is the flat oval link custom chain.  I find this chain and length look great with the large and medium lockets.
Fourth, personalize your look with a plate or other inscription.  I love mixing metals at this step.  Put a gold plate in a silver locket or add a sliver plaque or slider to a rose gold leather wrap.  Metal mixing is one of my favorite ways to create a custom look.  The Inscription line is a great way to add a personal date, quote, or sentiment to your keepsake.
Finally, accessorize!  There is a wide array of dangles, earrings, & plates to add something extra to your locket.  I love adding extra dangles to my necklaces with larger lockets.  There is even a piece called the dangle collector - available in gold or silver - to organize multiple dangles on your large Living Locket.  Earrings compliment your Living Locket look too.  Choose a set in the same metal color as your chain and locket or choose a to match the Swarovski crystal color on the face of the locket.

Building a Living Locket is a relaxing experience that taps into your creative side.  It is an active way to memory keep and create a keepsake for you or for a loved one.  I have fun pairing charms and creating looks that inspire me everyday.  Find some of my creative looks on my O2 Instagram, here @O2plannergirl.

I would love to help you build a locket to tell your special story.  Please shoot me an email here to let me know how I can help you tell a story special to your heart.

xoxo, Moe.

10.25.2016

Trend Tuesday // Origami Owl New Adventure

I have been in love with the Origami Owl jewelry brand for a long, long while now.  I've posted about a jewelry piece I made in honor of my family dog Rudy, here.  That is what I love about this brand - you can customize a locket to tell YOUR story.  That is the whole premise behind the brand - to tell a personalized story unique to you.  
My new adventure is that I've launched my own Origami Owl business!  I'm now an independent designer ready and willing to help you create a one-of-a-kind keepsake for you to hold close to your heart.  If you want to find some awesome locket inspiration please follow my new O2 Instagram account @o2plannergirl!

If you're unfamilliar with this awesome jewelry brand, let me introduce you!  This brand was started by a young girl, Bella, who had a dream to own her own car by her 16th birthday.  She started this company from the ground up and now independent designers bring these one of a kind keepsakes to you.  You can shop online or from a jewelry bar.  Here are the 5 steps to creating your locket -
I do hope you'll check out my new adventure and shop the website here and let me know if you're interested in hosting a party or have any questions!

xoxo, Moe

10.26.2015

Make it Monday // Inspirational Charm Bracelet

When fall rolls around not only do I bust out the knitting needles and crochet hooks, I suddenly become an arm candy queen.  I don't know why - maybe it's the boots and the scarves - but I will stack up the bracelets like to tomorrow.  My favorite are charm bracelets with lots of dangly things.  I found some cool little charms in my stash and at the craft store the other day, so I knew I needed another 
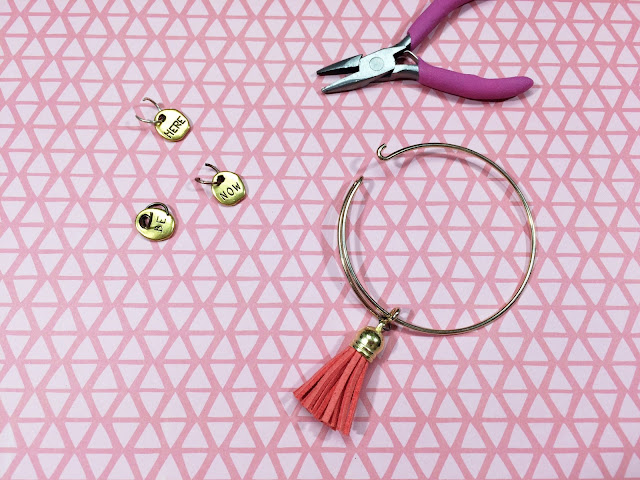
Supplies :: charm bracelet base (like these, found mine in the Joanne's clearance section), tassel charms, inspirational charms, pilers, assorted jump rings.

If you're unsure of where to find inspirational charms, check all your craft stores in the jewelry aisles.  I found these a bit ago and find any excused to use them.  This DIY is also about how to properly open a jump ring.  If I have one creative pet peeve it is the improper opening of a jump ring.  Instead of pulling the two edges apart, twist the jump ring apart.
Using the pliers in one and and your thumb and forefinger (or second pair of pliers) center the opening between the two.  The edge in the pliers twist toward you and the edge between your two fingers twist away from you.  You don't want to stretch the ring out as you want it to be able to go back to it's original shape.  Twisting it like this should do the trick.
Attach the charms to the loop on the bracelet so that the charms don't fall off.  You could also use a bracelet that is in a continuous circle for this DIY as well.
I love the sentiment of these charms - Be Here Now - is something that I'm really trying to work on.  When Zach is here I try to take the time to enjoy us together.  But of course I get wrapped up everyday things.  I need to try to enjoy the time we have more.

How do you remind yourself to enjoy the moment?

xoxo, Moe

11.12.2013

Trend Tuesday // Top 6 Places for Jewelry & Accessories

I do this thing where in the Fall I get really into layering - I think everyone does this - but I love layering clothes & accessories!  I'm always on the hunt for affordable jewelry, accessories, & purses even though I don't need any more.  While I'm doing a No Buy November with make up & accessories (though I think it might turn into a Low Buy November!) I thought I'd share with you my favorite places to buy jewelry & accessories!  This list is great if you're shopping for yourself or shopping for a gift or looking for something to ask for from Santa:
These are my fall back shops when I don't know what I want but know I want something.  Working for Claire's/Icing was a highlight in my job experience I think because I got to develop a real sense of style. I also saw a lot of little girls come in with their sense of style too!  Of course, Icing is geared towards older teenagers to early twenties.  But sometimes you can find great things in there being a little older.  They always have sales on earrings & hair accessories (both Icing & Claires) and don't forget to check out the clearance.  I think that lately a lot of my jewelry has come from the clearance section of these two stores.  Something else you might be able to keep a lookout for are the stores that tend to get all the sale stuff - these stores often have a huge clearance section all the time.  You might be able to snag some goodies up for cheap every time you go in.  Also these stores have 10 for $10 sales - buy ten items & each is a dollar - or 5 for $10 sales - buy five items & each is two dollars.  I love Icing for purses & scarves as well.  Oh, did you know their websites are now shopable!  So excited they launched that!

I just discovered this shop & I'm in love!  I haven't bought anything yet but there are a few items on my Christmas list!  This site is set up like a marketplace with individual sellers but you can search through all the stores from the home page.  It's most comparable to Etsy with categories, individual sellers, storefronts, etc - but not everything is hand made.  This is a lame explaination but it's like a virtual mall with a bunch of different sellers all in one site.  My favorite part about Shop Lately are the Sale Events where you can see all the sale items from all shops.  I also like the Marketplaces or Market Bashes that feature a collection of similar items from different stores - so like all belts, or all skulls, or all crystal jewelry, or all animal print, or all scarves, etc.  Some of the sales you just can not beat & they often have free shipping!

This is another place I love to just pop in when I'm at the mall.  You never know what you might find.  I love that it's all arranged by color & I can go directly to what catches my eye.  Right now I love all the rose gold accessories they have at Charming Charlie.  My current favorite watch is from there & I just feel so elegant in it even though it's a chunky metal watch.  They too have awesome sale items - can you tell what I'm getting at with this blog post?  I've picked up three perfect for Fall necklaces there recently (mentioned in my October Favorites video!) for super cheap - they must have been under $8 each.  Usually a necklace will come with a set of matching earrings so you don't even have to try to match them.  But since it's all color coordinated you wouldn't have a hard time with that anyway.  Their regular prices aren't that bad either and they carry shoes, bags, and other accessories.  But I'm sure you know that already.

I never really thought of Bit Lot's as a place to find accessories but I've found a set of cute scarves there for $6 each!  They were all animal print which is so in for Fall & have held up pretty good.  When I was poking around there back when I was looking for affordable Fall decor I saw some really great looking black & gold earrings that were really on trend.  For the most part Big Lot's is one of those places you have to dig to find the gold - but don't over look the sale items either!  While I had convinced myself that Big Lot's was only good for home decor & pretty candles I ended up surprising myself on a recent trip by finding these on trend things.

Of course Target has to be on this list!  But we don't have a Target where we live - it's about 30 minutes away - so I don't get there often.  Their bags, purses, & accessories are super cute you just can't say no.  I love browsing the clearance here too!  Nothing much to say here since I know you're already out the door heading to Target.

These marketplaces are great to find handmade goods - Etsy more so than Storenvy.  With Etsy you can find a lot of handmade jewelry that you know someone has taken the time to craft just for you.  Often you'll find one of a kind jewelry pieces that can hold a special place in someones heart.  You can also scour vintage finds to discover the perfect gift for someone special.  I love Etsy because it's a way to tell a story.  Etsy is more than a storefront it's a narrative.  You can get to know a seller better.  Storenvy isn't that much of a marketplace as Etsy is - it's more just a place of markets.  It's like a whole bunch of unrelated stores decided to get together in one place.  So there's less of a story there.  Sometimes you can find gems but sometimes it's mass produced stuff.  A lot of stores are carefully curated collections of items the seller loves.  So these stores can really give you a narrative.  I like hosting my store Five One Six on Storevny because the storefronts are a bit more professional than on Etsy.  But to each his own.

So now that I totally want to get my shop on I hope that you've discovered or rediscovered some fun places to shop for affordable jewelry & accessories.  What did you just add to your wish list?

xoxo, Moe

Connect on Twitter // Follow on Pinterest // Peep me at Hello Cotton

9.18.2013

Wednesday Decor // Jewelry & Night Stand Organization

Our bedroom is unbelievably small.  It's very, very small and I have a growing make up collection so there's shrinking room on my vanity for my jewelry.  A lot of my nightstand was being used as space for junk - both drawers were junk drawers!  So I decided to sit down, clean them out, and put them to good use - to organize my jewelry.
The first thing I moved over a while ago was this three tiered jewelry stand I picked up at Joanne's (I believe).  It's a soft velvet texture and is great for both bracelets and necklaces.  If the necklace is too long, I doubled it up & wrapped it around two of the tiers.  I don't really wear jewelry much - answering the phones and being very active at my job really limits the jewelry I wear!  But it's nice to have it all on display when I need it.  I actually have more bangles but I am notorious for taking them off & putting them in my purse.  So I'm pretty sure the remainder of them are in a bag somewhere.

Since I don't really wear too much jewelry I've been getting into watches.  For some reason they just seem a bit more classy & practical to wear for work.  I've been collecting a few but needed a way to store them.  Luckily I snatched up these divider things on sale at Meijer!  I'm sure you could find them in the closet section of a place like Meijer or Target, or even on Amazon.  (Hey! Here's a link for them on Amazon!)  The sections are great for earrings, watches, bracelets, etc.  Love them!  As you can see there's plenty of room for more since I picked up two of the dividers.  Oh, and the divider things comes out - so if I ever want to use it as just a plain tray, that's an option.
Then I just stuck a box on the side with hair ties, my ear plugs, & my chap stick.  A brush because I have long hair now, I have to brush it (gosh, so annoying lol).  Under the brush is a stylus for my iPad.  Then I have a few journals - my blog book, a Vera Bradley patterned one, & my Gnome Gnotebook.  On top of the night stand are some lotions & my alarm clock stand (from Modcloth here).  The lamp is something I've had for ages & it used to be white - then I painted it yellow - then I painted it black.  I forgot to mention that there is a night stand on each side of the bed in the same style.  I picked these up from Big Lots & almost totally missed on getting a second for Zach.  He had his own but I didn't really like the mix-matched feel.  His is now the nightstand for the spare room.  I had to snatch up the floor model of mine for him.  Phew!
The bottom drawer (not pictured!) just holds some more bits - bluetooth keyboard for my iPad, matches for our candles, a few empty Birchbox boxes for storage.  I've vowed all the junk will reside in this drawer only!  Also, in the first picture, you can probably see some yarn & half finished crochet projects in a basket under the night stand.  Yeah, that just sort of lives there I don't even know what projects are in it!  But I also keep a box of spare crochet hooks in the bottom drawer as well.

How do you organize your night stand? Where does your jewelry live?

xoxo, Moe

Connect on Twitter // Follow on Pinterest

6.11.2012

New in the Shop // Summer Jewelry Update

I've been trying to spend my Mondays on a sort of Work From Home Schedule.  I wake up around 8ish, make coffee, & set to work on the shop/blog/promoting/etc.  It's been very productive for me & I love it!  Today, in fact, 8 new pairs of earrings were added to the shop.

Shop SUMMER JEWELRY

Each piece of jewelry in the shop is One of a Kind! I don't make any 2 pieces the same.  While a lot of the pieces have the same elements, no two are designed the same.  I love uniqueness & want you to have a completely unique piece made only for you!

If you'd like to pick up a few pairs, I am running a 15% off sale with the promo code SWEET15.  Head on over to the jewelry shop to check them out!

I am also looking for some advice on how you balance your work from home schedule.  I know there are tons of techniques, but do you do work the whole day or do you work on one thing, throw a load of laundry in, work on something else, wash the dishes, etc.  I think I am a work all day kind of person.  I want to get as much done as I can! But I'm not sure if it's efficient! Any advice or resources would be awesome!


Connect on Twitter // Follow on Pinterest // Peep me at Hello Cotton