Showing posts with label blog tips. Show all posts

2.20.2020

Boost Your Blog // 6 Places to Find Photo Props

If you've ever been super envious of those perfectly styled blog photos you see all over Pinterest, I've got the solution for you!  You don't have to spend a butt ton of money to build your library of styling props you just need a keen & creative eye.  
this post contains affiliate links, please read my full disclosure here.

First off, make sure you have a rough idea of your blog's style.  You can start by understanding and creating a style guide and creating a brand board of inspiring images over on Pinterest.  When you do this you're less likely to say 'hey that looks nice!' to something that may not fit in with your blog's (or other social media outlet) vibe.  Understanding the vision of the posts your write and the presence you want to create will help you say yes to better photo props.

I have six places I like to find my photo props, so here's my list:

Thrift Store

Right now thrift store chic is super huge as it has been for quite a while now!  You can find pieces like wooden cutting boards, baskets, & fabric for bigger background pieces but you can also find smaller accent pieces for your photos.  I like to look for colorful glassware & dishes to use in photos as well.  This is also a great place to find classic seasonal pieces that will stay relevant year after year.

Clearance Shelves

The Target clearance shelves are my jam!  Not only can you find discount seasonal items that may be relevant the next time that season comes around but you can also find really cool textiles to use as backgrounds.  Be sure to snatch up small rugs, table runners, scarves, etc that will be great to add color & texture into your photos.  You can also check the clearance shelves of Micheal's' for knick knacks, desk accents, and more.  I found quite a few variations of succulents at my local Mike's recently! 

Target Dollar Spot/Bullseye's Playground

This is another great place to get affordable seasonal decor.  While I like to pick up fall or summer or spring decor in this area to save money I also like to find smaller specific holiday things there too.  I'm not one to decorate that much for any holiday but Christmas so having an affordable Halloween prop stash is great.  Find things that can translate into multiple holidays - like silver can be for Christmas or Halloween, red can be used around Valentine's Day or Christmas, etc.  I found some fake apples in the Target Dollar Spot for the fall back in September!  So shop often & shop early!  You can also shop seasonally here to find specific color schemes to fit in with your aesthetic.  If your blog has a lot of pastel vibes shop during the spring.  If your blog has a lot of jewel tones or has a boho vibe, shop during the early fall.

Dollar Store

Another place to find affordable seasonal decor is the Dollar Store!  I've done a nice spring decor DIY featuring some of their seasonal products and this guy will last me many spring seasons to come.  You can often find some nice little accent pieces that imitate pieces found in higher end stores.  Their floral sprig collection is awesome too!  I also look back in the automotive section to find soft, fluffy polishing cloths that you can use as a faux fur background.  I use a piece of Dollar Tree foam core board with a plank style removable wallpaper vinyl as a backdrop for nearly all of my photos and YouTube videos.

Your Own Closet

In one of my first IGTV videos, I talk about using the fabrics from your own closet as backgrounds. You can style any cardigans, dresses, or fuzzy sweaters as fun accents in your background.  Beach towels would work nicely too.  Drape different fabrics different ways to create layers and textures.  Use your own bedspread for amazing flat lays, add jewelry as an accent.  You can see that I used jewelry to create some fun stock photos for you all in this post.  

Scene Creators 

Don't want to have a closet full of props to make your flat lays?  Well there is something cool out there I've recently found that can help you create amazing flat lay scenes...they are called Scene Creators!  You can find them on a ton of digital design websites - The Hungry Jpeg, Creative Market, Etsy, Design Bundles, etc - and some of them will even work with online design platforms like Canva & PicMonkey.  These guys allow you to mix & match digital elements on a background to create your flat lays.  This is perfect for a consistent theme and really great if you're more of a digital blogger.  If you don't really need to take or style you blog photos and you just need a nice, clean, on brand photo to overlay the post title, this is a great way to create consistent flat lays!  I'm playing around with this idea for that reason - I don't always need to take a photo but I don't always like the stock images I find.

Once you have your props on hand you'll be more likely to create a cohesive vibe to your blog's look.  Its also great to be able to have a pile of your own stock photography to choose from when you may not have time to shoot.  If you've got only a few shots get creative with your cropping to use the same photo more than once.  Get your design on by using this PicMonkey tutorial to create a blog image template to use over and over again.  You can also check out this Canva tutorial over on the YouTube channel on creating blog graphics.


Keeping your blog fresh can be fun, but it also can be daunting. I've created a FREE resource that can help you get back on track (or just remind you to stay on track) that shows you 5 ways to revamp your blog! This 10 page book will give you great tips on reviving old posts, automating your process, and keeping you on the right foot. You can download it by signing up for the newsletter above.

Ready to do more with your blog? Check out all the Boost Your Blog posts right here.

What is your favorite thing to photograph? Do you have a prop library?
xoxo, Moe

11.15.2018

Boost your Blog // 6 Productive Things to do When You're Stuck

I took off the month of October to focus on enjoying life and being married...so when I tried to get back to the grind of blogging and creating other content I had a bit of a struggle.  Thought I've created a content calendar outline (click here if you want to read about my OG blog planner!) and that's helped me get back in my routine, sometimes I still feel a little stuck.  
this post contains affiliate links, please read my full disclosure here.
When I feel this way there are a few things I like to do to get my full mojo back.  I work with existing content I've created and I interact with content that I love hoping to spark inspiration within myself!  Sometimes I just need a little push.  So I hope that these 6 tips help you to get back into your groove:

Choose a hashtag. Like, Comment, Repeat

Whenever I want to find new creators to interact with I choose a hashtag that I use frequently and flip through some of the images under that hashtag on Instagram.  When I'm scrolling through I will like and comment - genuine comments not just the heart emoji! - and follow who I find inspiring.  I'll save some of their content to my inspiration folders & try to pin what I can.  That way I'm paying it forward for them!  Then I choose another hashtag and repeat!  Check out this post on how to authentically gain Instagram followers.

This helps me because I'm getting inspired and because some of the people I interact with pop over to my feed to give my content some love.  Sometimes I get a follow as well! But the goal is to interact and drive traffic to my content.


Automate Something

There is always something that can be automated - right now I'm contemplating automating my Instagram posting.  Automating something means you're taking the hassle out of a task that can now leave you time for something else.  One of the few things I've automated are pushing Instagram posts to my Facebook page, publishing blog posts & YouTube videos over to my Facebook page, and batch scheduling series posts for the Live & Create Facebook group.  I've also created automated emails through MailChimp that go out when you subscribe to certain lists. 

This helps me because I don't have to worry about a few mundane tasks that I always put off.  The biggest task I put off is batch posting to the Live & Create group so to be able to sit down and schedule posts right within Facebook saves me money and allows me to focus on other things that need to be done!  (Track you social media posting with these free printable stickers!)

Create Something Outside of your Online Space

If you're not finding inspiration with in your online space break out of it!  I have a few hobbies offline but even if I find myself wanting to make something just for me, I do it.  I haven't filmed a Plan with Me in ages because I just want to sit down with my planner, my tea, and Ancient Aliens in the background while I have some me time.  And that is ok!  Take a class over at a craft store or community center if you need a little push to get started.

This helps me because I connect back in with my creative self with out the pressure of perfection.  I don't need to take pictures, I don't need to share, I can just be myself.  When we create for ourselves we can focus on our true creativity.

Pin Content to Group Boards

Group Pinterest boards are a great way to get your content noticed by other bloggers & creators.  By finding & joining these boards you're able to get your content in front of other people interested in your niche.  You'll pin your content there, then you'll pin content from the group board to your boards.  Other members will do the same and their followers will see your content.  This is why creating Pinterest friendly images is important!  Consider creating multiple images as well!  You can watch an easy to follow tutorial on using Canva to create your blog images over on the YouTube channel and find an easy way to use PicMonkey for branding here.

This helps me because, again, I'm immersing myself in inspiration.  I'm sharing my content but I'm also finding content to share.  This is a great way to find things to share in your Facebook groups too! Plus I may find an article like this that sparks something in me!

Beef up an Old Blog Post

We all have some old blog posts that can use new graphics, monetization, updated links, restructuring, or new info so choose 5 posts and beef them up!  Add in a call to action, create a graphic to pin, add in some affiliate links/ads and then turn around and promote that blog post!  Repin it, share in on social media, send it out in a relevant newsletter, etc.  Do just a little to drive traffic to older but super awesome posts.

This helps me because I don't have to write a brand new post, I only have to beef one up.  I may also find inspiration to write a follow up post or create a series of posts related to that one.  I can also monetize something that I'm linking to in other posts to hopefully reap those benefits.


Research Hashtags

And let's go back to the hashtag - I have a love-hate relationship with hashtags.  They are great because they help people find your content but they are annoying because they are often misused and I don't know what to do with them!  I use the Preview app to find my hashtags but I'll also flip through Instagram to brainstorm more hashtags to use.  I also write down hashtags for the products I promote - brand hashtags (like the Happy Planner), any challenge hashtags that are currently relevant, any app hashtags (I use A Color Story, A Design Kit, & InstaSize), etc - so that I can show up in those searches.  

This helps me because I'm making sure I'm optimizing my reach.  I want to make sure I'm using relevant hashtags and not just vague words that get likes.  We're looking for engagement here!

These six things help me get me back in the right head space to keep creating content!  I'm in a bit of a rut/struggle now so I've been going through a few of these things to get me re-inspired.  I've written a free ebook on how to get back your blogging mojo and if you're feeling a bit stuck, I hope you'll download it below!


Be sure to check out the past Boost Your Blog articles here and keep a look out on this playlist over on my YouTube channel.  I hope to make more design videos for bloggers!  Ready to get some creative inspiration?  Join the Live & Create facebook group for mindful living, creative planning, and personal development tips.

What do you do to get inspired when you're in a rut?

xoxo, Moe

7.26.2018

App Review // Instasize

Finding, using, and sharing apps is one of my favorite hobbies.  Starting with my iPhone 4 I've loved to download photo editing apps, overly process photos and share them with the world.  That was when Instagram & the power of the smartphone was new.  Today, there's a different story when it comes to the photos we take and edit with our phones - subtle, professional edits that enhance the natural beauty of a photo.  Prior to the age of the smartphone you'd use something like Photoshop to create the perfect photo.  Today that whole game has changed!
this post contains affiliate links, please read my full disclosure here.

We're trying harder now to curate the photos we take and there are a ton of apps that can help edit that perfect shot right on your phone - Instasize is one of them!  I was contacted by Instasize to review the full version of their app and share it with you today.  Instasize is an easy way to carefully and subtly enhance your photos as well as create a curated social media presence.


What is Instasize?

Instasize is truly an all in one photo editing app.  The app features a wide range of professional filters & editing tools, the ability to edit both photo & video, pre designed text overlays, 50 fonts to insert your own text, & a collage creator.  Seriously, all in one app!

A premium subscription of $4.99 USD/month offers you access to updates monthly + exclusive, member only tools. 

Information from the iTunes app description here. Download from the Google Play Store here.


What does Instasize do?

In a nutshell, Instasize allows you to curate your social media presence with consistent photo edits & text overlays.   Giving you a complete tool kit to stream line your social feeds in one app, Instasize can be your go to for any size photo you need to post.  At it's core, Instasize can fit a portrait photo into a square canvas, perfect for posting to Instagram.  However this app does so much more:

Photo & Video Editing

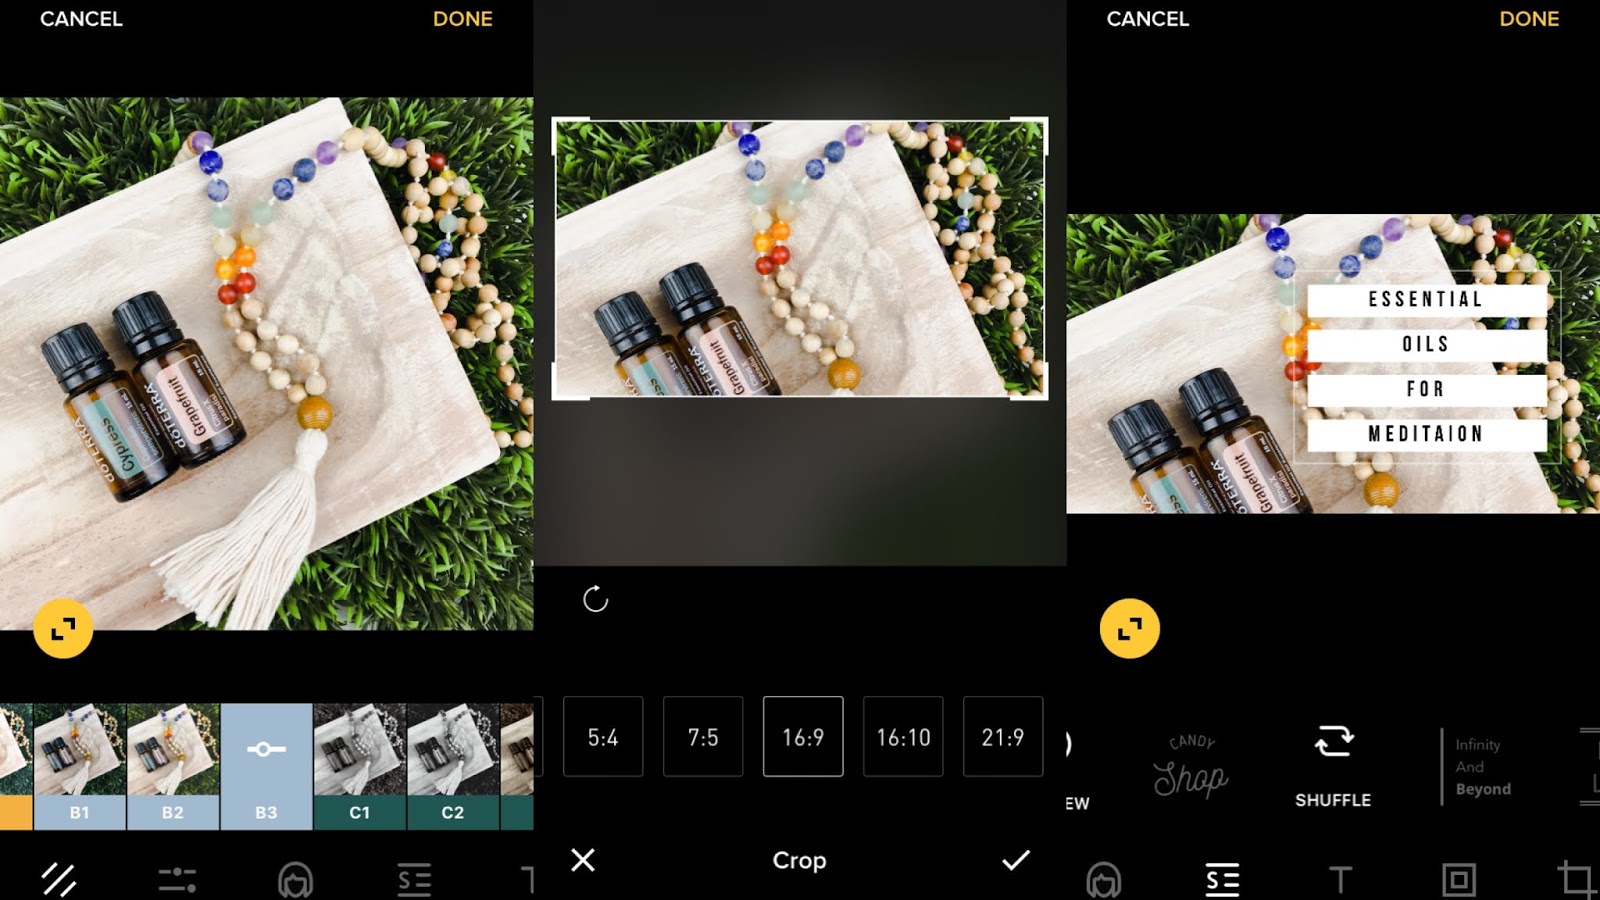
First off, there are 40 professional filters for you to choose from to edit both photo and video.  When you load the original size photo/video into the app you'll be editing the original size.  You can either crop the media, work with it at it's original size, or tap the yellow circle in the lower left of the image to shrink it onto a square canvas.
From here you can edit the photo using the filters or the precision edit tools - both options for saturation, brightness, etc and beauty tools to whiten teeth, even skin tone, etc. I think that this app is perfect for portrait or landscape photos.  And by that I don't mean the orientation of the photo but rather editing images/video of people and/or the outdoors!  The flat lays I usually do don't fair well with the filters in this app, I've found.  But I love the way the filters enhance my selfies!

Collage Maker

Another cool feature of this app is that you can create a collage then edit all the photos in the collage at the same time.  Doing this means you'll be able to have a consistent look to each photo rather than the fear that each image may have a different look.  I find this an important feature because of the consistency and the ease of not having to jump between apps.
From the collage maker you can choose different layouts and actually see how your photos will be arranged in each layout prior to choosing the collage.  Then you can edit the spacing between each photo and even add a background, photo, or color around the image.

Social Media Formats

Cropping your media all in the same app is important & Instasize gives you many options to crop your media for various sites.  The only downside I can find is that you're unable to crop in a vertical format - think long form video or stories for Instagram or SnapChat.  In the example below I edit a photo, crop it for a YouTube thumbnail, then add text.
If you import a photo or video at a 9:16 ratio, you can still edit it but you can't crop something like a native camera photo/video to a 9:16 ratio.  This is easily solved by either cropping before or after editing the media in the app.

Preset Font Overlays & Customized Text

If you need a quick graphic, Instasize offers 10 text overly presets.  This is great to be consistent with your branding when you're posting to Instagram or other social feeds.  Use the second text overlay - Finish Line - for a series of posts outlining a process, use the first option - Candy Shop - to announce a sale, & use the Full Moon overlay for a little bit of simplicity.
Your also able to add your own text if you're not fond of the presets.  You can choose from 50 professional fonts - there are really nice sans serif & scrip fonts included!  You may not find your personal branded fonts but you may be able to find something super close.  Get creative with how you add the fonts to your canvas.  The best part is that you can add the text to your videos too!


How it helps you

Because this app is nearly an all-in-one content curation app, Instasize gives you a way to plan, edit, and be consistent with your online presence.  As a blogger, influencer, & content creator you'll have a ton of easy to use tools right at your finger tips.
Another subtle feature of this app is the ability to use the media storage on the homepage of the app to plan your Instagram grid.  While you can't add a caption or store hashtags you can get a visual idea of how your grid may look and then push the photo to Instagram when you're ready.  Easily delete photos you don't plan to use or tap & hold a photo to move it around on the grid.

All in all, Instasize is a great app to create the consistent social feed you desire!  While you can use the app for free upgrading to the monthly subscription will give you the best experience with the app.  So I recommend it.


Want to learn more about how to use Instasize? Check out the Instasize blog here.  Find more iPhoneography tips on my blog here.

What apps do you use in your online branding?  How do you keep a consistent feed? 

6.25.2018

Boost your Blog // Why Should I Open a Digital Etsy Shop?

If you're a blogger looking to make a little bit of income on the side, opening a digital shop might be for you.  You can sell digital prints, stock photos, worksheets, workbooks, planner printables, etc. especially if it is relevant to your content.  Opening a digital shop will add another revenue stream from your blog!  There are a ton of eCommerce sites where you can open this type of shop, but I want to tell you about why Etsy is the best place.
this post may contain affiliate links, please read my full disclosure here.

Etsy is the leading handmade marketplace.  It's been around for 13 years.  I remember when I first heard about Etsy and it was then that I decided to open up shop selling earrings and crocheted items.  I didn't have much success with physical items - plus I did not like to go to the post office!  When I moved up to Indiana in the Fall of 2012, I'd been selling digital items in my Etsy shop for about a year.  At that time I sold blog templates & custom Blogger designs.  It was when I started selling digital items that I found the most success.  It was a balance between being creative and not having to go to the post office!

I've shuttered my online doors a couple of times in the past but I've kept my current shop open for a few years now.  Currently I sell digital planner printables as well as stickers designed to cut with your Cricut Explore.  But I'm thinking about branching out to selling more digital supplies for creative businesses - graphics & templates, social media stuff, etc.  Check out the shop here.

But why Etsy Especially since they just announced a plan to increase the transaction fee from 3.5% on the sale price only to 5% on the sale price + shipping starting July 16, 2018.  I've written a post here on why I keep turning back to Etsy, by why should you consider Etsy in the first place?  In the age where eCommerce shops can be made quickly & easily, why start with Etsy?

Low Start Up Cost

Etsy has the eCommerce platform down for you.  You don't have to build or pay someone to build the website for you.  While there are a lot of drag & drop options and most eCommerce platforms are easy to use, with Etsy you don't have to invest much time or money into getting your shop up & running.  It is free create a shop, you can use free software to create a shop graphic & even edit/create your shop listings.  At a cost of .20 cents a listing you can list 100 items for about $20.  Each listing lasts for 4 months.  You're only charged the transaction fee (3.5% prior to July 16, 2018) once a sale is made and if you're not finding success, delete and item before it renews and you won't be charged another .20 cents to relist it after the 4 months expires.  You're not investing the time or the money you don't have!  Plus if you're selling digital items you're not going to be shipping anything.  So this increased transaction fee won't impact you as much.

Digital Fulfillment Service Built In to the Platform

Selling digital items means you'll need to actually get that file to the customer.  With Etsy there is a fulfillment service built right in at no extra cost.  You list the item and you're done.  You don't have to monitor sales and deliver the files to a customers email.  Etsy does this for you after the payment has cleared.  Other eCommerce platforms often require the use of either their app or a third party app to execute this fulfillment process.  While that's not too bad, Etsy makes it very easy to run a digital shop without any extra work.


Name Recognition & Search Optimization 

Etsy allows you to tag your listings with relevant search tags.  You're also given ample space in the product title to include relevant search terms.  The description area is a thrid place to create a through product description.  All of these allow you to show up in Etsy's search.  Because Etsy is the leading place for handmade & creative products, people come to Etsy to search for what they need.  If they are coming to Etsy to search they will find your shop as long as you tag your products properly.  This is the most work that you'll need to put into your listings (well, this and your photos).  The more work you put in to properly tagging your products the better you'll show up in the search.  It's as if the advertising is being done for you.  Of course you'll need to share that you actually have a shop on your various platforms but you're not going to need to pay for advertising space.  While Etsy does offer the option to advertise in search results, my unscientific studies have proven to me that this type of advertisement really has no bearing on sales.

Ease of Use

All points above add to the fact that Etsy is just easy to use.  You don't have to manage security certificates, cookie notices, or any changes to internet use laws because Etsy will do it for you.  I feel, you're getting a great convenience for a very low price and peace of mind.  If you want to take it upon yourself to manage your own website and eCommerce and fulfillment, good on you.  I just place big importance on ease of use.  You're getting the advertising & the digital fulfillment covered, your partnering with a big name in the game and you're not having to create & maintain your own stand alone site.  The overall design of the Etsy platform is aesthetically pleasing as well and you're not having to make all these design decisions that cost moolah on your own site!


So, while there are some restrictions Etsy is a great place to start selling.  I am of the set it & forget it mindset.  I am also not going to fix something that isn't broken!  What I am going to do though, is change with the times.  I plan to raise my prices in my shop in July.  Why do that?  Why not move to another platform?  Because I like this platform, I find value in this platform, and I think my community finds value in my product.  When we partner with businesses that are in the business of doing business, we must realize that things will change - these partners want to make money just like we want to make money.  This is also the first increase in 13 years of the platform so I find this site rather trustworthy and believe they aren't ripping us off!  Etsy does a lot of the managing for you - fees, fulfillment, security, advertising, etc - and I find value in their service.  

If you're thinking about expanding your blog income by starting a digital shop, forget the headache & start with Etsy!  Want to read more about running an Etsy shop? Check out these posts.

Do you have an Etsy shop?  Why do you use Etsy?

xoxo, Moe

6.21.2018

Boost your Blog // Apps I use to Run my Blog

I've been blogging for over 10 years now and the landscape of blogging has changed so much since I first started.  I've also become more streamlined in my own blogging - only doing what I feel is worth my time, using the camera that I have, and working from my phone a lot of the time.  If it isn't simple for me to do...then I don't do it!
this post contains affiliate links, please read my full disclosure here.
I'm not the type of blogger who likes to follow the rules.  I find the 'proper way to blog' to be overwhelming & time wasting for me.  Examples - I don't have a self hosted blog, I use my iPhone to take photos, I never research keywords for post titles, I'm bad at newsletters, and the list goes on.  However, I still consider myself a successful blogger.  Part of this is because I'm authentic.  Another part is that I share relevant info.  And the final part is that I use apps & tools to streamline my process.

As someone who works a lot from my phone, you'll find apps & programs that have both a desktop and a mobile version.  This is the number one reason why I'm considering getting my next iPhone in the Plus model for the bigger screen!  Anyway, here are the apps & tools I use to run my blog:

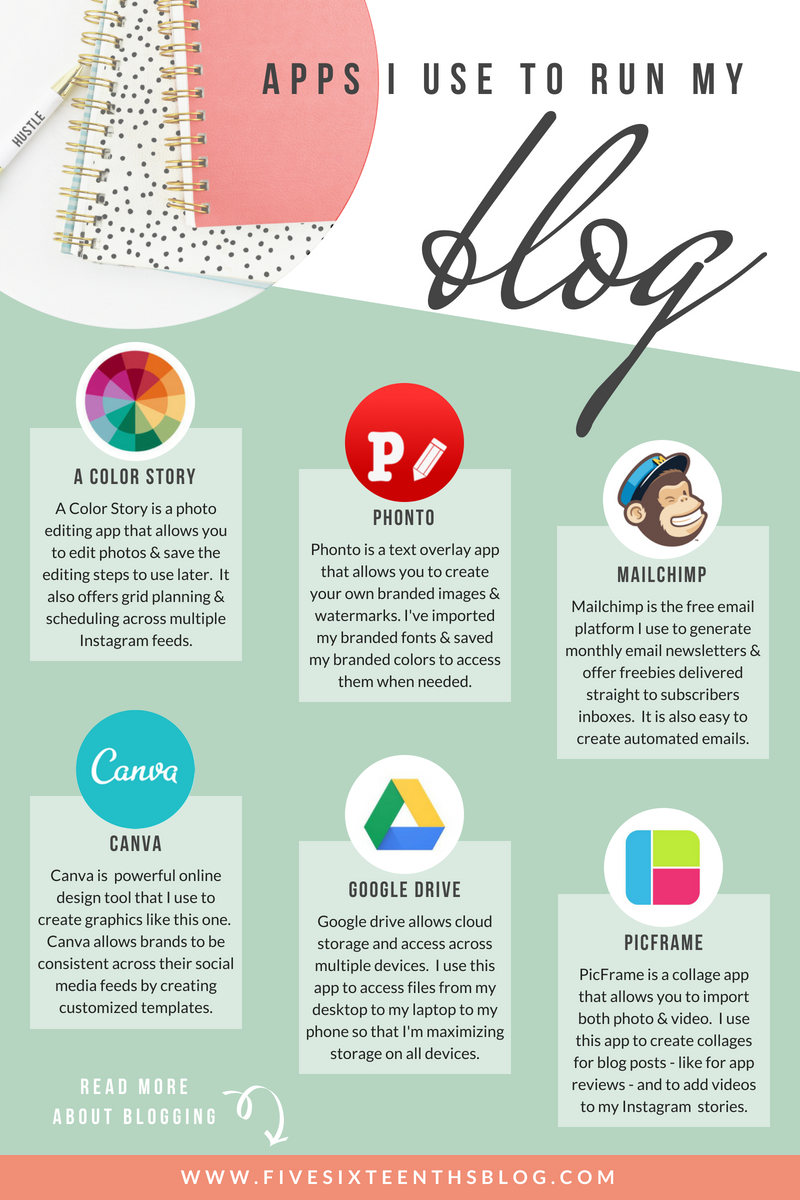
A Color Story

This is literally the best mobile photo editing app, ever.  I have a full blog post on this app here and will constantly recommend it to anyone editing photos on their phone.  What I love about this app is that the FREE pack included in the download is all you really need to create bright, crisp photos perfect for Instagram, Facebook, and your blog.

Not only can you edit photos but you can also edit short videos.  So if you want your Instagram stories or videos to fit your pages aesthetic you totally can!  The controls are just the same whether your' editing a photo or video so it's super easy.  Plus you can save a series of edits to use on other photos later to get that consistent feel.

Finally, you can plan your Instagram grid using this app!  This is a feature I've recently started using for both my Connected Chakras feed & the Feel the Inhale essential oil feed.  If you're wanting to create a cohesive grid with a certain theme, you can preview how your images will look next to each other.  I use this to see how my images will look next to each other & to plan which images I'll use each week.  Unfortunately there's no auto post option - you'll still have to manually import your photos to Instagram but you can at least plan the aesthetic and the caption.

Phonto

This is the app I use to create any blog image with text over them. Like the image at the top of this post, Phonto is the way I create my pinnable blog images.  I love this app because I can import my own branded fonts right into the app and use them.  The app does come with a TON of fonts already but it is great to be able to use your own fonts!  I love that I can save preset text - like my blog URL or a text watermark for Instagram - to add to each new photo.

A companion app that I've just recently found myself using is Vont.  Designed by the same creators as Phonto, this app allows you to put text over video.  You can even import your own branded fonts as well!

You can read another full blog post on Phonto here.

Mailchimp

I suck at sending emails but I love the automated system offered by Mailchimp.  If you've ever signed up for an email opt in - like the Tarot eBook or the Blogging eBook - then Mailchimp has automated the sending for me.

This is the main thing I use Mailchimp for.  The automation takes the pressure off of creating unique emails every week for my email list.  I automate sending new blog posts to subscribers as well.  So it appears like I'm actively doing a newsletter....but I'm totally not!  I plan on doing a post on how to use the automation feature of Mailchimp soon!

Canva

Like the graphic in this post, I use Canva for my other design needs.  I love that the templates are easy to use and that my brand colors & fonts are easily stored.  When I need to change the size of a graphic I can also auto resize it super simply!

Canva allows me to create ebooks, infographics, and other digital downloads to make my blog look amazing.  I also use this to create my Instagram stories highlights and other templates I share over there.  The template options in both the desktop version and the app are amazing!  While you can use your branded text on the desktop site the app doesn't allow you too.  Which is why I choose Phonto for mobile.

Canva also allows you to create templates to sell or share with others which is a cool way to monetize your content!

Google Drive

This is my choice for a cloud storage service.  While you get 15GB free with your gmail account, I pay for 100GB of storage.  This makes it easy to transfer files between my phone & my computer.  Since I take and edit my photos on my phone I need a convenient way to transfer the files to my computer so I can compose the blog post.  On my computer I have a Google Drive back up so I can choose anything that's been uploaded as if it were on a drive on my computer.  It makes the whole process super streamlined.

I also use Google Drive to host any freebies that I share on the blog.  Because I need a way to get the freebies to you I need a hosting service.  Google Drive allows me to share specific files and set specific permissions for each file.


PicFrame

This is an app I've been using for a thousand years it feels like.  This is your basic photo collage app and I love it because it is simple.  Change the size, add photos, save.  Easy. Peasy.  Recently this app add the ability to save templates to use later.  I find this helpful when I want to make a collage or create a nice graphic for my Instagram stories.  You can change the ration to 9:16 so that your creation fits perfectly.

I just found out recently that you can add video into the collage!  What I usually do is add one video to the collage then save it so that there's white space around the video to add text.  Then I'll use Vont to add the branded text I like!  Read a full review of the app here.

All of these apps make blogging super easy for me.  I don't have to stress about my content or my design because I've got these tools right at my finger tips.  If blogging isn't something I can easily do, I don't want to do it.  Since I've started to take my blog a little bit more seriously I've been trying to find ways to create a space that is successful but still fun for me!


I'm constantly on the look out for new and fun apps to add to my arsenal.  If you've like to read more about the apps I love & use check out all the App Reviews right here on the blog.  And if you've got an app suggestion you'd love for me to review, shoot me an email here.


5.10.2018

App Review // Photo Video Collage (PVC) Pro

If you've been around the block or two with this whole blogging thing you'll know that things change all the time.  I mean we had the Instagram algorithm switch, adpocalypses over on YouTube, and the switch (quite a while ago) to vertical images on blogs because Pinterest favored them.  So what is new now?
this post contains affiliate links, please read my full disclosure here.

Well it may not be new, new.....but video is taking over.  We've got video on Instagram (read more about what to post when you've got nothing to post here) and on Facebook.  And the verdict is video is better because it engages us longer.  Who doesn't scroll through the next video on Facebook or tap on the videos on the explore page of Instagram?

I was contacted by the makers of Photomarks, Bits & Coffee, to review a cool collage app that combines photo & video to create square content to share on your Instagram, Faceook, or other social media feeds.  Let's talk about this cool app.

What is it?

Photo Video Collage or PVC pro is an  collage app that allows you to "Create beautiful and engaging photo & video collages with your memories and favorite music, built for sharing on Instagram, and Facebook!  PhotoVideoCollage brings collages to a whole new level. Not only can you add photos but also entire videos and mix the soundtracks with your favorite iTunes song!"
Information taken from the app store here.

This app takes collage much farther by combining photo, video, text, and sound to create unique content optimized for sharing.  The price of this app is $1.99 USD so it's pretty reasonable but there is a free version here, too!

What it does

PVC pro gives you the ability to create quality videos for your social feeds with just a few taps.  Choose a layout, tap a box, add a photo or video.  It is that simple.  You can create branded content by using images created in a text overlay app - my favorite is Phonto but PhotoMarks is made by the same creator as PVC Pro - or use your own styled images.
Drag & drop to rearrange the elements of the layout and add music from iTunes.  If you have copyright free music, this would work perfect to share & monetize.  You can add a text title as well.

There are 70+ square layouts, background colors & texture overlays, the ability to export a new video to Instagram, Facebook, email, or your camera roll. 
This app is another great powerhouse tool to make content while you're out & about!

How it helps you

As an on the go blogger, I do most of my content creation on the go and on my phone.  I film not only YouTube videos but short & sweet videos for my various feeds.  The optimal video is also square or - I can't believe we've come to this - vertical.  I'm not saying it's right, I'm just saying it's happening.
This app can help you create interesting and optimized videos - especially if you have multiple things to share.  One way I use this app is to add a vertical video into the collage plus two other graphics with supplemental information.  I find these fit better into your Facebook page or groups but are not that aesthetically pleasing when used on your Instagram feed.  But you can always pop these into your stories.

Overall, I think this app is very useful.  I've created a few videos with this app (check one here on the 516 Facebook Page) and have to say I will keep it around!  I do wish that there was an option to go horizontal or vertical.  A vertical layout would be fun to use in your stories.  I think this app is great as a companion app in your blogging arsenal. 

Download PVC pro today to get your video making on!  Want more amazing apps to try? Read more app reviews here.

What apps do you use in your blogging arsenal? 

xoxo, Moe

5.03.2018

Boost your Blog // What to Post on Instagram When You have Nothing Insta-Worthy

My favorite social media platform is Instagram.  I love how visual the platform is and how interactive it can be.  I also love how curated it can be...if you want it to be.  Because it's such an interactive platform, everyone knows Instagram is the place to be to attract readers, followers, and sales.  We're drawn to a consistent posting style & consistent schedule, especially from our favorite influencers.  I also find myself wanting to curate my own grid while also being organic & authentic...so sometimes I don't have something prepared to post.
this post may contain affiliate links, please read my full disclosure here.
Keeping a consistent schedule doesn't have to be all planner apps and editorial calendars - we can be a little organic in our posting to give our followers an authentic experience while still being on brandFirst there are a few tips I want to give you on deciding what to post when you have nothing to post:
  1. Does it give value?  If you just want to post something because you haven't posted anything, reevaluate what you're doing.  What you post should give value to your audience and not just be filler.  We're dedicating time to curating a sub par post and taking our time away from another, perhaps more productive task just to follow the rules of engagement.  If it doesn't add value, don't post it.
  2. Does it fit the aesthetic? While we can be as organic as we like or as gird-centric as we like, the best thing we can do to keep our followers interested is to make sure our posts fit our aesthetic.  Aesthetic is a broad term and I may not be the best person to give you advice on this but........make sure what your posting fits with your page.  Edit it the same, use the same fonts as your brand, etc.  Make sure it fits on your feed.

So, with all that being said, what can we post that is authentic & on brand when we don't really have anything to share?

Current View/Stock Photo + Motivational/Real Talk

This is my favorite one (and that's why I put it first!) because often times I have something I want to say but I don't have a picture to say it with.  Usually I snap a quick shot of something I've got styled in my home, my actual current view, or an on brand stock photo then use the caption to offer something of value.  I use A Color Story to create consistent edits so that my photos all have the same feel.  A Color Story also has a feature to help you plan your feed and I use this to make sure an edited stock photo will fit in the aesthetic I've already got going.  I've listed a few stock photo resources  & tips here.

Turn a Poor Photo Black & White

Sometimes we get so caught up in the perfect Instagram life we forget that real life things do happen.  Like last minute road trips, quick runs to Target, or just front porch sits with our family.  We like to capture photos of these moments but they don't always turn out insta worthy because we're enjoying the moment and not thinking about our feed.  If you do want to share a candid shot that may not be perfectly styled - turn it black & white!  The contrast is going to help your photo look alright and fit into your grid.  Instagram has a few black & white filters, but I have a whole post on creating the perfect black & white photo right here.


Share a Quote

If you want to give something of value but you don't have a photo, share an image of a quote.  Every ninth photo on my grid is a quote on a white background in my branded text.  Use a text overlay app like Phonto, A Design Kit, or PhotoMarks to create your quotes to stick with your over all aesthetic.  I like Phonto because you can import branded text right to the app.  For example, the script text I use for my blog header is not in the Phonto app but I was able to import it so I can use it consistently.  You can also use the stories feature on Instagram to type out quotes and then save to your camera roll & upload.  PicMonkey and Canva work great for this too, and they both have a smartphone app.

Styled Product Photo

Grab a product photo from your shop and share it on your feed.  Talk about the product, why you love it, what it can do for someone, or why someone needs it.  Share something of value in the caption so that your followers feel a connection.  They may not even know you have a shop or that you sell anything!  They may just want to get in on that action!  You can also share how you're currently using something that you sell to create that authentic connection.

Video 

Since videos automatically play on our feeds and there's some action going on, videos often get more interaction from our followers.  They are longer than just the second it takes to view a photo so videos can help us capture our follower's attention.  Through video, followers are able to hear your voice and see a snapshot into your real life.  With the app A Color Story you can even edit short videos to match the edits on your feed.  That app is seriously the best app ever for bloggers.  Plus the ideas are endless when it comes to what you can showcase in a video.  You can even use a fun app like PVC Pro to create video collages.  (review coming soon!)

So when you think you've got nothing to post, you've now got five ideas to get you back on track!  You can even build these ideas into your current posting schedule if you've got space to fill.  The point of this is to show you that you can be authentic while still being on brand.


It is important that we're keeping social media a stress free place for us as infulencers and as consumers.  Personally, I don't like stressing over the perfect photo especially when I could be spending that time on quality content on another platform.  In order to be more authentic online recently I've not been stressing myself out if I'm not posting on every single platform.  I want to create content of value not just a quick post & run.  Lets create a community rather than just a conglomeration of overwhelm.

What is your Instagram strategy?  What do you post when you don't know what to post?

xoxo, Moe

2.22.2018

Boost Your Blog // Create Pinable Blog Images with Your iPhone

I've said it before and I'll say it again - my iPhone is a key part of my blogging arsenal.  I use it to take & edit photos, I use it to organize blog files, I use it to share blog posts, and I use it to create cover images for those blog posts.  There is a lot of power packed into this tiny thing and I am all about harnessing it.  Blogging doesn't have to be a chore and, honestly, it shouldn't be.  Creating a space that is supportive & expressive is right at your fingertips.
this post contains affiliate links, please read my full disclosure here.
I've been blogging for over 10 years and Pinterest came into the game for me right around the time I decided to take my blog to the next level.  But it wasn't until recently I started to optimize my blog posts with the vertical images best suited for Pinterest.  As website traffic grows increasingly from mobile users, vertical media is being prioritized over the square or horizontal format.  Not only are we consuming media in a vertical format, but the tiled style of your Pinterest feed allows for vertical pins to rule.  The more real estate an image takes up the easier it is for us to see on our small, mobile screens.

Since we're already on our phones all the time, we can take our blogging tools on the go.  I can't tell you how helpful it is to have an handy computer in my pocket to work on blog tasks - especially with my 9-5 job.  I can edit videos, photos, and blog posts quickly and on the go!  But let's get started with the step by step on creating Pinterest friendly images straight on your iPhone:

First, Start with the Perfect Canvas

Create a your photo library

I often use my own blog photos to create the pinable cover photo for each blog post.  But sometimes I don't have a photo specific to a blog post.  This post is actually a good example of that!  If I don't have a photo, I'll pull from my own library of styled photos or from an online, royalty free stock photo site.  Unsplash is a great resource as it allows you to create a library as you browse their site and I use it quite often.

Plenty of bloggers use stock photos, so don't feel like you're cheating!  Here are some tips to make sure you're choosing the best stock photo for your post.  You can also find some free styled photos here on the blog.

Image size is important

The best aspect ratio for a pinable image is 2:3.  This means you're image is longer than it is wide.  You don't have to be terribly precise if you're cropping a photo, but many photo apps offer a ratio scale so you can crop your image perfectly.  Vertical images straight from your camera roll fit this 2:3 ratio perfectly.  When you're taking your blog photos, or searching for the perfect stock photo, consider where your text will fall on this image.  Sometimes you can use any 'ol image you take but sometimes you'll want to take a specifically framed image so that your text will balance nicely on the image.

If you want to step up your iPhoneography game, I've got a ton of posts with photo tips here.  Make sure your lighting is even and when in doubt, just make it black & white!

Adjust, Edit, & Include your Watermark

Subtle edits to create cohesiveness

If you're using a stock photo you'll want it to fit in with your current editing style.  Since you're starting with an image that fits the post and fits in well with your blog, you'll want to make sure the over all aesthetic of your blog is matched with any edits you normally do to photos.  Subtle edits work the best - these edits correct & balance with out creating an overly filtered effect.

I have two apps to recommend for these types of consistent edits - A Color Story & AfterLight The perk of both of these apps, and why I recommend them, is that you can save your edits as presets to use over and over again!  Talk about consistency!

A Color Story is my all time favorite app to use and I honestly use it on the daily.  The free Essentials filter pack is all you really need for subtle natural edits plus you can batch edit (which saves a butt ton of time) & you can see how your photo would look on your Instagram grid.  All of these features are part of the free version of the app!  Say what?!?!

Add branded text & watermarks

The key part of a pinable image is the text that draws in the reader.  Add the blog post title or other related key words to your pinable image as well as the web address for your blog + the watermark if you have one.  It is important to watermark photos with at least your web address because pins lose their links all the time.  Others also try to hijack images to claim as their own so your watermark deters this behavior.

My favorite app for this is Phonto.  It is super simple to use, you can save text as presets, and you can upload your own fonts.  So it is perfect for your branding!  Another app that is newer on the scene but seems amazing already is A Design Kit.  This app comes from the creators of the A Color Story app so they can work seamlessly together.  I don't believe you can save any presets, the there are quite a few text options available.  I also just reviewed an app called PhotoMarks that works amazing to add branded text!

Finally, organize your files

Push images through to your other devices

I've used my iPad for blogging before so my photo library is shared between my devices.  And if you use a Mac, it would be even easier to grab your files from the cloud.  I use Google Drive to push my files & photos between my devices.  I find it is the easiest and gives me the most storage to work with.  Once the photo is uploaded from my phone I can rename it in Google Drive and upload it to my blog post.

I will also have the images available to post to various social feeds, no matter what device I'm on.  Previously I would need to email myself the images so I could download them to my computer.  If I needed to edit or change something, it became a huge hassle!  This type of cloud sharing would be great for teams or blogging partners to collaborate.  Or even if you are a part of a group of bloggers that work closely together on content.


It is seriously that simple to create amazing, pinable blog images right on you iPhone.  I've been thinking of upgrading my phone to an 8 plus for the bigger screen since I do so much blog work on it!  These little guys pack a huge punch when it comes to convenience, creativity, and quality!


If you've got some older blog posts that need some TLC or you just wanna take the time to make sure you're starting out on the right foot, I've got a FREE ebook for you!  This guide to revamp your blog is an easy to follow 10 page book filled with 5 simple tips to get your blog working for you.  Plus you'll be on the 516 newsletter list!

I hope this post inspired you to start making your Pinterest images in the palm of your hand.  Sometimes I think we put a lot of pressure on ourselves when we blog to have the best software, the best camera, the best gadgets when really there are amazing ways to get things done simply & easily.  I want to share all of that with you!  So check out more of the Boost Your Blog series here and get to blogging!

How do you create pinable images for your blog?  How do you save time & work efficiently?
xoxo, Moe

2.21.2018

App Review // PhotoMarks

One of my favorite apps to download are font overlay apps.  These apps that allow you to add text to your photos in a professional way.  I was contacted by PhotoMarks to test & review their font overlay app and let me tell you it is a great app to add to your arsenal...especially if you are a blogger!  This app has a feature I love - you can save different templates (known as profiles) so that you can add your branded text to images over & over again.  You don't have to start from scratch each time!  This is also great for adding a watermark or logo to you photos as this app supports an uploaded logo!

What it is 

This is your basic font overlay app.  You load a photo, add your text, save to your camera roll.  While this app doesn't have the most sleek design, it does have great function.  It is a very intuitive app.  If you've used any app to load or edit photos, you'll be able to figure this app out.  You can customize the appearance of your photos by adding text or logos - you can even upload your own logo.  
PhotoMarks from Bits&Coffee is an elegant solution for visually watermarking or annotating your photos. Easily protect your copyrighted images or add beautiful text comments to your photos before sharing on Instagram, Facebook, Twitter, Email, or other options.
With PhotoMarks you can completely customize the appearance of your text and logo marks. Working with multiple layers is an easy and visually pleasing experience. Brand, trademark, and copyright protect your pictures with ease!
The app costs $4.99 on ios and it seems there are no in-app purchases, so you're getting the full experience right off the bat!  Plus, there is a desktop version in case you're not one to go to your phone for this kind of thing!

What it does

This app allows you to create seamless, branded photos with just a few taps.  Supporting full resolution & multiple layers, this app is a powerful too for your social media presence.  The best part is that you can save your work as a template (known as profiles) and then load them later to keep with your consistent branding.  The mutli-layer function allows you to add different text options & logos for easy arrangement. Exporting to your camera roll is easy & the app supports sharing to social media.
PhotoMarks can be a powerhouse design tool right in your pocket.  It offers quite a few fonts to choose from so you'll be able to find a similar font, if not the fonts you may use for branding.  You can also easily upload a transparent logo to use over & over again so that your photos are protected.

How it helps you

Consistency is key when building your blog/brand.  I've mentioned the idea of a style guide over here on the blog before and I personally find it important to stick with your one to three fonts across your platforms.  It is very tempting to change things up, espeically if you're a creative person, but when people see a photo they should easily recognize it as yours.  
I'll say it again, the best part is saving a template to use again & again for your blog or social media sharing!  This is so helpful when you've got a quite a few blog posts written but need to make your blog graphics quick.  I use my phone for nearly everything when it comes to the blog.  I only write my posts on a computer & everything else - photos, editing, blog graphics, etc - is done on my phone.  That makes my blog work so easy for me.  So having something like this powerhouse app is wonderful for my productivity.  So if you've got a 9-5 like me you can take a lunch hour to edit photos & create blog graphics, then drop them into any blog copy you have written.,
I've only got two downsides to this app - it doesn't support custom fonts and it's not that pretty.  If you can't find your font in their extensive collection, odds are you can find something similar.  However if you use a custom font there is no way to import that font into the app.  If you're also down for a pretty app - an app that really inspires you to use it - you may find this app a little chunky.  It functions well and is a really intuitive app to use, its just not that pretty.  So if function is more important than form you probably won't be bothered.

All in all this app is a great standalone or companion app to the apps you already use as a blogger.  The logo upload option means you don't have to have the image saved to your phone at all times to overlay in another app.  And the template or profile option allows you to pull branded content in easily.  Super functional app!

Download PhotoMarks here & get your branding on!

xoxo, Moe