Showing posts with label drugstore make up. Show all posts

3.01.2018

Three Ways to Save Money While Building your Make Up Collection

I'd consider make up to be one of my many, many hobbies.  For me personally it's the thrill of the hunt (finding limited edition products or being the first to find something new on the shelves), the thrill of saving at the check out counter, and the thrill of the comparison.  Make up is really something I collect - of course I use it too - but it's fun to have a lot of things at your disposal when you want to play around.  It's also great to be able to find some amazing things for a great price, here are my 3 tips for saving money while building a collection:
this post contains affiliate links, please read my full disclosure here.

Clip your coupons and hunt for deals

The place I like to shop for drugstore make up is CVS mainly because of their coupon program.  I've written a post on it here but mainly you can join their beauty club and for every $50 spent you get $5 Extra Bucks to spend in the store.  Additionally, they have in store coupons that print when you scan your rewards card.  And you can stack a CVS coupon with a Manufacturer's Coupon with your Extra Bucks to get the most bang for your buck.  I shop at CVS for everyday things - cereal, tooth paste, anything really - to build up my extra bucks to buy beauty products.  This is a great way to try things you're interested in but don't really want to shell out cash for.  They also have really great sales every week.  The only thing I can complain about is the selection of some brands is very poor.  For example my CVS doesn't have a great selection of Wet n Wild.

Follow your favorite brands on social media & keep an eye out on places like HauteLook.  You can find amazing (& sometimes secret) sales but keeping up with the brands you love.  HauteLook also runs sales on some of my favorite brands - like the Balm - quite often.

Know the Best Drugstore Brands

When it comes to affordability there are a few brands that are on the top.  Wet n Wild & Eyes Lips Face (ELF) are the tops for me.  They are easily accessible, start off at a really low price point, and the quality pretty much rocks.  CVS often has buy one get one free on Wet n Wild and even if it's just BOGO 50% off, you're still getting a steal.  The Eyes Lips Face website is constantly running sales (really get on their 50% off everything sales) but they are also available at local retailers.  Here's the breakdown:  If you want an affordable foundation that lasts all day the Wet n Wild Photo Focus foundation rocks.  Wet n Wild has the best eyeshadows & lipsticks.  Plus, they are constantly releasing amazing limited edition items which can fulfill you're need to hunt.  Eyes Lips Face is probably found in your local Target or Walmart and sometimes at Walgreens.  In recent years the brand has expanded to be more readily available and their product lines have only increased in quality.  In this line the blushes are a good range for what is available in store.  There are also a few blush & highlighting palettes that really impress me.  You don't have to place an order online to get a good grasp of the brand, however there are far more things online than in stores.  Their brushes are amazing and if you're just starting out your brush collection picking a few of their Studio Line Brushes will really build your collection fast.  (Here is a video on the essential Elf brushes that you have to have!)

Shop the Holiday Sets

If you want to get the most bang for your buck when it comes to high end, or prestige brand, make up be sure to shop the limited edition holiday sets.  You may be spending $45 but you might be getting a $100+ value.  First, save you're money...then weight the odds.  Whenever I want to try a brand or try something new from a brand, I look at these sets.  You'll often be getting a steal and getting a good sampling of that brand.  Additionally you're often getting smaller sizes of products in these sets so you're not tied to something you might not like.  You'll either work through it quickly or not feel as bad passing it to a friend because you didn't pay full price for a certain item.

If you're worried about bulky packaging you can also depot the things you like into Z Palettes to maximize you're storage space.  Brands like Elf and Physicians Formula also do holiday sets at the Drug Store and often you'll get more bang for your buck that way.  My personal philosophy when it comes to holiday sets is to shop for what you want.  Because these things are so, so popular I like to snatch up the things that I would be really sad if I couldn't find after the holidays.  Then, after the holidays, I'll go shopping to find any leftover sets that might be on discount.


You can really save a ton of money building your collection if you're patient and you build your collection one or two pieces at a time.  It's easy to do this if you coupon, coupon, coupon.  I stop into CVS quite often to see what deals I can get with my Extra Bucks and MFG coupons and that way I'm only spending a few bucks at a time but building a collection of things to try!

What are some of your money saving tips when it comes to make up?

xoxo, Moe

9.12.2017

Beauty Review // 15 Minute Everyday Make Up Routine

I've been really, really, really trying to stream line my morning routine.  Since incorporating being more mindful in my everyday life, my morning routine has become super important to me.  It is a time for me, myself, & I to connect.  I've totally fallen out of the routine recently though.  I keep telling myself I can do it....but then I hit snooze.  (So if you have tips to get the hell up in the AM, I need them!)
this post contains affiliate links, please read my full disclosure here.
Putting on make up in the morning used to be a 100% go to for me.  Then it fell to the way side.  I think my skin got a whole lot clearer at some point in time and therefore I started giving less of a crap about make up!  My make up collection has been severely neglected these last few years as well.  I use the same products or types of products nearly everyday now.  And while I love that, I still want to purchase more products...but I don't find I use them.

Today I want to walk you through my 15 minute morning routine to get a fresh, fun face!  This is all drugstore too, so you won't break the bank!

The Base

One of the first things I do after I wake up is wash & moisturize my face.  I've been using products from doTERRA the promote clear skin.  After I wash, dry, spot treat, and moisturize I apply a primer if needed.  I haven't been using a primer recently but my all time favorite is this one from Rimmel.  I've been using it for ages!


The Foundation

In order to save time I don't do too much spot concealing.  I like to use medium to full coverage foundations in general so spot concealing isn't necessary.  The Wet n Wild Photo Focus foundation is perfect for this (review here).  I used to do a lot of color correcting as well, but using a more full coverage foundation also makes this unnecessary.
For quick application I use a Real Techniques sponge, using the flat bit to pat the foundation onto my face.  I use a bit of the Wet n Wild Photo Focus concealer under the eyes and as a primer for the eyelids.  The rounded side opposite the flat end is perfect for under the eyes & the other contours of the face.  To set it all, I use the Coty Airspun Loose Face Powder (review here) with the round side of the sponge.  Using one tool for my whole face saves time.

Complexion 

This is where we get into the multi purpose products I love so much.  Wet n Wild had a trio of blush, bronzer, and highlight one summer that I still use (#sorrynotsorry) but today I use the matte blush & bronzer duo in Figi from Eyes Lips Face.  I use a brush from this set on amazon for some light bronzing/contouring and a Real Techniques blush brush for the blush.  This set is great because both shades in the duo are perfect for my skin tone.  The blush is great for all seasons.  It makes the whole look no fuss.

Eyes & Brows

Eyes have already been primed with concealer & set with setting powder.  I use a crease brush to add a bit of definition with the bronzer.  If you're feeling feisty, adding a bit of the blush color on the lid will tie the whole look together.  This technique gives you a fresh, natural eye look especially if you don't have time in the morning!  
Brows are super easy with the Wet n Wild brow mascara.  This puts all the hairs in place and fills them in just a tad.  Then I use what ever mascara I have - this one is from Revlon.

Lips & Final Touches

To round out the look, I keep the lips simple with my favorite shade of the Wet n Wild Liquid Cat Suit in Rebel Rose.  Here is where I'll change it up if I've already got an idea in mind.  I'm not going to sit here for another 15 minutes deciding on a lip color!!  Some of my other faves include the Maybelline Super Stay Matte Ink Lip Colors and the NYX Lip Suedes.  Simple application & long lasting.  And of course, gotta add some highlight.  This one is from Make Up Revolution.
Recently, I haven't been using setting spray as my favorite isn't sold in America!! I love the Maybelline Super Stay Setting Spray that I got when we were in Amsterdam.  Zach should be going back here shortly.....so I hope he can bring a few bottles back for me!

So that is my get ready quick routine to have a fresh, natural face for work!  I've only recently been doing this routine but it has been working!  I love that this is a no fuss way to look put together in the morning.
I think the key here, though, is to find the products that work for you.  This has taken a lot of experimentation on my part (and created an extensive make up collection!).  I know what colors look best on me and what products make my life easier.  If a product is multi use, that makes my life easier!  I love using duos, trios, and face palettes - I only have to got for one thing instead of multiple products.  Anytime there are holiday sets or collections that come out I snatch them up!

I did time this and while I was taking the pictures and all in all it did not take over 18 minutes...so cutting out all the photo taking posing, and making sure I'm actually capturing what I want its got to be under 15 minutes!  Like I mentioned above, it's all about finding the best products for you to make your routine easier!

If you'd like a few more beauty posts, check them all out here!

How do you get ready quickly?  Any go to products you recommend?

xoxo, Moe

6.20.2017

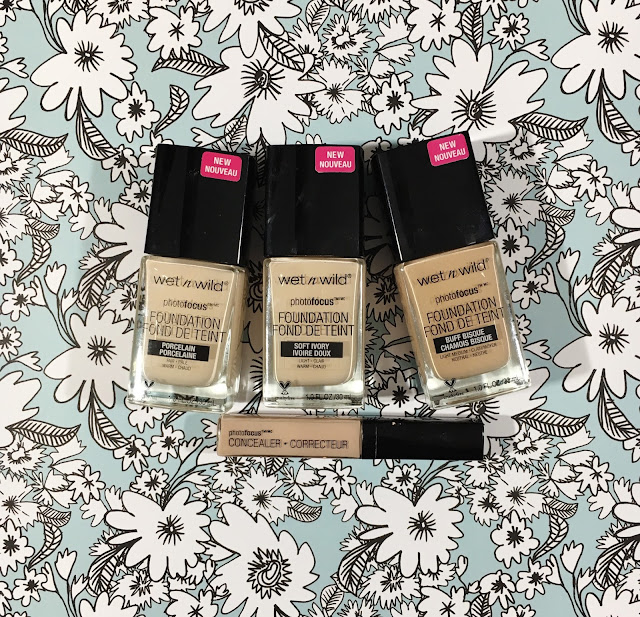
Beauty Review // Wet n Wild Photo Focus Foundation + Concealer

If you didn't know, Wet n Wild is one of my all time favorite brands from the drugstore.  Nearly every time there is a limited edition product from this brand I scoop it up.  I've curbed my makeup spending significantly over the last year or so - but honestly that is because I've found other interests!  None the less, Wet n Wild's new Photo Focus line has caught my eye.
Wet n Wild Photo Focus Foundation Review
I've had these products for quite a while and have to say I really do love this product.  You can't beat a great foundation under $10!

From the Website
Your skin, only better. Our new high-performing, skin-perfecting foundation underwent major road testing under seven different photo lighting conditions to deliver flawless camera-ready makeup every time. Specially made with a matte, light-diffusing complex to give your skin #nofilter perfection.

High-performing, breakthrough formula
Featuring light-adjusting complex to help prevent white cast in photos
Tested under 7 light conditions with and without the use of flash

taken from the Wet n Wild website here.

First Impressions & Application
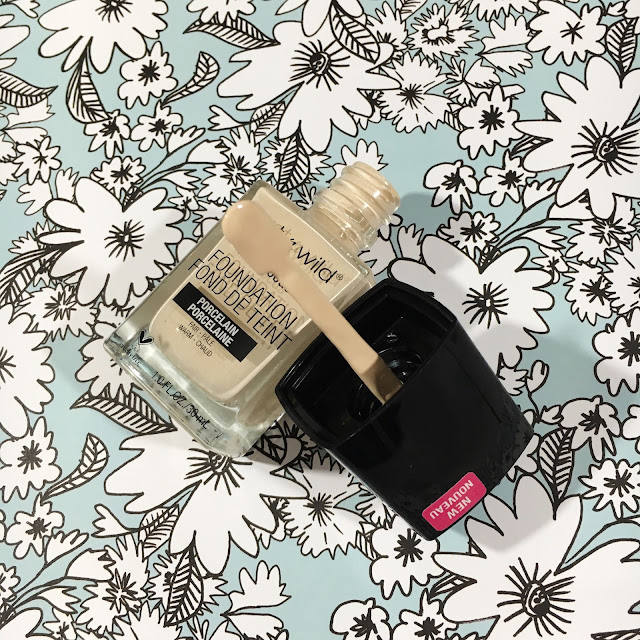
When I first opened the bottle I was a little surprised by the little spatula type deal that is attached to the cap.  At first it reminded me of the way the Maybelline Dream Wonder Fluid Touch foundation bottle is made.  The product is a little thicker than the Dream Wonder foundation, from what I remember.  Using the spatula was not the first instinct I had, for sanitary reasons, so I poured the  product onto a make up palette.  The consistency of this foundation isn't too thick, though thicker than the Dream Wonder foundation and the Fit Me foundation by Maybeline.

I applied this with my Real Techniques Beauty Sponge and love this application.  The sponge does soak up quite a bit more of this foundation that I expected.  I'd say it soaks it up a little bit more than something like a Revlon Color Stay or even the Wet n Wild Coverall foundation.  The Photo Focus foundation seems to apply similarly to the Dream Wonder - it applies thinly, feels like there may be a little bit of oil (not in a bad way!) in the product.  The foundation applies easily and blends seamlessly.  I was impressed with the coverage which is medium, yet buildable.  It also doesn't apply too cakey.
Wet n Wild Photo Focus Foundation Review
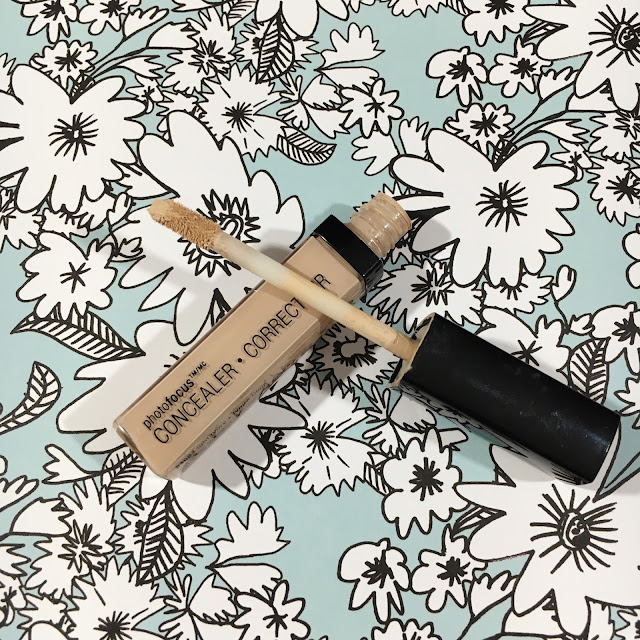
The concealer is nothing to write home about, pretty average at best.  It applies evenly, has a light to medium coverage (good for brightening), and is really creamy so it blends well.  My first impression is that it is average but I prefer the Coverall Concealer from Wet n Wild.  

I also want to mention a lot of people said that the foundation smelled like paint.  It was the very first thing they noticed when working with the product.  When I first started wearing the foundation I did not notice the strong scent.  However, it did become noticeable over time!  

Wear Time
I work a typical 8 hour work day.  I would say that this foundation, with powder (my favorite powder here), lasts up to 9-10 hours.  It actually beats the heat too.  I wore this foundation for this photo shoot and it stood up to the heat and a few outfit changes!  It even looked great for dinner afterwards.

This foundation has become my go to for long wearing, easy application.  Not to mention the price is amazing!  With oily skin, it seems only the higher priced drug store products have a good chance of staying on me.  I don't notice that this breaks down or separates.
Wet n Wild Photo Focus Concealer Review
As for the concealer - again, pretty average.  Lasted a good while, even through the heat.  All concealers crease on me at some point.  This one was just as good as any other.  The thickness of the product didn't feel heavy or move around on me.

Overall Impressions and Recommendations
If you have oil skin, I 100% recommend this product.  It does have a little bit of a weird, paint like smell so if you're sensitive to smells application may be hard for you.  Since it wears pretty well and the price is super affordable, I plan to go back to the foundation in the future!
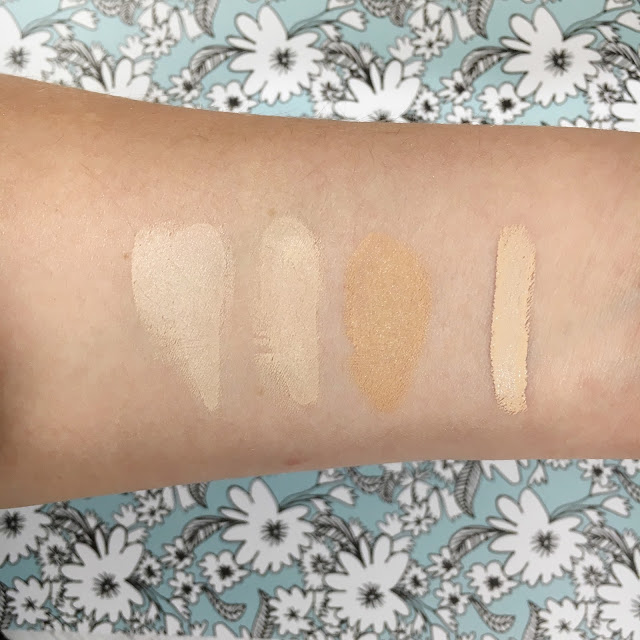
Wet n Wild Photo Focus Foundation Swatches
As for color range, the website says the shades go pretty deep but not too light.  There are 20 shades in all from porcelain to mahogany.   I'm actually surprised by the depth of the color range as I did not find shades too deep out in the stores.  I did check various Walgreen's - there is one by my work that carries very deep shades of all foundations - and still didn't see the darkest shades.  But if you can find these guys out in the wild, $6 for a foundation is affordable enough to grab two and mix your perfect shade.  This is exactly what I do.  It also mixes well with the Maybelline Fit Me Matte foundation.

All in all, I give this foundation a thumbs up.  Good coverage, long lasting, affordable, + a wide range of shades is all impressive.  As for the concealer - you probably have another one that is your favorite but this one is not too bad.  Nothing to get super excited about.

Have you found any drugstore favorites recently?  Anything super exciting?

xoxo, Moe

5.23.2016

Make it Monday // DIY Glitzy Stiletto Manicure

There are few things I love more than having an awesome manicure - my #planneraddiction is probably one, and so is coffee.  If I had a million dollars my nails would be on point every day (no pun intended).  I've been drawing a lot of inspiration from Jefree Star ever since I started following him on Snapchat recently.  I've always had a thing for those stiletto nails and even started wearing my nails in a really severe almond shape.  I've been wearing some press on/glue on nails from the drug store for probably about a year now.  Last week my manicure was a set of French tip nails from Kiss and I couldn't recommend those enough!  This week I thought I'd try something new - a little bit of bling and little bit of a stiletto.
 
(this post contains affiliate links, please see my full disclosure here)

I've done this mini stiletto nail before (not sure if I'd ever showed it on any social media) but these nails make for the perfect base.  And the best part is they are super affordable from your local drug store.  I suggest checking out CVS and using your Extra Bucks for some awesome discounts.  They are called Active Oval, but they are more almond to me.  And that shape is perfect for filing into a tiny, mini stiletto point.  I could not function if I had a full stiletto nail - I would not be able to type at all - so the little mini point is cute and interesting.  This shape, I think, is great for long fingers - especially if you want to emphasize the length.  It might be weird but I love how alien they kind of look!!

So anyway, I got together some supplies and I'm going to show you how I did it

Supplies // oval or almond shaped glue on nails (I prefer these from Kiss , nail glue (if not included in your kit), base coat, top coat, coordinating colors of your choice - polish, glitter, rhinestones (I used craft glitter and craft rhinestones from the craft store), file, quick dry spray
 
Begin by picking out the nails to best suit your fingers.  There is a trick to this - you don't want them too wide and you don't want them too narrow.  Once you find a nail that fits your finger, find the size smaller and see how that looks.  If the first one looks better choose that one - but I often see others with glue on nails like these where the nail is way too wide for their finger.  The more natural the nail looks the better.  You may find you have to file down around the edges to make the nail fit your nail bed better.  Take the time to do this step!  This is especially necessary if you find you've run out of the nail size that fits a certain finger best.  This step will ensure that you have the best fitting and most natural looking nails glued one.

If you're a pro at applying glue on nails, go ahead and do your normal routine.  I use a file to scuff up my natural nail a bit so the glue will adhere better.  Lay all the nails out in the order they will be applied and begin to apply them one by one.  I start with my thumbnail on my left hand - I apply glue to the back of the nail then place the nail on to the nail bed starting at the cuticl and sort of rocking it down.  For me, this give the best adhesion.  Continue until all nails are on your little fingers.
 
Begin to shape the nail into a mini point with the file.  Follow the natural angle of each side of your finger to create a nice point.  Shape all the nails into a mini stiletto.  Do not file too much at once but alternate the filing from side to side to get an even point.

Paint your base coat.  Choose the nails that will be covered with glitter, paint every nail except for the ones covered with glitter in the polish color of your choice.  Choose the nails that will remain rhinestone free, paint the top coat on all nails that will remain rhinestone free.

Glitter Nails
Make sure you have a place to make a mess with the glitter!  Paint the top coat, one nail at a time, on the nails that will have glitter.  Pour the glitter over the nail, tap off the excess.  Use the remaining glitter to repeate the process on each glitter nail.
 
If you find you may need to add more glitter, pain the top coat again, pour the glitter again, etc.  If the glitter gets everywhere - which it probably will - use a paint brush to dust off the glitter around your cuticle.  One you are satisfied, paint the final top coat over the nails.

Rhinestone Nails
This one may be a little tricky.  Squeeze out a little bit of glue onto your plate, using the toothpick dip it into the glue then pick up a rhinestone with the glue end of the toothpick and place it on the nail.  Fill the whole nail or do a strip down the middle - it is up to you.  Repeat with however many nails and whatever design you prefer.
 
Once everything is done, if you haven't already, go a ahead a spray the quick dry spray onto your nails.

Now you have a crazy glitzy mini stiletto manicure!  It might be crazy but it's definately worth it!

What is the craziest manicure you've ever had?  Do you find it super fun to play with your nails?

xoxo, Moe

3.08.2016

Beauty Review // Coty Airspun Loose Face Powder

I've been trying to start this year out right by switching around my daily makeup every month and putting up my Makeup Baskets on my YouTube channel.  So far so good!  I found a product in the depths of my makeup collection - the Coty Airspun Loose Powder.  And it has changed my makeup game.  I remember using this waaaayyyyy back when and I've discovered a brand new way to use it.  It keeps my makeup on all day long!
From the Website
I can't find an actual website for the product, though this is the Coty website.  So this information is from the back of my packaging:
Featuring an exclusive Microspun formula where loose powder particles are spun and swirled until the reach a cloud like softness.  This ultra smooth powder hides tiny lines, wrinkles, and blemishes, and gives a new softness to your skin.  Use to set makeup or as a foundation.  Long lasting.  Dermatologically tested.
First Impressions and Application
First off - if you do not purchase the unscented version, be prepared to smell like an incredibly floral grandma for a bit.  Secondly - this powder is very, very messy.  The powder will go everywhere, believe me.
When I first purchased this powder way back when I used it set my makeup with the puff that is provided.  I pressed it all over my face to create a visible layer then used a powder brush to sweep off the excess.  I wasn't too impressed with this application.

Most recently I've been applying the powder with a damp beauty sponge - the Real Techniques Miracle Complexion Sponge.  This sponge has many sides perfect for various applications.  I use the flat side of the sponge for foundation, the pointed side opposite the flat side to blend in concealer, then the flip side (the long, smooth football side) to pick up the powder.  This long smooth side has a lot of surface area to pick up the powder plus a pointed side to blend the powder under the eye.

I use tapping motions to blend the powder into my skin, much like one would tap in foundation with a beauty sponge.

Wear Time
I find with a good primer and good, long lasting foundation this powder can give me a full 8-10 hours of wear.  At about the time my face starts to show oil (the 3 or 4 hour mark) my face still looks fresh.  The foundation hasn't worn off and there is very, very little oil showing through.  My face looks fresh, it is really nice.  By the end of the day a super close up of my face shows a little bit of breakdown, but not too much.  I'd say that even a photograph wouldn't pick up on the break down!  It is super impressive to get home after having my makeup on for 10 hours and feel like it is just starting to show some breakdown.

Additionally - trying to get this off with just a makeup wipe is crazy!! The product is definitely stuck on your skin and you'll pull your skin before you can get it all off!  A good cleanser is required for removal...but I'm not complaining!
Overall Impressions and Recommendations
All in all I would suggest you picking this up if you need your makeup to last a crazy amount of time.  The Translucent Extra Coverage shade that I have still shows up a bit pink on my skin but blending down the neck helps with that.

There are a few shades so it might take some trial and error to find your correct one and if you can find the unscented version, I'd go with that.  Mine has the scent and I've gotten used to it (sort of).  I still plan to use it because it has amazing lasting power!!

Are there any rediscovered products you'd recommend?

xoxo, Moe

2.09.2016

Beauty Review // Affordable Drugstore Contour & Highlight

There have been a ton of new releases at the drugstore recently and I honestly can't get enough.  I am a drugstore beauty girl at heart and love picking up brand new things.  Today I want to share with you two affordable ways to highlight and contour using Wet n Wild products!  Both, I believe, are reformulated, re-releases - the highlight and contour duo is a reformulated version of the previous highlight and contour powders they released (I believe) in 2014/2015 and the shimmery highlighting palette is a new format of the Mega Glow powders (I'm pretty sure).  Either way these products have the brand new label at the drugstore and I think they both are they bomb!

This is going to be a different type of review on these products - I usually follow a different format in my previous reviews, but this is going to be more about the process and showing how to incorporate products into a routine.  Plus I'd like to do some posts featuring brushes to use or brushes that might be helpful for different products.  Hope you enjoy!

The Products
The Wet n Wild MegaGlow Contouring Palette in Dulce De Leche features two amazingly soft, blendable powders.  The powder on the left is a lighter powders - ideal for lighter skin tones - that can be used to set the under eye area and the center of the face, or any other areas of the face that should appear brighter.  The powder on the right is a deeper brown color that lends more neutral - not too orange or too ashy.  This color is perfect for creating a sculpted look.  Each powder is very, very buildable and blendable so there isn't a risk of packing on too much color.

The bushes I use with the Contouring Palette are the Elf Complexion brush for all over bronzing & contouring and the Elf Blush Brush to set the highlighted parts of my face.  Each brush is affordable and can be found either online on the Eyes Lips Face website or in stores (Target, Walgreens, etc.)

The MegaGlow Illuminating Palette reminds me of the smaller illuminating product the brand used to have featuring a similar stripe pattern.  There used to be a few shads of this product, but this seems to be a rerelease of this product.  I can't find this newer face palette on the Wet n Wild website.  This new palette features a wider surface area for each color and it is easier to target the color you might like to use.  Again, these powders are soft, buildable, and blendable for easy application.

The brush I love to use with any highlighter is the Elf Small Tapered Brush.  This brush has a smaller egg shape and is perfect for placing & blending the powders.  I have not seen this brush other than online at the Eyes Lips Face website.

The Swatches
rigth - highlighting powder // left - contouring powder
Wet n Wild MegaGlow Illuminating Palette in Catwalk Pink

The Process
After applying foundation but before setting the rest of the face, I use the flat side of the Elf Blush Brush to pick up the lighter powder in the contouring duo.  I gently place the powder under my eyes and down the center of my face.  Using a transparent powder, I then set the rest of my face.
Using the tip of the Elf Complexion Brush, I pick up some of the deeper shade in the contouring palette.  I start off by working the color into the hollows of my cheeks the up around my temples and hairline.  Then I work any excess beneath my jawbone.  This brush applies just the right amount and allows precise placement but also the ability to blend with out switching tools.
The broader side of the Elf Small Taper Brush is perfect for picking up highlighter.  I usually tap the brush across all colors of the Illuminating palette and then place, in a sweeping motion, the highlighter on the tops of my cheek bones.  I work any additional product up above my browbone as well.  This brush is perfect to build up the color.  I then use the pointed tip of the brush to blend in circular motions.  This creates a better blend between all of my face products.

Overall Review & Recommendations
These products impressed the pants off me.  If you're just getting into highlighting and contouring this contouring palette is my top recommendation.  It is under $5 at the drugstore and the quality is on point!  

While I do like the illuminating palette, I do thing the Fergie Center Stage Collection Shimmer Palettes are much better highlighters.  Plus, there are an assortment of colors in the shimmer palettes.  This Illuminating Palette is not a drugstore must have for me - there is a better option with in the brand, plus Elf has great highlighter options.

Hope this little review was helpful!  I have a ton more products I want to at least mention on the blog!!

What are your drugstore must have items?  Any new releases you're in love with?

xoxo, Moe

1.26.2016

Trend Tuesday // CoverGirl TruNaked Palettes Swatches

I can't get over the amount of nude inspired drugstore eye shadow palettes that are hitting the shelves right now.  First we had the Maybelline palettes (reviews/first impressions here & here), the it was one from L'Oreal (see it featured here), then Revlon (GRWM video here), now.....we've got CoverGirl.  
CoverGirl release at the beginning of 2016 the TruNaked Eyeshadow Palettes and I have to say they are the bomb!  I only have two to swatch for you today because for the life of me I can't get my hands on the Nudes shade - every where is sold out!  Each time I come upon an empty display my heart get's broken a little more.  
These palettes are so much more compact than their earlier counter parts - much smaller than the L'Oreal La Palette Nude, the Revlon ColorStay Not Just Nudes palettes, and the Maybeline The Nudes palettes.  And they have much better quality - in order of preference I'd say CoverGirl, L'Oreal, Revlon, Maybelline.  On the lid of the product it even says 'shades like a leading $50 palette'!  While I don't have any of the Naked palettes, I do believe you can achieve the same look.
If you're down for the rosey pinks of the Naked 3, totally pick up the TruNaked Roses palette.  There are three matte pinky-mauve shades.  The lightest one is Almond and a mid-tone one is Baby, and the deeper one is Copper Rose . Oh yeah, these palettes also have shade names!!!  There is no matte highlight shade in this palette only an extremely glittery/shimmery pale, pale pink.  All other shades are very shimmery/glittery yet I haven't notices too much fall out.  The colors are all very unique to each other - nothing seems overly similar - even the deepest shades have something unique about them to differentiate them from each other.
If you have more bronze skin, I think the Goldens palette would be great.  This one features two matte shades again - one for the crease/transition is a soft, midtone brown and one as a matte highlight/browbone shade.  The rest, again, are all shimmery/glittery.  I love the bronzes, golds, and olive greens in this palette and think this one can actually create a more dynamic look that the Roses palette.  You can get a golden, a bronze, and an olive eye look distinctly from this palette.  From the Roses palette I see only variations on the rosey eye look, nothing too standout-ish from each other (if that makes sense.
The texture on these is wonderful.  It's what you'd like a drugstore palette to perform like!  I want to say they aren't as soft as the Lorac shadows, but I don't have the Naked palettes so I can't compare texture there!  Each shade applies and blends well.  And I've noticed that they stay on well into the day.  A super plus!

I have to get my hands on the Nudes version of this palette!  I think it will be the perfect go to look for me because I've been super lazy recently.  Man, these swatches really get me!

Have you tried the TruNaked palettes?  Any tips?

xoxo, Moe

9.08.2015

Trend Tuesday // Five Eye Palettes for Fall

If there is one thing I love, it's a good rosey pink eye palette.  There are quite a few of all rose gold or all mauvey pink eye palettes in my collection and I can't wait to bust them out for the fall.  Who am I kidding, I'll bust them out any time!  I have however been neglecting my eye palette collection.  For the last few makeup baskets I've posted I've only been using singles or some quads from the drugstore.  I want to break back into some of my most love palettes and bring out some that I've only tried a few times.  Each of these have rosey tones and some great complementary shades to create some great fall looks.
this post contains affiliate links, please see my full disclosure here
L'Oreal La Palette Nude 1
I've only busted this one open a few times.  I think I had it in a makeup basket once, previously, but I was impressed.  It is fairly expensive for a drugstore palette (however I would recommend this one over the 10 pan palettes from Maybelline - I've got a review here and a first impressions here).  This palette has an assortment of mattes and shimmer shades - in the perfect combo.  The three matte shades are beautiful blending shades plus a great deep brown that can create a wonderful nude smokey eye.  The lightest shade on the far left is actually a shimmery shade and not matte as the picture makes it look.  Each of the shimmery shades are more like a satin finish where as that lightest shade looks like there's some glittery bits.  Not bad - just not matte and not like the other shimmers!
These pans are huge for any palette and the color payoff is great for a drugstore palette.  The shades can go from subtle to buildable.  If you can get this on a 40% off sale at Ulta or even part of a buy one get one 50% off (make sure you pick up the other La Palette Nude 2 to get on for 50% off!) I'd suggest it.

Lorac Pro 1 Palette
This is a staple palette.  If you ever get the chance to get a Lorac palette - do it!  I have the 1 and the 2 and some other smaller palettes and love the quality of the eyeshadows.  So buttery, so pigmented.  If you're afraid of applying too much eyeshadow you'll need a light hand with this!  The top row is all matte and the bottom row is all shimmer.  These shades do kick up a lot of powder and as you can see the palette gets super messy - I can't keep it clean.
The shades in this palette are great for fall.  Not only is there a mauve matte shade - my favorite blending shade - there's a coper, an orangey color, and I love the gray.  These shades don't blend away easily and you'll get a distinct look between each shade.

Exposed 3
This is a super close dupe to the Urban Decay Naked 3 palette.  I picked this on up on Groupon in a set of all there Naked palette dupes - Exposed 1, 2, & 3.  This is made by Beaute Basics and really makes me want the Naked 3.  The palettes are actually on Groupon currently, though not in the deal I got but still for a pretty great price.  (Additionally if you sign up for Ebates there is 6% cash back at the time I'm writing this post...hot damn!)  Anyway - this is a go to palette for an all rose gold look.  This palette has 3 matte shades as well - a nice highlight shade, a nice rosey mauve, and a deeper brown-mauve.  The other shades are shimmery, not chunky glitter.
The color payoff is awesome for the price as well.  I would say it is better than the L'Oreal La Palette Nude but not as great as the Lorac Pro.  Very decent for a beginner and way more affordable (if you grab in on a deal!) than the Naked 3.  I was reaching for this palette until I got the smaller version - the Wet n Wild Smoke and Melrose palette from the drugstore (it is great for travel). If you have that in your collection you can totally get a great rosy look as well.

Too Faced Chocolate Bar Palette
This palette has a bunch of different tones for fall.  I love the shade that I believe is called Peanut Butter.  It is the burnt orange shade in the middle, on the far left.  There are deeper rosey shades in this palette as well.    There are 5 matte shades - including a large matte highlight shade - and 11 shimmer/glitter shades.  The gold in this palette is to die for and would be a great look for fall.  
If you're into neutrals with a pop of color and shadows that are very easy to work with, this is your palette.  The color payoff is also amazing on these shadows with out blending away.  These can be built upon to get a more intense look and the deeper shades can create a smokey look.

Ulta Rose Gold Palette
This is a new one to hit the drugstore and it is also a take on the Naked 3 style palette.  It is structured almost like the Lorac palette in that the top row is shimmer and the bottom row is matte. This one has a lot of shade similarities to the other palettes listed - there are a few mauve blending shades, a gold, a matte pink, and a great champagne color.  The shade Breathless is a beautiful matte brown.
These shades perform well, too.  They are easy to work with, easy to blend.  They aren't as smooth as the Lorac shadows but perform as well as the Too Faced Chocolate Bar palette, I'd say.  You won't get a multitude of looks with this palette though - the shade range is pretty one dimensional.  You have the lights and then the darks. You can get a distinct natural look and a distinct deeper, smokey look.  Not really the dynamic palette like the others listed but still pretty great for the drugstore!  If you're into being not intimidated - this is a great palette.

I've mentioned before in this post on saving money on cosmetics, but Ebates is the way  to go for saving money on cosmetics online.  Ulta is currently having 3% cash back through Ebates and then if you use the $3.50 off $10 for the drugstore products...you're on your way to saving $$$$.  I'd see if you can find like the Lorac Palette on other sites that may have more cash back through Ebates.  Sign up here.

What do you recommend for Fall?  Any go to looks you have?

xoxo, Moe

*all of these palettes were purchased by me and all opinions are my own.

5.12.2015

Trend Tuesday // Top 5 New at the Drugstore

Spring has definitely sprung here in NW Indiana.  I know I said that before and then it snowed that same day....but I promise...there should be no snow until like October.  So I'm good for a few more months.  I am so happy to come out of the Winter months.  My skin is still a bit dry though and I can not take it.  I'm still using the Aveno Daily Moisturizing Lotion mentioned in this post but I'm waiting for the day that it is so hot and my skin gets so oily all my make up seems to slide off.  Sometimes there's a little learning curve when you're coming out of or going into new seasons!
I've picked up some new make up over the past 2 months but I've just now gotten back into using it.  I've really just been doing concealer and a bit of powder (gasp!).  Coming from a full coverage gal...that's big.  I'll be sharing my fave quick concealers in another post, but here are my current top five favorites that are new at the drugstore:
I love the colors in the L'Oreal La Palette Nude.  Honestly, this is what I want in a drugstore palette (cue reviews of the Maybelline The Nudes Palette and The Smokes Palette).  The colors are great and they have a great shade range - meaning they don't blend together and each color has individual characteristics.  There is a matte light mauve/brown shade (third from the left) that really gets me.  That's my type of shade!!

Also the full coverage of the L'Oreal Pro Matte foundation rocks my world.  The two shades I have are 101 & 102 and I know I'll be mixing them to get my perfect shade when I hopefully start to get a little more tan.  But I've been loving the minimal blemish-only-coverage the NYX concealer palette gives.  The concealers blend nicely and I don't feel like I just have bits of concealer.  For bright as hell highlighting you should definitely check out the Wet n Wild Come Correct concealer.  The lighter shade is BAM highlighted but the texture reminds me of the IT Cosmetics Bye Bye Undereye so the coverage and staying power is awesome.
Finally, I love the simplicity of the Wet n Wild Velvet Matte Lip Colors too.  At first I really didn't like the shade Pinky Candy (all the way at the right there) because I thought it didn't show up well...but now that we're in the Springtime months I think I'll like the subtle pink more.  They apply so smoothly and last pretty long but the packaging isn't that great.  The product will fall out of the tube...so don't turn it upside down!

I can't wait to get into the Summer time make up now too!

Have you brought out your warm weather make up?  Any new favorites that you have?

xoxo, Moe.

3.24.2015

Beauty Review // Favorite Spring Make Up from the Drug Store

The snow has melted, finally, and I am so ready to bust out the make up for Spring.  I did a bit of a transition into the bright, springtime colors in my March Make Up Basket but can't wait to put together a fun spring look for my channel as well.  I'm was going through my make up to decide on what I should include in my April basket and decided to put together a really pretty collection of spring time make up in case you're in the mood to do some drug store shopping now that the weather is warmer:
For me, spring is all about the bright lip and cheek colors so I like to keep the eyes neutral.  I feel like all fall and winter long we were doing the deeper eye colors - smokey eyes, cranberries, deep reds, etc - and right now I want to lighten it up a bit with some neutral shades.  I am all over the matte look for springtime eyes so I love the Physicians Formula Matte Eye Shadow Quads (review here) because of the range of matte shades.  However, if you're looking to add some shimmer the Sonia Kashuk Eye on Neutral Shimmer palette has a great variety.  This palette has the deeper shades....if you need them.  The shade are pigmented and smooth but do kick up a bit of powder.  I love the lighter shades for a pop of shimmer in the center of the lid.
Now we're getting into the fun stuff - the cheek products.  Milani released these Rose Powder Blushes in a Limited Edition set last summer and I think the summer before that too - but these babies are permanent now.  These are two great colors Tea Rose (open on the top) is a really nice neutral-ish pink.  If you're scared of pink I would suggest this one because it's not going to be too bright pink even thought it looks scary.  I also love it because it has that slight tint of periwinkle which has to be one of my favorite colors to see in cosmetics!  The next blush is Coral Cove and this would look amazing on deeper skin tones.  It is definitely that pop of orange!  Each of these blushes is matte and really silky.  The rose relief won't go away too fast either....I have one from the original collection two years ago and it still has the rose design.

At the top of the image there are my two favorite powder highlights from the drug store, both from the Wet n Wild line.  On the left is the Wet n Wild Color Icon Bronzer in Reserve your Cabana.  It is s super light, champagne shimmery powder that reminds me a bit of the Hourglass Ambient Lighting Powders.  It is smooth and soft and just applies a light pearly highlight - nothing too shimmery.  It does kick up a bit of powder though but looks gorgeous on your cheek bones.  The second is the Wet n Wild Fergie Center Stage Collection To Reflect Shimmer Palette in Rose Champagne Glow (review of all the Shimmer Palettes ever here.)  These remind me of the MAC Mineralized Skinfinishes (I have the one in Lightscapade and boy is it dreamy) and kick up a lot less powder than the Color Icon Bronzer.  The Shimmer Palettes are much more glitter - they give that wet look with a little bit of fine shimmer - while Reserve your Cabana is more of a sheen - it is more reflective than it is shimmery, there are no little glitter particles.  I definitely think that the Shimmer Palettes are more comparable to a Mac Mineralized Skin Finish and the Color Icon Bronzer in Reserve Your Cabana is more like the Hourglass Ambient Lighting Powders.
My absolute favorite part of spring and summer is the bright lip colors.  I will keep a neutral eye and a neutral blush but go for a POW on the lips.  On the far left is a new line from Maybelline, the Rebel Blooms collection.  This is the shade Orchid Ecstasy and it is a really pretty pinky-fushcia-purple (the image makes it look really dark, but it really more of a true purple color in the tube.  These lipsticks are rather glossy and more sheer than my favorite line from Maybelline, the Vivids line.  The Rebel Blooms collection have a lot of fun colors but I chose this one because its a great, easy way to wear a purple lip with out feeling like you can't pull it off.  I love that this collection has a translucent purple cap...purple is my favorite color!  If you're down for a full, opaque bright lip I'd suggest the Maybelline the Vivids line.  Pictured above is the shade Pink Pop.  This line has a bright orange, clear top and is really fun to look at in the store.  The shades in this line are very opaque - one swipe is full color.  They are still glossy, just more full color and really comfortable to wear.  Personally I blot off the glossiness to have a bright matte lip.  Pink Pop is a true bubblegum, Barbie pink perfect for the springtime!

The next in the image (second from the right) is the new Wet n Wild Balm Stain in Redioactive...how clever.  This is my new favorite lip color.  It is the perfect bright pink, corally, red color.  I think it is really unique to the drug store.  These Balm Stains are super long wearing.  When you first apply them they have a nice gloss to them while giving your full color.  However, they leave behind and intense stain that lasts a good chunk of the day.  The stain left behind is also full color...so don't worry!

Finally, I love to play with the LA Girl Glazed Lip Paints (other colors were in my Favorite Summer Lip Colors here.)  This one is in the shade Peony and it is the perfect light, peachy-pink color. (This one was hard to photograph too, the packaging is more of a true bright coral peach color) These are really glossy and rather runny and are best applied with a lip brush.  They are a little bit sticky but I find that these lip colors last for a few hours.  Some colors even leave behind a little bit of a stain - but this one is so light you might not be able to tell depending on your lip color.

Hooray for spring time!  I can't wait to put together my April make up basket and really get back into the swing of things on my channel.  My goal is to continue with videos every Monday, Wednesday, and Thursday like I was doing at the beginning of the year.  Here's to making that happen!

What is your favorite drug store look for spring?  Anything new and excited you've added recently?

xoxo, Moe.

ps.  Read more beauty related posts here.