Showing posts with label blogging organization. Show all posts

12.23.2014

Three Inspiring Blog Planning Notebooks

Blog planning is something that I find so fun to do.  The one reason why I love it is because it is so fluid.  Depending on the attitude you have towards your blog, you can plan away and stick to the plan or plan away and then move things around.  I'm more fluid in my planning because I know there is a thing called life that I have to live (bummer, right? Just kidding!) and sometimes things get thrown out the window.  I like to plan out the month with what I'd like to do and then if it happens great....if I live my life and something else happens, that's great too!  So here are three inspiring blog notebooks I found while searching Pinterest for some blogging inspiration.
This crazy old post from the blog A Beautiful Mess is super inspiring!

Why I Like It:
I love the creative fluidity of this notebook.  It's totally customizable because of the rings - you can move pages here and there.  This also adds to the fluidity for me.  I love the sticky note idea to sketch out an idea and move it around the notebook in the various stages of planning.  You can also color code your notes making it ever more organized.  I also l
the hand written tabs.  This takes creativity to another level.  I think in your planning you do have to be creative as well...that is where you can draw some inspiration when you're feeling uninspired.

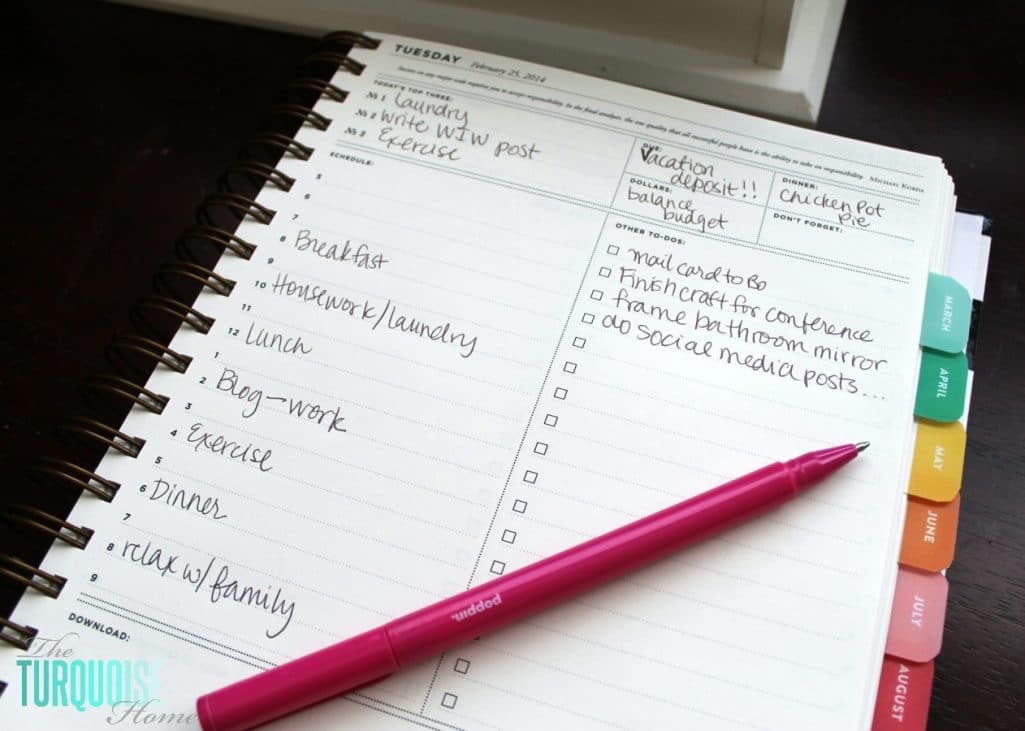
This daily planner from Turquoise Home from her post on being an efficient blogger.

Why I Like It:
When I was unemployed a looong time ago I was working all day on my blog and my various shops.  If you're a blogger thinking of taking the plunge into full time blogging an hourly breakdown of your day can really keep you accountable.  This split page design has the hourly breakdown on the left and a to-do list on the right.  I found that the hardest part about not having a boss was having no one to be accountable to.  It was the realization that I had to be the one to set the schedule and then I also had to be the one to fulfill it.  I also like the to-do list because I often forgot to focus on social media so adding this as an important check mark means you're going to focus on it every day.

This amazing planner in a Moleskine from Andrea.  I first saw the photo above on her instagram account.  You can read about here blog planner here.

Why I Like It:
If you head over to her blog and read her post on her planner you'll get a lot more info that just this picture.  I like this blog planner because it is a place for all things blog.  She created an index so she'd be able to find everything that she puts in this notebook.  She also has the photo sizes for her photos at a quick glance at the front of the notebook.  Doing this means you'll always have your blog style guide at your finger tips.  You could also throw in any hex codes for colors and a list of fonts and standards for your blog planning.  I also like that she has a monthly calendar.  I plan my posts much like she does - map out the reoccurring posts for the month so you have a place to start.  On the opposite page is sort of like the bullet journal system (a concept I really want to get into!) with the dates and posts she's working on.  The black & white lover in me really finds inspiration in the simplicity and organization of this planner.

I am thinking of moving my blog planner out of my Filofax even though I really do love having all my planning all in one place.  I may just add some graph paper so I can do set up like Andrea's.  I've already started something like that for my YouTube channel planning.  I just love planning!

If you want to see more of my blog planning process you can read these posts: My Blog Planner (an old post from 2012!), My 2014 Blog Planner (my first ring binder type of planner), Functional Ways to Use Project Life Cards in your Planner, My Blogging Kit 2.0.

How do you blog?  Do you plan with pen and paper or just go with the flow?

xoxo, Moe

9.18.2014

Boost Your Blog // Three Important Blog Tips you Might not Know

I'll be the first to admit that Blogging is a personal journey.  Your blog is an extension of you, your likes, & your personality so it's going to reflect you in the design, the posts, the layout, etc.  I do this Boost Your Blog series to help your blog reflect the best of you because ultimately it's on the web for others to read & if you'd like to gain readers, somethings are consistent through all blogs with a readership.  In this post I want to bring it back to the basics - I'm not going to talk about HTML, design tips, or the pros & cons of platforms - I'm going to bring it back down to 3 extremely basic things that will improve the over all look if your blog and bring up to par with other blogs that you may love.
Bump Up Your Blog Posts
There are three things consistent in all popular blogs:  image size, font readability, and use of tags or categories.  Here's how they relate:

Image size
The biggest way you can make an impact on your blog is with photos.  And besides taking well lit, well composed photos your photos should take up the full width of your blog post.  It's more pleasing to the reader and visually inspiring.  To figure out the width of your post area is really simple if you're using Chrome as your web browser:
Scroll down on your blog, find a chunk of text, and right click.  Select Inspect Element.  Once the crazy box (thats a technical term) shows up at the bottom, hover over the lines of code until the text you just right clicked is highlighted in a box.  The first number, in the sequence 000 x 000 is the width you should make your photos.  For example, 666px is the width I should make my photos.  (You can also google to find out how to find the correct widths in your specific template or platform.)
Now, you can resize your photos in your editing program of choice and select original size when you upload your photo to Blogger.  Or you can go into the HTML side of your draft post and change the width section to that number (like the image above).  Then delete the height section so it doesn't give you a skewed image, your image will automatically fill out to be the correct height.  Do this step after you've uploaded your image.

Giving your image the same real estate that your post body takes up gives the reader a more pleasurable experience.  I also tend to only take landscape or square photos as I find long, portrait photos to take up too much space & not balance nicely with my bodies of text.

disclaimer: I don't follow my own rules here! My images on my blog are 640 px.  So sue me ;)

Font readability 
This one is also important for the comfort of your reader.  Have you ever tried to sit for a while and read cursive handwriting?  It can all run together, can't it?  Limit the frilly, handwritten fonts in your design.  Use them only for a blog header or accents.

Additionally, consider how the body of your post looks.  It is easier to read a sans serif font at a lower size than a serif font.  Currently (at the time of this post because I change up my design quite frequently) I'm using a serif font in my post body.  If the size were scaled down less than 12px it would be harder to read.  If it were a handwritten font it would be even harder to read at this size.  Sans serif fonts are the easiest to read at lower font sizes.

I chose to go with this serif font, however, because I love the way the font looks when it is italicized or bold.  It gives a different texture to the page...so that is another thing to think about when picking your font.

Use of Tags
This next tip is about organization.  A lot of the times in your blog you'll want to categorize your post as one that might go into a series of posts.  This is where the tags or labels option comes in.  When I first started blogging I believed that the labels section of my post was there for me to list every single word that could describe my post so it would show up in search engines.  That is not the case.  The labels section is there for you to create categories for your blog.

Try to limit the number of categories you have so that you can find the posts all related to one category later.  I have nearly a million because I started this too late!  Create a list separately of the types of posts you do and file your posts under only a few of those labels.  If you have too many you may forget which labels you've put things under and posts may get left out (I'm guilty of that with too many labels!)  It creates a better experience for you when you are trying to link to a series of posts and allows readers to search under a certain tag to find what they are looking for.

These three tips are some of the basic things that will get you off to a good start in blogging.  Creating an organized space visually will keep a reader interested in your blog for longer!

What are your three tips for blogging that get over looked?  Anything you instantly notice when reading a blog for the first time?

xoxo, Moe

3.13.2014

Getting Organized // 2014 Planner Organization

I've touched on blog planning here before & honestly I love it but honestly I gave up on it recently.  Most recently I decided not to push my self into hating my blog - so I posted about being flexible, about posting when I want & what I want, and most importantly not posting if I don't want to or am not inspired to.  I would love to take this blog to a full time job thing (and even tried it & was loving it! and sort of miss it) but I don't want to end up feeling disconnected from my blog and I have in the past.  I don't put a lot of emphasis on number & followers, but I think the reason I tend to hang around the same amount of followers for a long time is because if I get too big, there's too much responsibility.
This blog is for me, honestly - for me to share things in a genuine way & hope someone finds it comforting or relatable.  Anyway, that's not the point of this post.  The point of this post is my renewed interest in planning.  Not just blog planning but life planning.  I thought I'd share with you a little video planner tour and then share with you what I'm doing & what I'm planning.  Onto the video:

(don't forget to watch in HD!  Let me know how you feel about this vid, I'm not sure the quality of my vids is really coming across here!)

Some of the most important things in my planner are as follows:

Color Coding
Like I mentioned in the video - prettifying my planner is not what I'm trying to do here. I'm not going to spend hours making in beautiful with each week having a theme.  Nope, I'm here to plan.  But that doesn't mean it can't be colorful.  I actually dismissed the color coding thing at first but then agreed that its the best way to see what's happening at a glance.  I also like my color associations - yellow for family because yellow highlighters mean most important to me & family is important, pink for blog because why not, orange for goals because they are important & orange is another important color to me, blue for youtube because why not (lol), green for money because green always equals money, and purple for things for me because it's my favorite color.  These 6 areas are all areas of my life I think.  So color coding means I can see what's happening where & when really easily.
Dashboard
This is a great idea because I can flip here & instantly know what to focus on (hey, there's that word again) for the day, week, etc.  Having the post it notes in coordinating colors also means that I know what parts of my life I'm focusing on & what needs to get done for each.

Monthly Life Calendar & Monthly Blog Calendar
My original planner set up was much larger.  I had a larger calendar - a month on two pages - and also a week on two pages.  After a week I realized I didn't need that much space!  So I condensed my monthly calendar to one page & recycled the month on two pages to the back for an editorial calendar.  It's taken me a bit to get back on track with how I used to to my blog planning.  You ever start something then stop & don't know how to start up again?  But having them separate is working for me - I do put the blog/youtube colors on the Life Calendar just so I know since it's the first place I look.
Ideas Section
At first I thought why not go back to having a blog notebook? But then I realized that now that I'd condenced my calendars down I could fit more paper at the back of the planner.  So that's where I jot ideas down & it really functions as my blog notebook.  Having everything in one place means I'm not looking for one or the other - I'm more organized because I know it's all in one spot.  The dividers also keep me on my current ideas.  I can flip back & forth but sometimes an idea is developing and I need to flip to it easily.  This section is good for supply lists, product lists, etc as well.

My planner is really important to me now & has been keeping me really accountable.  I am still under the mindset that I'll publish when I want to publish but this keeps my ideas organized.  Not to mention the trash goes out and things are mailed when they are supposed to be mailed!  I need to put things like change the air filter in here too - that is the next step!

How do you plan?  Do you keep your blog/work/life/etc separate or together?

xoxo, Moe

Connect on Twitter // Follow on Pinterest

10.01.2012

Make it Monday // Make a Blogging Kit for Travel or Moving

Being in a transition state, whether moving, remodeling, traveling, or in a place that's not quite home...blogging can become a little hard to do.  From experience, I know how a routine can get interrupted & lead to a blogging slump.  In September I felt like I had no idea what I was doing with the blog.  A lot of things got jumbled, new projects took the front seat, & blogging just fell into a chore.  And since blogging should be fun, whenever it becomes a chore I always re-evaluate.  I realized I needed some sort of familiar...thus came the Blogging Kit

Not having a desk means not having a place to coral all your bits & pieces, your inspiration, your favorite pens, etc.  Personally, blogging from the kitchen table, couch, assorted Starbucks tables makes things a lot harder to keep organized.  Instead of just throwing things in my purse all willy-nilly, I decided to try making a blogging packet with a little bit of everything I'd need if I were at my own desk.

 Blog Planner  - This is the most important part of my Blog Kit!  I used a planner with both a monthly & weekly calendar.  Right now I'm only filling in the monthly calendar but if I have a particularly busy week, filling in the weekly calendar helps me make sure I get everything done in the week that I need to.  If I didn't have my blog planner I'd be lost!

 Blogging Notebook  - Missing in this picture because I think I left it in Zach's car.  This is less important to my planning process so if I leave it in the car it's ok for a little while!  In this book I write down inspiration, ideas for features, sketch layouts or doodles, etc.  I guess you could call it a sketch book.  It also houses things for the various shops too.  I do have another smaller notebook to jot down things quickly & it's not as bulky as my bigger blogging book.

 Pens & Markers  - Because I like color & need to remember which things are the most important, markers, pens, & highlighters float around in my purse.  Putting them all together I spend less time digging in my purse (& pulling out tampons instead of markers in Starbucks is not cool! TMI?)  These markers have two tips - a fine & a broad tip - to highlight & to write.  Multi-purpose.  Score!

 Various Sticky Notes  - Also not pictured because I used all of mine.  I used to be the sticky not queen in high school & love the way Elsie & Emma of A Beautiful Mess organize their notebooks.  Kaelah of Little Chief Honeybee & Kaylah of The Dainty Squid use a similar method.  The best thing about sticky notes is that they aren't permanent & you can move them around.  If I'm fluid on when things need to be done or where something can go, it goes on a sticky note that way I can move it from week to week in the calendar or around in my blogging notebook.  I also use them to make divider tabs in my blogging notebooks.

 Kid Made Modern Tape  - Just because it's pretty & I like decorating things.  If a page seems like it needs a label, I slap some tape on there, couldn't hurt right?

 Tid Bits  - Currently the tid bits in the kit are from Art Prize, a cool art exhibition all over Grand Rapids where artists compete for a grand prize.  There were lot's of artists I found & eventually want to blog about them so I have a few of their cards/brochures so I can find examples, remember names, etc.  This is great for travel! Picking up little things along the way to remember can double for your scrap book & blog.

 Camera & iPhone  - Not only do I use my iPhone for responding to comments but I also use it for photographing day to day life.  If my phone battery dies or I don't want to pull out/don't have my DSLR my point & shot is the next best thing.  Capturing moments is important to blogging so I don't want to miss a thing!  I also believe the best camera for you is the one you'll use. (check this post for tips to improve your photog skills using your smart phone.)

 Storage  - The way I rangle all of the bits of my Blogging Kit is in a small clear bag with a zipper.  Mine is from Claire's & unfortunately you won't find these there any more.  When we discontinued them (I used to work at claire's!) I bought them all up.  They are great for things like this & for packing your toothbrushes when you're traveling.  Seriously, you'll find at least 3 of these when we travel! So handy!  You could also use any old pencil case but the plastic keeps it from getting dirty or wet if you spill something.

I am so happy that we'll be moving into our house sooooo soon! But until we build our awesome double desk, I may be blogging from couches & tables for a little while more.  This kit has helped me keep organized & gave me a bit more motivation to blog through October!

How do you stay organized while traveling? Do you blog on the road?


Connect on Twitter // Follow on Pinterest // Peep me at Hello Cotton