9.06.2018

How to Write Actionable To Do Lists (and Why You Should)

To do lists are a big part of my planning routine.  They don't usually reside on my weekly pages (though there are exceptions to the rule!) because I like to write specific and actionable lists - so I break things down.  This requires extra space in my planner - either graph filler paper, extra inserts, or sticky notes.
this post contains affiliate links, please read my full disclosure here.

If you've ever looked at your planner and felt complete overwhelm, then an actionable to do list might be something you should focus on.

How to Write Actionable To-Do Lists

Brain Dump

First, you may find there's too much in your head to keep anything straight.  Make it a habit to brain dump all your thoughts & to do's into one master list somewhere in your planner.  This is going to be the place you turn to when you need to get it all out...it will be your master list (and it will be messy!).  Give yourself permission to get messy, scribble, and get it all out.  From here you can prioritize and even eliminate.  Refer to this list often - you will add to it and you will subtract from it, but you may also find you will eliminate the things that are either no longer important, not worth your time, or are unnecessary.

Get Specific

From your brain dump it is time to get specific.  Which projects are you working on?  Which big tasks can you see?  This is especially helpful if you're running something like a blog - instead of marking down write posts, get specific and write down exactly which posts need to be written.  Then you can, again, prioritize from there.  It may help to have a few different sections in your brain dump area - one master list, then other lists around certain areas of your life.  But don't make this too complicated.  Come up with a method that works that you can quickly refer to and fill in as time goes by.  Make it something you'll actually use.

3 Action Steps

Once you've prioritized your list - like outlined the specific posts you'd like to write on your blog - then you can get to the action steps.  I am a big fan of 3 action steps under each to-do.  This helps you realize exactly what needs to be done & shows you your progress as you move through the steps.  It also makes completing the whole task easier because you're seeing the bigger picture.  Once you get into this routine you can also start to see how certain actions over lap to other tasks and you're more likely to complete them out of habit!  It can be as simple as outlining laundry in your planner - wash, fold, put away.  For me seeing the steps means even if I haven't completed everything I can check my progress and feel more productive.

If your to-do is a bigger project you can make a project planning page in your planner to house everything that needs to be done.  For inspiration, check out my wedding planning video where I use the project planning pages to outline this big project!  I also use the project stickers from the Student Sticker Books when I need to plan out projects.  

Why You Should Write Actionable To-Do Lists

Short answer: because you get more done!

Actionable to do lists help us plan better.  They help us allot time in a more efficient way, help us prioritize tasks, and help us say no to things that won't or don't serve us.  Through actionable to-do lists we can meet ourselves where we are and eliminate overwhelm.  We can understand how long it takes us to complete tasks & that can help us estimate our abilities in the future.

When we're breaking up tasks into their moving parts we're seeing the bigger picture and are able to understand a timeline better...even if it's just a Sunday afternoon and we need to get laundry done for the week!

Ever since I started creating a plan of action rather than a running to do list, I've been able to get projects done on a better time line!  No parts are missed, nothing is left to the last minute, and there's nothing unexpected.  One of the best parts is being able to translate what I've learned from one project or task into another, similar task or project.  I've also sort of been able to create 'templates' of reoccurring tasks to help me in the future.

Want to find some printable planner inserts that can help organize your life?  Check out the Etsy shop here for A5 & Personal Size inserts. Or join the Printable of the Month Club over on Patreon for an exclusive printable each month!

How do you write to do lists?  What helps you get the most done?

xoxo, Moe

9.04.2018

Beginners Guide to Blending Essential Oils

Creating your own essential oil blends can be a great way to develop your intuition and improve your emotional (and physical) wellness.  Blending essential oils can seem to be an intimidating task!  Perhaps you've gotten yourself a starter kit or you've collected essential oils that you feel drawn too, but you're not sure how to blend them to get the best emotional and/or physical benefits.  Well....let's get you on your blending way.
this post contains affiliate links, please read my full disclosure here.

I've share quite a few seasonally specific blending guides as well as an in depth look at traveling with essential oils but this post is all about helping you create your own blends for your own needs.  Below is the exact way I started to learn about blending essential oils and I can't wait to share it with you.  You can also find some information on using essential oils topically here.  Check out all the essential oils posts on the blog here.  Let's get started.

Essential Oil Categories

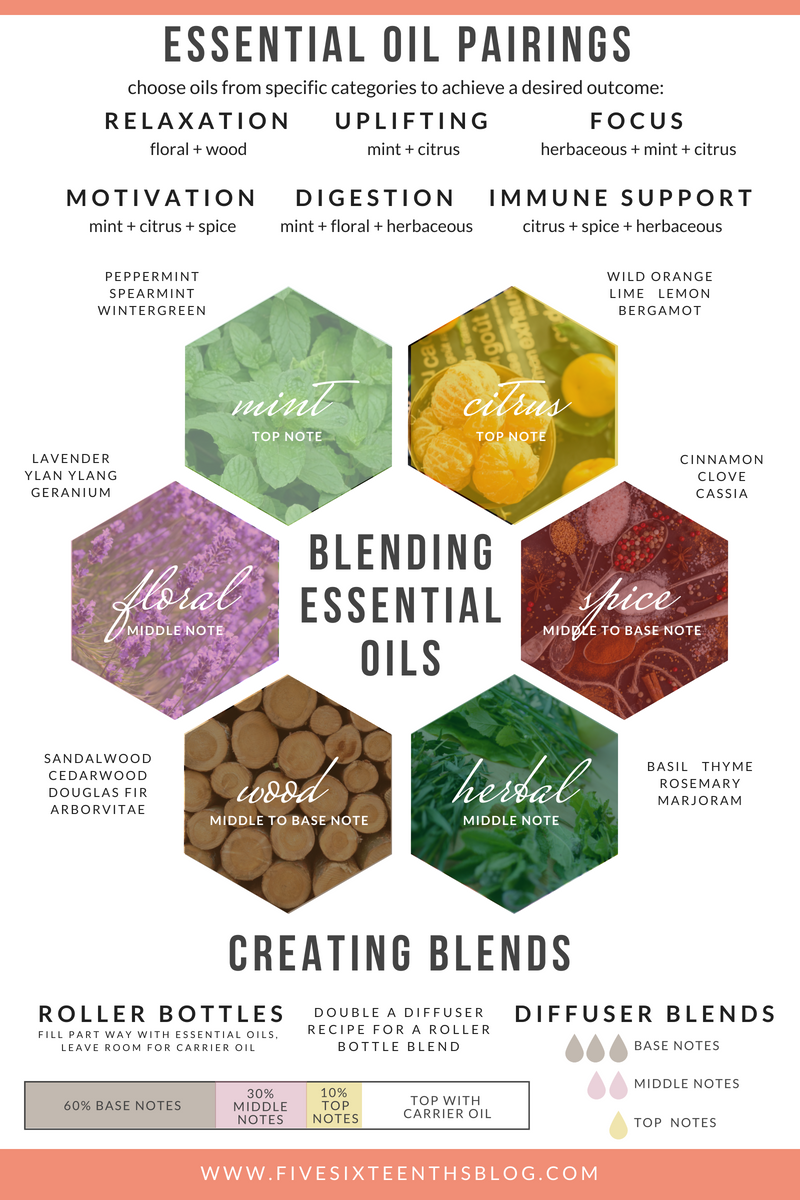
Citrus

Wild Orange, Lemon, Bergamot, Lime - these oils are fruity, fresh, & clean.  Most often citrus oils are top notes.  Citrus oils are great for adding a fresh kick to your blend and can help to remove odors & purify the air.

Spice

Cinnamon Bark, Cardamom, Black Pepper, Cassia - these oils are warm & deep.  Some oils in this category can often have a resinous scent - slightly sweet or with a vanilla like tone - to them.  This attribute is called 'balsamic'.  Oils in the category are often middle to base notes that add an interesting layer to a blend.

Herbal

Thyme, Basil, Rosemary, Marjoram - these oils are herbaceous.  They smell green, herby, and grassy.  Oils in this category are fresh & sharp and often are middle notes.  They can add a spring time vibe to your blends.

Mint

Spearmint, Wintergreen, Peppermint - these oils have a minty fresh kick.  Sometimes falling in the herbaceous category (Rosemary & Peppermint are related to each other!) but they have a distinct pep when added to your blends.  Most often these are top notes.

Wood

Arborvitae, Cedarwood, Sandalwood - these are all wood oils with a grounding scent.  These oils evoke a sense of stability.  The scent is rich & woody.  These fragrances are middle to base notes and can round off a relaxing blend.

Floral

Lavender, Geranium, Ylang Ylang - these floral oils smell soft, feminine, and powdery.  Floral oils are mostly middle notes.  These scents can be relaxing & supportive.


Getting Started

First off, determine the goal of the blend.  Are you looking for immune support?  Are you feeling nauseous?  Are you looking to relax?  Are you looking to focus?  Determine what the purpose or end goal of the diffuser blend is.  This will help you decide which oils to use.

Then, begin to gather a group of oils that fit the purpose or goal your going for.  If you'd like focus choose oils from the herbaceous, citrus, and mint categories.  If you'd like to feel relaxed choose wood & floral oils.  If you'd like to feel motivated choose citrus, minty, & spicy oils.  If you're looking for an immune supporting blend choose citrus, spice, and herbaceous.  Need digestive relief? Choose a mint, floral, and herbaceous oil.

Once you've chosen a few oils from each category designed to target your end goal, you can begin to pair them together.  There's no rule saying you can't have two of the same category oil in your blend so you can start by pairing together two citrus oils, two herbaceous oils, and so on.  Once  you get a little bit brave you can start to bring in other oils in the categories you've chosen to create blends you love.

More Blending Tips

Keep a Journal

Writing down your blends - including how many drops you used - will help you decide what you personally like & what you personally find effective.  For me I know that adding in too much Peppermint to any blend will be too overpowering for me. I've translated this into how I approach other minty oils like Spearmint, Wintergreen, and the Breathe blend.  Your journal doesn't have to be super fancy, you can even just make notes in your phone!

Get Creative

When you get brave enough just grab a base note, middle note, & top note OR an oil from a few of the categories above and just see what happens!  You may find an interesting combo you never would have tried before!  You can pick a few oil bottles, uncap them, and then hold the group of caps under your nose to see if their scents work nicely together.  Sub out different oils until you find a blend you like.  This is where cap labels can come in handy!  You don't want to mix up your tops or you'll have a hard time doing this creative experiment again.


Store your Blends

Before you make a giant 5ml bottle of a blend you think you'll use all the time make a smaller batch in a 5/8 dram bottleI phase through blends I make very quickly especially when I'm inspired.  When I first started making blends I'd want to make a bottle to keep and use later....but then I'd get bored!  So these smaller bottles are prefect to create a smaller blended batch & not waste the essential oils.  And you can travel with these better too!  You can also get smaller roller bottles in order to test out any topical blends.

Choose High Quality Oils

Essential oils are a popular thing right now leading a ton of companies to want to get in on the boom.  This creates a situation where in order for companies to make the most buck, they cut corners.  As there is little regulation on what can be labeled a 100% pure essential oil, bottles found in the grocery store, home good stores, and even health food stores may not be the best quality.  They may be cut with synthetic fragrance oils or other carrier oils that dilute the purity & efficacy of the oil itself.  I choose to use doTERRA Certified Pure Therapeutic Grade Oils for a myriad of reasons - one of the most important being quality.  DoTERRA tests each & every batch of oils prior to bottling to ensure quality, purity, & efficacy.  They also source high quality plant matter and process the raw materials near where they are grown.

Using high quality oils not only ensures that nothing unnecessary will enter your body if you're using these blends topically but it also ensure the fragrant profile of the essential oil is preserved.  Working with a low quality lavender oil may not yield the same effects as working with a higher quality oil.  Any synthetic fragrances may cause headaches or other adverse health effects....when the whole point is to help yourself out!


Grab the Free Ebook!

* indicates required


Creating your own essential oil blends is a great way to connect to your oils and get used to their physical & emotional applicationsDoTERRA offers a chemistry handbook with more information on the chemical make up of oils and which oils blend together well based on their chemistry.  This can add another level to your blending and works great to create things like cleaning solutions & skin care serums.  

The proprietary blends offered by doTERRA can add another layer to your blending creativity as well. One of my favorite books regarding the emotional associations for essential oils is Emotions & Essential Oils.  This book elaborates on the emotional balancing properties of both the single oils & proprietary blends.  You can cross reference an emotion your feeling or an emotion you'd like to feel with oils that can help with that situation.  The book also offers an emotional wheel that outlines which oils are great for different emotions.

I hope you found this post helpful and feel inspired to get started creating your own personal diffuser & roller bottle blends.  It is a great exercise in both creativity & intuition! If you'd like to learn more about working with essential oils everyday join the Live & Create Facebook group!

Do you create your own blends? What is your favorite essential oil blend?

xoxo, Moe

Disclaimer :: These statements have not been evaluated by the Food and Drug Administration.  This article is not intended to diagnose, treat, cure, or prevent any disease.

8.30.2018

Mindful Living with Words of Affirmation // Hallmark Review

Living a mindful life for me has evolved into a multi faceted journey.  First it started with just more awareness in my daily life, then I decided to go cruelty free with my make up, which then evolved into a low-tox lifestyle, and has now moved into nurturing my relationships with others.  This year, in 2018, my word of the year is Authentic.  I am focusing on living the best, truest version of myself and this involves investment in personal relationships.
I was compensated for this post. This post also contains affiliate links and I will be compensated if you make a purchase after clicking on my links.  Read my full disclosure here.

I have to say I am not one to send cards.  For me, it's not a priority but the thing a card says is 'hey, I care about you.'  And in that simple act you can really enhance or build a relationship with someone you care about.  As I grow older I'm reminded of the cards I received on birthdays, holidays, & smaller occasions and I want to make this a priority in my life going forward.
Which is why I'm excited to have been sent this fun little box from Dollar Tree to share with you!  Today, August 30th each of the 6500 Dollar Tree stores nation wide will begin to carry Expressions from Halmark at $1 each and Heartline a Hallmark Company at 2 for $1 - two super affordable card lines!  This means that you'll be able to celebrate life's amazing moments - both big & small - with wonderful cards that won't break the bank.

There are also 4 additional lines being carried at select stores to help us connect even closer with our loved ones:
Mahogany: Mahogany enhances emotional connections among family, friends, and the community, and celebrates what is most beloved about Black culture.
Vida: VIDA expresses the voice of Latinos across generations, bringing them closer together to celebrate life’s special moments.
Tree Of Life: Tree of Life brings Jewish family and friends together to celebrate their faith and culture by honoring meaningful holidays and milestones.
Joyfully Yours: Joyfully Yours lets family and friends express their faith in just the right way during holidays, special occasions, and moments big and small.
One of my Love Languages is Words of Affirmation.  I love to give compliments and share encouraging words because I also love to hear those same things!  The cards that Dollar Tree is offering now are both high quality and relatable.  The card stock these guys are made from is thick and the cards seem substantial. I feel like sometimes when we skimp on the card, it shows - whether it's poorly made, the sentiment is kinda off, or it just seems dated - a bad card can throw off the whole vibe that we're going for.  These cards have such sweet sentiments and delicate touches that your loved ones will totally feel appreciated.  They aren't hokey and no one will know you only spent a dollar!
I can't wait to give these guys to my friends, family, and coworkers to express my gratitude & celebrate life's little moments!  Check out more of the fun sentiments here on the Dollar Tree website and while you're there, check out this project.  I totally want to create a ready to go system where I can grab a card and give!  The best thing is this is so affordable I almost can't believe it!

How do you show your loved ones you care?  Are you excited for these new lines from Dollar Tree?

ps. check out another amazing Dollar Tree DIY post here!